background image

43

PVR (P

ersonal 

Video R

ec

or

der)

GB

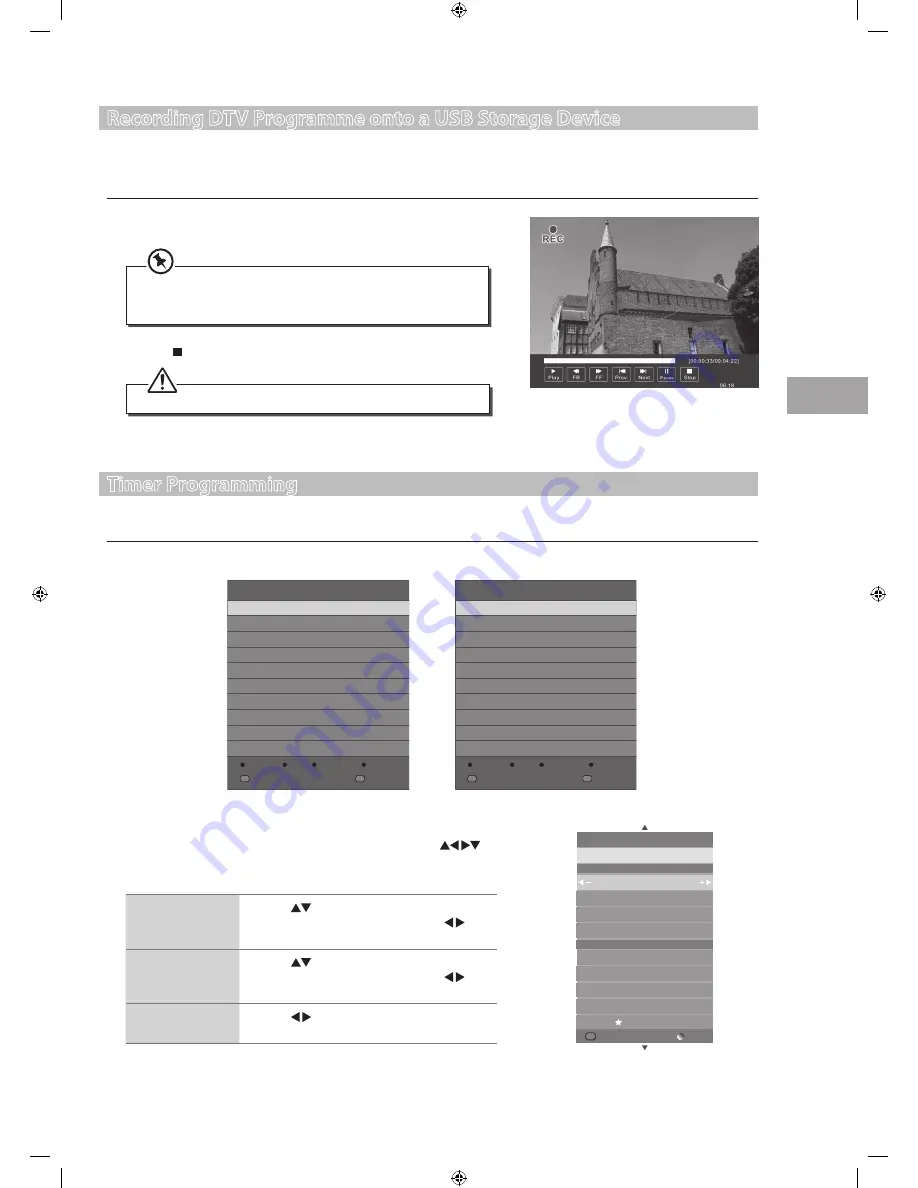
Recording DTV Programme onto a USB Storage Device

Use this function to record the DTV programme you are watching on the main screen and save them for future viewing.

Make sure that your connected USB storage device has enough available memory space.

1. 

Press and hold the 

RED

 button on the remote control for 3 seconds to 

record the programme that you are currently watching.

Timer Programming

This function is used to perform scheduled recording.

1. 

Press the 

GUIDE

 button on the remote control. The 

EPG

 menu will appear.

2. 

Press the 

 Stop

 button to stop recording.

The recording progress bar will disappear after 15 seconds. To 
display the recording progress bar again, press the 

OK

 button or 

the 

RED

 button.

Recording will stop automatically when the disk is full.

PROGRAMME GUIDE

CHANNEL

CH1

15:25-15:45
15:45-16:10

Tweenies

Cubix

INDEX

Index

OK

OK

RECORD

INFO

SCHEDULE

REMINDER

Programme Guide by Channel Format

PROGRAMME GUIDE

TIME

13 Jul

09:00

1 BBC ONE
2 BBC TWO
7 BBC CHOICE
10 BBC FOUR

12 CBBC

No information
No information
No information
No information

No information

INDEX

Index

OK

OK

RECORD

INFO

SCHEDULE

REMINDER

Programme Guide by Time Format

2. 

Press the 

RED

 button on the remote control while on the selected 

programme, the 

RECORDER

 menu will be displayed. Press the 


buttons to select the settings in the 

RECORDER

 menu for the Channel, Start 

time, End time and Mode.

Start time

(for Mode Once, 
Every Day, Weekly)

Press the 

 buttons to select the Minutes / 

Hour / Month / Date and then press the     
buttons to adjust the start time. 

End time

(for Mode Once, 
Every Day, Weekly)

Press the 

 buttons to select the Minutes / 

Hour / Month / Date and then press the     
buttons to adjust the end time. 

Mode

Press the     buttons to select the Once / Every 
Day / Weekly.

Back

25 Date

RECORDED 

1 BBC ONE

Start Time

10 Hour

25 Date

00 Minute

Dec Month

End Time

15 Minute

10 Hour

Dec Month

25 Date

Mode Once

OK

OK

S24LED11_IB_111014_Zell.indd   43

14/10/2011   3:36 PM

Содержание S24LED11

Страница 1: ...Instruction Manual 24 HD LED TV with integrated DVD player S24LED11 TBA S24LED11_IB_111014_Zell indd 1 14 10 2011 3 36 PM...

Страница 2: ...complete your fuss free installation we ll test and demonstrate your TV s functions FREESAT SET UP DEMO We ll set up the Freesat receiver and connect it to your existing dish TV and cabling We ll then...

Страница 3: ...ce 18 Channel Selection 18 Display Channel Information 18 Volume Adjustment 18 Customising TV Settings 19 Channel Setting TV DTV or Radio Mode 19 Auto Tuning ATV DTV mode 19 DTV Manual Tuning DTV mode...

Страница 4: ...7 Playing the DVD 47 Menu Playback for DVD 47 Stopping Playback 47 Previous Next for DVD CD Multimedia discs 47 Forward Backward for DVD CD Multimedia discs 47 Pause for DVD CD Multimedia discs 47 Rep...

Страница 5: ...ENU TITLE AUDIO PBC CANCEL REVEAL SIZE HOLD TEXT MIX SOURCE INDEX Preparation Thank youfor purchasing your new Sandstr m 24 HD LED TV with integrated DVD player Your new TV has many features and incor...

Страница 6: ...to fix the base stand to the TV 4 To remove the base stand lay the TV down on a flat surface with the back side facing up Please make sure to place a soft cushioned material such as a pillow or thick...

Страница 7: ...es the TV back to standby mode 4 POWER LED Illuminates green when the TV is turned on Illuminates red when the TV is in standby mode 5 IR Infrared Receiver Receives IR signals from the remote control...

Страница 8: ...udio output sockets 6 CI Common Interface Slot Allows the insertion of a Common Access Module Refer to page 22 for details 7 VGA PC AUDIO To connect to a computer or other devices with a VGA interface...

Страница 9: ...which could cause fire personal injury or damage to property Only use the battery type indicated in this manual When the batteries are exhausted the remote will not function Replace both batteries at...

Страница 10: ...DTV mode Go To RED To skip to a specific location on a DVD CD DVD mode A B GREEN Repeat a segment between A and B DVD mode REPEAT YELLOW Select between different repeat modes DVD mode ANGLE BLUE Selec...

Страница 11: ...in teletext ATV mode To advance playback rapidly DVD Media mode 23 HOLD Freezes a multi page passage on screen in teletext ATV mode To skip to the beginning of the previous chapter track photo DVD Med...

Страница 12: ...name ATV DTV mode Display the present disc information DVD mode 30 RADIO A short cut to switch input source to TV Digital radio channels DTV mode ZOOM Zoom out on the displayed frame DVD mode 31 GUIDE...

Страница 13: ...e bottom panel of the TV or the POWER button on the remote control to turn on your TV 4 Press the SOURCE button on the remote control to display the Input Source Use the buttons to select HDMI1 or HDM...

Страница 14: ...ins socket before switching on the POWER ON OFF switch which is located at the bottom under the frame 3 Press the button on the bottom panel of the TV or the POWER button on the remote control to turn...

Страница 15: ...to connect the TV s SCART input socket to an external AV device s SCART output socket 2 Plug the connected devices into the mains socket before switching on the POWER ON OFF switch which is located a...

Страница 16: ...Input Source Use the buttons to select any desired input source and then press the OK button to confirm Rear Left side of TV Audio Cable not included Audio Receiver Connecting Earphones Connect your e...

Страница 17: ...ugal Serbia Slovenia Lithuanian Latvian Spain Sweden Switzerland UK NewZealand United Arab Emirates 2 Connect the mains cable to the mains socket after you have completed all the connections 3 Switch...

Страница 18: ...he TV or on the remote control repeatedly or the 0 9 buttons to select the channel Alternative Press the OK button to enter the Channel List Then use the buttons to highlight and select the channel Pr...

Страница 19: ...3 In the Tune Type menu press the buttons to select DTV ATV DTV ATV Press the button and then press the buttons to select the country where you will operate the TV Press the OK button to confirm Chan...

Страница 20: ...t the desired UHF channel and then press the OK button to commence the search of that channel When the signal has been tuned the picture and signal strength will be displayed on the screen 4 Press the...

Страница 21: ...nel as one of the favourite programmes Press the FAV button again to undo it 4 Press the MENU button to return back to the main menu 5 Press the EXIT button to exit the menu Signal Information DTV Mod...

Страница 22: ...HDMI1 HDMI2 VGA Y Pb Pr A V IN HP USB Common Interface PC audio Rear Right Side of TV CI Common Interface Allows the Common Access Module to be inserted and access the content that has been encrypted...

Страница 23: ...mode Tint For NTSC format Adjusts the balance between red and green levels Tint is only available for NTSC signal reception Colour Temperature Cycle among colour temperature Cool Medium Warm User Adj...

Страница 24: ...selection will allow you to zoom in the picture without any alteration while the 4 sides of the picture will be cropped Zoom2 This selection will allow you to zoom in the picture further without any...

Страница 25: ...in the information banner SPDIF Mode Select the digital audio output mode 3 Press the MENU button to return to the previous menu 4 Press the EXIT button to exit the menu Stereo Dual Sound Reception AT...

Страница 26: ...to the source channel and volume you select Cycle through and select from the following on time options Off Once Every Day Mon Fri Mon Sat Sat Sun Sunday On Time Off Hour 12 Minute 00 DTV Channel 0 Vo...

Страница 27: ...en press the OK button Press the buttons to select Off Press the EXIT button exit the main menu To save energy you should always turn the auto standby function back to 3 Hour or 4 Hour Auto Standby Of...

Страница 28: ...TV programme has this feature Country This shows the country where you have selected in auto tuning If you want to change the country please refer to Auto Tuning on page 19 Move Select EXIT OPTION OS...

Страница 29: ...ting This may take awhile depending on the size of your USB storage device Warning All data will be lost Start Exit Format disk Format disk File System Size PVR File System Type PVR File System Size S...

Страница 30: ...ngs to the factory defaults 1 Press the MENU button and then press the buttons to select the OPTION menu 2 Press the buttons to select Restore Factory Default and then press the OK button Move Select...

Страница 31: ...e password please refer to page 32 Set Password Lock System The Lock System is designed to prevent accidental retuning of the TV losing channels and prevent children watching unsuitable programmes The...

Страница 32: ...word If you forget the new password press the master password 0000 3 Use the 0 9 buttons to input a 4 digit password to enter the LOCK menu The default password is 0000 If you change the password be s...

Страница 33: ...g schemes to block specific programmes and ratings This TV is programmed to remember which option it was last set to even if you switch the TV off 1 Press the MENU button and then press the buttons to...

Страница 34: ...then press the OK button 3 Use the 0 9 buttons to input a 4 digit password to enter the LOCK menu The default password is 0000 If you change the password be sure to remember the new password If you fo...

Страница 35: ...mat displays EPG of one channel hour by hour 3 Press the GUIDE button again or the EXIT button to switch off EPG and return to normal TV viewing PROGRAMME GUIDE CHANNEL CH1 15 25 15 45 15 45 16 10 Twe...

Страница 36: ...firm and view the selected channel GUIDE EXIT Press to switch off the EPG Schedule List 15 30 10th Mar Delete Time Date Programme Title Channel Name 802 SZTVM03 08 Minute 05 Hour Apr Month 28 Date Onc...

Страница 37: ...iz answers etc Press the REVEAL button again to conceal the information again Fasttext At the bottom of the teletext screen is a row of subject headings in red green yellow and blue The remote control...

Страница 38: ...to confirm Rear Left side of TV HDMI1 HDMI2 VGA Y Pb Pr A V IN HP USB Common Interface PC audio USB Cable not included Adapter Portable hard Disk USB Hub USB If a hard disk is used make sure its main...

Страница 39: ...ats mp3 wma m4a aac 5 Press the INFO button or the OK button to display the function bar Press the buttons and then press the OK button to select the function Play Prev Next Stop Repeat All Music Play...

Страница 40: ...enu 4 Press the buttons to navigate in the movie folder Select the movie file and then press the OK button to view A tick box will be displayed If you need to delete the file press the RED button Pres...

Страница 41: ...Patner Two years have passed and Peter Parker struggles to cope with the demands of life as a college student a Daily Bugle photographer and a crime fighting superhero But it hasn t gotten any easier...

Страница 42: ...Shift Progress Bar 1 Indicates the status of the currently displayed video 2 Indicates the time lagging behind the live broadcast DVR reviewing 3 Indicates the available recording time on your USB sto...

Страница 43: ...RECORD INFO SCHEDULE REMINDER Programme Guide by Channel Format PROGRAMME GUIDE TIME 13 Jul 09 00 1 BBC ONE 2 BBC TWO 7 BBC CHOICE 10 BBC FOUR 12 CBBC No information No information No information No...

Страница 44: ...rogramme list or from a USB Storage Device To play the recorded programme list Press and hold the BLUE button on the remote control for 3 seconds to call the recorded list When the preset time is reac...

Страница 45: ...e View 6 Press the EXIT button or the Stop button to stop the current playback and to return back to the previous menu 4 Press the buttons to select the _MSTPVR or MY PVR folder and then press the OK...

Страница 46: ...G CD R CD Recordable Audio Video format or JPEG files AUDIO VIDEO JPEG CD RW CD Rewritable Audio Video format or JPEG files AUDIO VIDEO JPEG AUDIO CD Compact Disc Digital Audio AUDIO Supported Formats...

Страница 47: ...due to different DVD disc s structure Forward Backward for DVD CD Multimedia discs There are 4 speeds for forward Press the button to toggle between the different forward options in sequence FF x 2 F...

Страница 48: ...down menu for selecting Input your Title Chapter Time by pressing the 0 9 buttons or input the playback time After editing press the OK button to start If the input is invalid it will not function Au...

Страница 49: ...nts will automatically be displayed and sorted by different file formats into Music Picture Video folders 1 Press the buttons to navigate through the folders and files 2 Press the 0 9 buttons to selec...

Страница 50: ...an Widescreen picture shown in the full screen with some part cut 4 3 Letter box Widescreen picture shown in the full screen with black bars on the top and bottom of the screen 16 9 Widescreen picture...

Страница 51: ...language to your language of choice Option Description SYSTEM SETUP EXIT SETUP RATING PASSWORD TV TYPE TV SYSTEM 1 KID SAFE 2 G 3 PG 4 PG13 5 PG R 6 R 7 NG 17 8 ADULT DEFAULT RATING RATING Allows the...

Страница 52: ...LE LANG AUDIO LANG OSD LANGUAGE ENGLISH GERMAN SPANISH FRENCH TURKISH ITALIAN DUTCH OFF MENU LANG SUBTITLE LANGUAGE Select the subtitle language LANGUAGE SETUP EXIT SETUP ENCODING SUBTITLE LANG AUDIO...

Страница 53: ...DUAL MONO DYNAMIC RANGE STEREO MONO L MONO R MIX MONO DUAL MONO STEREO The player will output both left channel and right channel audio MONO L It means that the player will output left channel audio o...

Страница 54: ...cloth Do not use any type of solvent such as thinner benzine commercially available cleaners or antistatic spray They may damage the disc Storing Discs Do not store discs in places subjected to direc...

Страница 55: ...ervice centre if the picture has not appeared after five minutes No or poor colour or poor picture Adjust the settings in the PICTURE menu Try another channel The problem may be caused by the broadcas...

Страница 56: ...t your aerial checked Talk to your retailer or contact your local aerial installer Why do I get blocking on my digital picture In most cases blocking is caused by a reception problem either the signal...

Страница 57: ...50 576P 720 x 576 720P 1280 x 720 50 60 1080I 1920 x 1080 50 60 1080P 1920 x 1080 50 60 PC Mode Please check the display settings of your computer before connecting to the TV If the display setting of...

Страница 58: ...tion In HOME STANDBY mode 32W Average Annual Energy Consumption 47kWh Standby Power Consumption 1W Operating Temperature 5 C 35 C Operating Humidity 10 80 Mercury Content mg 0 1 RoHS Presence of Lead...

Страница 59: ...59 Maintenance Hints and Tips Specification GB B A B C D E F G ENERG Y IE IJA IA 2010 1062 2011 47 kWh annum 32 Watt 60 cm 23 6 inch S24LED11 S24LED11_IB_111014_Zell indd 59 14 10 2011 3 36 PM...

Страница 60: ...e unit Unplug the unit from the mains socket during a lightning storm Mains Cable Make sure the unit or unit stand is not resting on top of the mains cable as the weight of the unit may damage the mai...

Страница 61: ...could result in a fatal electric shock DVD Class 1 Laser Product This unit utilises a laser Use of controls adjustments or performance of procedures other than those specified herein may result in haz...

Страница 62: ...ibited Restriction on Use Rovi Trade Mark Rights Use of the copyright protection technology contained in this product must be authorised by Rovi Corporation and is intended for home and other limited...

Страница 63: ...S24LED11_IB_111014_Zell indd 63 14 10 2011 3 36 PM...

Страница 64: ...S24LED11_IB_111014_Zell indd 64 14 10 2011 3 36 PM...

Отзывы: