background image

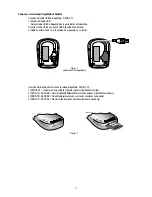
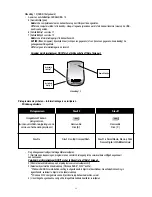
Abbildung 1.2  (SDDR-75 abgebildet)

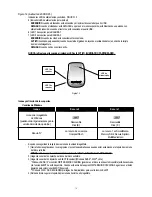
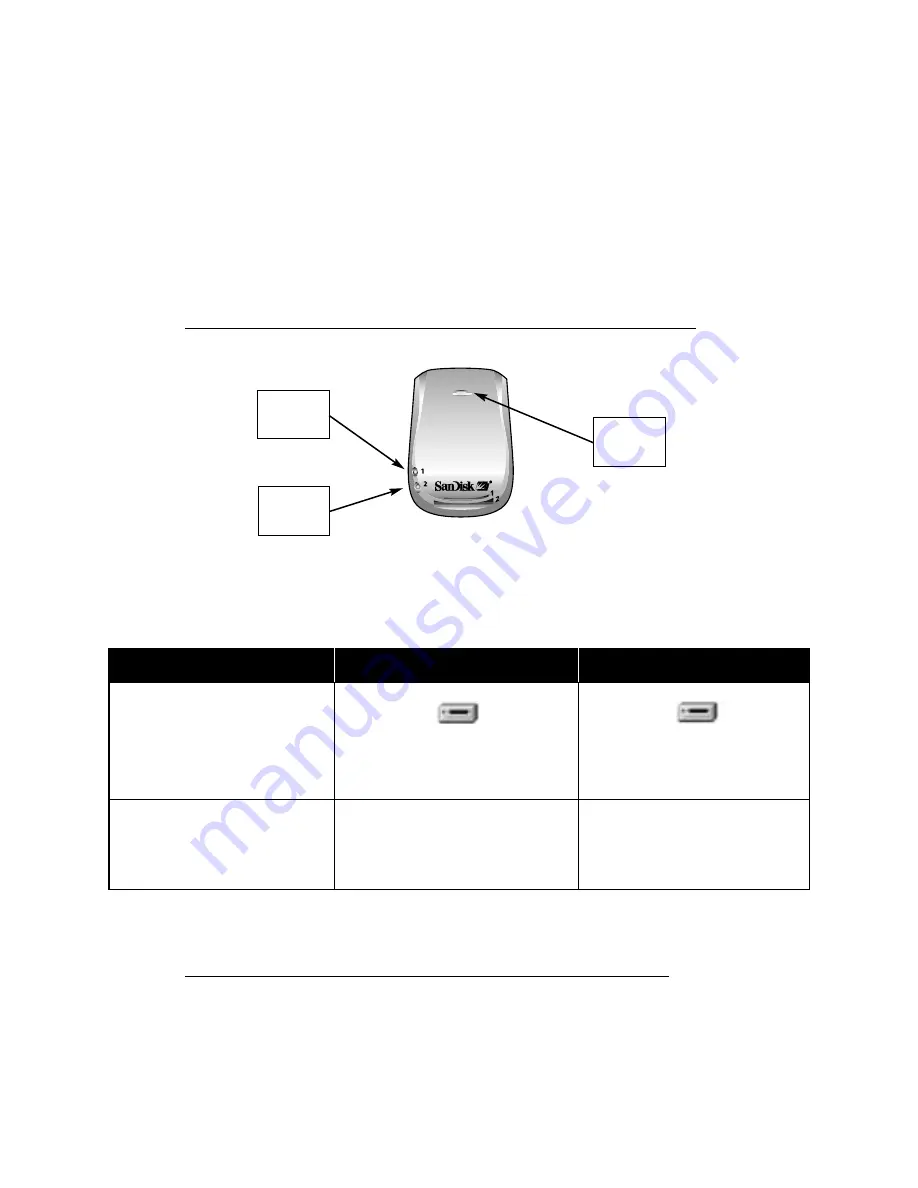
Netz- und Aktivitäts-LEDs. ABBILDUNG 1.3
5) Netz-LED (gelbe Farbe)

ON (EIN),

wenn der Computer eingeschaltet und das Lesegerät an den USB-Port angeschlossen ist.

OFF (AUS),

wenn der Computer ausgeschaltet ist, sich im „Aussetzen“-Modus, Ruhemodus (hibernate) oder im

Energiesparmodus befindet, oder das Lesegerät nicht an den USB-Port angeschlossen ist.

6) Datenträger LED 1 für STECKPLATZ 1
7) Datenträger LED 2 für STECKPLATZ 2

ON (EIN),

wenn der Datenträger ordnungsgemäß eingelegt ist.

AKTIV

(blinkt) bei vorliegender Aktivität (Daten werden geschrieben) auf die/den oder (Daten werden gelesen, 

heruntergeladen) von der Speicherkarte/vom ImageMate.

OFF (AUS),

wenn kein Datenträger eingelegt ist.

Entfernen Sie NIEMALS einen Datenträger, solange die LED AKTIV IST ODER NOCH BLINKT.

Symbole und Entfernen von Datenträgern

Windows-Benutzer

Werfen Sie die Speicherkarte sicher aus dem ImageMate aus.
1) Schließen Sie alle offenen Anwendungen, Programme und Fenster, die möglicherweise auf die Speicherkarte für 

austauschbare Datenträger Zugriff haben.
Entfernen Sie 

NIEMALS 

einen Datenträger, solange die LED AKTIV IST ODER NOCH BLINKT.

2) Klicken Sie mit der rechten Maustaste auf das Symbol für den austauschbaren Datenträger.
3) Klicken Sie mit der linken Maustaste und wählen Sie AUSWERFEN (Windows 98/SE*, 2000** und Me)

* Windows 98/SE > Als Standard ist SCHREIBEN NACH ZWISCHENSPEICHERN deaktiviert, AUSWERFEN ist nicht ver-
fügbar.Wenn SCHREIBEN NACH ZWISCHENSPEICHERN aktiviert ist, klicken Sie mit der linken Maustaste und wählen
Sie AUSWERFEN.
** Windows 2000 > Zur Verwendung von AUSWERFEN sind Administratorrechte ERFORDERLICH.

4) Entfernen Sie die Speicherkarte sicher aus dem ImageMate Dual Reader.

26

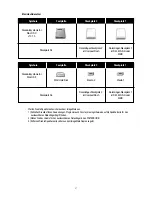
Abbildung 1.3

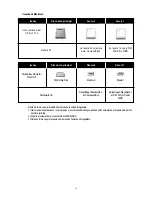
Netz-LED

Datenträger

LED 1`

Datenträger

LED 2

ImageMate Windows-

Symbole

(können je nach Betriebssystem 

unterschiedlich sein)

Steckplatz Nr.

Removable

Disk (E:)

Steckplatz 2 ist immer CompactFlash

Removable

Disk (F:)

Steckplatz 1 ist SmartMedia, Memory

Stick, Secure Digital oder

MultiMediaCard

Symbole

Steckplatz 2

Steckplatz 1

Содержание ImageMate SDDR-73

Страница 1: ...pactFlash and Secure Digital MultiMediaCard model SDDR 73 ImageMate Dual Card Reader for CompactFlash and SmartMedia model SDDR 75 ImageMate Dual Card Reader for CompactFlash and Memory Stick model SD...

Страница 2: ...ns for various types of Flash Memory Visit SanDisk s web site at www sandisk com for the most current product offerings Transfer your files quickly and easily No AC adapters or batteries are required...

Страница 3: ...and higher 1 No driver CD installation necessary 2 Plug the ImageMate into an available USB port 3 Restart the computer 4 Removable DiskVolume will appear on the desktop see Section 6 for Icon example...

Страница 4: ...t on the computer 2 1 meter extension cable included in package not shown Inserting the memory card into the ImageMate FIGURE 1 2 1 SLOT 2 is always CompactFlash Top label facing up 2 SDDR 73 SLOT 1 S...

Страница 5: ...the memory card from the ImageMate 1 Close all open applications programs and windows that may be accessing the Removable Disk memory card NEVER remove the media when the LED is ACTIVE FLASHING BLINKI...

Страница 6: ...vable DiskVolume to theTRASH 3 Safely remove the memory card from the ImageMate Dual reader 6 Icons Main Hard Disk Slot 2 Slot 1 Standard Mac OS X v10 1 3 Icons Slot Media Slot 2 is CompactFlash Media...

Страница 7: ...ion folder 5 Go to the edit menu and choose PASTE 6 The pictures will be COPIED to the destination folder 1 Double click on the appropriate Removable Disk Volume on the desktop 2 Double click on the D...

Страница 8: ...use and indemnifies SanDisk against all damages The information in this manual is subject to change without notice SanDisk Corporation shall not be liable for technical or editorial errors or omissio...

Страница 9: ...de glisser d placer les fichiers d une carte l autre ou de la carte flash au disque dur et vice versa SanDisk offre des solutions de lecture criture pour divers types de m moire flash Visitez son site...

Страница 10: ...ure 1 Aucun CD d installation n cessaire 2 Branchez l ImageMate sur un port USB disponible 3 Red marrez l ordinateur 4 L ic ne Removable Disk appara t sur le bureau Voir la section 6 pour des exemples...

Страница 11: ...s l emballage mais non illustr Insertion de la carte m moire dans le lecteur ImageMate FIGURE 1 2 1 EMPLACEMENT 2 toujours r serv aux cartes CompactFlash tiquette orient e vers le haut 2 SDDR 73 EMPLA...

Страница 12: ...rogrammes ouverts pouvant communiquer avec la carte m moire N jectez JAMAIS un support tant que le voyant est ACTIF ILLUMIN et CLIGNOTANT 2 Cliquez sur l ic ne Removable Disk avec le bouton droit de l...

Страница 13: ...e du lecteur ImageMate Dual 13 Ic nes Disque dur principal Emplacement 2 Emplacement 1 Ic nes standard Mac OS X v10 1 3 N d emplacement L emplacement 2 est r serv aux cartes CompactFlash L emplacement...

Страница 14: ...s le dossier de destination 6 Dans le menu d dition cliquez sur COLLER 7 Les images seront alors COPI ES dans le dossier de destination 1 Cliquez deux fois sur l ic ne de disque amovible situ e sur le...

Страница 15: ...i s une telle utilisation et d gage SanDisk de toute responsabilit Les informations contenues dans ce guide sont sous r serve de modification sans pr avis SanDisk ne saura tre tenue responsable des om...

Страница 16: ...y suelte los archivos entre dos tarjetas diferentes o entre la tarjeta flash y el disco duro y viceversa SanDisk ofrece soluciones de lectura grabaci n para diversos tipos de memoria flash Visite la...

Страница 17: ...ontrolador 2 Conecte la unidad ImageMate a un puerto USB disponible 3 Reinicie el ordenador 4 Se mostrar en la pantalla el volumen del disco extra ble Vea en la Secci n 6 los ejemplos de iconos Lea C...

Страница 18: ...tro incluido en el paquete no se ilustra Inserci n de la tarjeta de memoria en la unidad ImageMate FIGURA 1 2 1 RANURA 2 es siempre CompactFlash etiqueta superior orientada hacia arriba 2 SDDR 73 RANU...

Страница 19: ...s aplicaciones los programas y las ventanas abiertas que puedan estar accediendo a la tarjeta de memoria del disco extra ble NUNCA retire el soporte cuando el indicador LED est ACTIVO ILUMINADO o PARP...

Страница 20: ...a ble a la PAPELERA 3 Retire de forma segura la tarjeta de memoria del lector dual ImageMate 20 Iconos Disco duro principal Ranura 2 Ranura 1 Iconos est ndar del OS X v10 1 3 Ranura N La ranura 2 es s...

Страница 21: ...la carpeta de destino 5 Vaya al men de edici n y elija la funci n PEGAR 6 Las im genes se COPIAR N en la carpeta de destino 1 Haga doble clic en el volumen del disco extra ble apropiado del escritorio...

Страница 22: ...dad por los da os sufridos La informaci n que contiene este manual est sujeta a cambios sin previo aviso SanDisk Corporation no asume responsabilidad alguna por errores t cnicos o de redacci n o por o...

Страница 23: ...jetzt ganz einfach mit der Funktion Drag and Drop zwischen zwei verschiedenen Karten oder von der Flash Karte auf Ihre Festplatte bzw andersherum bertragen SanDisk bietet Lese Schreibl sungen f r ver...

Страница 24: ...nicht erforderlich 2 Schlie en Sie den ImageMate an einen verf gbaren USB Port an 3 Starten Sie Ihren Computer neu 4 DasVolume f r den austauschbaren Datentr ger erscheint auf dem Schreibtisch siehe...

Страница 25: ...bel 1 m im Lieferumfang enthalten nicht abgebildet Einlegen der Speicherkarte in den ImageMate ABBILDUNG 1 2 1 STECKPLATZ 2 ist immer f r CompactFlash oberes Etikett nach oben gerichtet 2 SDDR 73 STEC...

Страница 26: ...Sie alle offenen Anwendungen Programme und Fenster die m glicherweise auf die Speicherkarte f r austauschbare Datentr ger Zugriff haben Entfernen Sie NIEMALS einen Datentr ger solange die LED AKTIV I...

Страница 27: ...in den PAPIERKORB 3 Entfernen Sie die Speicherkarte sicher aus dem ImageMate Dual Leseger t 27 Symbole Festplatte Steckplatz 2 Steckplatz 1 Standardsymbole f r Mac OS X v10 1 3 Steckplatz Nr Datentr...
Страница 28: ...e zum Zielordner 6 Gehen Sie zum Men Bearbeiten und w hlen Sie EINF GEN 7 Die Bilder werden in den Zielordner KOPIERT 1 Doppelklicken Sie auf das entsprechende Volume f r den austauschbaren Datentr ge...

Страница 29: ...er von SanDisk Produkten in lebenserhaltenden Anwendungen die volleVerantwortung und stellt SanDisk von jeglicher Haftung frei Die Informationen in dieser Anleitung sind nderungen vorbehalten SanDisk...

Страница 30: ...n eenvoudig van de ene kaart naar de andere of van de flash kaart naar de vaste schijf heen en weer slepen en neerzetten SanDisk biedt een assortiment lees en schrijfoplossingen voor diverse typen fla...

Страница 31: ...n stuurprogramma vanaf een cd te worden ge nstalleerd 2 Sluit de ImageMate aan op een beschikbare USB poort 3 Start de computer opnieuw 4 Er verschijnt een symbool voor verwijderbaar schijfvolume op h...

Страница 32: ...USB poort van de computer 2 Verlengkabel van 1 meter ingesloten in de doos De geheugenkaart in de ImageMate steken AFBEELDING 1 2 1 Sleuf 2 altijd CompactFlash bovenste etiket omhoog 2 Sleuf 1 SDDR 7...

Страница 33: ...jderen 1 Sluit alle open toepassingen programma s en vensters die toegang tot de verwisselbare schijf geheugenkaart kunnen zoeken Verwijder de informatiedrager NOOIT als het lichtje actief is of flits...

Страница 34: ...nkaart nu veilig uit de ImageMate dubbele kaartlezer verwijderen 34 Symbolen Harde schijf hoofdschijf Sleuf 2 Sleuf 1 Standaardsymbolen voor Mac OS X v10 1 3 Sleufnr Informatiedrager in sleuf 2 is Com...

Страница 35: ...n kies Plakken 7 De beeldbestanden worden naar de doelmap gekopieerd 1 Dubbelklik op het juiste verwijderbare schijf volume op het bureaublad 2 Dubbelklik op de map DCIM of DCimages dit varieert afhan...

Страница 36: ...e informatie in deze handleiding kan zonder kennisgeving worden gewijzigd SanDisk Corporation is niet aansprakelijk voor technische of redactionele fouten of omissies in deze handleiding noch voor inc...

Страница 37: ...is cart es diferentes ou do cart o de mem ria para o seu disco r gido e vice versa A SanDisk oferece solu es de leitor gravador para v rios tipos de cart es de mem ria Visite o Web site da SanDisk em...

Страница 38: ...CD de instala o de controladores 2 Ligue o ImageMate porta USB dispon vel 3 Reinicie o computador 4 O disco amov vel aparece no ambiente de trabalho consulte a Sec o 6 para exemplos de cones Para mais...

Страница 39: ...metro inclu do na embalagem n o apresentado Inserir o cart o de mem ria no ImageMate FIGURA 1 2 1 RANHURA 2 sempre CompactFlash etiqueta de cima virada para cima 2 SDDR 73 RANHURA 1 Secure Digital Mu...

Страница 40: ...1 Feche todas as aplica es programas e janelas que possam estar a aceder ao cart o de mem ria amov vel NUNCA remova o suporte quando a luz LED est ACTIVA INTERMITENTE 2 Clique no cone do disco amov v...

Страница 41: ...eguran a o cart o de mem ria do ImageMate Dual Reader 41 cones Disco r gido principal Ranhura 2 Ranhura 1 cones padr o do Mac OS X v10 1 3 Ranhura n Ranhura para suportes 2 para CompactFlash Ranhura p...

Страница 42: ...AR 4 Aceda pasta de destino 5 No menu Editar escolha COLAR 6 As imagens ser o COPIADAS para a pasta de destino 1 Fa a duplo clique na letra correspondente ao dispositivo Disco amov vel no ambiente de...

Страница 43: ...ssa utiliza o e indemniza a SanDisk por todos os danos As informa es contidas neste manual est o sujeitas a altera o sem aviso pr vio SanDisk Corporation n o ser respons vel por erros t cnicos ou edit...

Страница 44: ...rquivos entre os dois cart es diferentes ou a partir do cart o flash para o seu disco r gido e vice versa A SanDisk oferece solu es de leitura grava o para v rios tipos de mem ria Flash Visite o websi...

Страница 45: ...alar o controlador pelo CD 2 Conecte o ImageMate em uma porta USB dispon vel 3 Reinicialize o computador 4 OVolume do Disco remov vel ser exibido na rea de trabalho Consulte a Se o 6 para exemplos de...

Страница 46: ...de 1 metro inclu do na embalagem n o ilustrado aqui Insira o cart o de mem ria no ImageMate FIGURA 1 2 1 SLOT 2 sempre para CompactFlash r tulo superior voltado para cima 2 SDDR 73 SLOT 1 para Secure...

Страница 47: ...anelas que estiverem abertos e que possam estar acessando o cart o de mem ria do Disco remov vel NUNCA remova a m dia quando o LED estiver ATIVO PISCANDO 2 Clique no cone do Disco remov vel com o bot...

Страница 48: ...remov vel para o LIXO 3 Remova o cart o de mem ria do leitor Duplo ImageMate Dual com seguran a 48 cones Disco r gido principal Slot 2 Slot 1 cones padr o do Mac OS X v10 1 3 No do Slot Slot 2 de m d...

Страница 49: ...4 V para a pasta de destino 5 V ao menu editar e escolha COLAR 6 As fotos ser o COPIADAS para a pasta de destino 1 Fa a o clique duplo na letra adequada da unidade de Disco remov vel 2 Fa a o clique...

Страница 50: ...e todos os riscos por tal uso e isenta a SanDisk de todos os danos A informa o neste manual est sujeita a mudan as sem aviso pr vio A SanDisk Corporation n o ser respons vel por omiss es ou erros t cn...

Страница 51: ...funzione drag and drop fra due diverse schede di memoriz zazione o dalla scheda di memoria flash all unit disco rigido e viceversa La SanDisk offre soluzioni di lettura scrittura per vari tipi di memo...

Страница 52: ...corre installare i driver dal CD 2 Collegare l ImageMate in una porta USB disponibile 3 Riavviare il computer 4 Il volume del disco rimovibile appare sul desktop per esempi di icona consultare la Sezi...

Страница 53: ...dotazione non illustrato Inserimento della scheda di memorizzazione nell ImageMate FIGURA 1 2 1 ALLOGGIAMENTO 2 sempre CompactFlash etichetta superiore rivolta verso l alto 2 SDDR 73 ALLOGGIAMENTO 1...

Страница 54: ...all ImageMate 1 Chiudere tutte le applicazioni i programmi e le finestre aperti che potrebbero accedere alla scheda di memorizzazione Disco rimovibile NON ESTRARRE MAI il supporto quando il LED ATTIVO...

Страница 55: ...ibile nel CESTINO 3 Estrarre in modo sicuro la scheda di memorizzazione dal lettore doppio ImageMate 55 Icone Disco rigido principale Alloggiamento 2 Alloggiamento 1 Icone standard Mac OS X v10 1 3 N...

Страница 56: ...otrebbe variare a seconda della macchina fotografica 3 Questa cartella conterr i file delle fotografie o una cartella contenente i file delle fotografie a seconda della macchina fotografica 1 Trovare...

Страница 57: ...da tale uso esentando allo stesso tempo SanDisk da ogni responsabilit diretta o indiretta Le informazioni contenute in questo manuale sono soggette a cambiamenti senza preavviso La SanDisk Corporatio...

Страница 58: ......

Страница 59: ......

Страница 60: ...SanDisk Corporation 140 Caspian Court Sunnyvale CA 94089 USA Headquarters 1 408 542 0500 Tech Support 1 866 SANDISK http www sandisk com 80 36 00189...

Отзывы: