


S&C Instruction Sheet 661-500 19
Operation
Removing the Battery for Maintenance or
Replacement
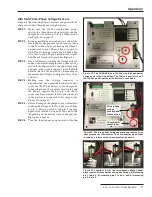
Complete the following steps to remove a battery:
STEP 1.
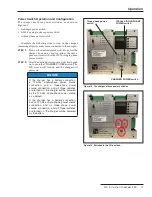
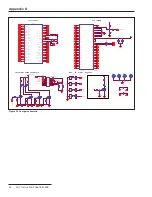
Disconnect the two-pin connector separating
the battery from the charger. See Figure 17 on
page 18.
STEP 2.
Run a battery test by clicking on the
Battery
Test
button in the
Battery Test
tab. See Figure
11 on page 15.
STEP 3.
Confirm the
No Battery
message appears on
the GUI application software.
STEP 4.
To place a new battery or to rewire the existing
battery to the charger, follow Steps 2 through 4
of the previous section on page 18.
STEP 5.
Using the
Battery Status
tab in the GUI
application (Figure 8, page 13), click on
Alarm
Reset
button to reset the charger. A pop-up
window will ask, “Do you want to override the
BAT (battery) records?” Selecting the
No
option
means the battery records will not be
overwritten. Selecting the
Yes
option means all
battery records will be deleted and new battery
records will be stored. This enables the charger
to connect to the battery.