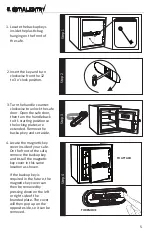
background image


8


7. TROUBLESHOOTING 


6. PROGRAMMING ADDITIONAL FINGERPRINTS (Continued)

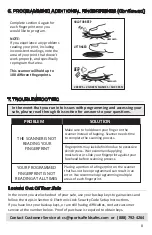
Complete section 4 again for 

each fingerprint zone you 

would like to program.

NOTE: 

If you experience any problems 

reading your print, including 

inconsistent readings, note the 

area of your print that doesn’t 

work properly, and specifically 

reprogram that area. 

This scanner will hold up to 

100 different fingerprints.


In the event that you run into issues with programming and accessing your 

safe, please read through this section for answers to your questions. 

BEEP

BEEP

BEEP

HOLD FOR BEEP

LIFT FINGER 

2 BEEPS + 2 GREEN FLASHES = SUCCESS!

Locked Out Of Your Safe


YOUR PROGRAMMED

FINGERPRINT IS NOT 

READING AT ALL TIMES

SOLUTION

PROBLEM


Contact Customer Service at  cs@sportsafieldsafes.com  or   (888) 792-4264

Placing a portion of a fingerprint on the scanner 

that has not been programmed can result in an 

error. We recommend programming multiple 

areas of each fingerprint.

Make sure to hold down your finger on the 

scanner instead of tapping. Scanner needs time 

to complete the scanning process.

Fingerprints may lack definition due to excessive 

skin dryness. We recommend applying 

moisturizer or slide your fingerprint against your 

forehead before scanning process.

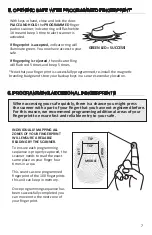
GREEN LED

GREEN LED

THE SCANNER IS NOT 

READING YOUR 

FINGERPRINT

In the event you are locked out of your safe, use your backup keys to gain access and 

follow the steps in Section 4: Electronic Lock Security Code Setup Instructions.
If you have lost your backup keys, or are still having difficulties, contact customer 

service at the number below. Proof of purchase is required to obtain keys.

Содержание BIOMETRIC SA-DIA1-BIO

Страница 1: ...nd follow all safety rules carefully before operating your security safe Failure to do so will void your warranty 110521 SECURITY SAFE INSTRUCTION MANUAL FOR SA DIA1 BIO SA DIA2 BIO SA DIA3 BIO SA DIA1 BIO DP SA DIA2 BIO DP AND SA DIA3 BIO DP ...

Страница 2: ...ERPRINT 7 6 PROGRAMMING ADDITIONAL FINGERPRINTS 7 7 TROUBLESHOOTING 7 8 CLEARING ALL PROGRAMMED FINGERPRINTS 8 9 INTERNAL LIGHTING 8 10 LOW BATTERY WARNING 10 11 LOCKOUT MODE TAMPER PROTECTION 10 12 SILENT ENTRY MODE 11 13 PROPER PLACEMENT AND MOVING OF SAFE 11 14 KEEPING YOUR SAFE DRY 11 15 SECURING YOUR SAFE 12 16 LOADING YOUR SAFE 13 15 HINGES AND INTERNAL MECHANISMS 11 LIFETIME WARRANTY 14 ...

Страница 3: ...ecommends that you do not store loaded firearms Always follow the firearm safety rules set out by the firearm s manufacturer A Sanctuary safe or any other firearm storage device cannot take the place of other safety procedures including advising children of the dangers of firearms SA Consumer Products and its distributors of the Sanctuary safes do not recommend suggest advise promote or otherwise condo...

Страница 4: ...gistering your Sanctuary safe we will be able to expedite and address any problems or challenges you may have which would otherwise require a notary letter and proof of payment The information you record onto this page will be required in the event you cannot access the contents of your Sanctuary safe Please fill out all the required information below and retain for your records and safe keeping PL...

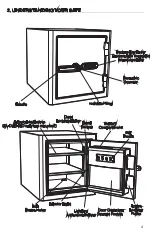
Страница 5: ...neath magnetic branding plate Biometric Scanner Active Locking Plates Key Hooks Adjustable Shelves SA DIA1 BIO only has one shelf Door Organizer Storage Pocket Bolt Down Holes Dead Locking Plates 4 Interior Light Reset Button Lighting Activation Button Battery Compartment ...

Страница 6: ...e the backup keys inside the plastic bag hanging on the front of the safe Step 3 Step 2 TO REMOVE TO ATTACH 4 Locate the magnetic key cover inside of your safe On the front of the safe remove the backup key and install the magnetic key cover in this same location as shown If the backup key is required in the future the magnetic key cover can then be removed by pressing down on the left or right si...

Страница 7: ... once 4 REPEAT at least 3 more times until there are 2 consecutive beeps and 2 green flashes If unsuccesful the indicator Ring will flash red 5 times and beep 5 times Repeat this section again BEEP BEEP BEEP HOLDFORBEEP LIFTFINGER Step 2 Step 3 Step 4 BEEP 2 BEEPS 2 GREEN FLASHES SUCCESS Reset button located under plastic cap WHITE LED GREEN LED GREEN LED 5 Locate the 4xAA batteries Install them int...

Страница 8: ...uence is properly captured the scanner needs to read the exact same place on your finger four times in a row This counts as one programmed fingerprint of the 100 fingerprints this unit can keep in memory Once programming sequence has been successfully completed you can move onto the next zone of your fingerprint TIP RIGHT TOP MIDDLE LEFT When accessing your safe quickly there is a chance you might pre...

Страница 9: ...ct Customer Service at cs sportsafieldsafes com or 888 792 4264 Placing a portion of a fingerprint on the scanner that has not been programmed can result in an error We recommend programming multiple areas of each fingerprint Make sure to hold down your finger on the scanner instead of tapping Scanner needs time to complete the scanning process Fingerprints may lack definition due to excessive skin dry...

Страница 10: ...n 8 CLEARING ALL PROGRAMMED FINGERPRINTS NOTE If 100 max fingerprints have already been programmed the indicator ring will flash 5 times and beep 5 times We recommend clearing all programmed fingerprints and starting the programming process over Hold the reset button for 5 seconds After 5 seconds the indicator ring will flash green two times and beep two times to signal that all fingerprints have now b...

Страница 11: ... ring will flash red 3 times in addition to a 3 second long beep 10 This safe is equipped to alert you of Low Battery Mode This Low Battery Warning is initiated immediately after an accepted fingerprint scan The indicator ring will first illuminate green followed by a 3 second long beep and the indicator ring flashing purple for 3 seconds It is highly advised to immediately replace the safe s batterie...

Страница 12: ...ing your safe in a place with climate control heat in the winter and cooling in the summer is highly recommended In areas of high humidity or frequent temperature fluctuations garages it is recommend to take appropriate precautions to ward against moisture damage We strongly encourage the use of an internal dehumidifier and or desiccants to protect your contents from rust or mildew Internal dehumidi...

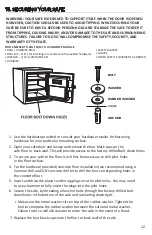
Страница 13: ...your safe door and locate and remove the four black caps on the safe floor or back wall This will provide access to the factory drilled bolt down holes To secure your safe to the floor it will first be necessary to drill pilot holes in the floor surface For the hardware provided concrete floor installation we recommend using a hammer drill and 3 8 concrete drill bit to drill the four corresponding hole...

Страница 14: ... will put pressure against the door when it is closed As a good safety precaution store heavier items either on the floor of the safe or away from the middle of the shelves 17 HINGES AND INTERNAL MECHANISMS The hinges and internal locking mechanism are permanently lubricated thus needing no maintenance Opening the door panel of your safe may void your warranty Always consult our customer service ex...

Страница 15: ...ada Proof of registration and copy of sales receipt must be on file at the time of claim Visit our website at www saproducts com to register your safe Lifetime warranty only applies to the original owner of the safe SA Consumer Products Inc shall only be responsible and liable when the safe is used in compliance with the directions specified in your new Sanctuary Safe Owner s Manual SA Consumer Pr...

Отзывы: