background image

44 _

 listening to music

USER BUTTON CUSTOM FUNCTION (Continued)

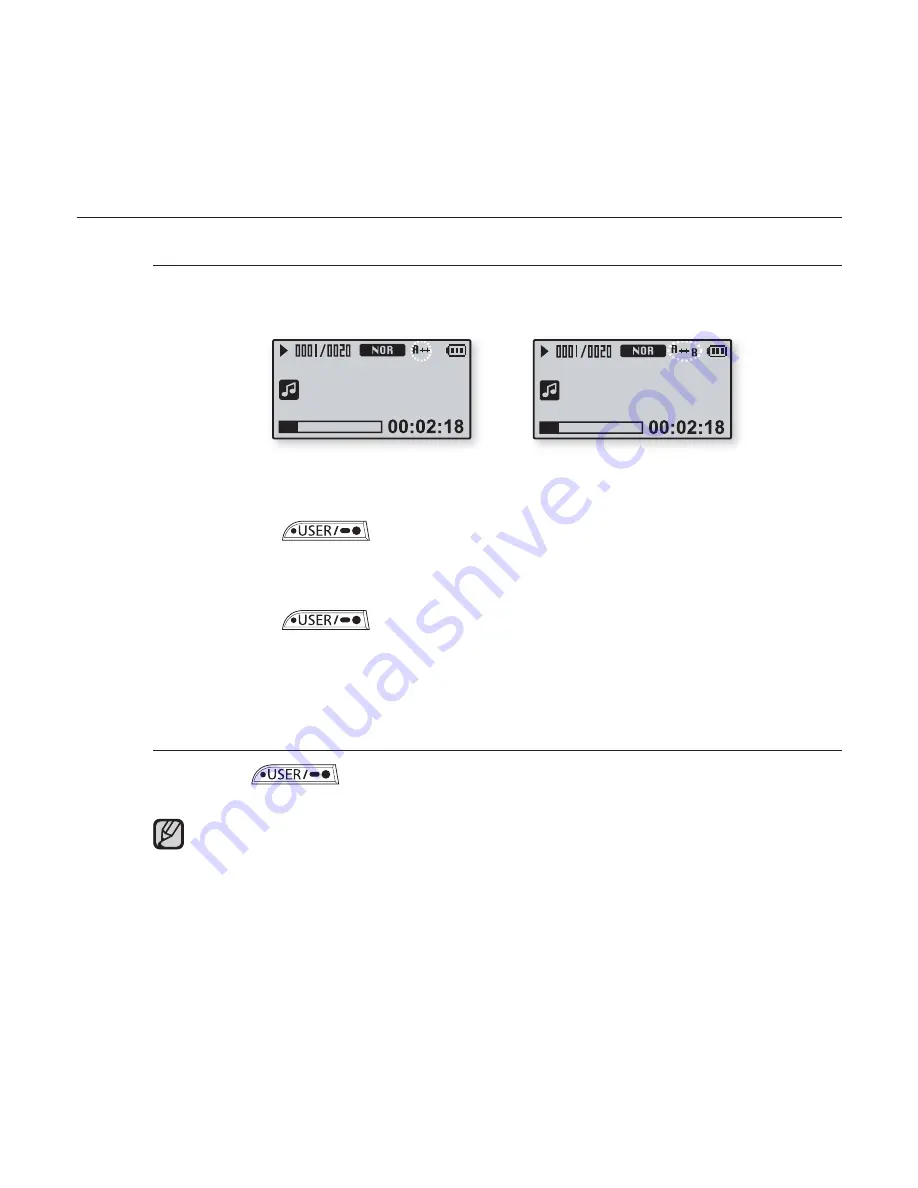
To set Section Repeat

This function enables you to listen to speci

fi

 c parts of a track repeatedly. 

Recommended for language learning.

1. 

Set the User Button Mode to 

<Repeat A-B>

 and play a 

fi

 le of your 

choice.

2. 

Press the 

 button

 at the beginning of the section you want 

to repeat.

The starting point is set and <A

J

> will appear in the screen display window.

3. 

Press the 

 button

 again to set the ending of the section 

you want to repeat.

 <A

Q

B> will appear on the screen and the speci

fi

 ed section starts to play 

repeatedly.

To cancel Section Repeat

Press the 

 button

 again during Section Repeat. 

Section Repeat will be canceled.

Section Repeat will be automatically canceled in the following case.

  The starting point of the section repeat is set but the ending point is not set  
  until after the current track ends.

ƒ

ƒ

ƒ

Singer-Song 1

Singer-Song 1

2

3

NOTE

Содержание YPU3JQBXAA

Страница 1: ...MP3 Player user manual YP U3 ...

Страница 2: ...SELECTION WITH MP3 PLAYER You can edit your favorite music files in the playlist EXPANSION AND COMPATIBILITY With your new player you re not limited to MP3 files Your player supports MP3 and WMA formats TOUCH NAVIGATION You can tap on the touch pad to navigate through the menus LONGER PLAY TIME AND SHORTER DOWNLOADING A fully charged battery can play up to 15 hours of music when using the earphone...

Страница 3: ...personal injury when using your MP3 Player follow these basic safety precautions NOTE Means hints or referential pages that may be helpful to operate the player Do NOT attempt Do NOT disassemble Do NOT touch Follow directions explicitly Unplug the power plug from the wall socket Call the service center for help These warning signs are here to prevent injury to you and others Please follow them exp...

Страница 4: ... the earphone while you are driving a bicycle automobile or motorcycle Otherwise it can cause a serious accident and furthermore it is prohibited by the law in some areas Using the earphone while walking or jogging on a road in particular on a crosswalk can lead to a serious accident For your safety make sure the earphone cable does not get in the way of your arm or other surrounding objects while...

Страница 5: ...mperatures above 95 F 35 C such as a sauna or a parked car Do not cause excessive impact on the player by dropping it Do not place heavy objects on top of the player Prevent any foreign particles or dust from entering into the product Do not place the product near magnetic objects Be sure to backup important data Samsung is not responsible for data loss Use only accessories provided by or approved...

Страница 6: ...nable protection against harmful interference in a residential installation This equipment generates uses and can radiate radio frequency energy and if not installed and used in accordance with the instructions may cause harmful interference to radio communications However there is no guarantee that interference will not occur in a particular installation If this equipment does cause harmful inter...

Страница 7: ...ponsibility that the product Trade Name Samsung Electronics Co Ltd Model Number YP U3 has been tested according to the FCC CISPR22 95 requirements for Class B devices and found compliant with the following standards EMI EMC FCC Part 15 Subpart B This device complies with part 15 of the FCC Rules Operation is subject to the following two conditions 1 This device may not cause harmful interference a...

Страница 8: ...er on off 17 Playing music 18 Controlling the volume 18 Disabling the buttons 19 Changing the settings and preferences 19 Music preferences 21 FM Radio preferences 24 Time preferences 25 Language preferences 27 System preferences 30 Resetting the system BEST BUY DIGITAL MUSIC STORE 31 31 PC requirements 32 Installing Best Buy Digital Music Store 33 Transferring files to the Player with Best Buy Di...

Страница 9: ...r next track 38 To search a music file 38 To switch back to the current play screen 39 Creating a playlist using Best Buy Digital Music Store 39 Creating a Playlist 40 Adding music files to a playlist you ve created 41 Transferring a playlist to your player using Best Buy Digital Music Store 42 Playing a playlist 43 User button custom function 43 To set user button mode ...

Страница 10: ...s MORE THAN MUSIC 46 46 Listening to FM Radio 47 To search for FM stations 48 To store stations in the preset memory 48 To listen to preset stations 49 To delete a preset 50 Voice Recording 51 To stop recording 52 Recorded file names 52 To listen to a previously recorded file UPGRADING FIRMWARE 53 53 Upgrading firmware ...

Страница 11: ...4 Player Earphones Cable Winder Installation CD AH46 00045D Clip AH69 01993A Black White Pink Green Blue Earphones AH30 00085E AH30 00084H AH30 00084E AH30 00084F AH30 00084G Cable Winder AH69 01992A AH69 01992B AH69 01992C AH69 01992D AH69 01992E USING THE CABLE WINDER 1 Insert the earphone cable into the winder and wind it around 2 Clip the earphone cable into the two holes of the winder ...

Страница 12: ...e MP3 player Earphone connection jack User Recording button Press to set section repetition DNSe Play Speed Play Mode or stop Voice recording Press and briefly hold to start Voice recording Power Play Pause button Press for play pause and move to the selected menu confirm and save your selection Press and briefly hold for power on off LED Lighting ...

Страница 13: ...move to next track menu Press and briefly hold to quickly scan tracks Up volume button Press to increase the volume or move to an upper item menu Left file browser button Press to move to the previous track menu or play the current track from the beginning Press and briefly hold to quickly scan tracks Back button Press to return to the previous screen Press and briefly hold to move to the main men...

Страница 14: ...12 _ the basics YOUR MP3 PLAYER Continued Hold switch Push in the direction of the arrow to lock the button functions USB plug USB switch Slides the USB plug in and out Microphone Clip hook ...

Страница 15: ...arch Indicator Music Title Indicator Play Status Bar FM Radio Mono Stereo Indicator Battery Indicator Current Frequency MHz Indicator Preset number Indicator FM Radio Indicator Manual Preset Indicator Frequency Location Indicator The screen pictures are for illustration purposes only The actual screen may differ 2 3 4 5 6 7 8 1 1 2 3 4 5 1 Singer Song 1 2 3 4 5 6 7 8 6 7 1 2 7 5 3 4 6 NOTE ...

Страница 16: ...mage to the touch screen do not use any object other than your fingers to operate the touch screen Do not tap on the touch screen if your fingers are not clean Do not tap on the touch screen with gloves on USING THE CLIP Fasten the clip by inserting its protruding part to the clip hook NOTE ...

Страница 17: ...e it before using the player for the first time and when you haven t used it for a long time 1 Slide the switch The USB plug is revealed 2 Connect the USB plug to the USB port on your PC as in the figure 1 2 The insertion direction of the USB port may differ depending on the PC Check the direction of the player s USB plug before inserting Screen Display USB Connected Charging Fully Charged ...

Страница 18: ...ile it is connected to a laptop computer make sure the laptop s battery is also fully charged or that the laptop is plugged into its power source TURNING THE POWER ON OFF Turning the Power on Press and briefly hold the button Power is turned on Turning the Power off Press and briefly hold the button Power is turned off Your mp3 player will be automatically turned off when none of the buttons have ...

Страница 19: ...screen 2 Press the button to select Music and then press the button The Music list will appear 3 Press the button to select the desired list and then press the button 4 Press the button to select the file to play and then press the button The music will start playing Press the button to move to the previous screen Press and briefly hold the button to move to the main menu NOTE Singer Song 1 Music ...

Страница 20: ...on to decrease it DISABLING THE BUTTONS The hold function disables all the other buttons on the mp3 player so that if you accidentally bump one while working out for example your music won t be interrupted 1 Push the switch in the direction of the arrow 2 Push the switch in the opposite direction of the arrow to release the hold function Hold ...

Страница 21: ...ct Music and then press the button The Music menu appears 4 Use the and buttons to choose the settings you prefer Press the button to move to the previous item Press the button to move to the next item select the menu Press the button to move up or down through the current menu If the Settings screen is open and you don t push any buttons for about 40 seconds the unsaved settings will be lost and ...

Страница 22: ...g you ve made in the DNSe menu will change to User EQ Play Mode Select playback mode such as repeat settings Select from Normal Repeat Repeat One and Shuffle Normal To play all the tracks in order one time Repeat To repeat all files Repeat One To repeat one file Shuffle To play files at random Play Speed Adjust the playback speed of music voice recording Select x0 7 x0 8 x0 9 x1 0 x1 1 x1 2 or x1 ...

Страница 23: ...nd sensitivity 1 Press and briefly hold the button to move to the main menu screen 2 Press the button to select Settings and then press the button The Settings menu appears 3 Press the button to select FM Radio and then press the button The FM Radio menu appears 4 Use the and buttons to set functions Music User Button Mo FM Radio Time Auto Preset FM Region FM Sensitivity ...

Страница 24: ... To receive more or fewer FM radio frequencies adjust the FM Sensitivity Select either Low Middle and High If you select High the more frequencies can be received Frequency range by region Korea US Search for FM frequencies in 100 kHz increments between 87 5 MHz 108 0 MHz Japan Search for FM frequencies in 100 kHz increments between 76 0 MHz 108 0 MHz Other Countries Search for FM frequencies in 5...

Страница 25: ...ess the button to scan for a desired preset frequency To cancel Auto Preset If you want to cancel the auto preset press any button in the process The auto preset setting is canceled and only frequencies set up to that point are stored Always connect your earphones to the player when searching or setting frequencies The earphones serve as antennas to receive FM Radio reception In poor reception are...

Страница 26: ...set functions Time setting options Sleep Turns off power automatically after the preset time Select either Off 15 min 30 min 60 min 90 min or 120 min Auto Power Off Automatically turns power off when there is no button operation after the preset time in the pause mode Select either 15 sec 30 sec 1 min 3 min or 5 min Display Off If no button is pressed within the time set shown below the Screen Dis...

Страница 27: ... any one of multiple languages 1 Press and briefly hold the button to move to the main menu screen 2 Press the button to select Settings and then press the button The Settings menu appears 3 Press the button to select Language and then press the button The Language menu appears 4 Use the and buttons to set functions Language System ...

Страница 28: ...çe ID3 Tag Set the language in which the track information will appear Select from Afrikaans Basque Catalan Chinese S Chinese T Czech Danish Dutch English Estonian Finnish French German Greek Hrvatski Hungarian Icelandic Italian Japanese Korean Norwegian Polish Portuguese Romany Russian Slovak Slovene Spanish Swedish Turkish Vietnamese Thai Indonesian Ukrainian Bulgarian and Romanian The supported...

Страница 29: ... voice file resume that s right for you 1 Press and briefly hold the button to move to the main menu screen 2 Press the button to select Settings and then press the button The Settings menu appears 3 Press the button to select System and then press the button The System menu appears 4 Use the and buttons to set functions Language System ...

Страница 30: ...e when using the earphone On will limit the maximum volume level up to 20 The maximum volume level when Volume Limit is set to Off is 40 Even if you have select Off the volume will be set back to 20 to avoid hearing damage when you turn the player back on LED Effect Select LED backlight effect Select either Off Button turns on when a button is pressed Random or Always on Default Set Returns all se...

Страница 31: ...ect a file to delete and then press the button Delete will appear 3 Press the button to select YES and then press the button The selected file will be deleted Files cannot be restored after they are deleted Please check before deleting files Deleting a file will stop playing the current music Voice Recording Delete Record F Resume Beep NOTE CAUTION V0001 mp3 V0002 mp3 V0003 mp3 V0004 mp3 Delete ...

Страница 32: ...r isn t recognized by your computer when you connect it you may have to reset the system Push the switch in the direction of the arrow Press and briefly hold the and buttons at the same time to reset the system The system will be initialized Your settings and files will not be affected 2 1 ...

Страница 33: ...ption services Best Buy Digital Music Store puts the world of music at your fingertips PC REQUIREMENTS Your PC system must meet the following minimum specifications in order to install and run Best Buy Digital Music Store Pentium 500MHz or higher USB Port 2 0 Windows XP Service Pack 2 or higher DirectX 9 0 or higher 100MB of free hard disc space CD Rom Drive 2X or higher Windows Media Player 11 0 ...

Страница 34: ...t be installed To find the administrator account please refer to your PC s user manual 1 Insert the Installation CD provided with the player into the CD ROM drive 2 Click Install now 3 Click Next Best Buy Digital Music Store installation starts and then creates an icon on your desktop when installation is complete Use care when inserting the Installation CD into a vertically oriented CD ROM drive ...

Страница 35: ...r PC as in the figure USB Connected appears on the screen display of the player 3 Click the Best Buy Digital Music Store icon on your PC s desktop Best Buy Digital Music Store will start Ejecting the USB Plug Slide the switch to eject the USB plug from the player Inserting the USB Plug Push the USB plug back into the player while sliding the switch Be sure to slide and hold the switch when you pus...

Страница 36: ...sic Store The File menu appears 5 Click Add Tracks to My Library The Local Library File Import window will appear 6 Click Browse on the right of Local Library File Import window The Browse for folder window will appear 7 Select the folder to add and click OK 8 Click Yes 9 Click Finish The files of the selected folder are added to the list in My Library 4 5 6 8 7 ...

Страница 37: ...ting during transfer may damage the player or your PC Connect the player to the computer directly rather than through a USB hub to avoid an unstable connection All functions are disabled during connection If you connect the USB plug to the PC and the player s Battery charge is low the player will be charged for several minutes before connecting to the PC Best Buy Digital Music Store has a thorough...

Страница 38: ...ton The music will start playing Music List File information including the artist name album name music title and genre will be displayed according to the ID3 tag information on the appropriate music file A file without an ID3 Tag is displayed as Unknown Artists To play by artist Genres To play by genre Albums To play by album Playlists To play by Playlist Songs To play in numeric or alphabetical ...

Страница 39: ... 2 Release the button at the point you wish to start It starts playing from the point you release the button PLAYING FROM THE BEGINNING OF THE CURRENT TRACK 1 Press the button after 3 seconds of play The current track starts playing from the beginning PLAYING THE PREVIOUS OR NEXT TRACK 1 Press the button within 3 seconds of play The previous track will start playing 2 Press the button The next tra...

Страница 40: ...selected folder 5 Press the button to select a file of your choice 6 Press the button The music file will start playing TO SWITCH BACK TO THE CURRENT PLAY SCREEN You can return to the current play screen at any time while using other functions 1 Press and briefly hold the button to move to the main menu screen 2 Press the button to select Now Playing and then press the button The player switches b...

Страница 41: ... the player to your PC Best Buy Digital Music Store must be installed on your PC Sign in to your account to edit or delete playlists Creating a Playlist 1 Click File on the top left of Best Buy Digital Music Store The File menu appears 2 Click New Playlist 3 Type in the playlist title A new playlist will be named and stored in the Playlists section of Best Buy Digital Music Store 1 2 3 ...

Страница 42: ...ou ve created 1 Click My Library in the Sources section of Best Buy Digital Music Store The My Library window appears 2 Select files that you want to transfer in the My Library window 3 Drag and drop selected files to the playlist in the Sources section The files you selected are transferred to the playlist YP U3 MTP 1 2 3 ...

Страница 43: ... on the left of Best Buy Digital Music Store The Playlists window appears 2 Select a playlist that you want to transfer in Playlists 3 Click Transfer to Device at the top right of Best Buy Digital Music Store 4 Click Samsung YP U3 The selected playlist will be transferred to the player folder by folder to Playlists in the Music folder of the main menu YP U3 MTP 1 YP U3 MTP 2 3 4 ...

Страница 44: ... the button The Music list will appear 3 Press the button to select Playlists and then press the button The Playlists the New Playlist you just transferred will appear If there is no playlist found you will see a No file message on the screen 4 Press the button to select the playlist of your choice and then press the button The music files saved in the selected Playlist will appear 5 Press the but...

Страница 45: ...ress the button to select Settings and then press the button The Settings menu will appear 3 Press the button to select User Button Mode and then press the button The User Button Mode menu will appear 4 Press the button to select the user button mode and then press the button User Button Mode List Repeat A B Sets section repeat DNSe Allows you to select an appropriate sound effect for music Play S...

Страница 46: ...ting point is set and AJ will appear in the screen display window 3 Press the button again to set the ending of the section you want to repeat AQB will appear on the screen and the specified section starts to play repeatedly To cancel Section Repeat Press the button again during Section Repeat Section Repeat will be canceled Section Repeat will be automatically canceled in the following case The s...

Страница 47: ...he User Button Mode to Play Speed and press the button Playback speed changes in the following order each time the button is pressed NOR x1 1 x1 2 x1 3 x0 7 x0 8 x0 9 To use the Play Mode button Set the User Button Mode to Play Mode and press the button Playback mode changes in the following order each time the button is pressed Normal Repeat Repeat One Shuffle What is DNSe Digital Natural Sound E...

Страница 48: ...ess the button to move to the previous screen Press and briefly hold the button to move to the main menu screen 1 Press and briefly hold the button to move to the main menu screen 2 Press the button to select FM Radio and then press the button FM radio reception will start Always connect your earphones to the player when searching or setting frequencies The earphones serve as antennas to receive F...

Страница 49: ...u screen To search for FM stations 1 Press the button and select MANUAL MANUAL wıll appear 2 Press and briefly hold the or button and then release Auto Searching appears on the display The search will stop at the frequency nearest from the point the button is released OR 2 Press the or button to progress through the frequencies one by one NOTE Auto Searching ...

Страница 50: ...s the button Save will appear 4 Press the or button to select a preset number and then press the button The selected station is set as a preset number To scan for a preset frequency automatically refer to page 23 To listen to preset stations 1 Press the button and select PRESET PRESET will appear 2 Press the or button to scroll through preset stations If no frequencies were preset No Preset will a...

Страница 51: ... to FM Radio 1 Press the button and select PRESET PRESET wıll appear 2 Press the or button to search for preset frequencies to delete 3 Press the button Delete will appear 4 Press the or button to select YES and then press the button The selected preset number is deleted If you don t want to delete the preset number select NO Delete ...

Страница 52: ...e button Voice recording will start as soon as the file name is displayed Method 2 1 Press and briefly hold the button to move to the main menu screen 2 Press the button to select Voice Record and then press the button The Voice Record list appears 3 Press the button to select Record and then press the button The confirmation window will appear 4 Press the button to select YES and then press the b...

Страница 53: ...e will not play The recorded file is stored in the Voice Record of the main menu Recorded Files Do not place the microphone too close or too far away during recording as this can affect the recording quality Voice recording is not enabled if the memory is full or the battery capacity is low You can make a voice recording for about 66 hours based on 32Kbps 1GB Press the button if you want to pause ...

Страница 54: ...0003 mp3 is the third voice recording file to be saved To listen to a previously recorded file 1 Press and briefly hold the button to move to the main menu screen 2 Press the button to select Voice Record and then press the button The Voice Record list will appears 3 Press the button to select Recorded Files and then press the button The Recorded files list will appear 4 Use button to select a rec...

Страница 55: ...t your player 2 When the player page appears select Firmware below the model name to download the latest firmware 3 Uncompress the downloaded file onto your Desktop The uncompressed files will be displayed 4 Connect the player to your PC 5 Right click on the Start button on the bottom left of your PC s screen then choose Explore to Open Windows Explorer on your PC Samsung YP U3 is displayed in Win...

Страница 56: ...der of Samsung YP U3 Data System 8 After disconnecting USB plug the player will be turned off automatically 9 Press and briefly hold the button The firmware will be upgraded When upgrading is complete the player will be turned off automatically Check the battery charge status of the player If the battery is not sufficiently charged the firmware will not be upgraded You need to have at least 20 MB ...

Страница 57: ...riefly hold the and buttons at the same time to reset the system Buttons do not work Check if the switch is in the direction of the arrow position Check if you pressed the right button then press again In Hold state press and briefly hold the and buttons at the same time to reset the system The screen will not turn on If Display Off is selected from Settings Time the screen display will be turned ...

Страница 58: ...hortened when the player is left for extended periods in low or high temperatures Best Buy Digital Music Store Program Malfunction Check if your PC meets the basic system requirements Connection to your PC is disabled Check the USB plug if it s correctly connected and try again Press Start on the toolbar of your PC to run Windows Update Select Key Updates and Service Packs then update all Reboot y...

Страница 59: ...stem Files or data are missing Check if the USB plug has been disconnected during file or data transmission If this is the case it may cause serious damage not only to files data but also to the product You have to be extra cautious as Samsung is not responsible for data loss Abnormal play time display during play Check if the file is in Variable Bit Rate VBR format Abnormal display of file name G...

Страница 60: ...ord Settings Now Playing Music User Button Mode FM Radio Time Language System DNSe Repeat A B Auto Preset Sleep Menu Voice Recording Bit Rate 3D User Set DNSe FM Region Auto Power Off ID3 Tag Delete Record File User EQ Set Play Speed FM Sensitivity Display Off Resume Play Mode Play Mode Beep Play Speed Volume Limit Skip Interval LED Effect Default Set Format About ...

Страница 61: ...Output 20mW 16Ω Output Frequency Range 20Hz 20KHz Signal to Noise Ratio 90dB with A filter Based on 1KHz 0dB Play Time 15 hours of music play MP3 128kbps Volume 15 Normal sound mode Temperature Range for Operation 5 35 C 23 95 F Case Plastics Weight 0 80 oz Dimensions WxHxD 3 15 X 1 X 0 43 inches FM Frequency 87 5 108 0 MHz FM Signal to Noise Ratio 55 dB FM T H D 1 FM Useable Sensitiivity 10dBμ Th...

Страница 62: ...is limited to private non commercial use by end user consumers for licensed contents No rights are granted for commercial use The license does not cover any product unit other than this product unit and the license does not extend to any unli censed product unit or process conforming to ISO IEC 11172 3 or ISO IEC 13818 3 used or sold in combination with this product unit The license only covers th...

Страница 63: ... be to the original purchaser however Samsung Authorized Dealers and Authorized Service Centers will comply with the warranty on the terms issued to purchasers in the country concerned For further information relating to the Authorized Service Centers contact 1 800 SAMSUNG 1 800 726 7864 Www Samsung com WARANTY CONDITIONS 1 The warranty is only valid when the warranty card is properly completed an...

Страница 64: ...ht to extension to or a new starting of the period of warranty Repair or direct replacement under the terms of this warranty may be fulfilled with functionally equivalent service exchange units 5 The warranty is not applicable in cases other than defects in material design and workmanship The warranty does not cover the following Periodic checks maintenance repair and replacement of parts due to n...

Страница 65: ...ventilation Unauthorized modifications carried out for the product to comply with local or national technical standards in countries for which the Samsung product was not originally designed Repairs performed by non authorized service centers such as opening of the product by a non authorized person The model serial No and product number on the product has been altered deleted removed or made ille...

Страница 66: ...RATION WITH RESPECT TO THIS PRODUCT SHALL BE BINDING ON SAMSUNG SAMSUNG SHALL NOT BE LIABLE FOR LOSS OF REVENUE OR PROFITS FAILURE TO REALIZE SAVINGS OR OTHER BENEFITS OR ANY OTHER SPECIAL INCIDENTAL OR CONSEQUENTIAL DAMAGES CAUSED BY THE USE MISUSE OR INABILITY TO USE THIS PRODUCT REGARDLESS OF THE LEGAL THEORY ON WHICH THE CLAIM IS BASED AND EVEN IF SAMSUNG HAS BEEN ADVISED OF THE POSSIBILITY OF...

Страница 67: ...USIVE REMEDY Some states do not allow limitations on how long an implied warranty lasts or the exclusion or limitation of incidental or consequential damages so the above limitations or exclusions may not apply to you This warranty gives you specific legal rights and you may also have other rights which vary from state to state This product is for personal use only and is only for use in complianc...

Страница 68: ...REV 0 0 If you have any questions or comments relating to Samsung products please contact the SAMSUNG customer care center Samsung Electronics America lnc 1 800 SAMSUNG 7267864 www samsung com ...

Отзывы: