3-2
Samsung Electronics
Disassembly & Reassembly
No.
Description
Description Photo
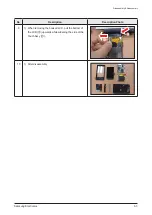
5
1) Remove the Cushion PCB from the MAIN PCB.
6
1) Disconnect the three connectors on the MAIN PCB
and remove the FPCB, and the MAIN PCB.
7
1) Insert a flat screwdriver or tweezers into the hole next
to the battery FPCB and remove the battery FPCB.
8
1) Remove the battery that is fixed with double sided
tape onto the LCD MODULE .
Ensure that the battery doesn’t get damaged.
Содержание YP-R1
Страница 15: ...3 4 Samsung Electronics MEMO ...
Страница 44: ...Samsung Electronics 4 29 Troubleshooting Install completed Check device manager ...
Страница 48: ...MEMO Samsung Electronics 4 33 ...
Страница 53: ...5 5 Samsung Electronics MEMO ...
Страница 55: ...6 2 Samsung Electronics PCB Diagram 6 1 1 Test Point Wave Form TP1 TP2 TP3 TP4 TP5 TP6 TP8 TP7 ...
Страница 58: ...Samsung Electronics 6 5 PCB Diagram 6 2 2 Test Point Wave Form TP2 TP3 TP4 TP7 TP6 ...
Страница 59: ...6 6 Samsung Electronics MEMO ...
Страница 69: ...7 10 Samsung Electronics MEMO ...

