Samsung Electronics
3-7
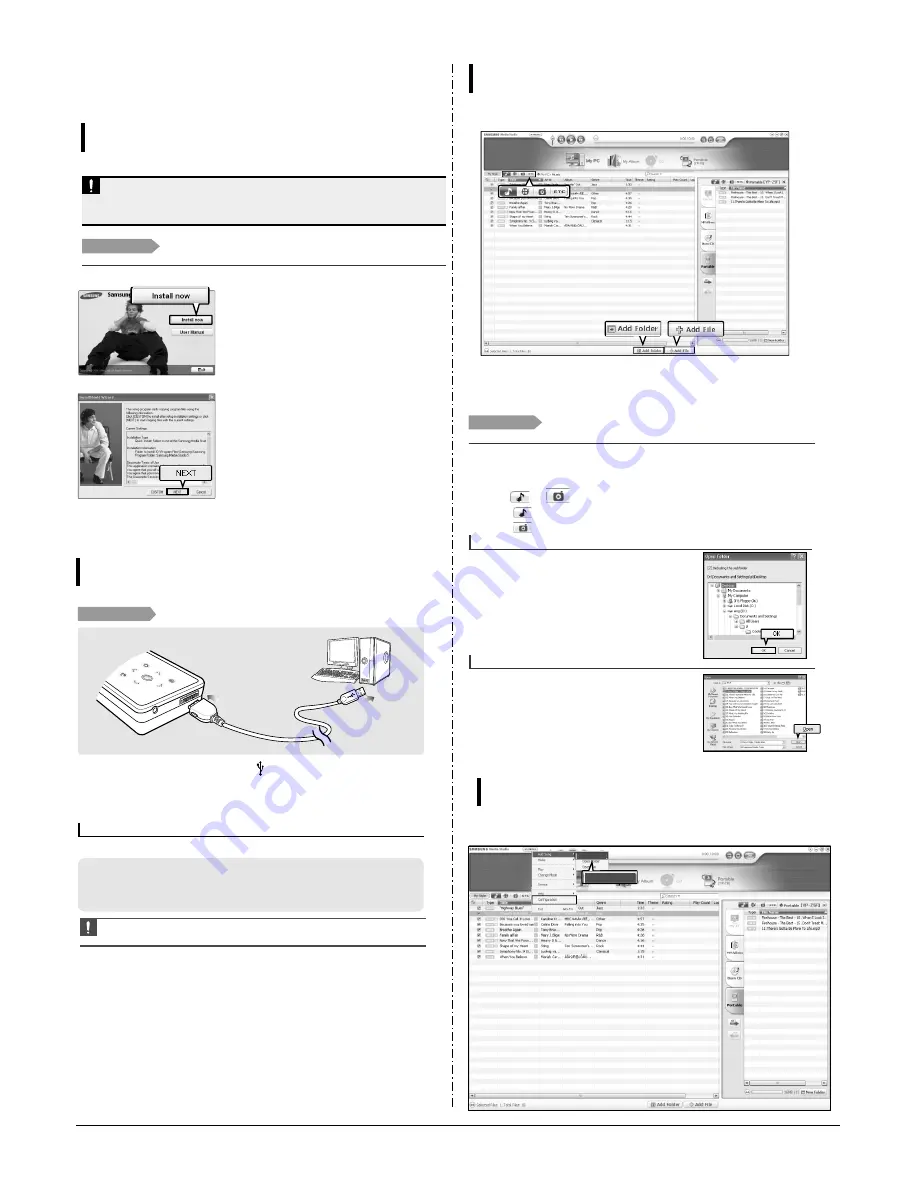
3. PC Connection
Installing Media Studio
Use Media Studio to transfer music files from
your PC to the player.
Loading Your Desired File
Before you start!
Insert the installation CD provided with the player into the CD-ROM drive.
If Media Studio is not installed automatically
■
Install the program on PCs running Windows 2000 or Windows XP after logging on with the
Administrator account. Please refer to the PC user manual on how to log on with the Administrator
account.
CAUTION
1
Click <Install now>.
2
Click <NEXT>.
■
An icon is created on the desktop after installation is
complete and Media Studio starts.
■
Media Studio installation starts.
Connecting to your PC
Loading Your Desired File
Before you start!
Use the USB Cable provided when connecting the product to your PC.
1
1
Connect the USB cable to the USB port ( ) on your PC.
2
2
Connect the other end of the USB cable to the Power/USB Connection Port on
bottom of the player.
■
<Connected> appears on the screen display of the player.
For use in conjunction with your PC, the following is required:
■
Pentium 300MHz or higher
■
USB Port 2.0
■
Windows 2000/XP
■
DirectX 9.0 or higher
■
100MB of free hard disc space
■
CD Rom Drive (2X or higher)
PC Requirements
CAUTION
■
If you connect the player through a USB hub, the connection may be unstable. Please connect the
player to the computer directly.
Loading Fold/File to Media Studio
Loading Your Desired File
Please refer to Help for more information on how to use Media Studio.
■
Click <MENU>
➝
<Help>
➝
<Help> from the menu on the top of the Media Studio program.
3
3
2
1
Media Studio will automatically start when the player is connected to your PC.
■
If the program does not start automatically, double Click the Media Studio icon on the desktop.
2
Click
or
which you want.
■
Click
icon to display music list.
■
Click
icon to display picture list
3
Click <Add Folder> on the bottom of Media Studio.
■
<Load Folder> window is open.
Before you start!
■
Connect the player to your PC.
■
Media Studio must be installed on your PC.
Loading Folder
3
Click <Add File> on the bottom of Media Studio.
■
<Load> window is open.
4
Select the folder to add and click <Open>.
■
The selected folder is added to the list.
Loading File
4
4
4
Select the files to add and click <OK>.
■
The selected files are added to the list.
Loading Auto Scan to Media Studio
Importing Music Files
2
Auto Scan
Auto Scan
Содержание YP-K5
Страница 2: ...ELECTRONICS Samsung Electronics Co Ltd AUG 2006 Printed in Korea Code no AH68 01819S...
Страница 19: ...Samsung Electronics 4 1 Samsung Electronics 4 Adjustments 1 How to recover the device...
Страница 20: ...4 2 Samsung Electronics...
Страница 21: ...4 3 Samsung Electronics...
Страница 22: ...4 4 Samsung Electronics...
Страница 23: ...4 5 Samsung Electronics 2 How to upgrade Firmware...
Страница 24: ...4 6 Samsung Electronics...
Страница 25: ...4 7 Samsung Electronics...
Страница 26: ...4 8 Samsung Electronics...
Страница 27: ...4 9 Samsung Electronics...
Страница 28: ...4 10 Samsung Electronics...
Страница 29: ...4 11 Samsung Electronics...
Страница 34: ...6 Troubleshooting 1 Power failure Samsung Electronics 6 1...
Страница 35: ...2 When you cannot hear through the earphones 6 2 Samsung Electronics...
Страница 36: ...3 When you cannot hear through the built in speaker Samsung Electronics 6 3...
Страница 37: ...6 4 Samsung Electronics 4 When the Touch Pad does not work properly...
Страница 38: ...6 5 Samsung Electronics 5 When you cannot connect the player to the PC...
Страница 42: ...9 1 Samsung Electronics 9 BLOCK DIAGRAM 9 BLOCK DIAGRAM...
Страница 43: ...Samsung Electronics 10 1 10 Wiring Diagram...
Страница 44: ...10 2 Samsung Electronics...
Страница 45: ...10 3 Samsung Electronics...
Страница 46: ...10 4 Samsung Electronics...
Страница 47: ...Samsung Electronics 11 1 11 PCB Diagram...
Страница 49: ...Samsung Electronics 12 2 2 MEMORY...
Страница 50: ...12 3 Samsung Electronics 3 LCD...
Страница 51: ...Samsung Electronics 12 4 4 USB...
Страница 52: ...12 5 Samsung Electronics 5 AUDIO CODE...
Страница 53: ...Samsung Electronics 12 6 6 POWER...
Страница 54: ...12 7 Samsung Electronics 7 FM...
Страница 56: ...Samsung Electronics 12 9 When you touch the Touch Pad...
Страница 57: ...12 10 Samsung Electronics It may differ depending on the battery voltage It may differ depending on the tune...
Страница 58: ...Samsung Electronics 12 11 Open Landscape View Close Portrait View...
Страница 59: ...12 12 Samsung Electronics...
Страница 60: ...Samsung Electronics 13 1 13 Circuit Board Description 1 CPU Block 2 SDRAM 3 NAND Flash...
Страница 61: ...13 2 Samsung Electronics 9 PBA Port...
Страница 62: ...Samsung Electronics 13 3...
Страница 63: ...13 4 Samsung Electronics...
Страница 66: ...14 2 Samsung Electronics Yepp Block Diagram...
Страница 74: ...14 10 Samsung Electronics Small Form factor Cards Comparison...


