background image

45

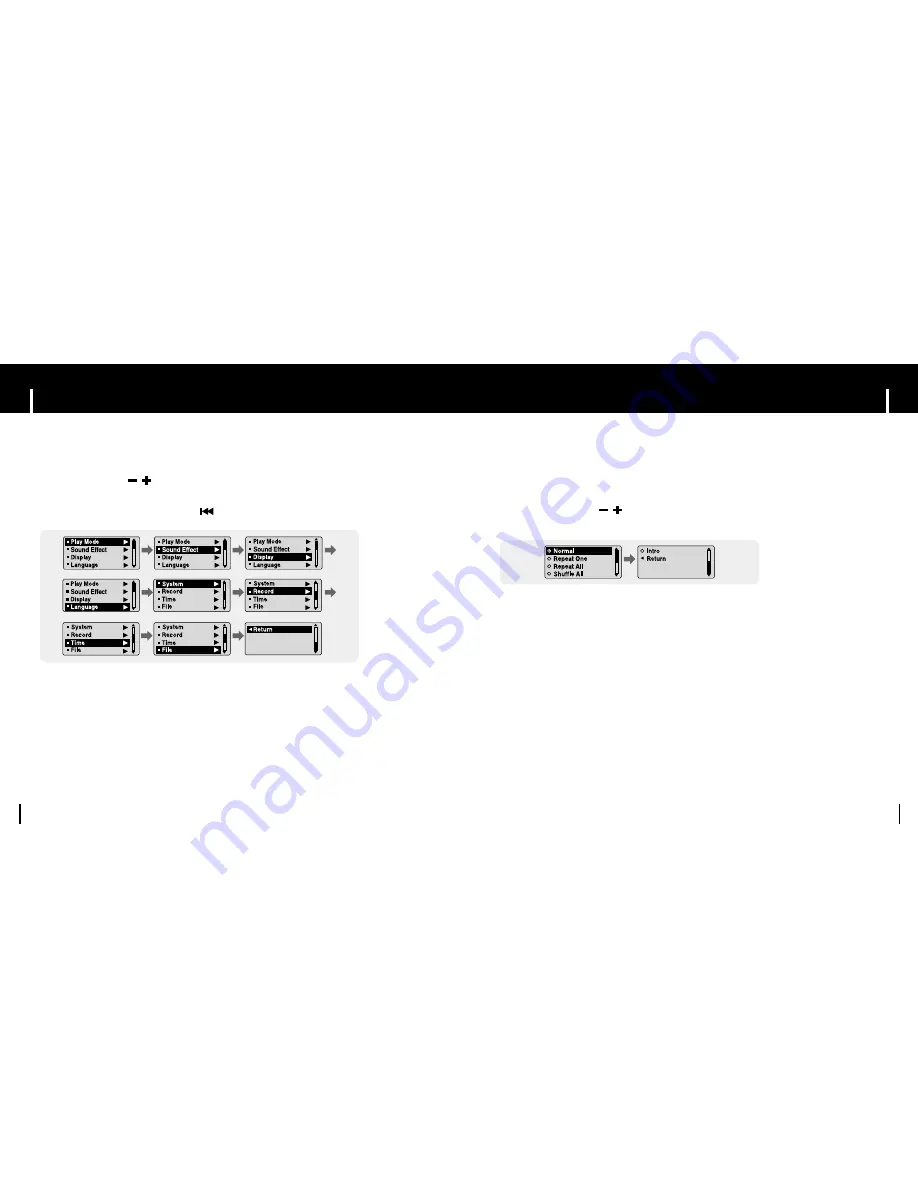
Selecting the Play mode

Setting the Advanced Functions

44

1

Select 

Settings

in the MENU. (refer to “MENU Options”)

2

In Settings, use     ,     to move to the function you want and 
press the 

“M”

button to select.

To move to a previous menu, use        or select Return.

1

Press and hold the 

“M”

button.

Select Settings

→ 

Play Mode.

2

In Play mode, use     ,     to move to the mode you want and press 
the 

“M”

button to select. 

● 

Normal: To play all the files in order one time.

● 

Repeat One: To repeat one file.

● 

Repeat All: To repeat all files.

● 

Shuffle All: To play files at random.

● 

Intro: To play the first few seconds of a music file. (refer to page 57)

● 

Return: To move to a previous menu

Содержание YP-C1X

Страница 1: ...YP C1 Samsung Electronics America Inc 400 Valley Road Suite 201 Mount Arlington NJ 07856 1 800 SAMSUNG 1 800 726 7864 www samsung com AH68 01694L Rev 0 0 ...

Страница 2: ...cable 19 Formatting the Player on your PC 20 Installing Media Studio 21 Using Media Studio 23 I Connection to Computer Loop Repeating 38 MENU Options 39 Using Navigation 40 Setting Playlist 43 Setting the Advanced Functions 44 Selecting the Playmode 45 Setting the EQ mode 46 Preset EQ 46 Bass Booster 46 WOW Set 47 User EQ Set 48 Display Settings 49 Scroll Display Time 49 Backlight 50 Tag Bitrate 5...

Страница 3: ...es and old electronic appliances Your player is packaged with cardboard polyethylene etc and does not use any unnecessary materials Read and understand all the instructions to avoid injury to yourself and damage to the equipment Do not expose to extreme temper atures above 95 F or below 23 F Do not expose to moisture Do not subject the unit to severe impact or place heavy objects on it Do not let ...

Страница 4: ...CDs cassettes and radio into MP3 files without a PC FM Reception Listening to an FM program is made easy with Auto Search and Frequency Memory functions SRS WOW Surround Sound The 3D surround feature adds spaciousness to the sound USB 2 0 Support Maximum data speed transfer of 18 Mbps Upgradeable Firmware You can upgrade the player s firmware when available Please check the home page www samsung c...

Страница 5: ... memory YP C1 H 128MB YP C1 V 256MB YP C1 X 512MB YP C1 Z 1GB Continued Player Earphones AH30 00084D Line In USB Cable AH39 00792A User manual AH68 01694L Installation CD AH80 00102A Neck Strap AH61 01414B Recording Button Play Pause Button Hold Switch Loop Repeating Button Neck strap Hook Earphone Jack Battery Cover ENC USB Cable Connection Port Forward Speed Search Reverse Speed Search Volume Up...

Страница 6: ... the operating system in Administrator Account main user for Windows 2000 or XP Otherwise installation will not be completed Windows ME 2000 and XP can recognize the driver without installing the provided program However you must install the program in order to format the player and upgrade firmware If you are using Windows 98 install the USB driver first before connecting the player to your PC Co...

Страница 7: ... to the computer and use it as the following pages show 3 The USB driver is installed with a message saying that it is searching for a new device You may not see the display screen during installation Go to the device manager see next page to check that installation has been successfully completed 4 Upon installation of the USB driver Samsung YP C1 USB Device will appear in your PC s control panel...

Страница 8: ...lation method may vary depending on the type of PC or operating system Contact your PC dealer or service center for installation information If errors occur continuously when you install the USB driver reconnect the USB cable after rebooting your system 1 Check the device manager Windows 98 ME Control Panel System Device Manager Windows 2000 XP Control Panel System Hardware Device Manager 2 Check ...

Страница 9: ...ete the installation N N N No o o ot t t te e e e You cannot use the player as a removable disc in Windows 98SE if the YP C1 program is not installed Make sure to install the USB driver file first 4 After selecting the driver click Update Driver 5 Click Next 6 Select Search for a suitable driver for my device and then click Next 7 Click Next to finish USB driver location CD ROM Win98USB Drivers ...

Страница 10: ...Remove Hardware message appears Press Stop N N N No o o ot t t ti i i ic c c ce e e e The WRITING READING message will appear on the player s display during file download or upload Disconnecting the USB cable while WRITING READING is displayed may cause malfunction of the player To use the player as removable backup storage for your PC simply drag and drop files to the Removable Disc icon in Windo...

Страница 11: ... previously preset menus will be reset and any pre existing song or data files will be erased Care must be taken as formatted files can not be recovered Formatting deletes all files on the MP3 player so maximum memory is available for new file storage It saves you the trouble of deleting unwanted files one at a time 1 Insert the Installation CD into CD ROM drive Select Install Samsung Media Studio...

Страница 12: ...onnect the player to PC A device connection window will appear on the right side of the screen Select Device Show device Window at the top of the screen if device connection window does not automatically appear 2 Select the folder with the file s you want to transfer from the Library window The music files within the folder appear in the center of the screen YP C1 contents window Library window ...

Страница 13: ...player to PC 2 Press the Device Format at the top of the screen 3 Press the Start button when the Format screen appears The memory of the player is formatted erased and all the saved files will be deleted I Formatting the Player in Media Studio N N N No o o ot t t te e e e Refer to the Help section of the software for more detailed information Formatting deletes all files on the MP3 player so maxi...

Страница 14: ...racks from an Audio CD N N N No o o ot t t te e e e Refer to the Help section of the software for more detailed information Change format Save path N N N No o o ot t t te e e e Refer to the Help section of the software for more detailed information 1 Connect the player to your computer 2 Press the Create Folder button at the bottom of device connection window 3 Enter the name of the new folder whe...

Страница 15: ...f the software for more detailed information Press F1 on your PC s keyboard after starting Media Studio Help will appear or Click on Help at the top of Media Studio Help window will appear N N N No o o ot t t te e e e Music recognition technology and related data are provided by Gracenote and Gracenote CDDB Music Recognition ServiceSM CDDB is a registered trademark of Gracenote The Gracenote logo ...

Страница 16: ...arrow When the button is pressed the HOLD message will appear on the display Make sure the earphones are connected I Playing Music Press the button Playback starts 1 Press and hold the REC button for two seconds and then release to start voice recording 2 Press the REC button again to stop the recording and save the voice file To move to other modes from the Voice mode refer to page 41 Changing Mo...

Страница 17: ...he order of L001 L002 and saved as MP3 files in LINE_ENC folder after recording N N N No o o ot t t te e e e Bit Rates can be set within the range of 32Kbps 128Kbps Volume can be adjusted while monitoring the recording N N N No o o ot t t ti i i ic c c ce e e e Do not disconnect the Line cable during recording If the battery is not sufficiently charged the player will not completely record the fil...

Страница 18: ...e that constantly changes the compression rate according to the type of sounds such as their pitch in the file When playing a VBR file you cannot move to and play the previous track even if you press within 5 seconds after playback starts Files that were downloaded in MP2 or MP1 and had their file extension changed to MP3 may not play 1 Press the REC button briefly during playback lB mark will be ...

Страница 19: ...een Press to select the number you want to assign to save the frequency and then press the A B button I Automatic Search for a Frequency Press and hold to search for and stop at frequencies with reception I Automatic Storage of a Frequency Number of channels saved I Searching Stored Frequencies I Deleting Stored Frequencies 1After moving to the PRESET number you want to delete press the A B button...

Страница 20: ...Recording 38 1 Press and hold the REC button during FM reception Recording of the currently transmitted FM broadcast begins 2 Press the REC button again A file is created and the recording stops Files are recording in the order F001 F002 F003 and saved as MP3 files in FM_ENC folder Loop Repeating While playing music files press the A B button briefly at the beginning of the loop you want to set A ...

Страница 21: ... N N No o o ot t t te e e e Press and hold the M button in Navigation mode to exit the Navigation mode 1 Press the M button to enter Navigation mode or press and hold the M button to move to Menu and then select Navigation in Menu 2 Select the file or folder that you want to play To exit a folder and go back one level To view the contents of a folder When moving to a file or folder in the same dir...

Страница 22: ...he button After folder play is released mark will appear and the selected file will be played Exiting Folder Play I Setting Playlist I Playing Playlist 1 Press and hold the A B button in music mode or select Playlist in Menu The playlist you set will be displayed 2 Move to the file you want to play and press the button mark appears and the selected file will be played Select a file while in Naviga...

Страница 23: ...vious menu use or select Return 1 Press and hold the M button Select Settings Play Mode 2 In Play mode use to move to the mode you want and press the M button to select Normal To play all the files in order one time Repeat One To repeat one file Repeat All To repeat all files Shuffle All To play files at random Intro To play the first few seconds of a music file refer to page 57 Return To move to ...

Страница 24: ...m 0 to 10 TruBass This is a bass boost feature that adds fullness to the sound Use to adjust TruBass from 0 to 10 Focus You can enjoy clearer tone from the High Middle and Low frequencies during playback Use to set Focus and then press the M button High Middle Low Optimum Optimize the SRS function according to the device connected to the earphone jack of the player Use to move to the connected dev...

Страница 25: ...ble level as the volume may increase in the SRS setting This unit supports sampling frequencies of 32KHz 44 1KHz or 48KHz Press and hold the M button Select Settings Display I Display Time Use to select the display time Play Time Current playback time is displayed Remain Time Remaining playback time of the current file is displayed Total Time Total playback time is displayed Use to select one of t...

Страница 26: ...hen the Bitrate is on it shows the bitrate of the file currently playing On Bit rate is displayed at the top of the screen Off The total number of tracks is displayed at the top of the screen I Backlight I Tag I Bitrate I Contrast Jog Use to set the Light On time from Off to 60 seconds When set to On the Light stays on continuously LCD Use to set the LCD Light Off time from Off to 60 seconds When ...

Страница 27: ...rtist album year genre and a comment field Supported languages can be changed or added N N N No o o ot t t te e e e For a VBR or Ogg file the search speed may not be uniform Press and hold the M button Select Settings System Use to select Resume On or Off On Playback will resume from the point it was previously stopped Off Playback will resume from the beginning of the file track that was playing ...

Страница 28: ... the FM Tuner Sensitivity the more frequencies it can receive High Middle Low Use to select Default Set Yes or No Yes All settings selected will be returned to the original factory settings No All settings selected will remain as they are Use to select Beep On or Off On Beep sounds whenever you press the button Off No beep sounds when you press the button I About If you select About you can check ...

Страница 29: ...ere is no sound and then it is saved as one file Press and hold the M button Select Settings Time Use to set the Power Off time from 0 to 3 minutes If no button is pressed after play stops the player will automatically turn off after the time you set When set to Off the function is disabled Use to set the Sleep time from 10 to 120 minutes The player will automatically turn off after the time you s...

Страница 30: ...ting the built in memory 1 Connect to http www samsung com select SUPPORT DOWNLOAD CENTER and then select your product 2 When the product page appears select Firmware below the model name to download the latest firmware 3 Uncompress the downloaded file in a folder 5 Double click YP C1 Updater icon on the Desktop 4 Run Setup exe and follow the instructions on the screen for installation If previous...

Страница 31: ...te all the data saved in YP C1 will be deleted Please backup your important data on your PC If you do not want your data to be deleted do not select Format data area 8 Confirm the version of the current firmware 9 Click the Close button 6 Connect the YP C1 to your PC N N N No o o ot t t te e e e If you experience any problems while upgrading firmware press and hold the Play button while connecting...

Страница 32: ...low the backlight will go out The buttons do not work Check setting of Hold switch Remove the battery once and then insert it again The player keeps being turned off In Stop mode the power is automatically turned off after ten seconds changes depending on settings Check to see if there are files saved in it Something s wrong with play time displayed during Play mode Check to see if a VBR file is p...

Страница 33: ...ertain third parties In particular this product is licensed under the following US patents 5 991 715 5 740 317 4 972 484 5 214 678 5 323 396 5 539 829 5 606 618 5 530 655 5 777 992 6 289 308 5 610 985 5 481 643 5 544 247 5 960 037 6 023 490 5 878 080 and under US Published Patent Application No 2001 44713 A1 This license is limited to private non commercial use by end user consumers for licensed c...

Страница 34: ...le protection against harmful interference in a residential installation This equipment generates uses and can radiate radio frquency energy and if not installed and used in accordance with the instructions may cause harmful interference to radio communications However there is no guarantee that interference will not occur in a particular installation FCC Any changes or modifications not expressly...

Страница 35: ...arried out by non Samsung Centers and warranty coverage will not be valid for any repairs or damage caused by such repairs 4 Repair or replacement under the terms of this warranty does not give right to extension to or a new starting of the period of warranty Repair or direct replacement under the terms of this warranty may be fulfilled with functionally equivalent service exchange units 5 The war...

Страница 36: ...BY SAMSUNG AND CAUSING THE ALLEGED DAMAGE WITHOUT LIMITING THE FOREGOING PURCHASER ASSUMES ALL RISK AND LIABILITY FOR LOSS DAMAGE OR INJURY TO PURCHASER AND PURCHASER S PROPERTY AND TO OTHERS AND THEIR PROPERTY ARISING OUT OF THE USE MISUSE OR INABILITY TO USE THIS PRODUCT SOLD BY SAMSUNG NOT CAUSED DIRECTLY BY THE NEGLIGENCE OF SAMSUNG THIS LIMITED WARRANTY SHALL NOT EXTEND TO ANYONE OTHER THAN T...

Отзывы: