Installation
English
24
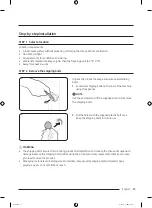
STEP 3
Adjust the leveling feet
1.
Gently slide the washer into position. Excessive force
may damage the leveling feet.
2.
Using a wrench, turn the leveling feet clockwise
or counterclockwise to adjust the height until the
washer is level.
3.
Using a flathead screwdriver, tighten the
locking
nuts (A)
.
NOTE
Use the open-end of the supplied wrench to adjust the
leveling feet.
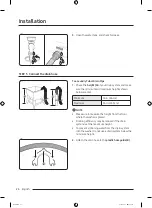
STEP 4
Connect the water hose
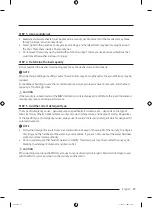
B
A
CAUTION
• Make sure to use new water hoses and that
rubber
gaskets (B)
are inside the
couplings (A)
at both ends
of the hoses. Water hoses without the gaskets may
leak.
• Allow 5 in. (127 mm) of space between the back of
the washer and the wall to prevent water hoses from
being kinked. Kinked hoses may cause water leaks.
• If there is a water leak, stop using the washer and
contact a local Samsung service center. A water leak
may cause electric shock.
• Do not stretch the water hoses by force. If a hose is
too short, replace the hose with a longer hose.
Untitled-4 24
2023-08-07 12:16:50
Содержание WF51CG8000AWA5
Страница 1: ...Washer Usermanual WF51CG80 A Untitled 4 1 2023 08 07 12 16 44...
Страница 65: ...Memo Untitled 4 65 2023 08 07 12 17 02...
Страница 66: ...Memo Untitled 4 66 2023 08 07 12 17 02...
Страница 67: ...Memo Untitled 4 67 2023 08 07 12 17 02...
Страница 68: ...Untitled 4 68 2023 08 07 12 17 02...
Страница 69: ...Lave linge Manueld utilisation WF51CG80 A Untitled 5 1 2023 08 07 12 19 26...
Страница 137: ...M mo Untitled 5 69 2023 08 07 12 19 44...
Страница 138: ...M mo Untitled 5 70 2023 08 07 12 19 44...
Страница 139: ...M mo Untitled 5 71 2023 08 07 12 19 44...
Страница 140: ...Untitled 5 72 2023 08 07 12 19 44...
Страница 141: ...Lavadora Manualdelusuario WF51CG80 A Untitled 6 1 2023 08 07 12 31 32...
Страница 207: ...Notas Untitled 6 67 2023 08 07 12 31 50...
Страница 208: ...Untitled 6 68 2023 08 07 12 31 51...


