background image

The User’s Manual is for common use.

Make use of the User’s Manual depending upon your washing machine model.

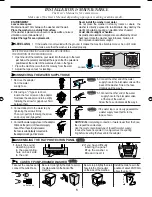
 INSTALLATION & MAINTENANCE

ENVIRONMENT
Leave some space 

Maintain at least 10cm between the washer and the wall.

Place the washer on a sturdy flat surface.

If the washer is placed on an uneven or weak surface, noise or 
vibration occurs. (Allowable is 1˚)

Adjust the legs for even placement.

Never install the washer near water.

Do not place the washer in steamy rooms or where  the 
washer is directly exposed to rain.Moisture may destroy the 
electrical insulation causing an electrical shock hazard.

Avoid direct sunlight or heaters.

As plastic and electrical components are affected by direct
heat,never place the washer near furnaces, boilers, etc. 
Do not place under direct sunlight.

•  

If the washer is not leveled with the ground, it makes the machine tremble more or be out of order. 

    So, make sure that the washer is leveled properly.

LEVELLING

SEE IF THE MACHINE IS PLACED LEVEL BY CHECKING 
THE POSITION OF THE WASHING TUB.

 Lock

 Loosen

•  

Open the lid of the machine, pour water into the tub up to the level  

     just below the pulsator, and adjust the legs so that the pulsator is 
     positioned at the center of the water as shown in the figure.

•  

Place the machine more than 10cm away from the wall.

•  

Adjust the legs on feet  for levelling .

1. Remove the adaptor
    from the water 
    supply hose.

2. First,using a "+" type scre driver, 
    loosen the four screws on the adaptor.   
    Next,take the adaptor and turn part(b) 
    following the arrow for gap about 5mm 
    between them.

3. Connect adaptor to the water tap by 
    tightening the screws firmly.
    Then, turn part (b) following the arrow 
    and put (a) and (b)together.

4. Connect the water supply hose to the adaptor.  
    Pull down the part (c) of the water supply 
    hose .When the part (c)is released,
    the hose is automatically connected to 
    the adaptor making a 'click' sound.

a

b

a

b

c

CONNECTING THE WATER SUPPLY HOSE

5. Connect the other end of the water 
    supply hose to the inlet water valve at the     
    back of the washer. Screw the hose 
    clockwise all the way in.

5-1.Connect the other end of the water 
       supply hose to the inlet water valve 
       at the top of the washer.  
   Screw the hose clockwise all the way in.


  If the water tap is a screw type,assemble 
   a water supply hose that fits to the 
   tap as shown.

NOTICE

 After completing connection, if water leaks from the hose,

then repeat the same steps.
Use the most conventional type of faucet for water supply. 
In case the faucet is square or too big,remove the spacing 
ring before inserting the faucet into the adaptor.

ASSEMBLING THE  RAT PROTECTION PANEL

1.

Insert the sound 

   absorbing panel
   to the assembling
   hole on back side 
   to the end.

2

.If you have difficulty 

   inserting the panel
   lift up the washer a
   little and insert it

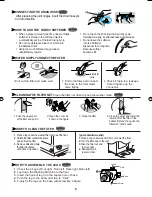
Install the drain hose in the 
position of about 90~100cm 
above the ground.

Be sure to join tightly the drain 
hose into the  drain-outlet 
on the side of the machine.

Be sure to join tightly the drain hose into
the drain-outlet on the back of the
machine.

Take out the cap-hose and 
connect the outlet-hose.

IN  CASE OF PUMP-DRAINED WASHER 

cap-hose

outlet-hose

70~80cm

  90~100cm

5

WA80N-BP5-02197A-GB-0616ÃÑ.indd   6

WA80N-BP5-02197A-GB-0616ÃÑ.indd   6

2005-06-17   ¿ÀÈÄ 1:44:06

2005-06-17   ¿ÀÈÄ 1:44:06

Содержание WA60N2

Страница 1: ...PTION OF PARTS 3 CONTROL PANEL 4 WASHING PROCEDURE 4 Digital Fuzzy course 4 Speedy course 4 Rinse 4 Spin 4 Rinse Spin 4 INSTALLATION MAINTENANCE 5 Environment 5 Levelling 5 Connecting the water supply hose 5 Assembling the rat protection panel 5 In case of pump drained washer 5 Connecting the drain hose 6 How to add the fabric softener 6 Water supply connector filter 6 Cleaning the filter net 6 Ho...

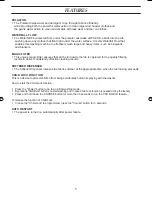
Страница 2: ...he tub is captured for top quality filtering results to deliver consistently effective cleaning results SOFTENER DISPENSER The Softener Dispenser releases the fabric softener at the appropriate time when the last rinsing proceeds CHILD LOCK FUNCTION This is a device to protect children from being accidentally hurt while playing with the washer How to start the Child Lock function Press the Power b...

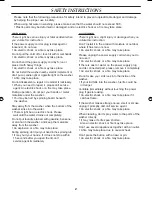
Страница 3: ...rvice agent immediately CAUTIONS There might be a slight injury or damage when you violate this instruction Don t install it in the area with moisture or outdoor where it has rain or snow An electric shock or a fire may take place Please unplug the power supply cord when you do not use it An electric shock or a fire may take place If there is dust or water on the power supply plug and its connecte...

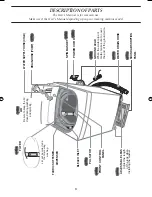
Страница 4: ...er s Manual is for common use Make use of the User s Manual depending upon your washing machine model GROUND LEAD When the water pipe is metal make sure to cover the end of the ground wire POWER CORD WATER DRAIN HOSE SOUND ABSORPTION PANEL SPIN BASKET ADJUSTABLE LEGS Adjust the length of the legs when installing the washer FRONT CONTROL PANEL BLEACH INLET PULSATOR FABRIC SOFTENER DISPENSER ...

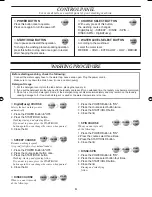
Страница 5: ...o pause press the START HOLD button again You can change the course when paused 4 Close the lid RINSE COURSE When you want rinse only do the followings 1 Press the POWER Button to ON 2 Press the course select button twice 3 Press the START HOLD button 4 Close the lid SPIN COURSE When you want spin only do the followings 1 Press the POWER Button to ON 2 Press the course select three times 3 Press t...

Страница 6: ...xt take the adaptor and turn part b following the arrow for gap about 5mm between them 3 Connect adaptor to the water tap by tightening the screws firmly Then turn part b following the arrow and put a and b together 4 Connectthewatersupplyhosetotheadaptor Pulldownthepart c ofthewatersupply hose Whenthepart c isreleased thehoseisautomaticallyconnectedto theadaptormakinga click sound a b a b c CONNE...

Страница 7: ... CLEANING THE FILTER NET Clean the filter net often to keep the washer clean 1 Push the upper part of the filter and pull in 2 Open the cover as shown in the figure 3 Clean the filter 4 Close the cover and insert the lower part of the filter in the basket first and then push the filter with click sound 1 Check the 4 Legs Front right Front left Rear right Rear left 2 Lay down the Washing Machine to...

Страница 8: ...d DISPLAY Spin LED Speedy LEDS On Water Level LEDS Blink Spinning does not work Is the laundry spread out evenly in the washer Is the washer set on a sturdy flat surface Water is overflowed Restart after spinning If the error sign still indicates call agency TROUBLESHOOTING IN CASE THE NEED FOR SERVICING ARISES If any problem occurs with your products do not hestitate to call any nearby Name addre...

Отзывы: