background image

29

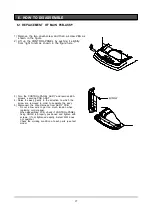
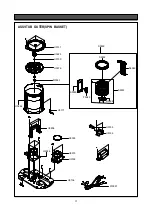
6-3 Replacement of CLUTCH ASS`Y

1) After removing CONTROL-PANEL
2) Remove COVER-SCREW 2EA(R

·

L) in CONTROL-PANEL

by using a pin and remove a SCREW 2EA(R

·

L) securing

CONTROL-PANEL by using a (+) driver and then remove
CONTROL-PANEL by pushing it slightly to left.

3) Remove screws (2EA in rear, 2EA in front) securing

TOP-COVER and remove SCREW securing EARTH
IRE and then lift TOP-COVER ASS`Y backward.

4) Remove 4 screws securing COVER-TUB and take

COVER-TUB out.

5) Remove PULSATOR-CAP by using a pin. After inserting

the (-) driver between the PULSATOR-CAP + PULSATOR,
disassemble by pushing it upward(

).

Fix in the groove of

and assemble by pushing

.

6) Remove a bolt securing the PULSATOR using 10mm box

and lift it up.

7) Remove a nut securing ASS`Y SPIN BASKET and CLUTCH

by using a ZIG box and take ASS`Y SPIN BASKET out.

8) Lay down the washing machine so that the front of

OUT-CASE faces upward and remove 4 bolts securing
SADDLE by using a 10mm box.

Be careful not to cause damage or scratch to the washing

machine when you lay it down to the floor.

9) Remove BOLT 4EA securing CLUTCH by using a 10mm box

and take CLUTCH-ASS`Y out. (Check the CLUTCH status as
shown in the figure here.)

Assembling is in reverse order as disassembling.

Points to check after replacing ASS`Y CLUTCH
1) Check if TOOTH is joined by 3.5mm

5.5mm, 2.0mm

4.5mm

depth to the blades of SLEEVE while the washing is in operation.
(with Drain Motor OFF)

If the joining depth is not deep enough, there may be a problem

during washing.

2) Check if TOUCH maintains at least 1.5mm distance from the edge

of SLEEVE during spinning. (with Drain Motor OFF)

NUT unlock : clockwise

NUT lock : counter-clockwise

3.5~5.5mm(ENGAGING DISTANCE) 

(The Condition During Washing)

OVER 1.0mm(ENGAGING DISTANCE) 

(The Condition During Spining)

SADDLE

SADDLE

CLUTCH

MOTOR

Содержание WA13R3Q3IW/YGG

Страница 1: ...GG WASHING MACHINE CONTENTS 1 PRECAUTIONS FOR SAFETY DURING SERVICING 2 TECHNICAL POINT 3 SCHEMATIC AND PCB DIAGRAM 4 HIGHLY IMPROVED STRUCTURE 5 TROUBLE DIAGNOSIS 6 HOW TO DISASSEMBLE 7 EXPLODED VIEW...

Страница 2: ...13 3 1 SCHEMATIC DIAGRAM 3 SCHEMATIC AND PCB DIAGRAM DC68 01913A...

Страница 3: ...14 3 2 PCB DIAGRAM This Document can not be used without Samsung s authorization...

Страница 4: ...ing PCB ASS Y 4 Raise the ass y gently to the direction to which the screw are removed in order to separate the ass y 5 Disconnect the Wire Harness from ASS Y PCB Do not allow wire to get too much ten...

Страница 5: ...ve SCREW TAP TH 3EA securing WATER VALVE of ASS Y DETERGENT located inside the TOP COVER and then remove ASS Y WATER VALVE Secure WATER VALVE after checking if CAP RING is not missing without CAP RING...

Страница 6: ...N BASKET out 8 Lay down the washing machine so that the front of OUT CASE faces upward and remove 4 bolts securing SADDLE by using a 10mm box Be careful not to cause damage or scratch to the washing m...

Страница 7: ...30 7 EXPLODED VIEW PARTS LIST ASSY COVER TOP P0051 P0018 C0082 A0098 P0008 W0002 P0120 P0053 R0051 P0011 P0038 P0075 W0004...

Страница 8: ...31 ASSY TUB OUTER SPIN BASKET U0131 U0225 U0100 U0076 M0053 U0262 U0258 X0003 U0196 U0195 S0050 F0045 R0009 S0035 S0049 S0032 U0075 U0136 W0001 H0028 U0199 U0177 S0030...

Страница 9: ...32 ASSY CASE OUTER J0013 A0086 F0062 U0061 A0057 I0022 F0113 B0014 B0012 B0044 B0023...

Страница 10: ...A LEG RUBBER BUTYL 10KG 12KG D29 BACK 2 H0028 SCA 10RF43 ASSY CLUTCH SCA 10RF43 SEM 10TH KWANGJU 1 I0022 DC97 00139C ASSY HOSE DRAIN O SW65ASP2 SW55APP2 PUM 1 J0013 DC90 11190B ASSY PUMP DRAIN SW65ASP...

Страница 11: ...0D ASSY PULSATOR WA12RAN3IS YFQ AG PP SAVO 1 WA13R3Q3IW U0076 DC97 06551D ASSY PULSATOR WA15R3Q3DW YL SAVOY BLU 1 WA15R3Q3IW U0100 DC60 40133A BOLT PULSATOR M8 L25 STS 304 1 U0131 DC61 10670E COVER TU...

Страница 12: ...PING TH 1 M4 L14 ZPC YEL 2 HINGE DOOR 6002 000630 SCREW TAPPING PH 2S M3 L8 ZPC YEL SWRCH18A 2 6002 001160 SCREW TAPPING TH 2 M5 L16 PASS STS430 4 COVER TUB 6002 001314 SCREW TAPPING HWH 2S M6 5 L20 Z...

Страница 13: ...ronics Co Ltd January 2005 Printed in Korea Code No DC68 02376A This Service Manual is a property of Samsung Electronics Co Ltd Any unauthorized use of Manual can be punished under applicable Internat...

Отзывы: