


VCR Setup
VCR Setup
8
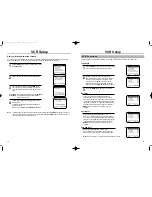
The VCR has an internal clock which is used to turn the VCR on and off for timer recording.
Automatically Setting the Clock
When the AUTO CLOCK SET feature is selected, the VCR automatically updates its internal clock using
Coordinated Universal Time information transmitted by some broadcast stations. If the VCR is connected to a
cable box or DSS
®
box, cable box or DSS
®
box setup must be completed first (see page 6) and it’s activated when
the cable box is tuned to the PBS channel.
1
Press M E N U on the remote control. Press
▼
and t o
select “CLOCK SET/ADJUST.”
2
Press
to select A U TO .
3
Clock Data CH : If you select A U TO, the VCR will
automatically tune to a channel providing time data.
This may take the VCR up to 5 minutes. You can also
tune the VCR manually to a channel that you know
carries time information (PBS channel) with the
buttons.
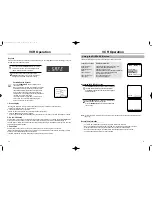
Time ZONE : If you select A U TO for your time zone,
the VCR sets the clock using the first Coordinated
Universal Time information it finds. If the time is not
correct, select another time zone.
Daylight Savings Ti m e : If you select A U TO, the VCR
sets the clock using the DSTinformation broadcast in
the signal (channel). If you select YES, Daylight
Savings Time is observed:
Spring : The clock changes forward one hour on the first Sunday in April.
Autumn : The clock changes back one hour on the last Sunday in October.
4
Press MENU when you finish setting the clock.
If you selected AUTO CLOCK, the VCR clock will be
set automatically when the VCR is turned OFF.
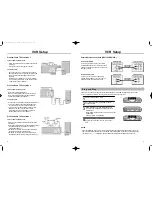
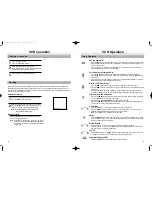
Your VCR has on-screen menus that allow you to access and control the VCR’s programmable features.
You will use the buttons on the remote control or on the front panel to work with the on-screen programming.
Each button works not only PLAY, STOP, F.F, REW but also as a shift cursor in the on screen menus.
: PLAY/Pause or
▲
cursor
: STO P or
▼
cursor : MENU ON or OFF
: REW or
cursor : F.F or
cursor
1
Press the MENU button on your remote control. The
Main Menu will appear on screen.
2
Select the item you want to adjust using the
▼
b u t t o n
followed by the
button on your remote control.
If you want to exit any on-screen menu, simply press the SEARCH/EXIT button on the remote control.
If the main menu does not appear, make sure the TV is tuned to the same channel as the CH3/4 switch on the
rear panel of the VCR, and check for the VCR indicator on the front display. If the VCR indicator does not light,
press the TV/VCR button on the remote control to turn it on.
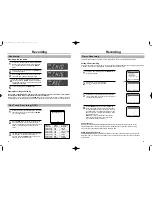
1
To select the language for the on-screen menu display,
press the M E N U button on the remote control.
2
Press
▼
on the remote control to select “Language.”
3
Press
to select the language you want for the on
screen menus (English, Spanish, French).
If AUTO CLOCK SET is unsuccessful, check local station listings for channels with Coordinated Universal Time.
Tune the VCR to one of these channels, and turn the VCR off. If the time does not set within 5 minutes, set the
time and date manually.
MAIN MENU
Timer recording
Clock set/adjust
Channel setup
VCR function setup
Language/Lengua/Langue
[
/ ]
[MENU/EXIT
]
MAIN MENU
Timer recording
Clock set/adjust
Channel setup
VCR function setup
Language/Lengua/Langue
[
/ ]
[MENU/EXIT
]
MAIN MENU
Timer recording
Clock set/adjust
Channel setup
VCR function setup
Language/Lengua/Langue
[
/ ]
[MENU/EXIT
]
MENU PRINCIPAL
Programmation
Réglage de l’horloge
Réglage des chaînes
Réglage des fonctions
Language/Lengua/Langue
[
/ ]
[MENU/EXIT
]
MAIN MENU
Timer recording
Clock set/adjust
Channel setup
VCR function setup
Language/Lengua/Langue
[
/ ]
[MENU/EXIT
]
CLOCK SET/ADJUST
AUTO
MANUAL
Select [
] and press [ ]
[
/ ]
[MENU/EXIT
]
CLOCK SET/ADJUST
Clock data CH: [AUTO]
Time zone : [AUTO]
Do you observe [AUTO]
DSTin summer?
[
/
]
[MENU/EXIT
]
Using Menus and the Remote Control
Selecting the On-Screen Language
Setting the Clock
9
01063A VR8170C/5170C-ENG 9/8/56 12:16 PM Page 8


