background image

16

17

1. Do not use mop tank assembly on the carpet.

2. It is recommended to fill in 80% water for the first time to ensure better

3. If it is not necessary to mop the floor, be sure to remove the water tank

and mop cloth assembly or pour out the water in the water tank.

4. It is not recommended to carry out wet-mopping operation with water

tank on wooden floor when unattended in order to avoid damage to the

wooden floor due to excessive water.

5. It is recommended to use pure water to avoid water quality problems

Caution

Then insert the water tank assembly into
the appliance.

5

Press ‘‘     ’’ and start mopping. 

6

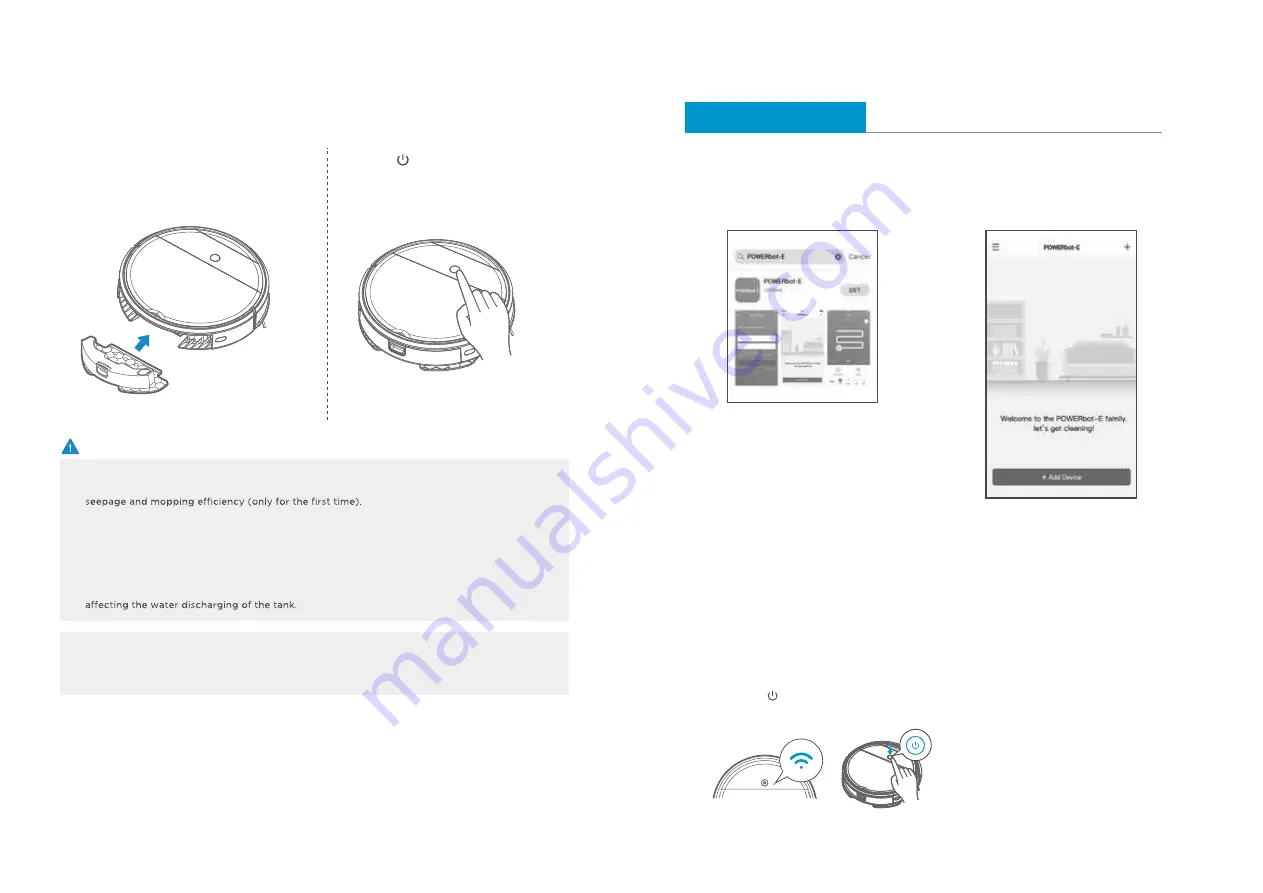
APP Guide Line (POWERbot-E)

App quick guide

Network access guide

Search “POWERbot-E” in APPLE App
Store or Google Play Store, and download 
the App. Follow the instructions on the 
interface to register and login App.

Click "+ Add Device" on the interface 
and operate as instructed.

Step 1

Step 2

When first using, slow flickering of WiFi indicator 
light indicates that the cleaner gets into the 
state of network accessing configuration, now 
click “Next Step” on App and conduct network 
accessing config operation as per the prompts 
on the interface.
Remarks: If WiFi indicator light doesn’t flicker, 
long press “     ”key for 3 seconds and release 
after a tick sound is heard.

Step 3

NOTE:
SmartThings is incompatible with tablets and some 
mobile devices.
– Android 6.0 or later (at least 2GB of RAM) is 
recommended.
iPad and some mobile devices may not be supported.
– iOS 10.0 or later / iPhone 6 or later is supported.
Visit Play Store or App Store to see if your mobile 
device is compatible with SmartThings.
The supported features are subject to change without 
any prior notice.

Remark
a. It will take 5~10 minutes until the dry mop is wetting.
    

 Wet the mop with water before using

b. The amount of water can be controlled in the POWERbot-E App

Содержание VR05R5050WK

Страница 1: ...INSTRUCTION MANUAL English VR05R50 Series Please keep this instruction manual carefully and read it before operating ...

Страница 2: ...wer ON OFF Clean Pause Mopping Operation APP Guide Line POWERbot E Product Maintenance Cleaning Cleaning of Dust Bin and Filter Cleaning of Water Tank Cleaning of Sensor and Wheel Cleaning of Charge Terminal Cleaning of BrushRoll Assembly Trouble Shooting 4 6 8 9 10 11 11 12 13 14 15 17 20 20 20 22 23 23 24 26 Open Source Announcement 27 Warnings about battery 28 Specifications 29 2 3 ...

Страница 3: ... may cause irritation or burns 18 Do not use a battery pack or appliance that is damaged or modified Damaged or modified 19 Do not expose a battery pack or appliance to fire or excessive temperature Exposure to fire or temperature above 130 C may cause explosion 20 Do not use and store in extremely hot or cold environments below4 C or above 40 C Please charge the robot in temperature above 4 C and...

Страница 4: ...Product Introduction 6 7 Instruction file Manual Mop attachment Filter Side brush X2 Pairs Docking station Mop X2 Remote control Auto Power cord Cleaning brush Appliance AAA Batteries ...

Страница 5: ...ocket 8 9 Brushroll cover Side brush Brushroll Wheel Universal wheel Battery cover Cover for water outlet Mop attachment Dust bin Docking station Water tank assembly Product Introduction Illustration of Appliance Introduction of Components Mop Mop attachment Water tank Water inlet Button ...

Страница 6: ...itch the power on after open the cover 2 Place the appliance on the docking station as shown in the pic 3 Remove it before using 1 5 M 1 5 M 1 5 M 1 5 M 1 Put the docking station well Place the docking station against a wall and remove all of obstructions around the docking stand as shown in the figure below 1 Do not use your robot on wet surfaces or surfaces with standing water Before using the pr...

Страница 7: ...ion increase Increasing the suction power Auto cleaning The robot will clean randomly 7 Suction decrease Decreasing the suction power 8 Direction Controlling the moving direction by forward left right key 2 3 Auto Power ON OFF Introduction of Remote Control 1 Power on Open the cover power on by turning the power switch to ON and then press the start button the indicator lights up 2 time the power ...

Страница 8: ... standby mode press the key to start zigzag cleaning Standby means that the power supply is on waiting for the user to operate and the appliance enters into the PAUSE by pressing the 1 Attach the mop to the mop attachment Press the button on tank and remove the tank 2 Fill the water 3 Mount the water tank onto the mop attachment 4 Mopping operation Caution a Do not input any chemical detergent and...

Страница 9: ...ogin App Click Add Device on the interface and operate as instructed Step 1 Step 2 When first using slow flickering of WiFi indicator light indicates that the cleaner gets into the state of network accessing configuration now click Next Step on App and conduct network accessing config operation as per the prompts on the interface Remarks If WiFi indicator light doesn t flicker long press key for 3 seco...

Страница 10: ...ng account before using the SmartThings app To set up a Samsung account you can follow the directions provided by the SmartThings app Or if you have a Samsung smartphone you can add your Samsung account in the setting app of your smartphone Then it will automatically sign in to your Samsung account Adding a device to the SmartThings APP Connect your smartphone to your wireless router If the smartp...

Страница 11: ...Maintenance Take out the dust bin Cleaning Cleaning of Dust Bin and Filter Open the cover by lifting the mark on the cover with fingers 1 2 Press a button to empty trash in the dust bin Take out the filter 3 4 Caution Clean the dust bin and filter by water Insert the filter into the dust bin 5 6 1 It is recommended to wash it when the filter is blocked If you want to buy the accessories please contact ...

Страница 12: ...water in the tank 3 Cleaning of Water Tank Wipe the water tank and leave it dry Sunlight exposure is not allowed 4 Wipe the sensor and the wheel gently with a cleaning tool or a soft cloth as shown in the figure below 1 Cleaning of Sensor and Wheel Clean the charging base and the charging terminal on the appliance with a cleaning tool or a soft cloth as shown in the figure below 1 Cleaning of Charge...

Страница 13: ...ve brushroll 2 Clean the brushroll bar and brushroll cover with a cleaning tool or a soft cloth brushroll can be washed with water 3 Cleaning of Brushroll Assembly After the brushroll is compeletly dry install it again as per the original disassembly and assembly sequence Caution ...

Страница 14: ...r rail to check for if there s foreign matter stuck Turn on the power switch of appliance Reset and make appointment The appliance gets stuck Not cleaned completely and robot goes to recharge No cleaning according to the preset time After the mop attachment installed the appliance is impermeable Appliance does not work Applian The appliance restart sometimes Keep hitting obstacles It try to clean ...

Страница 15: ...r or independent qualified professional FOR YOUR OWN SAFETY DO NOT ATTEMPT TO REMOVE THE BATTERY ON YOUR OWN OR DISPOSE OF IT IN FIRE DO NOT DISASSEMBLE CRUSH OR PUNCTURE THE BATTERY How to remove the battery Remove POWERbot from the charger docking station for disassembling You must turn off POWERbot for safety before disassembling 1 Lay down and invert POWERbot and then remove 2 screws 2 Remove t...

Отзывы: