background image

English

_74

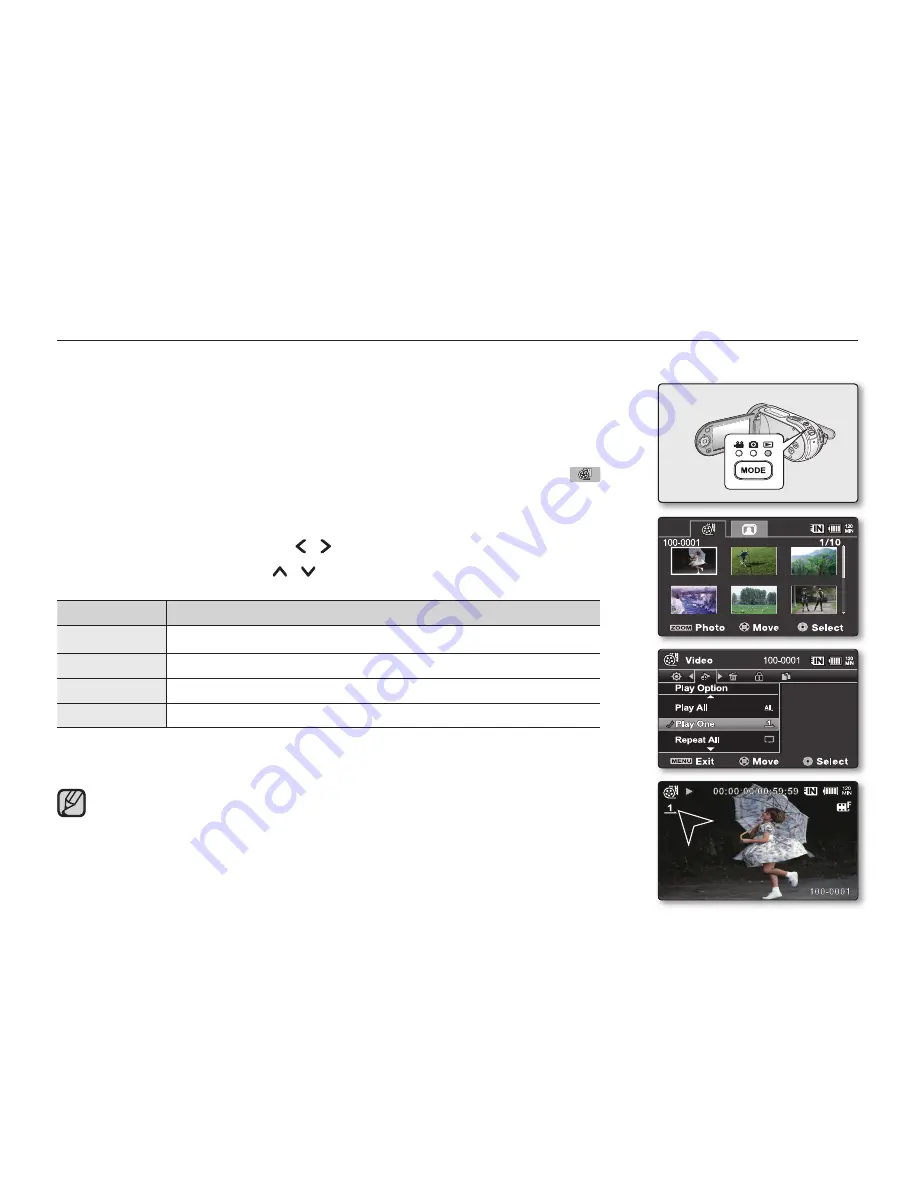
SETTING THE PLAY OPTION

You can play all movie images continuously or play the selected movie images only. 
You can also set the repeat option for all movie images.

1.

Slide the 

POWER

 switch downward to turn on the memory camcorder.

Set the appropriate storage media. 
(If images were recorded on a memory card, insert the memory card.)

2.

Press the 

MODE

 button. Use the 

Zoom

 lever to select Movie Play tab (        ). 

²

page 50

The thumbnail index screen appears on the LCD screen accordingly.

3.

Press the 

MENU

 button.

Press the 

Control

button (   /   ) to select 

"Play Option"

.

4.

Press the 

Control

button (   /   ) to select an option, and then press the 

OK

button.

item

contents

"Play All"

Plays back from the selected movie to the last movie.

"Play One"

The selected movie will be played.

"Repeat All"

All movies will be played repeatedly.

"Repeat One"

The selected movie will be played repeatedly.

5.

Press the 

MENU

 button to exit the menu.

During playback, the selected item is applied.

While the menu or thumbnail image screen is displayed, pressing the 

Recording start/stop 

button will move to the Movie Record mode.

In general, use of functions both in thumbnail display and full image 
display employs the same method, while their detailed options appear 
to be different.
This function works only Movie Play mode. Before selecting a menu item, 
set the mode to Movie Play first. 

²

page 50 


Содержание VP-MX25E

Страница 1: ...agine the possibilities Thank you for purchasing a Samsung product To receive a more complete service please register your product at www samsung com global register Memory Camcorder user manual VP MX25E ...

Страница 2: ...ly Functions User friendly EASY Q optimizes your memory camcorder to the recording conditions automatically which provides beginners with the best performance Twice the memory options The memory camcorder s external memory slot accepts both high capacity SDHC and MMCplus Play and transfer videos quickly and easily using the memory type of your choice In addition to this slot the memory camcorder h...

Страница 3: ...ansfer of movies or photos to a computer With the bundled software you can easily transfer and play back your own movies on your PC page 97 Swivel handle for free style shooting max 180 degree rotate No need to stand up and crouch to shoot your videos or photos This memory camcorder from Samsung has a new swivel handgrip You can adjust the swivel handle s angle up to 180 to suit the recording situ...

Страница 4: ... the camcorder These warning signs are here to prevent injury to you and others Please follow them explicitly After reading this section keep it in a safe place for future reference precautions Warning This camcorder should always be connected to an AC outlet with a protective grounding connection Batteries shall not be exposed to excessive heat such as sunshine fire or the like Caution Danger of e...

Страница 5: ...sponsible for your recorded video and audio Recorded contents may be lost due to an error when handling this memory camcorder or memory card etc Samsung shall not be held responsible for the loss of recorded contents and cannot compensate for any damages Make a backup of important recorded data Protect your important recorded data by copying the files to a PC It is recommended to copy it from your ...

Страница 6: ...e camcorder is at low temperature as in cold areas or right after the power is turned on Normal brightness will be restored when the temperature inside the camcorder rises Note that the foregoing phenomena have no effect on the image in a storage media so there is no cause for concern Hold the memory camcorder correctly Do not hold the memory camcorder by the LCD monitor when lifting it the LCD mo...

Страница 7: ...ent in picture and sound At worst the memory camcorder could malfunction Do not expose the memory camcorder to soot or steam Thick soot or steam could damage the memory camcorder case or cause malfunctions Do not use the memory camcorder near corrosive gas If the memory camcorder is used in a place where there is dense exhaust gas generated by gasoline or diesel engines or corrosive gas such as hy...

Страница 8: ...emarks of their respective companies Furthermore TM and R are not mentioned in each case in this manual Correct Disposal of This Product Waste Electrical Electronic Equipment Applicable in the European Union and other European countries with separate collection systems This marking shown on the product or its literature indicates that it should not be disposed with other household wastes at the en...

Страница 9: ...wer source 22 Basic operation of your memory camcorder 23 LCD screen indicators 30 Turning the screen indicators on off 31 Using the LCD enhancer 32 Adjusting the LCD screen 32 Using the MENU button 32 Using the Control buttons 34 Shortcut menu OK Guide 36 Initial setting Time Zone Date and Time OSD Language 39 Selecting the storage media 40 Inserting ejecting the memory card 41 Selecting the suit...

Страница 10: ... images 54 Viewing photo images 55 Changing the menu settings 57 Menu items 58 Using the recording menu items 58 iSCENE 59 White Balance 60 Exposure 61 Shutter 62 Focus 64 Anti Shake HDIS 65 Digital Effect 66 16 9 Wide 66 Resolution 67 Wind Cut 67 Voice Mute 68 Back Light 69 Interval REC 71 C Nite 71 Fader 72 Guideline 72 Digital Zoom RECORDING 46 PLAYBACK RECORDING OPTIONS 55 ...

Страница 11: ... Show 80 Changing the menu settings in Settings 81 Menu items 82 Using the settings menu items 82 Storage 82 Storage Info 83 Format 83 File No 84 Time Zone 86 Date Time Set 86 Date Format 86 Time Format 86 Date Time 87 LCD Brightness 87 LCD Colour 87 Beep Sound 88 Auto Power Off 88 TV Display 88 Default Set 89 Version 89 Menu Colour 89 Transparency 89 Language 89 Demo contents ...

Страница 12: ...rder to your PC 98 Uploading movie images in the memory camcorder to YouTube 99 Connecting to a TV 100 Viewing on TV screen 101 Recording dubbing images on a VCR or DVD HDD recorder 102 Maintenance 103 Additional information 105 Using your memory camcorder abroad 106 Troubleshooting 119 120 CONNECTING TO A PC 90 CONNECTING TO OTHER DEVICES MAINTENANCE ADDITIONAL INFORMATION TROUBLESHOOTING SPECIFI...

Страница 13: ...e or photo images pages 46 48 Step1 Preparation Step2 Recording Step3 Playing back Selecting an image to play back from the thumbnail index views using Control button page 51 Viewing playback from your memory camcorder on your PC or TV pages 94 97 99 101 This chapter introduces you to the basic features of your memory camcorder See the reference pages for more information 1 2 ...

Страница 14: ...Show4 allows easy upload of recorded movies to YouTube You can upload recorded movies to YouTube using the CyberLink MediaShow4 page 98 Step4 Connecting to a PC Step5 Easy Upload to YouTube This chapter introduces you to the basic features of your memory camcorder See the reference pages for more information You Tube BroadcastYourselfTM You Tube BroadcastYourselfTM ...

Страница 15: ...ow your memory camcorder The contents may vary depending on the sales region Parts and accessories are available at your local Samsung dealer To buy this one contact your nearest Samsung dealer A memory card is not included See page 40 for memory cards compatible with your camcorder You have to connect the AC power adaptor to the cradle when connecting external devices using the cradle Your camcor...

Страница 16: ...reen Internal microphone Built in speaker Lens button MENU button EASY Q button OK button LCD ENHANCER button Control button PHOTO button Recording start stop button Zoom lever W T 5 4 1 2 3 6 7 10 9 8 11 12 13 14 13 Be careful not to cover the internal microphone and lens during recording CAUTION ...

Страница 17: ...rt stop button MODE button Grip belt AV cable jack AV Swivel Hand grip USB jack Grip belt hook DC IN jack DC IN Cradle receptacle Jack cover Tripod receptacle Charging indicator CHG Memory card Battery slot cover 5 4 1 2 3 6 7 8 10 12 11 13 14 15 9 SDHC Usable Memory Cards 16GB Max MMCplus 10 11 13 14 12 15 9 8 4 3 2 1 5 7 6 ...

Страница 18: ...hat the memory camcorder is stable when you press the Recording start stop button with your thumb 1 Detach the belt 2 Adjust the length of grip belt 3 Attach the belt Angle Adjustment This memory camcorder has a new swivel handgrip Its handle turns along with the shooting angle You can now shoot videos or photos freely from high angles to low angles while standing Rotate the swivel hand grip at th...

Страница 19: ...such as TV PC etc to the cradle at your necessity If you connect your memory camcorder to the provided cradle using more than one type of output cable the order of output signal is as follows USB cable AV cable Do not connect the connection cables to memory camcorder and cradle at the same time it may cause conflict and may not work properly If this occurs remove all the connected cables and try th...

Страница 20: ...tery slot until it softly clicks Make sure that the SAMSUNG logo is facing up while the set is placed as shown in the diagram 3 Slide and close the battery slot cover Ejecting the battery pack 1 Slide and open the battery slot cover and push the battery lock Gently push the battery lock in the direction as shown in the diagram to eject the battery out 2 Pull the ejected battery out in the directio...

Страница 21: ...pack will still discharge if it is left attached to the memory camcorder It is recommended that you remove the battery pack from the memory camcorder Charging the battery pack in a low temperature circumstance may take longer time or fail to fully charge green indicator will not turn on Please make sure that there are no foreign substances in plug and socket when you connect AC power supply to the...

Страница 22: ...rs while the battery pack in charging the charging indicator blinks red preparation Charging indicator Charging state Power Charge On Mode Select Off Charging Fully Charged Error LED colour Blue Orange Green Red Flicker Auto Power Off Function To save battery power you can set the Auto Power Off function which turns off the memory camcorder if there is no operation for 5 minutes To disable this op...

Страница 23: ...e flickers The device will be forced to turn off after 5 seconds Low battery Battery Level Display The Battery Level Display shows the amount of battery power remaining in the battery pack Before using memory camcorder charge the battery Above figures are based on fully charged battery pack at a normal temperature Low ambient temperature may affect the use time 1 JAN 2008 12 00 15 1 10000 1 25 C N ...

Страница 24: ...om users and conditions We recommend using AC power adaptor when you are using the Interval REC Function Continuous Recording without zoom The continuous recording time of memory camcorder in the table shows the available recording time when the memory camcorder is in the recording mode without using any other function after recording started When actually recording the battery pack may discharge ...

Страница 25: ... not operating it To save battery power you can set the Auto Power Off function which turns off the memory camcorder if there is no operation for 5 minutes To disable this option change the setting of Auto Power Off to Off page 88 Do not allow metallic objects to come into contact with the terminals Make sure that the battery pack fits firmly into place Do not drop the battery pack Dropping the batt...

Страница 26: ...ed It may cause leakage heat generation induce overheating or fire Do not expose the battery pack to water The battery pack is not water resistant When fully discharged a battery pack damages the internal cells The battery pack may be prone to leakage when fully discharged Remove from charger or powered unit when not in use Even when the power is switched off the battery pack will still discharge i...

Страница 27: ... AC power adaptor Disconnect the AC power adaptor from the wall outlet immediately if any malfunction occurs while using your memory camcorder Do not use the AC power adaptor in a narrow space such as between a wall and furniture The rechargeable battery incorportabed in this product is not user replaceable For information on its replacement please contact your service provider CAUTION Correct dis...

Страница 28: ...rned on the self diagnosis function operates and a message may appear In this case refer to Warning indicators and messages on pages 106 108 and take corrective action Movie Record is set by default with the power on Setting the operating modes You can switch the operating mode in the following order each time you press the MODE button Movie Record mode Photo Record mode Play mode In Play mode sli...

Страница 29: ...ptical zoom Digital zoom Date Time Time Zone Digital Effect Manual Shutter Manual Exposure Manual Focus Face Detection White Balance iSCENE EASY Q Movie Record 1 2 3 4 6 7 8 9 10 11 12 13 14 15 16 17 The above screen is an example for explanation It is different from the actual display The OSD indicators are based on memory capacity of 2GB SDHC memory card Functions marked with won t be kept when ...

Страница 30: ... Bar Value Menu name Shortcut menu OK Guide Return Value adjust down Manual Exposure Value adjust up 1 2 3 4 5 Move Move Select Select Exit Exit MENU The illustration to the left shows the Manual Exposure screen Functions marked with won t be kept when the memory camcorder restarts Shortcut menu OK guide represents the most frequently accessed functions according to the selected mode Pressing the ...

Страница 31: ...o Remaining battery level time LCD Enhancer Back Light Zoom Optical zoom Date Time Time Zone Manual Exposure Manual Focus White Balance Photo record mode 1 2 3 4 6 7 8 9 10 11 12 1 5 The counter value is calculated from the remaining free space of the storage media which may not be updated after a recording if calculation remains the same ...

Страница 32: ... Menu name Shortcut menu OK Guide Return Value adjust down Manual Exposure Value adjust up 1 2 3 4 5 1 6 LCD SCREEN INDICATORS The illustration to the left shows the Manual Exposure screen Functions marked with won t be kept when the memory camcorder restarts Shortcut menu OK guide represents the most frequently accessed functions according to the selected mode Pressing the OK button will display ...

Страница 33: ...y level time Movie image resolution Protect LCD Enhancer File Name Date Time Play Option 1 2 3 4 5 6 7 8 9 10 11 Movie Play mode Thumbnail View Folder File Number Movie Play Tab Protect Copy Selected Storage media Built in memory or memory card Battery info Remaining battery level time Now Total file number Scroll bar Fader Error File Button Guide Web Mobile Delete Selected 1 2 3 4 5 6 7 8 9 10 11 ...

Страница 34: ...F fast forward page 53 Volume Down Play Status Play X Pause ZZ Move to previous file REW rewind page 53 Volume Up Movie Play mode Shortcut menu OK Guide 1 2 3 4 5 Date Time Volume Bar Movie Play mode Single Volume STBY 1 2 LCD SCREEN INDICATORS ...

Страница 35: ...rotect LCD Enhancer File name file number Date Time OK Guide Previous image OK Guide Next image Photo image resolution 1 2 3 4 5 6 7 8 9 10 Photo Play mode Thumbnail View Folder File Number Protect Photo Play Tab Storage media Built in memory or memory card Battery info Remaining battery level time Now Total file number Scroll bar Copy Selected Error File Button Guide Delete Selected 1 2 3 4 5 6 7 8...

Страница 36: ...tery capacity When the camcorder is turned on battery is installed press and hold the button for more than 2 3 seconds to display the remaining battery capacity The approximate recordable time in the selected storage and battery information appear for about 10 seconds Selected storage media is indicated in green and No Card appears if there is no memory card is inserted Pressing the button or any ...

Страница 37: ...n switch the LCD enhancer function in the following order each time you press the LCD ENHANCER button Release LCD enhancer 1level LCD enhancer 2level Release LCD enhancer 1level LCD enhancer is executed LCD enhancer 2level You can make a brighter screen than using just one level adjustment LCD enhancer function does not affect the quality of the image being recorded When LCD enhancer works at the ...

Страница 38: ...t operate in the EASY Q mode See page 87 to adjust brightness and colour of the LCD screen Over rotation may cause damage to the inside of the hinge that connects the LCD screen to the memory camcorder Do not lift the memory camcorder when holding the LCD screen WARNING preparation USING THE CONTROL BUTTONS Used for playback pausing fast forwarding and rewinding Also used as directional buttons up...

Страница 39: ...k Confirms selection UP Zoom wide lncreases the volume Moves the cursor up DOWN Zoom tele Decreases the volume Moves the cursor down LEFT Search playback RPS Reverse Playback Search rate x2ox4ox8ox16 Previous Skip Playback Previous image Moves to the previous menu RIGHT Search playback FPS Forward Playback Search rate x2ox4ox8ox16 Next Skip Playback Frame by frame playback Slow motion playback Slow...

Страница 40: ...o Exposure 3 Press the Control button once again will display the Manual Exposure shortcut menu screen with a manual control bar where you can adjust the value press the Control button 4 Press the OK button to confirm your selection Manual Exposure indicator will display on the screenUG Press the OK button to exit the shortcut menu Shortcut menu OK guide cannot be used in EASY Q mode Pressing the C...

Страница 41: ... Single image playback UP Exposure Auto Manual lncreases the volume DOWN Focus Auto Face Detection Manual Decreases the volume LEFT Shutter Auto Manual Search playback RPS Reverse Playback Search rate x2ox4ox8ox16 Previous Skip Playback Previous image RIGHT Voice Mute Off On Search playback FPS Forward Playback Search rate x2ox4ox8ox16 Next Skip Playback Frame by frame playback Slow motion playbac...

Страница 42: ...Slide POWER switch downward to turn on the camcorder When you turn on your camcorder for the first time the Time Zone screen appears based on Lisbon London You can also set the Time Zone Home from the Settings menu page 84 2 Select the your geographical area with Control button then press OK button The Date Time Set screen appears 3 Set the day with Control button then move it next with Control but...

Страница 43: ...he screen as 01 01 2008 00 00 when Date Time display is set to On After setting the date and time are automatically recorded on a special data area of the storage media Turning the date and time display on off To switch the date and time display on or off access the menu and change the Date Time mode page 86 Simple setting of the clock by time difference You can easily set the clock to the local t...

Страница 44: ...tton to select Language and then press the OK button 3 Press the Control button to select the desired OSD language and then press the OK button English 䚐ạ㛨 Français Deutsch Italiano Español Português 0GFGTNCPFU 5XGPUMC 5WQOK 0QTUM CPUM 2QNUMK êGīVKPC 5NQXGPUM CI CT Türkçe IsiZulu 4 Press the MENU button to exit the menu The OSD language is refreshed in the selected language Even if the battery pac...

Страница 45: ...o buy extra storage media So you can make recording playback more convenient Using a memory card not supplied This memory camcorder has multi card slot for access to SDHC Secure Digital High Capacity and MMCplus You can use SDHC and MMC plus card on your memory camcorder Some cards are not compatible depending on the memory card manufacturer and memory card type 1 Press the MENU button The menu li...

Страница 46: ...in memory or memory card using a PC If you insert a memory card when the memory camcorder is on the pop up message will prompt you automatically to select the storage type If there is no memory card inserted only the built in memory will be available Do not eject a memory card while it is being used in the camcorder The memory card and its data may be damaged Do not remove the power battery pack o...

Страница 47: ...ey may fail to record data correctly or they may lose data that has already been recorded For movie recording use a memory card that support faster write speed at least 2MB sec SDHC Secure Digital High Capacity Memory Card SDHC memory card complies with new SD specification Ver 2 00 This latest specification was established by SD Card Association to realize data capacity over 2GB The SDHC memory car...

Страница 48: ...sure to format your memory card using this camcorder You have to format newly purchased memory cards memory cards with data that your camcorder cannot recognise or are saved by other devices Note that formatting erases all data on the memory card If you cannot use a memory card that has been used with another device format it with your memory camcorder Note that formatting erases all information o...

Страница 49: ...a memory card that supports faster write speed If you are unavoidably using a low speed memory card resolution of the recording may be lower than the set value page 66 However the higher the resolution the more memory will be used You can have four resolution options to record a movie with the memory camcorder TV Super Fine TV Fine TV Normal Web Mobile For optimal performance of the memory camcord...

Страница 50: ...x576 50i approx 620min approx 38min approx 77min approx 155min approx 310min approx 620min Web Mobile 640x480 approx 920min approx 57min approx 115min approx 230min approx 460min approx 920min Recordable number of photo images Media built in memory Memory Card Capacity 16GB 1GB 2GB 4GB 8GB 16GB TV Super Fine 800x600 approx 31 000 approx 1 800 approx 3 600 approx 7 500 approx 15 000 approx 31 000 T...

Страница 51: ...ng on the memory card manufacturer and memory card type Proper operation is not guaranteed for those memory cards that are not formatted by this memory camcorder Perform the formatting directly on the memory camcorder for formatting To facilitate the movie recording it is recommended to use a memory card that supports faster write speed Write speed 2MB sec or higher If you use a low write speed me...

Страница 52: ...y and recording will start Pressing the Recording start stop button again during recording will set the memory camcorder to recording pause mode 4 When recording is finished turn the memory camcorder off For on screen information display page 23 Eject the battery pack when you have finished recording to prevent unnecessary battery power consumption For approximate recording time page 44 For various ...

Страница 53: ...tors disappear from the screen Almost all the settings will return to the settings that were set prior to activating the EASY Q mode Unavailable buttons during EASY Q operation The following button and menu operations are unavailable because the items are automatically set And the corresponding message Release the EASY Q may appear if unavailable operations are attempted MENU button OK button etc ...

Страница 54: ... you cannot proceed with the next recording 5 When taking photo images is finished turn the memory camcorder off The photo image is taken only in the 4 3 aspect ratio as shown in the illustration Audio will not be recorded with the photo image on the storage media If focusing is difficult use the manual focus function page 63 Do not operate the POWER switch or remove the memory card while accessing ...

Страница 55: ...und of the lever may be recorded as well You can also zoom with the Control W T button on the LCD panel The minimum possible distance between camcorder and subject while maintaining sharp focus is about 1cm about 0 39 inch for wide angle and 1m about 39 4 inch for telephoto The focus changes when zooming after focussing manually Focus automatically or seize the desired scene by zooming before focu...

Страница 56: ...view According to the previous record mode recordings will be stored in Movie images and Photo images thumbnail index view respectively When switching to the play mode after recording in Movie Record mode Movie images thumbnail index view appears When switching to the play mode after recording in Photo Record Photo images thumbnail index view appears In Play mode slide the Zoom lever to select the...

Страница 57: ...LCD screen page 87 3 Press the MODE button to set Play mode page 22 The thumbnail index screen appears on the LCD screen accordingly It may take some time to display the thumbnails 4 Use the Zoom lever to select Movie Play tab page 50 The thumbnail index view of movie images appears 5 Use the Control button to select the desired movie images and then press the OK button Shortcut menu for playback ...

Страница 58: ... connected to external devices volume adjustment should be done on the connected external device You can play back recorded movie files on a TV or a PC pages 94 99 You can upload recorded movie files to YouTube page 98 For various functions available during playback see playback options pages 73 79 Adjusting the volume You can hear the recorded sound from the built in speaker You can control the vol...

Страница 59: ...the Control button repeatedly skips files in forward direction During playback press the Control button to locate the start point of the current file pressing the Control button repeatedly skips files in reverse direction Press the Control button within 3 seconds from the start point it skips to the first image of the previous file Frame by frame playback ZZX While playback is paused press the Control ...

Страница 60: ...age 87 3 Press the MODE button to set Play mode page 22 The thumbnail index screen appears on the LCD screen accordingly It may take some time to display the thumbnails 4 Use the Zoom lever to select Photo Play tab page 50 The thumbnail index view of photo images appears 5 Use the Control button to select the desired photo images and then press the OK button Shortcut menu for playback will be disp...

Страница 61: ... MENU button The menu screen appears 4 Select the desired sub menu and menu item with the Control buttons and the OK button To return to the normal screen press MENU button Depending on the mode selected some menu items may not be available to select and change You can also access the shortcut menu using the OK button page 35 Button Tips a MENU button Use it to enter or exit the menu b Control but...

Страница 62: ...ite Balance 5 Select the desired sub menu item with the Control button and then press the OK button 6 Press MENU button to exit the menu The selected item is applied and the indicator is displayed But in case of some item just like Auto the item indicator may not displayed on the screen iSCENE White Balance Exposure Shutter Focus etc You can also change the menu setting using the shortcut menu rep...

Страница 63: ...Page iSCENE O Auto 58 White Balance O O Auto 59 Exposure O O Auto 60 Shutter O Auto 61 Focus O O Auto 62 Anti Shake HDIS O Off 64 Digital Effect O Off 65 16 9 Wide O On 66 Resolution O TV Fine 66 Wind Cut O Off 67 Voice Mute O Off 67 Back Light O O Off 68 Interval REC O Off 69 C Nite O Off 71 Fader O Off 71 Guideline O O Off 72 Digital Zoom O Off 72 Settings O O 80 recording options O Possible Not...

Страница 64: ...face etc when strong light strikes the subject as in a wedding or on stage Beach When recording seaside of lakeside scenes the blue of the water is clearly recorded Snow When recording snowy scenes of other places where the whole screen appears white use this mode to prevent sunken colours and record clear images High Speed For recording fast moving subjects such as golfers or tennis matches Food ...

Страница 65: ...ng Tungsten Adjusts for places under incandescent lamp or under bright lighting such as in a photo studio Custom WB Adjusts White Balance manually to match the light source or situation recording options Setting the white balance manually 1 Select Custom WB The indicator and the message Set White Balance are displayed 2 Frame a white object such as a piece of paper so that it fills the screen Use a...

Страница 66: ...mental light conditions None Manual You can adjust the brightness of an image manually Adjust the brightness when the subject is too bright or too dark Setting the exposure manually When manually setting the exposure the default setting appears as the value is automatically adjusted according to the environmental light conditions Press the Control button to adjust the exposure while viewing the im...

Страница 67: ...ton to adjust the shutter speed The manual shutter setting will be applied and indicator is displayed Recommended shutter speed when recording Shutter speed conditions 1 50 The shutter speed is fixed at 1 50 second Black bands that usually appear when shooting a TV screen become narrower 1 120 The shutter speed is fixed at 1 120 second Indoor sports such as basketball The flickering that occurs when ...

Страница 68: ...lues automatically Face Detection may not operate depending on the recording conditions For example the Face Detection Frame may appear when framing a face like shape even when the subject is not a person s face If this occurs turn off the Face Detection feature The Face Detection feature will not work when framing the side of a person s face You must facing them head on Face Detection will not wo...

Страница 69: ...focus The manual focus setting will be applied and indicator is displayed Further subject Nearer subject Manual focus is recommended in the following situations A picture containing several objects some close to the memory camcorder others further away A person enveloped in fog or surrounded by snow Very shiny or glossy surfaces like a car People or objects moving constantly or quickly like an ath...

Страница 70: ...S to On while using EASY Q When Anti Shake HDIS On is specified there will be a slight difference between the actual movement and the movement on screen Large camcorder shake may not be entirely corrected even if Anti Shake HDIS On is specified Firmly hold the memory camcorder with both hands It is recommended that you specify Anti Shake HDIS Off when using the memory camcorder on a desk or tripod W...

Страница 71: ...This mode creates a 3D effect embossing Mosaic A mosaic overlay appears on an image Mirror This mode cuts the image in half and make mirrored image on the other half Pastel This mode applies a pale pastel drawing effect to an image Cosmetic This mode helps adjust for facial imperfections Stepprinting Technique of recording the image in segments recording options Digital Effect modes are not availa...

Страница 72: ...olution of a movie to be recorded This memory camcorder can record in the TV Super Fine TV Fine TV Normal and Web Mobile modes The TV Fine mode is set as the factory default item contents on screen display TV Super Fine Movie images recorded in the 720x576 50i resolution at super fine image quality TV Fine Movie images recorded in the 720x576 50i resolution at fine image quality TV Normal Movie imag...

Страница 73: ...hen you want the microphone to be sensitive as possible The Wind Cut function works only with the built in microphone The Wind Cut function can not use while EASY Q is in use This function works only Movie Record mode Before selecting a menu item set the mode to Movie Record first page 22 Voice Mute The Voice Mute function is used if you want to block the incoming external sound and make a mute rec...

Страница 74: ...y Back lighting influences recording when the subject is darker than the background The subject is in front of a window The subject is against a snowy background The subject is outdoors and the background is overcast The light sources are too bright The person to be recorded is wearing white or shiny clothes and is placed against a bright background The person s face is too dark to distinguish his ...

Страница 75: ...s the Control button to select On then press the OK button The recording interval and total time for recording items are highlighted Sec seconds Hr hours 4 Set a desired recording interval Sec with Control button 5 Move it next with Control button and set a desired total recording time Hr in the same way 6 Press the OK button to finish the setting and press the MENU button to exit the menu 7 After ...

Страница 76: ...al defines how long the interval recording should be taken For example if you set the interval to 30 Sec interval recording should be taken for at least 15 minutes to record minimum movie length of 1 second 25 images Once the interval recording finishes recording for its total recording time it switches to the standby mode Press the Recording start stop button if you want to stop the Interval record...

Страница 77: ...d recording stops as the image and sound are faded out recording options This function works only Movie Record mode Before selecting a menu item set the mode to Movie Record first page 22 C Nite You can take a shot of an object in slow motion by controlling the shutter speed or a brighter image in dark places without compromising colours item contents on screen display Off Disables the function Non...

Страница 78: ...Guideline cannot be recorded on the images being recorded Digital Zoom You can select the maximum zoom level in case you want to zoom to a level greater than 34x the default setting during recording Up to 34x zoom is performed optically and after that up to 1200X zoom is performed digitally Note that the image quality decrease when you use the digital zoom item contents on screen display Off Only ...

Страница 79: ...tion and button operation See pages 73 80 for details on menu items during playback Playback menu items Items on screen display Movie Play Photo Play Default value Page Play Option O Play All 74 Slide Show O 79 Delete O O 75 Protect O O 76 Copy O O 77 File Info O O 78 Settings O O 80 playback options O Possible Not possible ...

Страница 80: ...ontrol button to select an option and then press the OK button item contents Play All Plays back from the selected movie to the last movie Play One The selected movie will be played Repeat All All movies will be played repeatedly Repeat One The selected movie will be played repeatedly 5 Press the MENU button to exit the menu During playback the selected item is applied While the menu or thumbnail ...

Страница 81: ... MENU button to delete The indicator is displayed on the selected movie or photo images Pressing the OK button toggles the selection and release All Files Deletes all movie or photo images 6 The pop up selection menu will appear depending on the selected menu item In this case select the desired item with the Control buttons and the OK button Accordingly the deleted images also disappear in thumbn...

Страница 82: ... Files Protects selected movie or photo images from delection To protect individual movie or photo images select desired movie or photo images by pressing the OK button And then press the MENU button to confirm The indicator is displayed on the selected movie or photo images Pressing the OK button toggles the selection and release All On Protects all movie or photo images All Off Cancels the protec...

Страница 83: ...em contents This File Copies the selected movie or photo images This function is available only in the full image display mode Select Files Copies the individual movie or photo images To copy individual movie or photo images select desired movie or photo images by pressing the OK button The indicator is displayed on the selected movie or photo images And then press the MENU button to confirm Pressi...

Страница 84: ... is available only in the full image display mode The illustration to the shows the Movie Play mode Before selecting a menu item set the mode Movie Play Photo Play first If free space available on the storage is insufficient copying may not be possible Delete unnecessary images page 75 Copied movie or photo images have no protection even if the original is set to be protected Copying may take a whil...

Страница 85: ... memory card insert the memory card 2 Open the LCD screen Adjust brightness or colour of the LCD screen page 87 3 Press the MODE button Use the Zoom lever to select the Photo Play tab page 50 The thumbnail index screen appears on the LCD screen accordingly 4 Press the MENU button 5 Press the Control button to select Slide Show and then press the OK button The indicator is displayed The Slide Show ...

Страница 86: ...ode selected not all items will be selectable to be changed If there is no storage media inserted it can not be selected and will be dimmed on the menu Storage Storage Info Format etc Button Tips a MENU button Use it to enter or exit the menu b Control button Use it to move up down left right c OK button Use it to select or confirm the menu The pop up selection menu will appear depending on the sel...

Страница 87: ...4 Date Time Set O O 01 01 2008 00 00 86 Date Format O O DD MM YY 86 Time Format O O 24Hr 86 Date Time O O Off 86 LCD Brightness O 0 87 LCD Colour O 87 Beep Sound O O On 87 Auto Power Off O O 5 Min 88 TV Display O On 88 Default Set O O 88 Version O O 89 Menu Colour O O Blue 89 Transparency O 0 89 Language O O English 89 Demo O O Off 89 These Items and Default values may be changed without notice Th...

Страница 88: ...rted it can not be selected and will be dimmed on the menu settings options Storage You can record movie or photo images on the built in memory or a memory card so you should select the desired storage media before starting recording or playback settings contents on screen display Memory Select the built in memory for storage medium So you can record or play back images on the built in memory Card...

Страница 89: ...er formatting or after deleting all files The file number is reset when a new folder is created Reset Resets the file number to 0001 even after formatting deleting all files or inserting a new memory card When you set File No to Series each file is assigned with a different number so as to avoid duplicating file names It is convenient when you want to manage your files on a PC Do not remove the recording...

Страница 90: ...difference between the two locations Setting the clock to the local time Visit You can easily set the clock to the local time zone when traveling 1 Press the Control button to select the Time Zone in Settings mode and then press the OK button Time Zone screen will be displayed 2 Select Visit with the Control button and then select your local area using the Control button You can check the time dif...

Страница 91: ...oa Midway Abu Dhabi Muscat Honolulu Hawaii Tahiti Kabul Alaska Tashkent Karachi LA San Francisco Vancouver Seattle Calcutta New Delhi Denver Phoenix Salt Lake City Almaty Kathmandu Chicago Dallas Houston Mexico City Dacca New York Miami Washington D C Montreal Atlanta Yangon Caracas Santiago Bangkok Buenos Aires Brasilia Sao Paulo Hong Kong Beijing Taipei Singapore Manila Fernando de Noronha Seoul...

Страница 92: ...ime is displayed as the unit of 12 hours 24 Hr The time is displayed as the unit of 24 hours Date Time You can set to display date and time on the LCD monitor Before you use the Date Time function you must set the Date Time Set page 36 settings contents on screen display Off The date and time are not displayed None Date The date is displayed 01 01 2008 Time The time is displayed 00 00 Date Time Th...

Страница 93: ...n with a variety of colour options by adjusting the colour rate of red and blue When you set red and blue colour range the higher the figures the brighter the LCD monitor will be You can adjust the LCD colour red blue from 15 to 15 using the Control button Beep Sound You can set the beep sound to on off If there is a beep sound when operate the menu settings the setting is turned on settings conten...

Страница 94: ...g situations When a USB cable is connected When the memory camcorder is connected to the AC adaptor And it cannot be selected and will be dimmed on the menu TV Display You can select the output path of the OSD On Screen Display settings contents on screen display Off The OSD appears in the LCD screen only On The OSD appears in the LCD screen and TV Connecting to a TV page 99 Default Set You can in...

Страница 95: ... Right after Demo is set to On With Auto Power Off set to Off if there is no operation for about 5 minutes in the STBY mode Demonstration stops temporarily by pressing other buttons MENU Control button Recording start stop etc When the Auto Power Off function is set to 5 Min the Auto Power Off function works with priority rather than Demo function If you execute Demo function release the Auto Powe...

Страница 96: ...High speed USB on a system with Service Pack 1 or later installed Cyberlink MediaShow4 System Requirements The following requirements must be satisfied to use CyberLink MediaShow4 CPU Intel Pentium 4 at least 3 0 GHz AMD recommended OS Operating System Windows Vista or XP Windows XP Service Pack 2 Standard installation is recommended Operation may not assured if the above OS has been upgraded RAM 5...

Страница 97: ... a trademark of the Intel Corporation Windows is a registered trademark of the Microsoft Corporation All other brands and names are property of their respective owners CyberLink MediaShow4 is optimised for Intel Core 2 Duo processors and CPUs with MMX SSE SSE2 3DNow and Intel HyperThreading technology DirectX is necessary so that CyberLink MediaShow4 works properly and it is automatically installe...

Страница 98: ...es This manual only refers to software installation and PC connection For more details on software refer to the Online help Readme on the CyberLink MediaShow4 CD Before you begin Quit any other software you are using Check that there are no other application icons on the status bar 1 Load the provided CyberLink MediaShow4 CD ROM into the PC The setup screen appears several seconds If the setup scr...

Страница 99: ...ick Finish The icon of CyberLink MediaShow4 is created on the desktop If you perform installation of software that is already installed uninstallation will start In this case perform the installation again after uninstallation is finished This manual only refers to software installation and PC connection For more details on software refer to the Online help Read me on the CyberLink MediaShow4 CD 5 ...

Страница 100: ... loading or unloading recording mediums or turning off the PC first disconnect the USB cable and turn off the memory camcorder After completing the data transmission you must disconnect the cable in the following way 1 Click the Unplug or eject hardware icon on the task tray 2 Select USB Mass Storage Device or USB Disk and then click Stop 3 Click OK 4 Disconnect the USB cable from the memory camcor...

Страница 101: ...the My Computer icon on the desktop The Removable Disk icon which represents the storage media in the memory camcorder appears in the My Computer window b Doubleclick the Removable Disk icon 3 The folders in the storage media appear Different file types are stored in different folders If the Removable Disk window does not appear confirm the connection page 94 or perform the steps 1 and 2 When the re...

Страница 102: ... If you modify it this memory camcorder may not recognise modified files You can use your memory camcorder as a mass storage device So you can store general data in the storage media of the memory camcorder The photo image is taken only in the 4 3 aspect ratio Movie Images H 264 y The SD quality movie images are named as SDV_ MP4 and Web movie images are named as WEB_ MP4 The file number automaticall...

Страница 103: ...s in the storage media appear 2 Create a new folder enter the folder name and then double click it 3 Select the folder to copy and then drag and drop it into the destination folder The folder is copied from the storage media memory card or built in memory to the PC Do not move or rename the camcorder s folders and files after transferring them If you change the basic name of folders and files your m...

Страница 104: ...1 Connect the memory camcorder to the PC with a USB cable page 94 2 Install CyberLink MediaShow4 provided and when done enter Video mode pages 92 93 Running the CyberLink MediaShow4 for the first time may display registration screen 3 Click Import in the main screen Open a folder from the left removable disk and select files of your choice 4 Then click Import all or Import selected to start importin...

Страница 105: ...ble with the single plug to the AV jack of the memory camcorder 2 Connect the other end with video yellow and left white right red audio cables to the TV For more information about the connection refer to your TV s user manual Before connecting make sure that the volume on TV is turned down forgetting this may cause howling from the TV speakers Carefully connect the input and output cables to the ...

Страница 106: ... memory camcorder is recording will appear on the TV screen You can also display only part of information or switch off the display Refer to TURNING THE SCREEN INDICATORS ON OFF on page 30 and press the button to switch the display status When TV Display is set to Off OSD On Screen Display does not appear on the TV screen page 88 Howling may occur when the memory camcorder is too close to the othe...

Страница 107: ... thumbnail view and then press the OK button 3 Press the record button on the connected device The memory camcorder will start playback and the recording device will record dub it Be sure to use the AC adaptor to power the memory camcorder from household AC outlet to prevent battery power from shutting off during recording on another video device To prevent recording OSD information displayed alon...

Страница 108: ... the humidity is high or in a dusty place Dust entering the memory camcorder could cause malfunctions If humidity is high the lens could become mouldy and the memory camcorder could become inoperative It is recommended that you put the memory camcorder in a box together with a desiccant when storing it in a closet etc Do not store the memory camcorder in a place subject to strong magnetism or inte...

Страница 109: ...ssing the storage media Do not bring the storage media near objects that have a strong magnetic field or that emit strong electromagnetic waves Do not store the storage media in locations with high temperature or high humidity Do not touch the metal parts Copy the recorded files to your PC Samsung shall not be responsible for any lost data It is recommended that you copy the data from your PC to oth...

Страница 110: ...temperatures can prevent complete charging Store in a cool dry place Extended exposure to high temperatures will increase natural discharge and shorten service life Fully charge the battery pack at least every 6 months when storing the battery pack over a long period of time Remove the battery pack and charger from the camcorder when not in use as the camcorder will use current even when switched ...

Страница 111: ...ach country or region has its own electric and colour systems Before using your memory camcorder abroad check the following items Power sources The provided AC adaptor features automatic voltage selection in the AC range from 100 V to 240 V You can use your camcorder in any countries regions using the AC power adaptor supplied with your camcorder within the AC 100 V to 240 V 50 60 Hz range Use a c...

Страница 112: ...is automatically turned off To disable this option change the setting of Auto Power Off to Off page 88 Storage media Message Icon Informs that Action Memory Full There is not enough space to record on built in memory Delete unnecessary files on the built in memory Use a memory card Back up files to your PC or another storage media and delete files Insert Card There is no memory card inserted in the c...

Страница 113: ...Format storage media using menu item after backup important files to PC or another storage device Set File No to Reset Message Icon Informs that Action Card Error The memory card has some problem and can not be recognised Format the memory card or replace it with a new one Card Locked The write protection tab on an SDHC card has been set to lock Release write protection tab Not Supported Card The m...

Страница 114: ...o the memory camcorder when using the device with the power on while there is condensation What can I do Turn the power off and detach the battery pack and leave it in a dry area for 1 2 hours before using it When does the condensation occur When the device is relocated to a place with a higher temperature than the previous location or when using it in a hot area suddenly it will cause condensatio...

Страница 115: ... to the wall outlet The power automatically turns off Is Auto Power Off set to 5 Min If no button is pressed for about 5 minutes the memory camcorder is automatically turned off Auto Power Off To disable this option change the setting of Auto Power Off to Off page 88 The battery pack is almost discharged Charge the battery pack or replace it with a charged one Use the AC Power adaptor Power cannot...

Страница 116: ...t want to see Demo image change the setting of Demo to Off page 89 Unknown indicator appears on the screen A warning indicator or message appears on the screen pages 106 108 The after image remains on the LCD screen This occurs if you disconnect the AC power adaptor or remove the battery pack before turning the power off The image on the LCD screen looks dark Ambient is too bright Adjust the brigh...

Страница 117: ...y card Release the lock on the write protect tab of the memory card SDHC memory card etc if any page 41 Copy any important recorded files to your PC before formatting Samsung shall not be responsible for any loss of data It is recommended that you copy the data to your PC or other storage media The data file name is not indicated correctly The file may be corrupted The file format is not supported by ...

Страница 118: ...on contents and features used Recording a fast moving subject increases the bit rate and consequently the amount of storage space required for the recording which can lead to a shorter available recording time The recording stops automatically There is no more free space for recording on the storage media Back up important files on your PC and format the storage media or delete the unnecessary files...

Страница 119: ...n and the point where the recorded movie starts stops On your camcorder there may be a slight time delay between the point when you press Recording start stop button and the actual point where the recorded movie starts stops This is not an error The recording stops The internal temperature of your camcorder is unusually high Turn off your camcorder and leave it for a while in a cool place Your cam...

Страница 120: ... focus Recording is being made in a dark place Light up to brighten the place The image appears too bright or flickering or changes in colour This occurs when recording images under a fluorescent lamp sodium lamp or mercury lamp Cancel iSCENE to minimize this phenomena page 58 Colour balance of image is not natural White balance adjustment is required Set proper White Balance page 59 The backlight f...

Страница 121: ...es recorded using other device may not be played on your memory camcorder Check out the memory card compatibility page 41 The Skip or Search function does not work properly If the temperature inside the camcorder is too high it can not function properly Turn the camcorder off wait for a few moments and turn it on again Playback is interrupted unexpectedly Check the AC adaptor or battery pack is pr...

Страница 122: ...uter you can also transfer data by connecting the USB cable but the provided CyberLink MediaShow4 is not Macintosh compliant On a Macintosh computer you can upload recordings using the iMovie application This memory camcorder can be used only as a removable storage device for the computers with Macintosh OS version 10 3 or later and Windows 2000 CyberLink MediaShow4 does not function properly Exit...

Страница 123: ...essing any button Remove the battery pack or unplug AC power adaptor and connect the power supply to the camcorder again before turning it on Connecting Dubbing with other devices TV DVD recorder etc Symptom Explanation Solution You cannot dub correctly using the AV cable The AV cable is not connected properly Make sure that the AV cable is connected to the proper jack i e to the input jack of the...

Страница 124: ...sired functions do not set the following items first Menu Cannot Use Because of the following setting C Nite Digital Zoom Digital Effect Mirror Digital Effect Mosaic Digital Effect Stepprinting Anti Shake HDIS Digital Zoom Exposure Manual Shutter Manual Focus Face Detection Back Light iSCENE Manual Digital Effect Mirror Digital Effect Mosaic Digital Effect Stepprinting C Nite C Nite Focus Face Dete...

Страница 125: ... 1 6 interlaced scan LCD panel TFT active matrix system Connectors Composite video out 1 0V p_p 75Ω analog Audio output 7 5dBm 47KΩ analog stereo USB output mini USB B type USB2 0 High Speed General Power source 8 4V Using AC adaptor 7 4V Using Lithium Ion battery pack Power source type Power supply 100V 240V 50 60Hz Lithium Ion battery pack Power consumption 2 0W LCD on Operating temperature 0 40...

Страница 126: ...r consult your dealer for assistance However if there is no alternative to cutting off the plug remove the fuse and then safely dispose of the plug Do NOT connect the plug to a mains socket as there is a risk of shock hazard from the bared flexible cord IMPORTANT The wires in the mains lead are coloured in accordance with the following code BLUE NEUTRAL BROWN LIVE As these colours may not correspon...

Страница 127: ... can get it if you want it that you can change the software or use pieces of it in new free programs and that you know you can do these things To protect your rights we need to make restrictions that forbid anyone to deny you these rights or to ask you to surrender the rights These restrictions translate to certain responsibilities for you if you distribute copies of the software or if you modify ...

Страница 128: ...d the date of any change b You must cause any work that you distribute or publish that in whole or in part contains or is derived from the Program or any part thereof to be licensed as a whole at no charge to all third parties under the terms of this License c If the modifi ed program normally reads commands interactively when run you must cause it when started running for such interactive use in t...

Страница 129: ...cense will not have their licenses terminated so long as such parties remain in full compliance 5 You are not required to accept this License since you have not signed it However nothing else grants you permission to modify or distribute the Program or its derivative works These actions are prohibited by law if you do not accept this License Therefore by modifying or distributing the Program or an...

Страница 130: ...xceptions for this Our decision will be guided by the two goals of preserving the free status of all derivatives of our free software and of promoting the sharing and reuse of software generally NO WARRANTY 11 BECAUSE THE PROGRAM IS LICENSED FREE OF CHARGE THERE IS NO WARRANTY FOR THE PROGRAM TO THE EXTENT PERMITTED BY APPLICABLE LAW EXCEPT WHEN OTHERWISE STATED IN WRITING THE COPYRIGHT HOLDERS AN...

Страница 131: ...t permit incorporating your program into proprietary programs If your program is a subroutine library you may consider it more useful to permit linking proprietary applications with the library If this is what you want to do use the GNU Lesser General Public License instead of this License GNU LESSER GENERAL PUBLIC LICENSE Version 2 1 February 1999 Copyright C 1991 1999 Free Software Foundation In...

Страница 132: ... therefore permits such linking only if the entire combination fi ts its criteria of freedom The Lesser General Public License permits more lax criteria for linking other code with the library We call this license the Lesser General Public License because it does Less to protect the user s freedom than the ordinary General Public License It also provides other free software developers Less of an ad...

Страница 133: ...tribute such modifi cations or work under the terms of Section 1 above provided that you also meet all of these conditions a The modifi ed work must itself be a software library b You must cause the fi les modifi ed to carry prominent notices stating that you changed the fi les and the date of any change c You must cause the whole of the work to be licensed at no charge to all third parties under the t...

Страница 134: ...f such executables When a work that uses the Library uses material from a header fi le that is part of the Library the object code for the work may be a derivative work of the Library even though the source code is not Whether this is true is especially signifi cant if the work can be linked without the Library or if the work is itself a library The threshold for this to be true is not precisely defi...

Страница 135: ...facilities is otherwise permitted and provided that you do these two things a Accompany the combined library with a copy of the same work based on the Library uncombined with any other library facilities This must be distributed under the terms of the Sections above b Give prominent notice with the combined library of the fact that part of it is a work based on the Library and explaining where to ...

Страница 136: ...se which applies to it and any later version you have the option of following the terms and conditions either of that version or of any later version published by the Free Software Foundation If the Library does not specify a license version number you may choose any version ever published by the Free Software Foundation 14 If you wish to incorporate parts of the Library into other free programs w...

Страница 137: ...her version 2 1 of the License or at your option any later version This library is distributed in the hope that it will be useful but WITHOUT ANY WARRANTY without even the implied warranty of MERCHANTABILITY or FITNESS FOR A PARTICULAR PURPOSE See the GNU Lesser General Public License for more details You should have received a copy of the GNU Lesser General Public License along with this library ...

Страница 138: ... 03 710 www samsung com lu NETHERLANDS 0900 SAMSUNG 726 7864 0 10 Min www samsung com nl NORWAY 815 56 480 www samsung com no POLAND 0 801 801 881 022 607 93 33 www samsung com pl PORTUGAL 80820 SAMSUNG 726 7864 www samsung com pt SLOVAKIA 0800 SAMSUNG 726 7864 www samsung com sk SPAIN 902 1 SAMSU 72678 www samsung com es SWEDEN 0771 400 200 www samsung com se U K 0845 SAMSUNG 7267864 www samsung ...

Страница 139: ...the use of certain Hazardous Substances in electrical and electronic equipment and we do not use the 6 hazardous materials Cadmium Cd Lead Pb Mercury Hg Hexavalent Chromium Cr 6 Poly Brominated Biphenyls PBBs Poly Brominated Diphenyl Ethers PBDEs in our products ...

Отзывы: