background image

ENGLISH

64

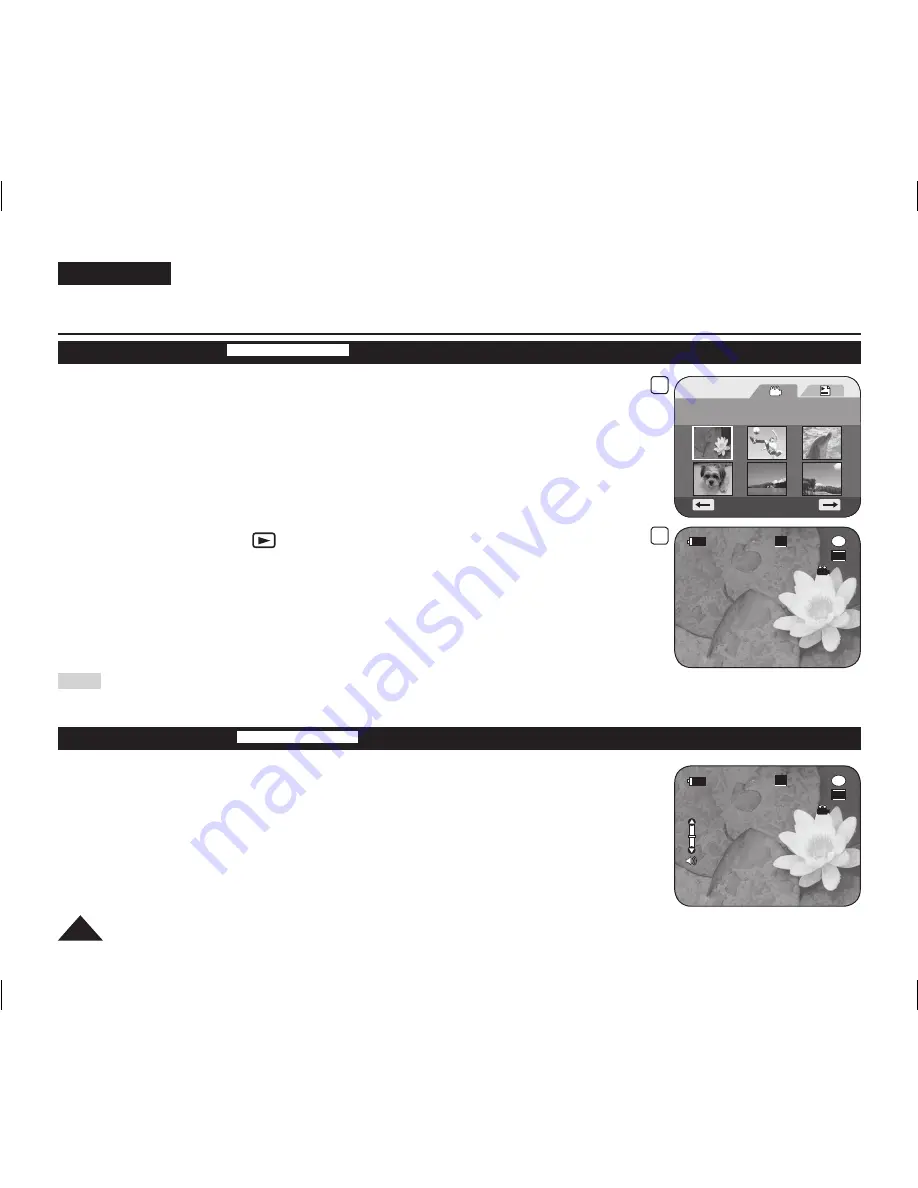
Playing Title Scenes 

DVD-RW/+RW/-R/+R DL 

The recorded title scenes are displayed as a thumbnail index (multiple images) on the LCD Screen.

You can fi nd the desired scene quickly using this convenient index. 

If the TFT LCD screen is closed, you can view the recording through the viewfi nder. 

Use the Playback related buttons on the DVD Camcorder or on the remote control. (VP-

DC172W/DC173(i)/DC175WB/DC175W(i)/DC575WB/DC575Wi only) 

pages 65~66

1.  Insert the disc you want to view.

2.  Open the LCD Screen.

3.  Set the 

[Mode]

 switch to 

[DISC]

(VP-DC173(i)/DC175WB/DC175W(i)/DC575WB/DC575Wi only)

4.  Set the 

[Power]

 switch to 

[

(Player)]

 

The thumbnail index screen appears.

 

To change the current thumbnail page, use the 

[Joystick]

 to highlight the thumbnail 

page movement arrows then press the 

[Joystick]

 left or right to match the direction 

of the arrow.

 

Use the 

[MENU]

 button to adjust brightness or colour of the LCD Screen. 

page 36

5.  Use the 

[Joystick]

 to select a title scene to be played, then press the 

[Joystick]

 

To stop playback, move the 

[Joystick]

 down.

Note

During playback, a displayed image may be paused for a while until the next image to be shown.

Adjusting the Volume 

DVD-RW/+RW/-R/+R DL 

  When you use the LCD Screen for playback, you can hear recorded sound from the built-in 

speaker.

  When you hear sound once the disc is in play, use the 

[VOL 

,

]

 buttons to adjust the 

volume.

 

A volume level display will appear on the LCD Screen.

 

Levels may be adjusted from anywhere between 

00

 to 

19

.

 

If you close the LCD Screen while playing, you will not hear sound from the speaker.

DVD Camcorder

4

[1/9]


5

001

SP

-RW

VR

0:00:01

001

SP

0:00:01

-RW

VR

10

AD68-01230G_UK_R2.indb   64

2007-07-09   ¿ÀÈÄ 1:58:46

Содержание VP-DC171I

Страница 1: ...truction Book Before operating the unit please read this Instruction Book thoroughly and retain it for future reference Use only approved battery packs Otherwise there is a danger of overheating re or...

Страница 2: ...ration 19 Using the Hand Strap Lens Cover 19 Hand Strap 19 Lens Cover 19 Installing the Lens Cover after Operation 19 Lithium Battery Installation 20 Lithium Battery Installation for the Internal Cloc...

Страница 3: ...g 44 Making your First Recording 44 Recording with Ease for Beginners EASY Q Mode 45 Zooming In and Out 46 Using the Fade In and Out FADE 47 To Start Recording 47 To Stop Recording 47 Using Back Light...

Страница 4: ...Playing within a Playlist Scene Move DVD RW VR mode 73 Deleting Scenes from Playlist Scene Delete DVD RW VR mode 74 Deleting a Section of a Playlist Scene Partial Delete DVD RW VR mode 75 DVD Camcorde...

Страница 5: ...ng Still images onto a Memory Card during DVD playback DVD RW RW R R DL 102 Marking Images for Printing Print Mark 103 Removing the Print Mark 104 PictBridge VP DC173 i DC175WB DC175W i DC575WB DC575W...

Страница 6: ...reen Make sure not to contact the magnetic stripe of your credit card near the LCD panel Your credit card information may be removed Notes regarding the LCD Screen View nder Lens 1 Direct sunlight can...

Страница 7: ...direct sunlight heating elements moisture or dust Notes and Safety Instructions Correct Disposal of This Product Waste Electrical Electronic Equipment Applicable in the European Union and other Europ...

Страница 8: ...e pulled out from the mains socket therefore the mains plug shall be readily operable Notices regarding Copyright VP DC171i DC171Bi DC171Wi DC173i DC175Wi DC575Wi only Television programmes video tape...

Страница 9: ...172W DC175WB DC175W i DC575WB DC575Wi only LCD Enhancer It can give you a clear quality image on LCD Screen even in the outdoors with bright daylight Mega pixel CCD VP DC575WB DC575Wi only Your DVD Ca...

Страница 10: ...ecordings After nalised a disc you can play back the recordings in most common DVD players DVD ReWritable DVD R DL DVD RW You can record and edit it many times You can delete recorded image les or for...

Страница 11: ...recorded from a PC or DVD recorder When such a case occurs the message Bad Disc may be displayed We do not warranty any damage or loss incurred due to recording and playback failure caused by disc or...

Страница 12: ...ng Selecting the desired disc and disc formatting page 42 Recording the desired Images page 44 Playing Back Selecting a scene to play back from the thumbnail index screen page 64 Editing You may edit...

Страница 13: ...WB DC175W i DC575WB DC575Wi only 9 Lens Cover 10 Lens Cover Strap Optional Accessories 11 8cm DVD RW Disc 12 Carrying Case Notes The contents can vary depending on the sales region Parts and accessori...

Страница 14: ...Camera Mode M Player Mode VP DC173 i DC175WB DC175W i DC575WB DC575Wi only Photo image Moving image Up FADE Down Stop Stop Left Backward Search Skip Backward Skip Backward Search Right Forward Search...

Страница 15: ...e 44 5 MENU Button 6 DISPLAY Button page 29 7 C NITE LIGHT S SHOW Button VP DC175WB DC175W i DC575WB DC575Wi only page 49 50 95 C NITE S SHOW Button VP DC173 i only page 49 95 C NITE Button VP DC171 i...

Страница 16: ...3 View nder 4 Record Start Stop Button page 44 5 Power Switch ON OFF Camera Player 6 USB Jack VP DC173 i DC175WB DC175W i DC575WB DC575Wi only 7 Zoom W T Lever page 46 8 Mode Switch DISC CARD VP DC17...

Страница 17: ...DC IN Jack 5 Hand Strap Hook 6 Tripod Receptacle 7 Memory Card Slot VP DC173 i DC175WB DC175W i DC575WB DC575Wi only 8 BATT RELEASE Switch Usable Memory Cards 2GB Max VP DC173 i DC175WB DC175W i DC57...

Страница 18: ...age 29 3 Skip 4 Stop 5 Play Still 6 MENU 7 Up Down Left Right OK 8 PHOTO page 94 9 W T Zoom page 46 10 Search 11 Slow 12 Q MENU Remote Control VP DC172W DC173 i DC175WB DC175W i DC575WB DC575Wi only 1...

Страница 19: ...Strap Insert the Hand Strap into the Hand Strap Hook 2 Insert your hand into the Hand Strap and adjust its length 3 Close the Hand Strap Lens Cover 1 Hook up the Lens Cover with the Lens Cover Strap...

Страница 20: ...ocking sound 3 Place the battery holder to match its mark with the mark on the remote control and turn the battery holder clockwise to x it Precautions regarding the Lithium Battery 1 The Lithium Batt...

Страница 21: ...o the DC IN jack on the DVD Camcorder The charging indicator will start to blink showing that the Battery is charging 6 When the Battery is fully charged disconnect the Battery Pack and the AC Power A...

Страница 22: ...1hr 30min Approx 3hr Mode Continuous recording time Playback time Mode Continuous recording time Playback time LCD ON XP Approx 55min Approx 1hr XP Approx 1hr 50min Approx 1hr 55min View nder LCD ON...

Страница 23: ...ischarged Battery Pack Management The Battery Pack should be recharged in an environment between 32 F 0 C and 104 F 40 C The Battery Pack should never be charged in a room with a temperature that is b...

Страница 24: ...e please contact your local dealer The batteries have to be dealt with as chemical waste Make sure that the Battery Pack is fully charged before starting to record A brand new Battery Pack is not char...

Страница 25: ...g to worry about the battery power You can keep the Battery Pack attached the battery power will not be consumed 1 Connect the AC Power adapter AA E9 TYPE to a wall socket The plug and wall socket typ...

Страница 26: ...Switch VP DC173 i DC175WB DC175W i DC575WB DC575Wi only Using the Joystick The Joystick is used to make a selection and to move the cursor left right up and down Using the Joystick you can easily mak...

Страница 27: ...age 52 M Player Mode VP DC173 i DC175WB DC175W i DC575WB DC575Wi only Delete Delete All Protect Print Mark Format page 97 page 98 page 96 page 103 page 99 For example Setting the White Balance 1 Press...

Страница 28: ...Type 19 Counter 20 Remaining Time 21 Record Mode page 43 22 Operating Mode 23 Zoom Position page 46 Digital Zoom Position page 62 24 LCD Enhancer page 39 25 Volume Control page 64 26 Message Line pag...

Страница 29: ...r page 93 File number of the moving image 10 Image Counter Current Image Total number of recorded images Turning the OSD On Screen Display On Off Turning OSD On Off Press the DISPLAY button on the lef...

Страница 30: ...respective values 7 You can set the month year hour and minute following the same procedure after setting the day 8 Press the Joystick after setting minute A message Complete is displayed 9 To exit pr...

Страница 31: ...tton The menu list will appear 4 Move the Joystick up or down to select System then press the Joystick 5 Move the Joystick up or down to select Remote then press the Joystick 6 Move the Joystick up or...

Страница 32: ...Camera or Player 3 Press the MENU button The menu list will appear 4 Move the Joystick up or down to select System then press the Joystick 5 Move the Joystick up or down to select Beep Sound then pres...

Страница 33: ...Camera 3 Press the MENU button The menu list will appear 4 Move the Joystick up or down to select System then press the Joystick 5 Move the Joystick up or down to select Shutter Sound then press the...

Страница 34: ...ton The menu list will appear 4 Move the Joystick up or down to select System then press the Joystick 5 Move the Joystick up or down to select Language then press the Joystick The available language o...

Страница 35: ...to Camera 3 Press the MENU button The menu list will appear 4 Move the Joystick up or down to select System then press the Joystick 5 Move the Joystick up or down to select Demonstration then press t...

Страница 36: ...5W i DC575WB DC575Wi only 2 Set the Power switch to Camera or Player 3 Press the MENU button The menu list will appear 4 Move the Joystick up or down to select Display then press the Joystick 5 Move t...

Страница 37: ...press the Joystick 6 Move the Joystick up or down to select the Date Time display type then press the Joystick Date Time display type Off Date Time Date Time 7 To exit press the MENU button Notes The...

Страница 38: ...ENU button The menu list will appear 4 Move the Joystick up or down to select Display then press the Joystick 5 Move the Joystick up or down to select TV Display then press the Joystick 6 Move the Joy...

Страница 39: ...e Viewing the sun or any strong light source through the View nder for a prolonged period may be harmful or cause temporary impairment Using the LCD ENHANCER The LCD ENHANCER function works in Camera...

Страница 40: ...g a recording viewing the LCD Screen from below 4 Self recording Making a recording viewing the LCD Screen from the front 5 Recording with the View nder In circumstances where it is dif cult to use th...

Страница 41: ...r Do not touch the pickup lens 4 Gently push the section marked PUSH CLOSE on the disc cover to close it Once inserted the disc is recognised and the ACCESS indicator blinks Do not cut off the power s...

Страница 42: ...new disc is required to record on it To format later use the Disc Manager menu page 79 For a DVD RW disc You are prompted with the Disc format All les will be deleted message Move the Joystick left or...

Страница 43: ...he Joystick up or down to select the desired record mode XP SP or LP then press the Joystick 7 To exit press the MENU button The icon of the selected mode is displayed Recording Times based on Disc Ty...

Страница 44: ...top button again STBY is displayed on the LCD screen after blinking If you press the Record Start Stop button to record again a new title scene will be created The title scene number will not appear i...

Страница 45: ...c settings 5 Press the EASY Q button again in the STBY mode to turn the EASY Q mode off The EASY Q function will not turn off while you are recording The DVD Camcorder will return to the settings that...

Страница 46: ...ery usage time This DVD Camcorder allows you to record using optical 34x VP DC171 i DC171Bi DC171W i DC171WB DC172W DC173 i DC175WB DC175W i only or 26x VP DC575WB DC575Wi only power zoom and digital...

Страница 47: ...4 Press the Record Start Stop button and at the same time release the Joystick Recording starts and the picture and sound gradually appear fade in To Stop Recording 5 When you wish to stop recording...

Страница 48: ...t the Mode switch to DISC or CARD VP DC173 i DC175WB DC175W i DC575WB DC575Wi only 2 Set the Power switch to Camera 3 Press the MENU button The menu list will appear 4 Move the Joystick up or down to...

Страница 49: ...171WB DC172W DC173 i only or C NITE LIGHT VP DC175WB DC175W i DC575WB DC575Wi only button shutter speed is changed to Color N 1 25 Color N 1 13 and off VP DC171 i DC171Bi DC171W i DC171WB DC172W DC173...

Страница 50: ...ars Danger The LIGHT can become extremely hot Do not touch it while in operation or soon after turning it off otherwise serious injury may result Do not place the DVD Camcorder into the carrying case...

Страница 51: ...ENU button 4 Move the Joystick up or down to select Record then press the Joystick 5 Move the Joystick up or down to select Wind Cut then press the Joystick 6 To activate the Wind Cut function move th...

Страница 52: ...on Selected settings are displayed Recommended Shutter Speeds When Recording Outdoor sports such as golf or tennis 1 2000 or 1 4000 Moving cars or trains or other rapidly moving vehicles such as rolle...

Страница 53: ...ng several objects some close to the DVD Camcorder others further away b A person enveloped in fog or surrounded by snow c Very shiny or glossy surfaces like a car d People or objects moving constantl...

Страница 54: ...cts moving quickly Portrait mode For focusing on the background of the subject when the background is out of focus The Portrait mode is most effective when used outdoors The shutter speed automaticall...

Страница 55: ...is displayed When the Auto mode is selected no icon is displayed Notes You can directly access the Program AE function by using the Q MENU button page 27 The Program AE function will not operate in E...

Страница 56: ...e Mode switch to DISC or CARD VP DC173 i DC175WB DC175W i DC575WB DC575Wi only 2 Set the Power switch to Camera 3 Press the MENU button The menu list will appear 4 Move the Joystick up or down to sele...

Страница 57: ...the desired lighting then press the Joystick The Set White Balance will disappear and the white balance setting will commence 8 To exit press the MENU button Custom WB icon is displayed Notes You can...

Страница 58: ...a mosaic effect 3 Sepia mode This mode gives the images a reddish brown pigment 4 Negative mode This mode reverses the colours creating a negative image 5 Mirror mode This mode cuts the picture in hal...

Страница 59: ...in use Once DIS EASY Q Colour Nite is set Mosaic Mirror Emboss2 or Pastel2 mode will be released Digital Zoom is not available in the Mosaic Mirror Emboss2 or Pastel2 mode Mirror mode is not available...

Страница 60: ...en press the Joystick If you do not want to use the 16 9 Wide function set the 16 9 Wide menu to Off 7 To exit press the MENU button The display mode is set to the selected mode Notes Mirror mode is n...

Страница 61: ...ystick up or down to select On then press the Joystick If you do not want to use the DIS function set the DIS menu to Off 7 To exit press the MENU button DIS icon is displayed Notes You can directly a...

Страница 62: ...to select Digital Zoom then press the Joystick 6 Move the Joystick up or down to select desired zoom value Off 100x 200x 400x or 1200x then press the Joystick 7 To exit press the MENU button When usi...

Страница 63: ...can be registered on a playlist Example You have recorded a few scenes on a DVD RW in VR mode You want to save the original recording but you also want to create a digest by putting your favorite scen...

Страница 64: ...bnail page movement arrows then press the Joystick left or right to match the direction of the arrow Use the MENU button to adjust brightness or colour of the LCD Screen page 36 5 Use the Joystick to...

Страница 65: ...and hold it moves to the next scene If you Move the Joystick left and hold it moves to the beginning of the scene One more press and hold makes it move to the beginning of the previous scene If you mo...

Страница 66: ...me normal playback press the Joystick Same as buttons on the remote control VP DC172W DC173 i DC175WB DC175W i DC575WB DC575Wi only Slow Playback Forward Reverse VP DC172W DC173 i DC175WB DC175W i DC5...

Страница 67: ...s use the Joystick to select title scenes to delete then press the Joystick The selected title scenes will be marked Select All Deletes all title scenes To delete all title scenes simply press the Joy...

Страница 68: ...peed When you press the Joystick up the picture will advance one frame When you press the Joystick down the picture will go back one frame Press the Joystick up and hold to play back the picture frame...

Страница 69: ...l be displayed in the form of a thumbnail index No thumbnail index is provided before creating a playlist 4 Press the Q MENU button 5 Move the Joystick up or down to select New Playlist then press the...

Страница 70: ...he Mode switch to DISC VP DC173 i DC175WB DC175W i DC575WB DC575Wi only 3 Set the Power switch to Player The thumbnail index screen appears 4 Move the Joystick up to highlight the thumbnail index scre...

Страница 71: ...lete then press the Joystick 6 Move the Joystick up or down to select Select or Select All then press the Joystick Select Deletes an individual playlist To delete a playlist use the Joystick to select...

Страница 72: ...ich you wish to add scenes then press the Joystick The scenes inside the playlist will appear 5 Press the Q MENU button 6 Move the Joystick up or down to select Add then press the Joystick The title s...

Страница 73: ...you want to change then press the Joystick The scenes inside the playlist will appear 5 Press the Q MENU button 6 Move the Joystick up or down to select Move then press the Joystick 7 Use the Joystick...

Страница 74: ...ail index 4 Use the Joystick to select the playlist which contains the scenes to be deleted then press the Joystick The scenes inside the playlist will appear 5 Press the Q MENU button 6 Move the Joys...

Страница 75: ...screen icon then move the Joystick right to highlight the playlist icon The playlist scenes will be displayed in the form of a thumbnail index 4 Use the Joystick to select the playlist which contains...

Страница 76: ...old to play back the picture frame by frame backward 9 Press the Joystick at the start point to pause the screen 10 Use the Joystick to search the end point of deletion 11 Press the Joystick at the en...

Страница 77: ...4 Move the Joystick up or down to select Disc Manager then press the Joystick 5 Move the Joystick up or down to select Disc Info then press the Joystick Disc Name Disc Type Disc Format Used Space and...

Страница 78: ...he Joystick to move the cursor to Delete then press the Joystick to delete the existing disc name 8 Use the Joystick to select the desired characters and items then press the Joystick 9 Use the Joysti...

Страница 79: ...he disc on a DVD Camcorder but playback is only possible on a DVD Recorder that supports VR mode Refer to page 11 for Finalised disc compatibility If you insert DVD RW disc message Disc format All les...

Страница 80: ...rning During nalising do not cause impact or vibration to your DVD Camcorder This could cause a malfunction Notes The Finalise Format functions are not available at battery level and Once nalised the...

Страница 81: ...k a nalised disc on a DVD Player Recorder To Playback a disc You can playback nalised DVD R RW Video mode R DL discs on DVD Players Recorders Playback is not guaranteed in all DVD Players Recorders Fo...

Страница 82: ...e Joystick up or down to select Disc Un nalise then press the Joystick 6 Move the Joystick left or right to select Un nalise then press the Joystick The message Un nalising please wait will appear Whe...

Страница 83: ...4 Move the Joystick up or down to select Record then press the Joystick 5 Move the Joystick up or down to select AV In Out then press the Joystick 6 Move the Joystick up or down to select Out or AV I...

Страница 84: ...k Audio R If you connect to a mono TV connect the yellow jack Video to the video input of the TV and the white jack Audio L to the audio input of the TV 2 Set the Mode switch to DISC VP DC173 i DC175W...

Страница 85: ...t a TV to the VCR 3 Set the Mode switch to DISC VP DC173 i DC175WB DC175W i DC575WB DC575Wi only 4 Set the Power switch to Player 5 Turn on both the TV and VCR Set the input selector on the VCR to Lin...

Страница 86: ...sert a new tape in your VCR 5 Connect the DVD Camcorder to your VCR with AV cable Connect the AV cable to the input jack on your VCR The yellow jack Video The white jack Audio L mono The red jack Audi...

Страница 87: ...c 6 To cancel press the Record Start Stop button again Notes Voice Plus is available only when the AV cable is connected If an USB cable VP DC173 i DC175WB DC175W i DC575WB DC575Wi only is connected t...

Страница 88: ...r to page 123 for selecting and formatting discs To record from a VCR 4 Insert the tape to be played in your VCR Pause at the starting point of playing 5 Start copying by pressing the Record Start Sto...

Страница 89: ...using the MMC be careful not to edit or delete data by mistake Deleting Photo Moving Images stored in Memory Card Marking Photo Images with Print Information Formatting Memory Cards Inserting a Memory...

Страница 90: ...M Cam Mode and M Player Mode Because wide LCD supports only 4 3 mode Structure of Folders and Files on the Memory Card The photo images that you recorded are saved in JPEG le format on the Memory Card...

Страница 91: ...isplayed Number of Images that can be stored on a Memory Card Quality Photo Size 128MB 256MB 512MB 1GB 2GB Super Fine 800x600 Approx 600 Approx 1200 Approx 2400 Approx 4830 Approx 9740 1152X864 Approx...

Страница 92: ...ccess the Photo Size function by using the Q MENU button page 27 The number of images that can be stored on a Memory Card depends on various conditions Regarding detailed image capacity see page 91 Ph...

Страница 93: ...o Camera 3 Press the MENU button The menu list will appear 4 Move the Joystick up or down to select Memory then press the Joystick 5 Move the Joystick up or down to select File No then press the Joyst...

Страница 94: ...the Memory Card page 89 2 Set the Mode switch to CARD 3 Set the Power switch to Camera 4 After framing your subject fully press the PHOTO button to take the picture The picture is taken and saved int...

Страница 95: ...image To view the next image move the Joystick right To view the previous image move the Joystick left Press Joystick left right and hold to search for an image quickly Holding the Joystick left or r...

Страница 96: ...4 Press the MENU button The menu list will appear 5 Move the Joystick up or down to select Memory then press the Joystick 6 Move the Joystick up or down to select Protect then press the Joystick 7 Mo...

Страница 97: ...lete then press the Joystick The message Delete will appear 7 Move the Joystick left or right to select Yes then press the Joystick The selected image will be deleted Press the MENU button to nish set...

Страница 98: ...ht to select Yes or No then press the Joystick 8 To exit press the MENU button Notes You can directly access the Delete All function by using the Q MENU page 27 Deleting all les using the Delete All m...

Страница 99: ...The Format All les will be deleted message will appear 6 Move the Joystick to the left or right to select Yes then press the Joystick The Complete message will appear when the formatting is completed...

Страница 100: ...imes are approximate as recording capacities can be affected by variables such as subject matter and memory card type Notes The DVD Camcorder supports memory cards ranging up to 2GB Recording time is...

Страница 101: ...t or right to match the direction of the arrow You can control playback using the Joystick During the playback use the VOL button to increase or decrease the volume Notes MENU and Q MENU buttons are n...

Страница 102: ...pears 3 Use the Joystick to select a title scene to be played then press the Joystick The selected scene will be played continuously 4 Press the PHOTO button The still image is recorded on the Memory...

Страница 103: ...nail index of photo images appears If there are no recorded images on the Memory Card the No le message will appear 3 Use the Joystick to search for the photo image that you want to mark 4 Press the M...

Страница 104: ...u can directly access the Print Mark function by using the Q MENU button page 27 If the Print Mark is set to This File you can set the number of copies from 001 to 999 If the Print Mark is set to All...

Страница 105: ...utton The menu list will appear 4 Move the Joystick up or down to select System then press the Joystick 5 Move the Joystick up or down to select USB Connect then press the Joystick 6 Move the Joystick...

Страница 106: ...ck with your printer manufacturer The Date Time menu cannot be setup if the printer does not support this option The PictBridge is a registered trademark of CIPA Camera Imaging Products Association an...

Страница 107: ...system with Service Pack 4 or later installed Windows XP High speed USB on a system with Service Pack 1 or later installed Windows VISTA High speed USB on a system with Service Pack 1 or later instal...

Страница 108: ...Player Mode be sure that the Memory Card is inserted into the DVD Camcorder before connecting USB cable If no Memory Card or an unformatted Memory Card is inserted PC will not recognise your DVD Camc...

Страница 109: ...ystick up or down to select System then press the Joystick 5 Move the Joystick up or down to select USB Connect then press the Joystick 6 Move the Joystick up or down to select Computer or Printer the...

Страница 110: ...er software is installed automatically Following drivers will be installed PC Camera USB Streaming driver Capture Driver 2 Click on Con rm to nish driver installation 3 If the DirectX 9 0 is not insta...

Страница 111: ...tware CD that came with this DVD Camcorder We do not guarantee compatibility for different CD versions For photo editing use Photo Express For movie playback on a PC install software in this order DV...

Страница 112: ...removable disc icon and click the right mouse button to select Eject 2 Select Con rm and disconnect the USB cable when the Windows Splash screen appears Notes If you disconnect the USB cable from the...

Страница 113: ...ending on the video conferencing software In this case connect an external microphone to the soundcard of the PC to enable voice communication Using the DVD Camcorder with PC Net meeting program insta...

Страница 114: ...r and the other end to the USB jack on your computer 2 Setup and execute Windows Movie Maker Windows Movie Maker is used for Windows XP users C program les Movie maker moviemk exe Using the removable...

Страница 115: ...corder Player the television set or an external device must be PAL compatible and have the appropriate Audio Video jacks Otherwise you may need to use a separate Video Format Transcoder PAL NTSC forma...

Страница 116: ...on a DVD RW RW disc un nalise it Cover is opened Slow Cover is opened Close the cover Recovering Data While recording if the power is suddenly turned off the le writing is not properly done When you...

Страница 117: ...condensation happens when a DVD Camcorder is moved to a place where there is a signi cant temperature difference from the previous place In other words the water vapor in the air turns into dew becaus...

Страница 118: ...lly charged battery pack Charge runs out quickly The atmospheric temperature is too low The Battery Pack has not been charged fully The Battery Pack is completely dead and cannot be recharged use anot...

Страница 119: ...sc Disc was nalised Make the disc writable to record additional pictures DVD Camcorder is too hot Turn off the power and cool it down a while Disc is not recognised and the disc cover opens The disc i...

Страница 120: ...ded DVD RW RW R R DL disc on a PC Clean the disc using a cleaning cloth Finalise the disc except DVD RW Pushing the OPEN switch does not open the Disc Cover Check the Power supply Battery Pack or AC P...

Страница 121: ...oto Size Selecting the Photo Size 92 Photo Quality Selecting Image Quality 91 Delete Deleting Files 97 Delete All Deleting all Files 98 Protect Preventing Accidental Erasure in Memory Card 96 Print Ma...

Страница 122: ...3 i DC175WB DC175W i DC575WB DC575Wi only This Owners Manual covers the complete range of VP DCXXX DVD camcorders including non AV Analog In and AV Analog In versions of the same models Please note th...

Страница 123: ...c you must format it in Video or VR mode When loading a DVD RW disc you must format it We cannot guarantee that you will be able to play back in all other manufacturer s DVD Camcorders DVD Players Rec...

Страница 124: ...ethod TFT LCD View nder Colour LCD Connectors Video output 1Vp p 75 terminated Audio output 7 5dBs 600 terminated USB output VP DC173 i DC175WB DC175W i DC575WB DC575Wi only Mini B type connector Gene...

Страница 125: ...LCD Enhancer 39 LIGHT 50 Lithium Ion Battery Pack 21 M Memory Card 89 Move 73 Moving Image 100 N Name 78 O Operating Modes 26 OSD 28 29 OSD Language 34 P Partial Delete 68 75 Photo images 95 Photo Qu...

Страница 126: ...ssistance However if there is no alternative to cutting off the plug remove the fuse and then safely dispose of the plug Do NOT connect the plug to a mains socket as there is a risk of shock hazard fr...

Страница 127: ...repair work will not be covered by this warranty 4 This product is not considered to be defective in materials nor workmanship by reason that it requires adaptation in order to conform to national or...

Страница 128: ...E SAMSUNG SAMSUNG 12 SAMSUNG service service service FOURLIS TRADE A E B E 112 145 68 210 629 3100 1 service 2 SAMSUNG 3 service SAMSUNG SAMSUNG 4 laser CD DVD AD68 01230G_UK_R2 indb 128 2007 07 09 2...

Страница 129: ...5 service SAMSUNG FOURLIS TRADE A E B E AD68 01230G_UK_R2 indb 129 2007 07 09 2 00 05...

Страница 130: ...AD68 01230G_UK_R2 indb 130 2007 07 09 2 00 05...

Страница 131: ...HUNGARY 06 80 SAMSUNG 7267864 www samsung com hu ITALIA 800 SAMSUNG 7267864 www samsung com it LUXEMBURG 0032 0 2 201 24 18 www samsung lu NETHERLANDS 0900 20 200 88 0 10 Min www samsung com nl NORWA...

Страница 132: ...he use of certain Hazardous Substances in electrical and electronic equipment and we do not use the 6 hazardous materials Cadmium Cd Lead Pb Mercury Hg Hexavalent Chromium Cr 6 Poly Brominated Bipheny...

Отзывы: