background image

FEATURES

Features include automatic cord rewind and dust indicator. 

IMPORTANT  SAFEGUARDS

1. Read all instructions carefully. Before switching on, make sure that the voltage of your electricity 

supply is the same as that indicated on the rating plate on the bottom of the cleaner.

2.  WARNING: Do not use the vacuum cleaner when rug or floor is wet.

3. Close supervision is necessary when any appliance is used by or near children. Do not allow the

vacuum cleaner to be used as a toy. Do not allow the vacuum cleaner to run unattended at any time.
Use the vacuum cleaner only for its intended use as described in these instructions.

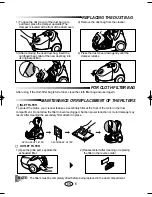
4. Do not use the vacuum cleaner without a dust bag.  Change the dust bag before it is   full in order to

maintain best efficiency.

5. Do not use the vacuum cleaner to pick up matches, live ashes or cigarette butts. Keep the vacuum

cleaner away from stoves and other heat sources. Heat can deform and discolour the plastic parts of
the unit.

6. Avoid picking up hard, sharp objects with the vacuum cleaner as they may damage the cleaner

parts. Do not stand on the hose assembly.  Do not put a weight on the hose. Do not block the suction
or the exhaustion part.

7. Switch the vacuum cleaner off at the machine before unplugging from the electrical outlet. Grasp 

the plug to disconnect from power outlet to avoid damage to cord, plug, prongs or socket. Do not pull
the power cord.  Always disconnect cord from electrical outlet before changing the dust bag. 

8. The use of an extension cord is not recommended.

9. If your vacuum cleaner is not operating correctly, switch off the power supply and consult an 

authorized service agent.

10. Do not attempt to replace a damaged power supply cord. Only the manufacturer or qualified service

personnel can replace power cords. Serious injury may result.

WARNING 

1. Do not use to suck up water.

2. Do not immerse in water for cleaning.

3. The hose should be checked regularly and must not be used if damaged.

NOTE :

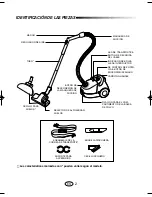
Not all models have the same features.

1

EN

DJ68-00094T(EN+ES)  1/20/04 10:32 AM  Page 2

Содержание VC-5853

Страница 1: ...Operating Instructions EN Instrucciones de uso ES VACUUM CLEANER Before operating this unit please read the instructions carefully ...

Страница 2: ...es Heat can deform and discolour the plastic parts of the unit 6 Avoid picking up hard sharp objects with the vacuum cleaner as they may damage the cleaner parts Do not stand on the hose assembly Do not put a weight on the hose Do not block the suction or the exhaustion part 7 Switch the vacuum cleaner off at the machine before unplugging from the electrical outlet Grasp the plug to disconnect fro...

Страница 3: ... REGULATOR FLOOR NOZZLE RUG FLOOR SELECTOR CLAMPER FOR DUST BAG COMPARTMENT POWER CONTROL SWITCH ON OFF SWITCH DUST FULL INDICATOR SUCTION HOSE BUTTON FOR SUCTION HOSE REMOVAL CARRYING HANDLE TUBE BELT STRAP ASSY CREVICE TOOL HANGER ACCESSORY DUSTING BRUSH CORD REWIND BUTTON 2 EN ...

Страница 4: ...ADY FOR USE 1 Connect the suction hose to the suction tube 2 Connect the suction tubes together depending on model 4 Grip the body connector with one hand and squeeze the tube in an inward direction 3 Connect the nozzle to the suction tube OPTION EXTENDING Holding the narrow part of the telescopic tube with one hand pull the handle in the opposite direction with your other hand SHORTENING Holding ...

Страница 5: ...es replacement POWER CONTROL VARIABLE CONTROL TYPE ONLY The vacuuming power can be adjusted to suit any situa tion with the electrical power control MIN For delicate fabrics e g net curtains MAX For hard floors and heavily soiled carpets To adjust power output just turn it right or left USING THE ACCESSORIES CREVICE DUSTING Crevice tool for radiators crevices corners between cushions Dusting brush...

Страница 6: ...er taking care of the lockers direction Strap ends should face the body of the cleaner 2 Pull the lockers to the front of the cleaner until they click into place 3 Adjust the strap length to fit your body When not using the strap Detach the lockers by pushing them down and drawing them out from the unit Keep the strap separately for the next time you want to use it USING ASSEMBLING THE STRAP OPTIO...

Страница 7: ...ower reduction or motor damage may result After cleaning the secondary filter attach it in place After using if the cloth filter bag is full of dust clean the cloth filter bag and use it again SECONDARY FILTER SECONDARY FILTER OUTLET FILTER NOTE The filters must be completely dried before being replaced in the dust compartment 1 Open the grille part separate the exhausted filter 2 Reassemble it af...

Страница 8: ...d Cord does not rewind fully Check that the cord is not Pull the cord out 2 3m twisted or wound unevenly push down the cord rewind button PROBLEM CAUSE REMEDY This Vacuum cleaner is approved the following EMC Directive 89 336 EEC 92 31EEC and 93 68 EEC Low Voltage Safety Directive 73 23 EEC and 93 68 EEC Select the carpet indicator when cleaning carpets Select flat surface indicator when cleaning ...

Страница 9: ...tes de calor El calor puede deformar y decolorar los componentes plásticos del aparato 6 Evite aspirar objetos duros y afilados ya que pueden dañar las piezas del aparato No pise la pieza de montaje de la manguera No coloque objetos pesados sobre la manguera No bloquee los orifi cios de aspiración ni de expulsión 7 Apague la aspiradora antes de desenchufarla de la toma de alimentación Para descone...

Страница 10: ...CIÓN PARA EL COM PARTIMENTO DE LA BOLSA DE POLVO MANGUERA DE SUCCIÓN BOTÓN DE DESCONEXIÓN DE LA MANGUERA DE SUCCIÓN CARRYING HANDLE TUBO BOQUILLA RINCONERA ENSAMBLAJE DE LA CORREA DE TRANSPORTE CEPILLO PEQUEÑO SOPORTE PARA ACCESORIOS ASA DE TRANSPORTE BOTÓN DE RECOGIDA DEL CABLE 2 ES INDICADOR DE BOLSA LLENA INTERRUPTOR DE CONTROL DE POTEN CIA BOTÓN DE ENCENDIDO APAGADO ...

Страница 11: ...ente el botón de recogida del cable con la punta del pie MONTAJE DE LA ASPIRADORA PARA SU USO 1 Conecte la manguera al tubo de filter ciclonico 2 Conecte los tubos de aspiración entre sí según el modelo 4 Ajuste el conector a la aspiradora 3 Conecte el cepillo al tubo OPCIÓN EXTENSIÓN Mientras sujeta el extremo más estrecho del tubo telescópico con una mano tire del mango con la otra mano en la di...

Страница 12: ...o para el tipo de control variable La potencia de aspiración se puede ajustar a cualquier situación con el control de potencia eléctrica MIN Para tejidos delicados como por ejemplo cortinas MAX Para suelos duros y alfombras muy sucias Para ajustar la potencia de salida gire el control a la izquierda o a la derecha USO DE LOS ACCESORIOS BOQUILLA RINCONERA CEPILLO PEQUEÑO Boquilla rinconera para rad...

Страница 13: ...la dirección de los enganches Las puntas de la correa deben dirigirse hacia el cuerpo de la aspiradora 2 Tire de los enganches hacia la parte frontal de la aspiradora 3 Ajuste la longitud de la correa para que se acomode a su cuerpo Si no utiliza la correa Para soltar los enganches desplácelos hacia abajo y tire de ellos para sacarlos de la unidad Guarde la correa por separado para la próxima vez ...

Страница 14: ... podrían producir daños en el motor o una disminución de la potencia de aspiración Una vez limpio el filtro secundario colóquelo en su lugar Si después de su uso la bolsa está llena límpiela y vuélvala a utilizar FILTRO DE ENTRADA FILTRO DE ENTRADA FILTRO DE SALIDA 1 Abra la rejilla y retire el filtro gastado 2 Vuélvalo a colocar después limpiar o cambiar el filtro en orden inverso 3 Después de re...

Страница 15: ...bras Seleccione el indicador de superficies lisas cuando limpie suelos baldosas etc CEPILLO UNIVERSAL Utilice el cepillo para suelos para limpiar todo tipo de superficies NOTA Para obtener el máximo rendimiento limpie el cepillo con la boquilla rinconera El motor no arranca La potencia de aspiración va disminuyendo gradual mente El cable no se recoge omple tamente No hay corriente Está bloqueado e...

Страница 16: ...DJ68 00094T REV 0 0 ...

Отзывы: