background image

English - 18

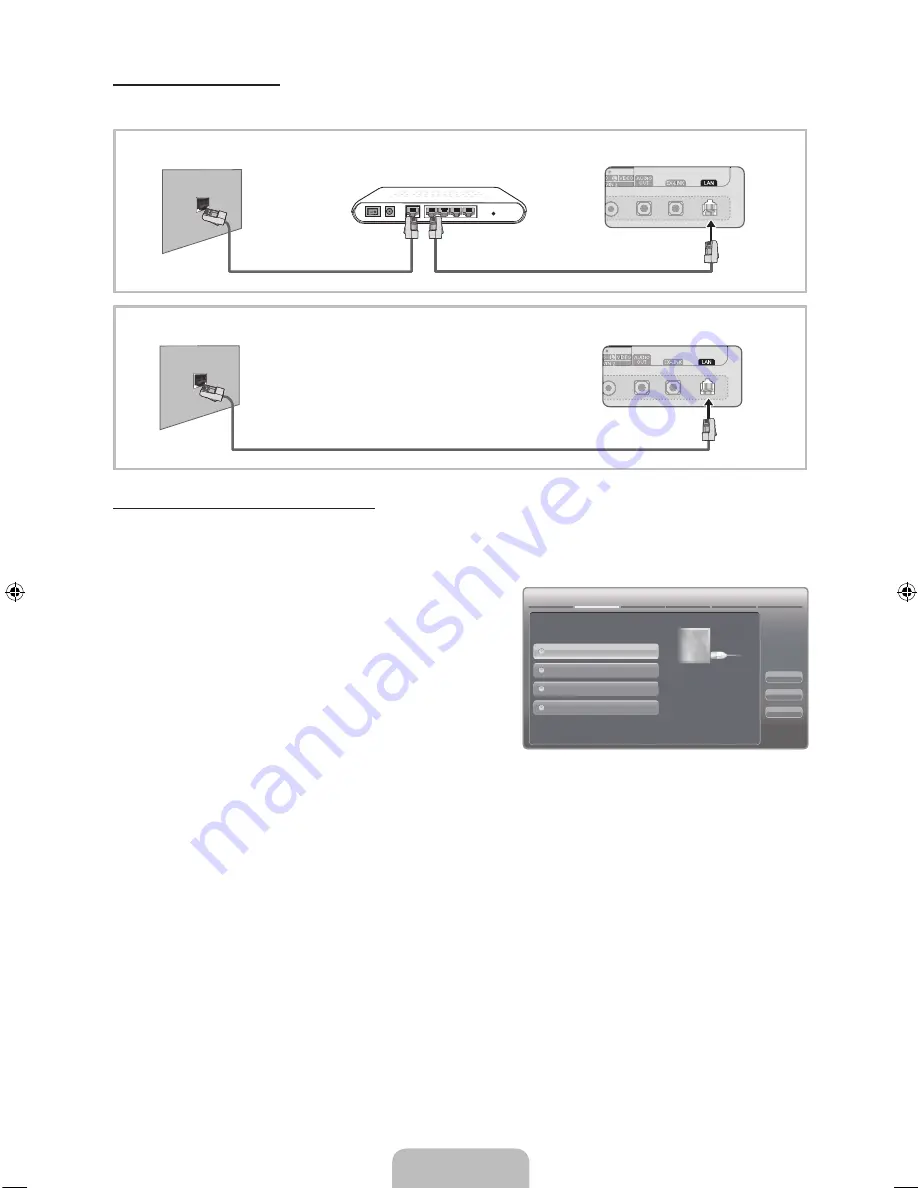
Network Connection - Wired

There are two main ways to connect your TV to your network using cable, depending on your network setup. They are 
illustrated below:

Configuring the Network Connection - Wired

Most home networks use the Dynamic Host Configuration Protocol (DHCP) to configure network connections. Home networks 
that support DHCP automatically provide the IP address, subnet mask, gateway, and DNS values your TV needs to access the 
Internet so you don’t have to enter them manually.
To configure your network connection for a network that uses DHCP, follow these steps:

1. 

Connect your TV to your network as shown in one of the 
illustrations above.

2. 

Turn on your TV, press the 

MENU

 button on your remote, and 

then select 

Network


Network Settings

. The 

Network 

Settings

 screen will appear.

3. 

Select 

Wired

, press 

ENTER

E

, and then press 

ENTER

E


again.

4. 

The Network Connection screen appears, and verifies the 
network connection. When the connection has been verified, 
the “

Internet connection successful.

” message appears. 

Network set up is completed.


If your TV cannot acquire network the connection values automatically or if you want to set the connection manually, 
select 

IP Settings

 on the network connection screen. Set 

Internet Protocol Setup

 to 

Manual

. You must enter the 

IP 

Address

Subnet Mask

Gateway

, and 

DNS Server

 manually.


For more detailed information, refer to “Wired Network Connection” in the e-Manual.

The LAN Port on the Wall

TV Rear Panel

LAN Cable (Not Supplied)

The Modem Port on the Wall

TV Rear Panel

LAN Cable (Not Supplied)

Modem Cable (Not Supplied)

Extternal Modem 

(ADSL / VDSL / Cable TV)

Network Settings

Wired

Previous

Next

Cancel

Wireless(General)

WPS(PBC)

One Foot Connection

Select a network connection type.

Connect to the network using LAN 

cable. Please make sure that the 

LAN cable is connected.

[UD7000-NA]BN68-03435A-03L03.indb   18

2011-03-14   오후 6:45:06

Содержание UN55D7000LF

Страница 1: ...i vous avez des suggestions ou des questions concernant les produits Samsung veuillez contacter le Service Consommateurs Samsung Comuníquese con SAMSUNG WORLD WIDE Si desea formular alguna pregunta o comentario en relación con los productos de Samsung comuníquese con el centro de atención al cliente de SAMSUNG Country Customer Care Center Web Site Address CANADA 1 800 SAMSUNG 726 7864 www samsung ...

Страница 2: ...s conditions exclusions and limitations of the original Limited Warranty supplied with Samsung Electronics SAMSUNG products and the requirements conditions exclusions and limitations contained herein SAMSUNG will additionally provide Warranty Repair Service in the United States on SAMSUNG products purchased in Canada and in Canada on SAMSUNG products purchased in the United States for the warranty...

Страница 3: ... open the box y y QWERTY Remote BN59 01134B Batteries AAA x 4 y y Owner s Instructions y y Power Cord y y Cleaning Cloth y y Warranty Card Safety Guide Holder Ring 4EA BN61 07295A Holder Wire stand BN61 05491A AV Adapter BN39 01154H AV Component Adapter BN39 01154W 3D Active Glasses for LED 7050 Series SSG 3300GR Input Cables Sold Separately To purchase the RS232 cable contact www SamsungParts com...

Страница 4: ...r your TV s features o Volume Adjusts the volume In the OSD use the and buttons as you would use the and buttons on the remote control k Channel Changes the channels In the OSD use the and buttons as you would use the and buttons on the remote control P Power Turns the TV on or off Standby mode Your TV enters Standby mode when you turn it off and continues to consume a small amount of electric pow...

Страница 5: ... X L8 x4 C M4 X L8 x4 B A Rear Front Top View DO NOT USE CHEMICALS DO NOT USE GREASE DO NOT USE OIL ATTENTION 1 2 Place a soft cloth over the table to protect the TV and then place the TV on the cloth screen side down Insert the Stand Guide into the slot of TV bottom side 4 3 Side View Incorrect assembly Correct assembly ...

Страница 6: ... when you fasten the screws If you fasten the screws with the TV lying down it may lean to one side when you stand it up Side View Correct assembly Incorrect assembly 1 2 3 4 5 D M4 X L8 x4 B A Front C M4 X L12 x4 Top View DO NOT USE CHEMICALS DO NOT USE GREASE DO NOT USE OIL ATTENTION Place a soft cloth over the table to protect the TV and then place the TV on the cloth screen side down Insert th...

Страница 7: ...o not use screws that do not comply with the VESA standard screw specifications x x Do not use screws that are longer than the standard length or do not comply with the VESA standard screw specifications Screws that are too long may cause damage to the inside of the TV set x x For wall mounts that do not comply with the VESA standard screw specifications the length of the screws may differ dependi...

Страница 8: ...recommendation search word and search function Displays information on the TV screen Exits the menu Gives direct access to channels Press to select additional digital channels being broadcast by the same station For example to select channel 54 3 press 54 then press and 3 Adjusts the volume Opens the OSD Quickly select frequently used functions Link to various application services Returns to the p...

Страница 9: ... 3 5 4 6 8 0 7 9 _ W Q E S A D Z TAP ENTER X T R Y G F H V C B I U O K J L P M N D MENU m E Convenient QWERTY keyboard to type characters in SMART HUB and SOCIAL TV menu etc SYM Enables the symbol printed on the lower right side of each button OFN Optical Finger Navigation Sensor In full browser function it can be used as the pointer If the user doesn t press any button during 30 seconds the senso...

Страница 10: ...ed on the LCD screen of the QWERTY remote 2 Press MUTE 0 MUTE and 0 on the remote side of the QWERTY Remote as it faces the TV This sequence must be completed within 4 seconds There might be a slight delay between input and the response from the OSD Do not wait for visual confirmation on the screen 3 Follow the initial pairing process within 3 minutes If the initial pairing process does not finish...

Страница 11: ...ress ENTERE On the Time Zone screen use the or button to select your zone and then press ENTERE On the DST screen press ENTERE then select whether to turn DST Daylight Savings Time on or off When done press ENTERE If you selected Manual you ll go to the Date and Time screen Select Date or Time and then press ENTERE Then use the number buttons or the or button to set the date or time Use the or but...

Страница 12: ... about the HDMI version and if out of date request an upgrade x x Be sure to use an HDMI cable with a thickness of 14 mm or less x x Be sure to purchase a certified HDMI cable Otherwise the picture may not display or a connection error may occur x x We recommend using a basic high speed HDMI cable or an HDMI cable that is Ethernet is compatible Note that this product does not support the Ethernet ...

Страница 13: ...Cable Connection Available Devices External devices that support EX Link EX LINK Connector for service only R W Y R W Y VIDEO OUT AUDIO OUT R AUDIO L R W Y Y R W R W Y R R W R W G B Y VIDEO OUT AUDIO OUT R AUDIO L PR PB COMPONENT OUT AUDIO OUT R AUDIO L G B R W Y Y R R W R W G B R R W Y Device Device Device Red White Red Red Red Blue White White Green Yellow Yellow Audio Cable Not Supplied Compone...

Страница 14: ...nected it to the TV via HDMIyou will only hear 2 CH audio from the home theater receiver If you want to hear 5 1 CH audio connect the digital audio out jack from your DVD Blu ray player cable box STB satellite receiver directly to an amplifier or home theater AUDIO OUT Connects to the audio input jacks on your amplifier DVD home theater x x When connecting use the appropriate connector x x When yo...

Страница 15: ... 1280 x 1024 1280 x 1024 1280 x 800 1280 x 800 1280 x 960 1360 x 768 1440 x 900 1440 x 900 1680 x 1050 31 469 37 861 37 500 37 879 48 077 46 875 48 363 56 476 60 023 67 500 63 981 79 976 49 702 62 795 60 000 47 712 55 935 70 635 65 290 59 940 72 809 75 000 60 317 72 188 75 000 60 004 70 069 75 029 75 000 60 020 75 025 59 810 74 934 60 000 60 015 59 887 74 984 59 954 25 175 31 500 31 500 40 000 50 ...

Страница 16: ...mcorder PC DVI PC DVI Devices TV IPTV Blu ray HD DVD DMA Name the device connected to the input jacks to make your input source selection easier If you have connected a PC to the HDMI IN 1 DVI port with an HDMI cable select PC under Edit Name to enter a device name If you have connected a PC to the HDMI IN 1 DVI port with an HDMI to DVI cable select DVI PC under Edit Name to enter a device name If...

Страница 17: ...work see your user s manual for configuration instructions To configure your network connection for a network that uses DHCP follow these steps 1 Connect your TV to your network as shown in the illustration above 2 Turn on your TV press the MENU button on your remote and the select Network Network Settings 3 Select the Wireless General press ENTERE and then press ENTERE again 4 The Network functio...

Страница 18: ...t Wired press ENTERE and then press ENTERE again 4 The Network Connection screen appears and verifies the network connection When the connection has been verified the Internet connection successful message appears Network set up is completed If your TV cannot acquire network the connection values automatically or if you want to set the connection manually select IP Settings on the network connecti...

Страница 19: ...ur PC Index Help Return Basic Features Changing the Preset Picture Mode Adjusting Picture Settings Changing the Picture Size Changing the Picture Options Using the TV with Your PC Index Help Return Sync media from multiple devices with AllShare AllShare syncs your digital devices so you can enjoy music movies and photos from your PC camera and mobile devices on your larger TV screen Connects you t...

Страница 20: ...E MANUAL button Home Moves to the e Manual home screen Zoom Magnifies a screen Index Displays the Index screen Contents Area Contains the topic contents if you selected a sub menu To move to the previous or next page press the l or r button Basic Features Changing the Preset Picture Mode 5 10 Help Try Now Home Zoom Index Changing the Preset Picture Mode O O MENUm Picture Picture Mode ENTERE Pictur...

Страница 21: ... their poles in the correct direction y y Clean the sensor s transmission window on the remote y y Try pointing the remote directly at the TV from 5 6 feet away The cable set top box remote control doesn t turn the TV on or off or adjust the volume y y Program the Cable Set remote control to operate the TV Refer to the Cable Set user manual for the SAMSUNG TV code This TFT LED panel uses a panel c...

Страница 22: ...r your TV Make sure to use only the appropriate supplied screw If you use a different screw you can damage your TV 2 Firmly fasten the screw you provided size M4xL20 or similar to the wall or cabinet where the TV is to be installed If you fasten the screw to the wall we recommend you drive the screw into a stud If that is not possible use a molly to anchor the screw 3 Tie the TV Holder cord to the...

Страница 23: ...ling Installation with a stand Installation with a wall mount Other Warnings The actual appearance of the TV may differ from the images in this manual depending on the model Be careful when you touch the TV Some parts can be somewhat hot Storage and Maintenance If you attached some stickers on the TV screen it remains some debris after removing the sticker Please clean it to watch TV Do not spray ...

Страница 24: ... x 683 1 mm 48 8 x 1 2 x 28 1 inches 1240 0 x 29 7 x 714 1 mm 48 8 x 12 2x 31 1 inches 1240 0 x 309 8 x 790 9 mm Weight Without Stand With Stand 22 3 lbs 10 1 kg 25 4 lbs 11 5 kg 29 7 lbs 12 5 kg 31 7 lbs 14 4 kg 35 5 lbs 16 1 kg 41 0 lbs 18 6 kg Model Name UN46D7050 UN55D7050 Screen Size Diagonal 46 Class 45 9 measured diagonally 55 Class 54 6 measured diagonally Sound Output 10 W X 2 15 W X 2 Di...

Страница 25: ...3 6 4 1 2 5 Unit inches Model name 1 2 3 4 5 6 7 8 9 UN40D7000 7 9 7 9 23 8 0 3 0 3 8 9 7 9 7 1 5 2 UN46D7000 15 7 15 7 29 4 0 3 0 3 8 9 9 0 7 1 4 9 UN55D7000 15 7 15 7 35 7 0 3 0 3 8 9 9 0 7 1 6 1 Model name 1 2 3 4 5 6 7 8 9 UN46D7050 15 7 15 7 29 4 0 3 0 3 8 9 9 1 7 1 4 9 UN55D7050 15 7 15 7 35 7 0 3 0 3 8 9 9 1 7 1 6 2 NOTE All drawings are not necessarily to scale Some dimensions are subject ...

Страница 26: ...ly approved by the party responsible for compliance could void the user s authority to operate this equipment This device complies with Part 15 of the FCC Rules Operation is subject to the following two conditions 1 This device may not cause harmful interference and 2 this device must accept any interference received including interference that may cause undesired operation IC Statement This Class...

Страница 27: ...mitaciones de la Garantía limitada original suministrada con los productos de Samsung Electronics SAMSUNG así como los requisitos condiciones exclusiones y limitaciones incluidos en el presente documento SAMSUNG proporcionará adicionalmente un servicio de reparación de garantía en EE UU para los productos de SAMSUNG adquiridos en Canadá y en Canadá respecto a los productos de SAMSUNG adquiridos en...

Страница 28: ...Remote BN59 01134B y pilas 4 x AAA y y Manual del usuario y y Cable de alimentación y y Paño de limpieza y y Tarjeta de garantía Guía de seguridad Soporte anilla 4 unid BN61 07295A Soporte sujetacables BN61 05491A Adaptador del TV BN39 01154H AV Adaptador de componentes BN39 01154W Las gafas activas 3D Para serie LED 7050 SSG 3300GR Cables de entrada se venden por separado Para adquirir el cable R...

Страница 29: ...talla con los controles de las funciones del televisor o Volumen Ajusta el volumen En la OSD utilice los botones y de igual modo que los botones y del mando a distancia k Canal Cambian los canales En la OSD utilice los botones y de igual modo que los botones y del mando a distancia P Encendido Enciende o apaga el televisor Modo de espera El televisor se pone en el modo de espera cuando se apaga y ...

Страница 30: ... suave encima de la mesa para proteger el televisor y luego coloque éste encima con la pantalla hacia abajo Introduzca el soporte de la guía en la ranura de la parte inferior del televisor 4 3 Vista lateral Montaje incorrecto Montaje correcto Siga los pasos que se indican a continuación para conectar el televisor al soporte Para serie LED 7000 Montaje del soporte sujetacables ...

Страница 31: ...rnillos con el TV recostado éste puede inclinarse hacia uno de los lados cuando lo vuelva a levantar 1 2 3 4 5 D M4 X L8 x4 B A Frontal C M4 X L12 x4 Vista superior NO UTILIZAR PRODUCTOS QUÍMICOS NO UTILIZAR GRASAS NO UTILIZAR PETRÓLEO ATENCIÓN Ponga un paño suave encima de la mesa para proteger el televisor y luego coloque éste encima con la pantalla hacia abajo Introduzca el soporte de la guía e...

Страница 32: ...las especificaciones de tornillos estándar VESA x x No use tornillos con una longitud superior a la medida estándar o que no cumplan con las especificaciones de tornillos estándar VESA Los tornillos que sean demasiado largos pueden causar daños en el interior del televisor x x Para montajes murales que no cumplen las especificaciones de tornillos estándar VESA la longitud de éstos puede variar dep...

Страница 33: ...ecomendada Muestra información en la pantalla del televisor Sale del menú Proporciona acceso directo a los canales Pulse este botón para seleccionar canales adicionales digitales emitidos por la misma emisora Por ejemplo para seleccionar el canal 54 3 pulse 54 y 3 Ajusta el volumen Abre la pantalla OSD Seleccionar rápidamente las funciones que se usan con mayor frecuencia Enlazar con diferentes se...

Страница 34: ...Q E S A D Z TAP ENTER X T R Y G F H V C B I U O K J L P M N D MENU m E Útil teclado QWERTY para escribir caracteres en los menús SMART HUB y SOCIAL TV etc SYM Habilita el símbolo impreso en la parte inferior derecha de cada botón Sensor OFN Optical Finger Navigation Navegación óptica con el dedo En el modo de pantalla completa se puede utilizar como puntero Si el usuario no pulsa ningún botón dura...

Страница 35: ...os Se mostrará RESET OK en la LCD del QWERTY Remote 2 Pulse MUTE 0 MUTE y 0 en el lado a distancia del QWERTY Remote encarado al televisor Esta secuencia se debe completar en menos de 4 segundos Puede haber un ligero retardo entre la entrada y la respuesta de la OSD No espere confirmación visual en la pantalla 3 El proceso inicial de emparejamiento se efectúa antes de 3 minutos Si el proceso de em...

Страница 36: ...na Tiempo o DST y pulse ENTERE En la pantalla Zona Tiempo utilice los botones o para seleccionar la zona y pulse ENTERE En la pantalla DST pulse ENTERE y elija si desea activar o desactivar DST horario de verano Una vez haya terminado pulse ENTERE Si ha seleccionado Manual irá a la pantalla Fecha y Hora Seleccione Fecha u Hora y pulse ENTERE A continuación utilice los botones o para establecer la ...

Страница 37: ...del dispositivo externo acerca de la versión HDMI y si ésta es antigua solicite una actualización x x Debe utilizar un cable HDMI de un grosor de 14 mm o menos x x Debe adquirir un cable certificado HDMI De lo contrario la imagen puede no mostrarse o producirse un error de conexión x x Recomendamos utilizar un cable HDMI básico de alta velocidad o un cable HDMI compatible con Ethernet Tenga en cue...

Страница 38: ...necta a AV IN el color verde del terminal AV IN 1 VIDEO no coincide con el cable de vídeo amarillo Uso de una conexión de cable EX Link Dispositivos disponibles Dispositivos externos que admiten Ex Link EX LINK Conector sólo para servicio R W Y R W Y VIDEO OUT AUDIO OUT R AUDIO L R W Y Y R W R W Y R R W R W G B Y VIDEO OUT AUDIO OUT R AUDIO L PR PB COMPONENT OUT AUDIO OUT R AUDIO L G B R W Y Y R R...

Страница 39: ... reproductor DVD Blu ray receptor de cable o satélite decodificador y está conectada al televisor a través de HDMI sólo se oye el sonido de 2 canales del receptor del sistema Home Theater Si desea oír el audio de 5 1 canales conecte el terminal de la salida de audio digital del reproductor DVD Blu ray decodificador receptor por satélite STB directamente al amplificador o al sistema Home Theater AU...

Страница 40: ...52 x 864 1280 x 1024 1280 x 1024 1280 x 800 1280 x 800 1280 x 960 1360 x 768 1440 x 900 1440 x 900 1680 x 1050 31 469 37 861 37 500 37 879 48 077 46 875 48 363 56 476 60 023 67 500 63 981 79 976 49 702 62 795 60 000 47 712 55 935 70 635 65 290 59 940 72 809 75 000 60 317 72 188 75 000 60 004 70 069 75 029 75 000 60 020 75 025 59 810 74 934 60 000 60 015 59 887 74 984 59 954 25 175 31 500 31 500 40...

Страница 41: ...C Dispositivos DVI TV PTV Blu ray HD DVD DMA Dé un nombre al dispositivo conectado en las tomas de entrada de esta manera será más fácil seleccionar el dispositivo de entrada Si ha conectado un PC en el puerto HDMI IN 1 DVI con un cable HDMI seleccione PC en Editar Nombre para escribir el nombre del dispositivo Si ha conectado un PC en el puerto HDMI IN 1 DVI con un cable HDMI a DVI seleccione DVI...

Страница 42: ...red Si dispone de una red de IP estática consulte en el manual del usuario las instrucciones de configuración Siga estos pasos para configurar la conexión de una red que utiliza DHCP 1 Conecte el televisor a la red tal como se indica en las ilustraciones anteriores 2 Encienda el televisor pulse el botón MENU del mando a distancia y seleccione Red Configuración de red 3 Seleccione Inalámb General p...

Страница 43: ...ccione Cable pulse ENTERE y vuelva a pulsar ENTERE 4 Aparece la pantalla de conexión de red y comprueba la conexión de la red Una vez comprobada la conexión de la red se muestra el mensaje Internet se conectó correctamente Se completa la configuración de la red Si el televisor no adquiere automáticamente los valores de la conexión de la red o si desea configurar ésta manualmente seleccione Ajustes...

Страница 44: ...da Regresar Funciones básicas Cambio del modo preestablecido de la imagen Ajuste de los valores de la imagen Cambio del tamaño de la imagen Cambio de las opciones de la imagen Uso del televisor con el ordenador Índice Ayuda Regresar Sincronización de recursos de varios dispositivos con AllShare AllShare sincroniza los dispositivos digitales para que se pueda reproducir en la pantalla más grande de...

Страница 45: ...ntalla de inicio del e Manual Zoom Agranda una pantalla Índice Muestra la pantalla del índice Área de contenidos Incluye los contenidos del tema si ha seleccionado un menú secundario Para ir a la página anterior o siguiente pulse los botones l o r Funciones básicas Cambio del modo preestablecido de la imagen 5 10 Ayuda Int Ahora Inicio Zoom Índice Cambio del modo preestablecido de la imagen O O ME...

Страница 46: ...sensor del mando a distancia y y Apunte con el mando a distancia directamente al televisor desde una distancia de 5 6 pies 1 5 2 metros El mando a distancia del cable decodificador no enciende ni apaga el televisor ni ajusta el volumen y y Programe el mando a distancia del decodificador de cable satélite para que haga funcionar el televisor Consulte el manual del decodificador de cable satélite pa...

Страница 47: ... diseñado para su televisor Use sólo el tornillo suministrado Si utiliza un tornillo diferente podría dañar el televisor 2 Apriete firmemente el tornillo suministrado tamaño M4xL20 o similar en la pared o en el mueble donde vaya a instalar el televisor Si va a utilizar el tornillo sobre una pared es aconsejable montarlo sobre un montante Si esto no es posible utilice un perno para anclar el tornil...

Страница 48: ...nstalación con un soporte Instalación con un montaje mural Otras advertencias Según el modelo el aspecto real del televisor puede diferir del que se muestra en las ilustraciones de este manual Tenga cuidado al tocar el televisor Algunas partes pueden estar calientes Almacenamiento y mantenimiento Si ha pegado algunas pegatinas en la pantalla del televisor al extraerlas quedarán restos Limpie la pa...

Страница 49: ...3 x 603 6 mm 41 3 x 1 2 x 23 9 pulgadas 1048 5 x 29 7 x 606 3 mm 41 3 x 10 9 x 26 9 pulgadas 1048 5 x 276 7 x 683 1 mm 48 8 x 1 2 x 28 1 pulgadas 1240 0 x 29 7 x 714 1 mm 48 8 x 12 2x 31 1 pulgadas 1240 0 x 309 8 x 790 9 mm Peso Sin el soporte Con el soporte 22 3 lbs 10 1 kg 25 4 lbs 11 5 kg 29 7 lbs 12 5 kg 31 7 lbs 14 4 kg 35 5 lbs 16 1 kg 41 0 lbs 18 6 kg Nombre modelo UN46D7050 UN55D7050 Tamañ...

Страница 50: ...Unidad pulgadas Nombre del modelo 1 2 3 4 5 6 7 8 9 UN40D7000 7 9 7 9 23 8 0 3 0 3 8 9 7 9 7 1 5 2 UN46D7000 15 7 15 7 29 4 0 3 0 3 8 9 9 0 7 1 4 9 UN55D7000 15 7 15 7 35 7 0 3 0 3 8 9 9 0 7 1 6 1 Nombre del modelo 1 2 3 4 5 6 7 8 9 UN46D7050 15 7 15 7 29 4 0 3 0 3 8 9 9 1 7 1 4 9 UN55D7050 15 7 15 7 35 7 0 3 0 3 8 9 9 1 7 1 6 2 NOTA No todos los dibujos están necesariamente a escala Algunas dimen...

Страница 51: ...This page is intentionally left blank ...

Страница 52: ...s exclusions et limitations de la garantie limitée originale fournie avec les produits de Samsung Electronics SAMSUNG et les exigences conditions exclusions et limitations de la présente garantie SAMSUNG offrira en plus un service de réparation sous garantie aux États Unis pour les produits achetés au Canada et un service de réparation sous garantie au Canada pour les produits achetés aux États Un...

Страница 53: ... QWERTY Remote BN59 01134B et piles AAA x 4 y y Guide de l utilisateur y y Cordon d alimentation y y Chiffon de nettoyage y y Carte de garantie Guide de sécurité Anneau de support 4EA BN61 07295A Support porte fil BN61 05491A Adaptateur AV BN39 01154H AV Adaptateur composantes BN39 01154W Les lunettes 3D Active pour téléviseur à DEL 7050 SSG 3300GR Câbles d entrée vendus séparément Pour l achat du...

Страница 54: ...ermet de régler le volume Dans le menu à l écran utilisez les touches et de la même manière que les touches et de la télécommande k Chaîne Permet de changer de chaîne Dans le menu à l écran utilisez les touches et de la même manière que les touches et de la télécommande P Alimentation Appuyez sur cette touche pour mettre le téléviseur sous tension ou hors tension Mode veille Le téléviseur passe en...

Страница 55: ...ue de dessus NE PAS UTILISER DE PRODUITS CHIMIQUES NE PAS UTILISER DE GRAISSE NE PAS UTILISER D HUILE ATTENTION 1 2 Pour protéger le téléviseur posez un tissu doux sur la table et placez le téléviseur écran vers le bas sur ce dernier Insérez le guide du support dans la fente située sur la partie inférieure du téléviseur 4 3 Vue latérale Assemblage inadéquat Assemblage approprié ...

Страница 56: ...ment au moment de l assemblage x x Assurez vous qu au moins deux personnes soulèvent et déplacent le téléviseur x x Lorsque vous vissez les vis maintenez le téléviseur à la verticale Si vous vissez les vis lorsque le téléviseur est en position horizontale il pourrait pencher vers un côté au moment où vous le replacez à la verticale 1 2 3 4 5 D M4 X L8 x4 B A Avant C M4 X L12 x4 Vue de dessus NE PA...

Страница 57: ...rmes aux spécifications de vis standard VESA x x N utilisez pas de vis plus longues que les longueurs standard ou non conformes aux spécifications VESA de vis standard Des vis trop longues pourraient endommager l intérieur du téléviseur x x En ce qui a trait aux supports muraux non conformes aux spécifications de vis de la norme VESA la longueur des vis peut différer selon les spécifications du su...

Страница 58: ...t par exemple Permet d afficher l information à l écran du téléviseur Permet de quitter le menu Permet d accéder directement aux chaînes Appuyez sur cette touche pour choisir des chaînes numériques supplémentaires diffusées par la même station Par exemple pour sélectionner la chaîne 54 3 appuyez sur 54 puis sur 3 Permet de régler le volume Permet d afficher le menu des fonctions Permet de sélectio...

Страница 59: ... 3 5 4 6 8 0 7 9 _ W Q E S A D Z TAP ENTER X T R Y G F H V C B I U O K J L P M N D MENU m E Le clavier QWERTY permet de taper des caractères dans le menu SMART HUB et SOCIAL TV etc SYM permet d activer le symbole imprimé sur le côté inférieur droit de chaque touche Fonction de navigation optique commandée par le doigt Optical Finger Navigation elle peut servir de pointeur Si l utilisateur n appuie...

Страница 60: ...nt plus de 3 secondes Le message RESET OK s affichera à l écran de QWERTY remote 2 Appuyez sur MUTE 0 MUTE et 0 sur le côté de QWERTY Remote face au téléviseur Cette opération doit être exécutée en 4 secondes Il se peut qu il y ait un léger retard entre l entrée et la réponse de l affichage à l écran N attendez pas la confirmation visuelle à l écran 3 Suivez la procédure de pairage initiale durant...

Страница 61: ...sélectionner votre zone puis appuyez sur ENTERE À l écran H d été appuyez sur ENTERE puis choisissez d activer ou de désactiver la fonction H d été heure d été Une fois l opération terminée appuyez sur ENTERE Si vous avez sélectionné Auto l écran Date et Heure apparaît Sélectionnez Date ou Heure puis appuyez sur ENTERE Utilisez ensuite les touches numériques ou la touche ou pour régler la date ou ...

Страница 62: ...ignez vous sur la version HDMI auprès du fabricant de l appareil externe et si elle trop ancienne demandez une mise à niveau x x Assurez vous d utiliser un câble HDMI d une épaisseur de 14 mm ou moins x x Vérifiez que vous achetez un câble HDMI certifié Sinon l image risque de ne pas s afficher ou une erreur de connexion peut survenir x x Il est recommandé d utiliser un câble HDMI haute vitesse de...

Страница 63: ... la prise AV IN la couleur de la prise d entrée AV IN 1 VIDEO vert ne correspond pas à la couleur du câble vidéo jaune Connexion avec câble EX Link Appareils disponibles appareils externes compatibles avec EX Link EX LINK Connecteur utilisé à des fins de réparation seulement R W Y R W Y VIDEO OUT AUDIO OUT R AUDIO L R W Y Y R W R W Y R R W R W G B Y VIDEO OUT AUDIO OUT R AUDIO L PR PB COMPONENT OU...

Страница 64: ...eur ou un récepteur satellite boîtier décodeur et que cet appareil est branché au téléviseur par câble HDMI le récepteur de la chaîne de cinéma maison ne fera entendre qu un son en deux canaux Pour entendre le son en 5 1 canaux branchez directement la prise Digital Audio Out du lecteur DVD Blu Ray câblosélecteur ou récepteur satellite à un amplificateur ou une chaîne de cinéma maison AUDIO OUT Se ...

Страница 65: ...1024 1280 x 1024 1280 x 800 1280 x 800 1280 x 960 1360 x 768 1440 x 900 1440 x 900 1680 x 1050 31 469 37 861 37 500 37 879 48 077 46 875 48 363 56 476 60 023 67 500 63 981 79 976 49 702 62 795 60 000 47 712 55 935 70 635 65 290 59 940 72 809 75 000 60 317 72 188 75 000 60 004 70 069 75 029 75 000 60 020 75 025 59 810 74 934 60 000 60 015 59 887 74 984 59 954 25 175 31 500 31 500 40 000 50 000 49 5...

Страница 66: ...Appareils DVI TV IPTV Blu ray HD DVD DMA Entrez le nom de l appareil branché aux prises d entrée afin de faciliter la sélection de la source d entrée Si vous avez connecté un ordinateur à une prise HDMI IN 1 DVI à l aide d un câble HDMI sélectionnez PC sous Entrer le nom pour entrer le nom du dispositif choisi Si vous avez connecté un ordinateur à une prise HDMI IN 1 DVI à l aide d un câble HDMI à...

Страница 67: ...vous au guide de l utilisateur pour les instructions de configuration Pour configurer la connexion à un réseau utilisant un protocole DHCP procédez de la manière suivante 1 Connectez votre téléviseur au réseau conformément aux illustrations ci dessus 2 Mettez votre téléviseur sous tension appuyez sur la touche MENU de la télécommande puis sélectionnez Réseau Paramètres réseau 3 Sélectionnez Sans f...

Страница 68: ...3 Sélectionnez Câble appuyez sur ENTERE puis de nouveau sur ENTERE 4 L écran de connexion au réseau apparaît et vérifie cette connexion Une fois la connexion vérifiée le message Internet connection successful La connexion à Internet a réussi s affiche La configuration réseau est terminée Si votre téléviseur ne peut acquérir automatiquement les valeurs de connexion au réseau ou si vous souhaitez co...

Страница 69: ...ctions de base Modification du mode d image préréglé Ajustement des paramètres de l image Modification de la taille de l image Modification des options de l image Utilisation du téléviseur et du PC Index Aide Retour Synchronisation média entre plusieurs appareils avec AllShare AllShareMC synchronise vos appareils numériques ce qui vous permet d écouter de la musique et de visionner des films et de...

Страница 70: ...écran d accueil du e Manual Zoom Agrandit un écran Index Affiche un écran d index Zone de contenu Contient le contenu de la rubrique si vous avez sélectionné un sous menu Pour passer à la page précédente ou suivante appuyez sur la touche l ou r Fonctions de base Modification du mode d image préréglé 5 10 Aide Essayer Accueil Zoom Index Modification du mode d image préréglé O O MENUm Image Image Mo...

Страница 71: ...ssion de la télécommande y y Essayez de pointer la télécommande directement vers le téléviseur d une distance de 1 5 à 1 8 m 5 à 6 pi La télécommande du câblosélecteur ou récepteur numérique ne commande pas la mise sous tension ou la mise hors tension du téléviseur ou ne règle pas le volume y y Programmer la télécommande du câblosélecteur ou récepteur satellite pour faire fonctionner le téléviseur...

Страница 72: ... appareil Veillez à utiliser uniquement la vis fournie appropriée Si vous utilisez une vis différente vous risquez d endommager votre téléviseur 2 Vissez fermement la vis que vous avez fournie taille M4 x L20 ou similaire à l armoire ou au mur sur lequel le téléviseur doit être installé Si vous vissez la vis dans un mur il est préférable qu elle pénètre dans un montant Si cela est impossible utili...

Страница 73: ...lation sur une base Installation sur un support mural Autres avertissements L aspect réel du téléviseur peut différer des illustrations dans le présent guide selon le modèle choisi Faites attention lorsque vous touchez le téléviseur car certaines parties peuvent être chaudes Entreposage et entretien Si vous essayez de détacher une vignette que vous avez fixée sur l écran du téléviseur certains déb...

Страница 74: ...pouces 916 0 x 241 3 x 603 6 mm 41 3 x 1 2 x 23 9 pouces 1048 5 x 29 7 x 606 3 mm 41 3 x 10 9 x 26 9 pouces 1048 5 x 276 7 x 683 1 mm 48 8 x 1 2 x 28 1 pouces 1240 0 x 29 7 x 714 1 mm 48 8 x 12 2x 31 1 pouces 1240 0 x 309 8 x 790 9 mm Poids Sans support Avec support 22 3 lbs 10 1 kg 25 4 lbs 11 5 kg 29 7 lbs 12 5 kg 31 7 lbs 14 4 kg 35 5 lbs 16 1 kg 41 0 lbs 18 6 kg Nom du modèle UN46D7050 UN55D70...

Страница 75: ...Unité pouces Nom de modèle 1 2 3 4 5 6 7 8 9 UN40D7000 7 9 7 9 23 8 0 3 0 3 8 9 7 9 7 1 5 2 UN46D7000 15 7 15 7 29 4 0 3 0 3 8 9 9 0 7 1 4 9 UN55D7000 15 7 15 7 35 7 0 3 0 3 8 9 9 0 7 1 6 1 Nom de modèle 1 2 3 4 5 6 7 8 9 UN46D7050 15 7 15 7 29 4 0 3 0 3 8 9 9 1 7 1 4 9 UN55D7050 15 7 15 7 35 7 0 3 0 3 8 9 9 1 7 1 6 2 REMARQUE Les dessins ne sont pas nécessairement à l échelle Certaines dimensions...

Страница 76: ...This page is intentionally left blank ...

Отзывы: