background image

85

Energy Saving

Move

Enter

Return

Language  

: English

Time 
Menu Transparency 

: High

Safety Lock

Energy Saving 

해제

Video Wall
Safety Screen

Setup

Setup

More

Off

On


-

The displayed image may differ depending on the model.

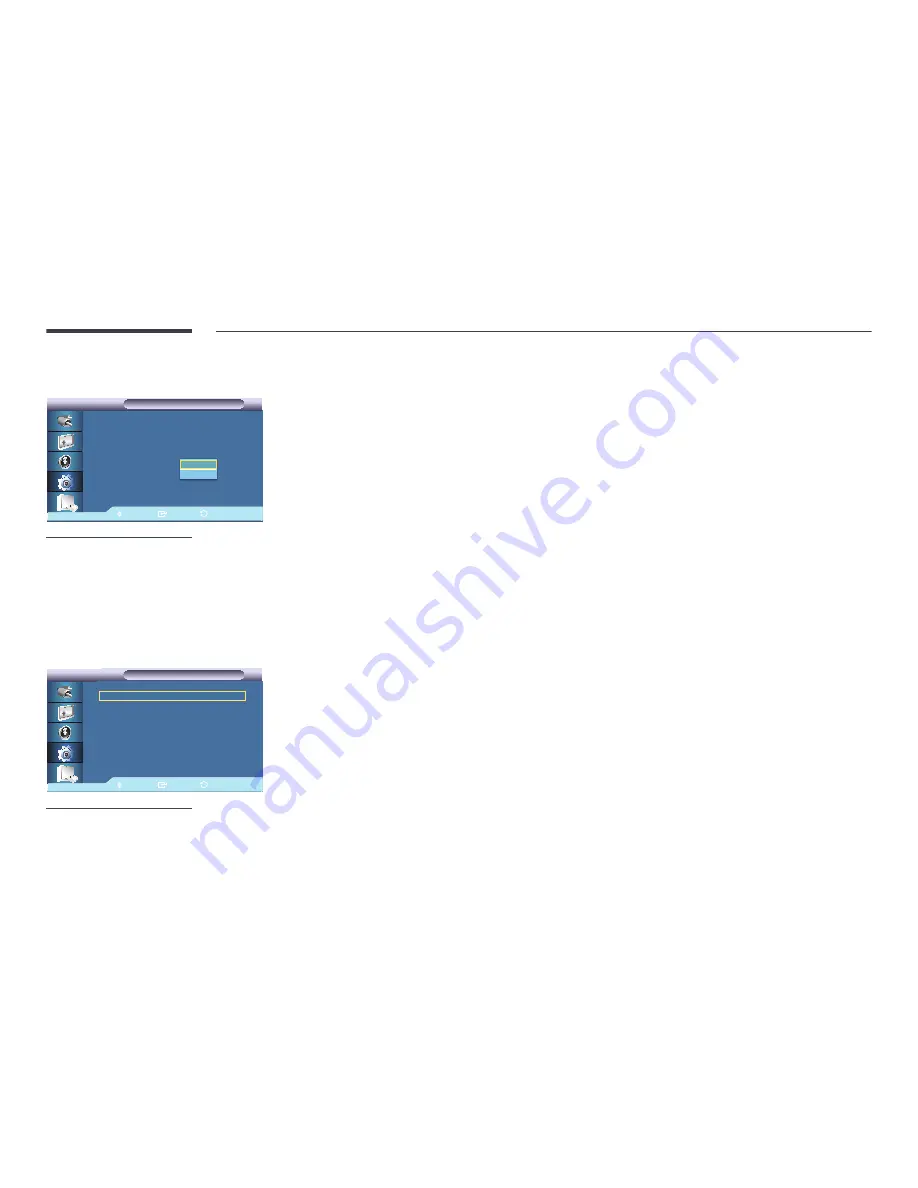
This feature adjusts the power consumption of the unit in order to save energy.


Off

 / 

On

Video Wall

Video Wall

 is a set of video screens connected together, so that each screen shows a part of the whole picture or where the 

same picture is repeated on each screen. 
When the 

Video Wall

 is on, you can adjust the 

Video Wall

 screen setting.


When 

Video Wall

 is running, the 

Size

 functions are not available.


Disabled when 

PIP

 is set to 

On

.

Turns Off/On the 

Video Wall

 function of the selected display Off/On.


Off

 / 

On

Video Wall

Move

Enter

Return

Video Wall


Format
Horizontal


Vertical


Screen Position  

Video Wall

Video Wall


: On


 ▶


: Full  


: 1  


: 1  


      ▶


-

The displayed image may differ depending on the model.

Содержание UD46C-B

Страница 1: ...FD DISPLAY User Manual The color and the appearance may differ depending on the product and the specifications are subject to change without prior notice to improve the performance UD46C B BN46 00331A 01 ...

Страница 2: ...n Checkpoints 43 Connecting to a PC 44 Connection using the D SUB cable Analog type 44 Connection using a DVI cable Digital type 45 Connection Using an HDMI DVI Cable 45 Connection Using an HDMI Cable 46 Changing the Resolution 47 Changing the Resolution on Windows XP 47 Changing the Resolution on Windows Vista 47 Changing the Resolution on Windows 7 48 Changing the Resolution on Windows 8 48 Conn...

Страница 3: ...und Mode 78 Custom 79 Auto Volume 79 SRS TS XT 80 Sound Select 80 Sound Reset 81 Setup Language 82 Time 83 Clock Set 83 Sleep Timer 83 Timer1 Timer2 Timer3 83 Holiday Management 83 Menu Transparency 84 Safety Lock 84 Change PIN 84 Lock 84 Energy Saving 85 Video Wall 85 Video Wall 85 Format 86 Horizontal 86 Vertical 87 Screen Position 87 Safety Screen 88 Pixel Shift 88 Timer 89 Bar 89 Eraser 90 Pix...

Страница 4: ...hedule Management 132 Troubleshooting Guide 134 Troubleshooting Guide Requirements Before Contacting Samsung Customer Service Center 136 Testing the Product 136 Checking the Resolution and Frequency 136 Check the followings 137 Q A 140 Specifications General 142 PowerSaver 145 Preset Timing Modes 146 Appendix Contact SAMSUNG WORLD WIDE 148 Responsibility for the Pay Service Cost to Customers 156 N...

Страница 5: ...registered trademarks of the Video Electronics Standards Association Ownership of all other trademarks is attributed to their due owner An administration fee may be charged if either a an engineer is called out at your request and there is no defect in the product i e where you have failed to read this user manual b you bring the unit to a repair center and there is no defect in the product i e wh...

Страница 6: ...bol are prohibited Instructions marked by this symbol must be followed Cleaning Exercise care when cleaning as the panel and exterior of advanced LCDs are easily scratched Take the following steps when cleaning The following images are for reference only Real life situations may differ from what is shown in the images 1 Power off the product and computer 2 Disconnect the power cord from the produc...

Страница 7: ...er socket Overheated power sockets may cause a fire Do not touch the power plug with wet hands Otherwise an electric shock may result Insert the power plug all the way in so it is not loose An unsecure connection may cause a fire Connect the power plug to a grounded power socket type 1 insulated devices only An electric shock or injury may result Do not bend or pull the power cord with force Be ca...

Страница 8: ...he plug when disconnecting the power cord from the power socket An electric shock or fire may result Installation Warning DO NOT PLACE CANDLES INSECT REPELLANTS OR CIGARETTES ON TOP OF THE PRODUCT DO NOT INSTALL THE PRODUCT NEAR HEAT SOURCES A fire may result Have a technician install the wall mount hanger Installation by an unqualified person can result in an injury Only use approved cabinets Do ...

Страница 9: ...rm the product Do not install the product in a kitchen or near a kitchen counter Caution Do not drop the product while moving Product failure or personal injury may result Do not set down the product on its front The screen may become damaged When installing the product on a cabinet or shelf make sure that the bottom edge of the front of the product is not protruding The product may fall and becom...

Страница 10: ...disconnect the power cord Then contact Samsung Customer Service Center Continued use can result in a fire or electric shock Do not leave heavy objects or items that children like toys sweets etc on top of the product The product or heavy objects may fall as children try to reach for the toys or sweets resulting in a serious injury During a lightning or thunderstorm power off the product and remove...

Страница 11: ...substances have entered the product Then contact Samsung Customer Service Center Product failure an electric shock or fire may result Caution Leaving the screen fixed on a stationary image for an extended period of time may cause afterimage burn in or defective pixels Activate power saving mode or a moving picture screen saver if you will not be using the product for an extended period of time _ D...

Страница 12: ...ed from the remote control Place the battery in a location that children or infants cannot reach If children have had the battery in their mouths consult your doctor immediately When replacing the battery insert it with the right polarity Otherwise the battery may become damaged or it may cause fire personal injury or damage due to leakage of the internal liquid Use only the specified standardized...

Страница 13: ...n in the image The panel is fragile and can get damaged Lay the product down to handle it as shown in the image the packaging can be used Ensure you use the handles on the back when moving the product Do not hold or grasp any area of the product within 15mm from the front ...

Страница 14: ... in the images 1 Remove the black locking device at the bottom of the box 3 2 1 2 Using the grooves in the box lift and remove the top of the box 3 Check the components and remove the styrofoam and plastic bag The appearance of actual components may differ from the image shown 4 Store the box in a dry area so that it can be used when moving the product in the future ...

Страница 15: ...provided with the product To install a stand you can purchase one separately Components Components may differ in different locations Quick setup guide Warranty card Not available in some locations User manual MagicInfo Lite Edition Software CD Batteries P 22 Not available in some locations Remote Control P 21 Power cord D SUB cable P 41 Wall mount Fixed Bracket Kit Checking the Components ...

Страница 16: ...tailer Wall mount Kit Stand RS232C Stereo cable P 98 DVI cable P 42 HDMI DVI cable P 42 HDMI cable P 43 Video cable P 46 Stereo cable Component cable P 47 RCA stereo cable P 49 RCA cable P 46 AV Component Adapter P 46 AUDIO Adapter P 46 LAN cable P 99 Network Box P 50 DP DVI cable ...

Страница 17: ...Description Remote Control Sensor Aim the remote control towards this spot on the LCD Display Keep the area between the remote sensor and remote control obstacle free Light sensor Automatically detects the intensity of ambient light around a selected display and adjusts the screen brightness Power indicator Turns off in power on mode and blinks green in power saving mode SOURCE button Switches fro...

Страница 18: ...hed to any part of the display using the double sided tape provided with the sensor The External sensor KIT can also be attached to a wall near the display Do not attach the External sensor KIT to the display if the display does not have plastic or metal sides The display can be damaged ...

Страница 19: ...control signal via the external sensor board and outputs the signal via LOOP OUT RJ45 MDC Connects to MDC using a LAN cable RS232C IN Connects to MDC using an RS232C cable RS232C OUT PC AUDIO IN Receives sound from a PC via an audio cable PC AUDIO OUT Connects to the audio of a source device AV COMPONENT IN Connects to a source device using the AV component adapter D SUB IN Connects to a source de...

Страница 20: ...g device 1 Fix the cable of your anti theft locking device to a heavy object such as a desk 2 Put one end of the cable through the loop on the other end 3 Insert the locking device into the anti theft lock slot at the back of the product 4 Lock the locking device An anti theft locking device can be purchased separately Refer to the user guide provided with your anti theft locking device for detail...

Страница 21: ...U OFF VOL CH CONTENT HOME MagicInfo Lite S BLANK QZ 1 ABC 2 DEF 3 GHI 4 JKL 5 MNO 6 DEL SYMBOL 0 PRS 7 TUV 8 WXY 9 MUTE SOURCE Power off the product Enter the password in the OSD menu or change the channel Mute the sound Unmuting the sound Press MUTE again or press the volume control VOL button Display or hide the onscreen display menu or return to the previous menu Power on the product Adjust the...

Страница 22: ...menu Manually select a connected input source from PC DVI or HDMI It sets safe lock function Quickly select frequently used functions Return to the previous menu MagicInfo Quick Launch Button MagicInfo can only be enabled when a network box is connected This button is disabled for products that do not support MagicInfo Remote control button functions may differ for different products To place batt...

Страница 23: ... Close the onscreen display OSD menu Remote Control Reception Range 7m 10m 30 30 Use the remote control within 7m to 10m from the sensor on the product at an angle of 30 from the left and right Store used batteries out of reach of children and recycle Do not use a new and used battery together Replace both batteries at the same time Remove batteries when the remote control is not to be used for an...

Страница 24: ...te control pointed at product will be received by both display products and The appearance may differ depending on the product 1 2 CONTROL IN IR OUT Controlling more than one display product using an external sensor kit sold separately A command sent from the remote control pointed at product to which the external sensor kit is connected will be received by both display products and The appearance...

Страница 25: ...d Rotation Contact Samsung Customer Service Center for further details The product can be tilted at a maximum angle of 15 from a perpendicular wall surface To use the product vertically portrait turn it clockwise so that the LED is pointing down A B Figure 1 1 Side view Ventilation Installation on a Perpendicular Wall A Minimum 40 mm B Ambient temperature Under 35 C When installing the product on ...

Страница 26: ...an indented wall allow at least the space specified above between the product and wall for ventilation and ensure that the ambient temperature is kept below 35 C Dimensions 1 2 3 4 5 Unit mm inches Model name 1 1 2 2 3 4 3 4 5 UD46C B 1023 7 1018 3 572 9 578 3 95 5 All drawings are not necessarily to scale Some dimensions are subject to change without prior notice Refer to the dimensions prior to ...

Страница 27: ...detailed information on installing the wall mount see the instructions provided with the wall mount We recommend you contact a technician for assistance when installing the wall mount bracket Samsung Electronics is not responsible for any damage to the product or injury to yourself or others if you elect to install the wall mount on your own ...

Страница 28: ...VESA standard screw specifications the length of the screws may differ depending on the wall mount specifications Do not fasten the screws too firmly This may damage the product or cause the product to fall leading to personal injury Samsung is not liable for these kinds of accidents Samsung is not liable for product damage or personal injury when a non VESA or non specified wall mount is used or ...

Страница 29: ...600 bps Data bits 8 bit Parity None Stop bit 1 bit Flow control None Maximum length 15 m only shielded type Pin assignment 1 2 3 4 5 6 7 8 9 Pin Signal 1 Detect data carrier 2 Received data 3 Transmitted data 4 Prepare data terminal 5 Signal ground 6 Prepare data set 7 Send request 8 Clear to send 9 Ring indicator ...

Страница 30: ... 6 9 5 1 P2 P1 P1 P2 P2 Female Rx Tx Gnd 2 3 5 1 2 3 Tx Rx Gnd Female LAN Cable Pin assignment 1 2 3 4 5 6 7 8 Pin No Standard Color Signal 1 White and orange TX 2 Orange TX 3 White and green RX 4 Blue NC 5 White and blue NC 6 Green RX 7 White and brown NC 8 Brown NC ...

Страница 31: ...C Direct LAN cable PC to HUB RJ45 MDC RJ45 MDC HUB P1 P1 P2 P2 Signal P1 P2 Signal TX 1 1 TX TX 2 2 TX RX 3 3 RX RX 6 6 RX Cross LAN cable PC to PC RJ45 MDC P1 P2 Signal P1 P2 Signal TX 1 3 RX TX 2 6 RX RX 3 1 TX RX 6 2 TX ...

Страница 32: ...32 Connection Connection 1 RS232C IN OUT RS232C IN OUT RS232C IN OUT RS232C IN OUT Connection 2 RJ45 RJ45 Connection 3 RS232C OUT RJ45 RS232C IN OUT RS232C IN OUT RS232C IN OUT ...

Страница 33: ... Auto adjustment control 0x3D 0 8 Video wall mode control 0x5C 0 1 9 Safety Lock 0x5D 0 1 All communications take place in hexadecimals The checksum is calculated by adding up all values except the header If a checksum adds up to be more than 2 digits as shown below 11 FF 01 01 112 the first digit is removed E g Power On ID 0 Header Command ID Data length Data 1 Checksum 0xAA 0x11 1 Power Header C...

Страница 34: ...a length Ack Nak r CMD Val1 Checksum 0xAA 0xFF 3 N 0x11 ERR ERR A code showing what error has occurred Volume control Function The volume of a product can be adjusted using a PC Viewing volume state Get Volume Status Header Command ID Data length Checksum 0xAA 0x12 0 Setting the volume Set Volume Header Command ID Data length Data Checksum 0xAA 0x12 1 Volume Volume Volume value code to be set on a...

Страница 35: ... DTV 0x21 HDMI1 0x22 HDMI1_PC 0x23 HDMI2 0x24 HDMI2_PC 0x25 DisplayPort DVI_video HDMI1_PC and HDMI2_PC cannot be used with the Set command They only respond to Get commands This model does not support HDMI1 HDMI1_PC HDMI2 and HDMI2_PC ports MagicInfo is only available with models that contain the MagicInfo function RF TV DTV are only available with models that include a TV Ack Header Command ID D...

Страница 36: ...sum 0xAA 0x18 0 Setting the picture size Set Picture Size Header Command ID Data length Data Checksum 0xAA 0x18 1 Screen Mode Screen Mode A code that sets the product status 0x01 16 9 0x04 Zoom 0x31 Wide Zoom 0x0B 4 3 Ack Header Command ID Data length Ack Nak r CMD Val1 Checksum 0xAA 0xFF 3 A 0x18 Screen Mode Screen Mode A code that sets the product status Nak Header Command ID Data length Ack Nak...

Страница 37: ...d on or off using a PC Only available on models that have the PIP function The mode cannot be controlled if Video Wall is set to On This function is not available in MagicInfo Viewing PIP on off state Get the PIP ON OFF Status Header Command ID Data length Checksum 0xAA 0x3C 0 Setting PIP on off Set the PIP ON OFF Header Command ID Data length Data Checksum 0xAA 0x3C 1 PIP PIP A code used to turn ...

Страница 38: ...nction Video Wall mode can be activated on a product using a PC This control is only available on a product whose Video Wall is enabled This function is not available in MagicInfo Viewing video wall mode Get Video Wall Mode Header Command ID Data length Checksum 0xAA 0x5C 0 Setting the video wall Set Video Wall Mode Header Command ID Data length Data Checksum 0xAA 0x5C 1 Video Wall Mode Video Wall...

Страница 39: ...5D 0 Enabling or disabling safety lock Set Safety Lock Enable Disable Header Command ID Data length Data Checksum 0xAA 0x5D 1 Safety Lock Safety Lock Safety lock code to be set on a product 1 ON 0 OFF Ack Header Command ID Data length Ack Nak r CMD Val1 Checksum 0xAA 0xFF 3 A 0x5D Safety Lock Safety Lock Safety lock code to be set on a product Nak Header Command ID Data length Ack Nak r CMD Val1 C...

Страница 40: ...mand ID Data length Ack Nak r CMD Val1 Checksum 0xAA 0xFF 3 A 0x84 V Wall_ On V Wall_On Same as above Nak Header Command ID Data length Ack Nak r CMD Val1 Checksum 0xAA 0xFF 3 N 0x84 ERR ERR A code showing what error has occurred Video Wall User Control Function Personal Computer turns Video Wall function of TV Monitor on off This function is not available in MagicInfo Get Video Wall Status Header...

Страница 41: ... 6 0x61 0x62 0x63 0x64 0x65 0x66 0x67 0x68 0x69 0x6A 0x6B 0x6C 0x6D 0x6E 0x6F 7 0x71 0x72 0x73 0x74 0x75 0x76 0x77 0x78 0x79 0x7A 0x7B 0x7C 0x7D 0x7E N A 8 0x81 0x82 0x83 0x84 0x85 0x86 0x87 0x88 0x89 0x8A 0x8B 0x8C N A N A N A 9 0x91 0x92 0x93 0x94 0x95 0x96 0x97 0x98 0x99 0x9A 0x9B N A N A N A N A 10 0xA1 0xA2 0xA3 0xA4 0xA5 0xA6 0xA7 0xA8 0xA9 0xAA N A N A N A N A N A 11 0xB1 0xB2 0xB3 0xB4 0xB...

Страница 42: ...0 Set Number Data 1 0x01 2 0x02 99 0x63 100 0x64 Ack Header Command ID Data length Ack Nak r CMD Val1 Val2 Checksum 0xAA 0xFF 4 A 0x89 Wall_Div Wall_SNo Nak Header Command ID Data length Ack Nak r CMD Val1 Checksum 0xAA 0xFF 3 N 0x89 ERR ERR A code showing what error has occurred ...

Страница 43: ...layers Pre connection Checkpoints Before connecting a source device read the user manual provided with it The number and locations of ports on source devices may differ from device to device Do not connect the power cable until all connections are completed Connecting the power cable during connection may damage the product Connect the sound ports correctly left white and right red Check the types...

Страница 44: ...ure you connect a source device first before connecting the power cable A PC can be connected to the product in a variety of ways Select a connection method suitable for your PC Connecting parts may differ in different products Connection using the D SUB cable Analog type D SUB IN PC AUDIO IN ...

Страница 45: ...al type DVI IN MagicInfo PC AUDIO IN Connection Using an HDMI DVI Cable When you connect a PC to the product using an HDMI DVI cable set Edit Name to DVI PC to access video and audio content stored on the PC HDMI IN 1 HDMI IN 2 PC AUDIO IN ...

Страница 46: ...46 Connection Using an HDMI Cable HDMI IN 1 HDMI IN 2 ...

Страница 47: ...re quality The picture quality of TFT LCDs may degrade if the optimum resolution is not selected Changing the Resolution on Windows XP Go to Control Panel Display Settings and change the resolution Changing the Resolution on Windows Vista Go to Control Panel Personal Settings Display Settings and change the resolution ...

Страница 48: ...e Resolution on Windows 7 Go to Control Panel Display Screen Resolution and change the resolution Changing the Resolution on Windows 8 Go to Settings Control Panel Display Screen Resolution and change the resolution ...

Страница 49: ...ing all other cables Ensure you connect a source device first before connecting the power cable You can connect a video device to the product using a cable Connecting parts may differ in different products Press the SOURCE button on the remote control to change the source Connection Using the AV Cable AV COMPONENT IN PC AUDIO IN DVI OUT LOOPOUT PC AUDIO IN ...

Страница 50: ...n HDMI DVI cable To resolve this additionally connect an audio cable to the audio ports on the product and video device When you connect a video device to the product using an HDMI DVI cable set Edit Name to DVI Devices to access video and audio content stored on the video device Supported resolutions include 1080p 50 60Hz 720p 50 60Hz 480p and 576p HDMI IN 1 HDMI IN 2 PC AUDIO IN ...

Страница 51: ...ay normally if at all or the audio may not work if an external device that uses an older version of HDMI mode is connected to the product If such a problem occurs ask the manufacturer of the external device about the HDMI version and if out of date request an upgrade Be sure to use an HDMI cable with a thickness of 14 mm or less Be sure to purchase a certified HDMI cable Otherwise the picture may ...

Страница 52: ...52 Connecting to an Audio System Connecting parts may differ in different products PC AUDIO OUT ...

Страница 53: ...he one provided with the network box restoring the previous version of the operating system or installing software that is not compatible with the operating system provided you will not be able to benefit from technical support and will be charged a fee for a visit from a service technician A product exchange or refund will also not be available MagicInfo Setup Wizard v 1 12 Select Application ste...

Страница 54: ... Preferred DNS server Alternate DNS server 10 44 33 22 10 33 22 11 Back B Next N Finish Cancel 4 Enter the IP information MagicInfo Setup Wizard v 1 12 Select Language step 3 Select the language you want to install on the system for menus and dialogs Current Language Engilsh German English French Italian Chinese Traditional Japanese Korean Russian Swedish Turkish Chinese Simplified Portuguese Back...

Страница 55: ...on 1 Application MagicInfo Pro LAN WAN based version 2 Internet Protocol TCP IP IP 192 168 0 102 3 Language English 4 Screen Type Landscape Do not show again Back B Apply Finish Cancel 7 Double check the settings you have just configured If the execution icon does not appear double click the MagicInfo icon on the desktop The icon will appear at the bottom right of the screen ...

Страница 56: ...er depending on the model To use MagicInfo a network box sold separately must be connected to the product Use to select PC HDMI or other external input sources connected to the LCD Display Use to select the screen of your choice 1 PC 2 DVI This is deactivated when a network box is installed 3 AV 4 Component 5 HDMI1 6 HDMI2 7 MagicInfo Activated when a network box is connected ...

Страница 57: ...del PIP turns off when the LCD Display is switched to an external source If you select in Size Position and Transparency will not be activated The PIP function is not available when Video Wall is On When external AV devices such as VCRs or DVDs are connected to the LCD Display PIP allows you to watch video from those devices in a small window super imposed on the PC Video signal ...

Страница 58: ... depending on the model Selects the input source for the PIP Without Network box Main picture Sub picture PC DVI AV HDMI1 HDMI2 DVI PC AV PC HDMI1 PC HDMI2 PC With Network box Main picture Sub picture PC AV HDMI1 HDMI2 AV PC HDMI1 PC HDMI2 PC MagicInfo Network Box PC AV Component PIP is disabled if the primary screen does not receive a signal ...

Страница 59: ...Move Enter Return PIP On Source HDMI 1 Size Position Transparency 투명하게 The displayed image may differ depending on the model Position PIP PIP Move Enter Return PIP On Source HDMI 1 Size Position Transparency 투명하게 The displayed image may differ depending on the model Changes the Position of the PIP window ...

Страница 60: ...Devices The displayed devices differ depending on the external input mode When connecting a PC to the HDMI terminal set Edit Name to PC In other cases set Edit Name to AV However since 640x480 720p 1280x720 and 1080p 1920x1080 are common signals for AV and PC make sure to set the Edit Name in accordance with the input signal The Picture menu changes depending on the input signal and Edit Name When...

Страница 61: ...ence if no video is found Off On Source AutoSwitch selection and PIP function If the Source AutoSwitch selection is set to On the PIP function will not work the Source AutoSwitch selection must be set to Off for the PIP feature to work When the Source AutoSwitch selection is On and or the Primary Source Recovery is On the display power saving mode becomes inactive When Primary Source Recovery is O...

Страница 62: ...ayed image may differ depending on the model Specify Primary Source for the automatic input source Secondary Source Source AutoSwitch Settings Source AutoSwitch Settings Move Enter Return Source AutoSwitch Primary Source Recovery Primary Source Secondary Source PC On On DVI The displayed image may differ depending on the model Specify Secondary Source for the automatic input source ...

Страница 63: ...tisement More The displayed image may differ depending on the model The LCD Display has four automatic picture settings Information Advertisement and Custom that are preset at the factory Information Recommended for communicating exact information e g public information Advertisement Recommended for displaying advertisements e g videos or indoor or outdoor ads Custom Not available when Dynamic Con...

Страница 64: ...al preference By adjusting the picture using the Custom function Mode will change to Custom mode Not available when Dynamic Contrast is set to On Contrast Adjusts the Contrast Brightness Adjusts the Brightness Sharpness Adjusts the Sharpness Gamma Adjust the mid range brightness Gamma for the picture Natural Mode1 Sets the picture brighter than Natural Mode2 Sets the picture darker than Mode1 Mode...

Страница 65: ... when Dynamic Contrast is set to On Off Cool Normal Warm Custom If you set the Color Tone to Cool Normal Warm or Custom the Color Temp function is disabled If you set the Color Tone to Off the Color Control function is disabled Color Control Move Enter Return Red Green Blue 50 50 50 Color Control Color Control The displayed image may differ depending on the model Adjusts individual Red Green Blue ...

Страница 66: ...ck is used to fine tune and get the best image by removing noise that creates unstable images with jitters and shakiness If satisfactory results are not obtained using the Fine adjustment use the Coarse adjustment and then use Fine again Coarse Removes noise such as vertical stripes Coarse adjustment may move the screen image area You may relocate it to the Center using the horizontal control menu...

Страница 67: ...ing the resolution in the control panel the auto function is performed Signal Balance Move Enter Return Signal Balance 사용자 조정 Signal Control Signal Balance Signal Balance Off On The displayed image may differ depending on the model Signal Balance Selects either On or Off with the signal balance Signal Control Available when Signal Control is set to On R Gain G Gain B Gain R Offset G Offset B Offse...

Страница 68: ...nce Size 16 9 HDMI Black Level PIP Picture Dynamic Contrast Off Lamp Control 100 Picture Reset Picture Picture More Normal Low The displayed image may differ depending on the model When a DVD or set top box is connected to your product via HDMI or DVI port it may cause a degradation in the screen quality such as an increase in the black level a low contrast or discoloration etc depending on the ex...

Страница 69: ...creen Color Adjusts the Color of the PIP window on the screen PIP input only operates in AV HDMI1 or HDMI2 mode Tint Adds a natural tone to the PIP window PIP input only operates in AV HDMI1 or HDMI2 mode Dynamic Contrast Move Enter Return Signal Balance Size 16 9 HDMI Black Level Normal PIP Picture Dynamic Contrast 해제 Lamp Control 100 Picture Reset Picture Picture More Off On The displayed image ...

Страница 70: ...r depending on the model Adjusts the inverter lamp in order to reduce energy consumption Not available when Dynamic Contrast is set to On Picture Reset Reset picture settings i Yes No The displayed image may differ depending on the model Reset the screen settings ...

Страница 71: ...ze 16 9 Digital NR On HDMI Black Level Normal Picture Picture Dynamic Custom Standard Movie More The displayed image may differ depending on the model The LCD Display has four automatic picture settings Dynamic Standard Movie and Custom that are preset at the factory Dynamic Standard Movie Custom Not available when Dynamic Contrast is set to On ...

Страница 72: ...menus the contrast and brightness can be changed to your personal preference Not available when Dynamic Contrast is set to On Contrast Adjusts the Contrast Brightness Adjusts the Brightness Sharpness Adjusts the picture Sharpness Color Adjusts the picture Color Tint Adds a natural tone to the display The Tint slider is only displayed when input source is AV Component HDMI1 or HDMI2 ...

Страница 73: ...adjustable Not available when Dynamic Contrast is set to On Off Cool2 Cool1 Normal Warm1 Warm2 If you set the Color Tone to Cool2 Cool1 Normal Warm1 or Warm2 the Color Temp function is disabled Changing a setting in the Color Tone menu will switch the screen mode to Custom ColorTemp Color Temp 10000K The displayed image may differ depending on the model Color Temp is a measure of the warmth of the...

Страница 74: ...3 normal mode Screen Fit Displays the input scenes as they are without any cutoff when HDMI 720p 1080i 1080p signals are input Custom Changes the resolution to suit the user s preferences Digital NR Move Enter Return Mode Custom Custom Color Tone Normal Color Temp Size 16 9 Digital NR HDMI Black Level Picture Picture Off On More The displayed image may differ depending on the model The Digital Noi...

Страница 75: ...ust the screen quality of your product by configuring the HDMI Black Level Normal Low For Timing which can be used for both the PC and the DTV in HDMI and DTV mode HDMI Black Level will be activated Film Mode Picture Picture Move Enter Return More Film Mode 해제 PIP Picture Dynamic Contrast Off Lamp Control 100 Picture Reset Off On The displayed image may differ depending on the model Film Mode cali...

Страница 76: ...ness of the PIP window on the screen Sharpness Adjusts the Sharpness of the PIP window on the screen Dynamic Contrast Picture Picture Move Enter Return More Film Mode Off PIP Picture Dynamic Contrast Lamp Control 100 Picture Reset Off On The displayed image may differ depending on the model Dynamic Contrast automatically detects the distribution of the visual signal and adjusts to create an optimu...

Страница 77: ...r depending on the model Adjusts the inverter lamp in order to reduce energy consumption Not available when Dynamic Contrast is set to On Picture Reset Reset picture settings i Yes No The displayed image may differ depending on the model Reset the screen settings ...

Страница 78: ...fer depending on the model The LCD Display has a built in high fidelity stereo amplifier Standard Selects Standard for the standard factory settings Music Selects Music when watching music videos or concerts Movie Selects Movie when viewing movies Speech Selects Speech when watching a show that is mostly dialog i e news Custom Selects Custom if you want to adjust the settings according to your per...

Страница 79: ...djust sound using Custom function Mode will turn to Custom mode Bass Emphasizes low frequency audio Treble Emphasizes high frequency audio Balance Allows you to Adjusts the sound balance between the left and right speakers AutoVolume Move Enter Return Mode Custom Custom Auto Volume 표준 SRS TS XT Sound Select Main Sound Reset Sound Sound Off On The displayed image may differ depending on the model R...

Страница 80: ...round XT delivers a compelling virtual surround sound experience through any two speaker playback system including internal television speakers It is fully compatible with all multichannel formats Off On Sound Select Move Enter Return Mode Custom Custom Auto Volume Off SRS TS XT Off Sound Select 면 Sound Reset Sound Sound Main Sub The displayed image may differ depending on the model Enable the sou...

Страница 81: ...81 Sound Reset Reset sound settings i Yes No The displayed image may differ depending on the model Reset the sound settings ...

Страница 82: ...etup More English Deutsch Español Français Italiano Svenska Русский Português The displayed image may differ depending on the model You can choose one of 14 languages The language chosen affects only the language of the OSD It has no effect on any software running on the computer English Deutsch Español Français Italiano Svenska Русский Português Türkçe Polish 简体中文 繁體中文 日本語 한국어 ...

Страница 83: ...80 Timer1 Timer2 Timer3 You can set the LCD display to automatically turn on or off at a specified time Only enabled when the clock is set using the Clock Set menu The Manual option allows you to select a day of the week Holiday When choose Apply timer is not available on holiday when choose Don t Apply timer is available on holiday Holiday Management Add You can register holidays Delete Selected ...

Страница 84: ...of the OSD High Medium Low Opaque Safety Lock Move Enter Return Change PIN Lock Safety Lock Safety Lock The displayed image may differ depending on the model Change PIN The password can be changed The preset password for the LCD Display is 0000 If you forgot your password press the remote buttons INFO EXIT MUTE to reset the password to 0000 Lock This is the function that locks the OSD in order to ...

Страница 85: ...creens connected together so that each screen shows a part of the whole picture or where the same picture is repeated on each screen When the Video Wall is on you can adjust the Video Wall screen setting When Video Wall is running the Size functions are not available Disabled when PIP is set to On Turns Off On the Video Wall function of the selected display Off On Off On VideoWall Move Enter Retur...

Страница 86: ...es a full screen without any margins Natural Displays a natural image with the original aspect ratio intact Horizontal Move Enter Return Video Wall Format Horizontal Vertical Screen Position Video Wall Video Wall On Full 1 1 The displayed image may differ depending on the model Sets how many parts the screen should be divided horizontally Fifteen adjustment levels 1 15 If Vertical is set to 15 the...

Страница 87: ...er Return Screen Position Screen Position The displayed image may differ depending on the model The screen can be divided into several images A number of screens can be selected with a different layout when dividing Select a mode in Screen Position Select a display in Display Selection The selection will be set up by pressing a number in the selected mode The screen can be split into a maximum of ...

Страница 88: ...ages on the screen you can use this function to have pixels move on the LCD in the horizontal or vertical direction Off On Horizontal Sets how many pixels the screen moves horizontally Five adjustment levels 0 1 2 3 and 4 Vertical Sets how many pixels the screen moves vertically Five adjustment levels 0 1 2 3 and 4 Time Set the time interval for performing the horizontal or vertical movement respe...

Страница 89: ...peration will be performed for the set period of time and then automatically finish Off On Mode You can change the Safety Screen Type Bar Eraser Pixel Period Use this function to set the execution period for each mode set in the Timer Time Within the set period of time specify a time for execution Bar The displayed image may differ depending on the model This function prevents after images on the ...

Страница 90: ...er depending on the model This function prevents after images on the screen by moving a rectangular pattern Pixel The displayed image may differ depending on the model This function prevents after images by moving many pixels on the screen ...

Страница 91: ...68 1280 X 768 1360 X 768 1366 X 768 S N The displayed image may differ depending on the model Available in PC mode only When the picture is not displayed properly on the screen when setting the graphics card resolution of the computer to 1024 x 768 60Hz 1280 x 768 60Hz 1360 x 768 60Hz or 1366 x 768 60Hz by using this function Resolution Select you can have the picture displayed on the screen in th...

Страница 92: ...del Adjusts the Power On time for the screen Set the Power On time to be longer to avoid overvoltage OSD Rotation Move Enter Return Setup Setup Resolution Select Off Power On Adjustment OSD Rotation Advanced Settings Setup Reset Reset All More S N Landscape Portrait The displayed image may differ depending on the model OSD Rotate Landscape Portrait ...

Страница 93: ...perature exceeds the specified temperature and the product will automatically power off to prevent overheating if the temperature keeps rising It is best to use the product at temperatures 75 80 C based on ambient temperature of 40 C Refer to Specifications herein for details about operating conditions Current Temperature Shows the current temperature of the product Auto Power Move Enter Return Te...

Страница 94: ...ced Settings Off On The displayed image may differ depending on the model Locks or unlocks the monitor control buttons on the product Off On User Auto Color Move Enter Return Auto Color Reset User Auto Color User Auto Color The displayed image may differ depending on the model Auto Color Automatically adjusts the colors Reset Resets the color settings Enabled only in PC mode ...

Страница 95: ... read No Signal if no input signal is detected On Power saving mode will be activated if no input signal is detected Auto When no input signal is detected Power saving mode will be activated if an external device is connected A message will read No Signal if no external device is connected Lamp Schedule Move Enter Return Lamp Schedule On Lamp Schedule Lamp Schedule Schedule 1 Hour Lamp am pm Minut...

Страница 96: ...timum Mode OSD No Signal OSD MDC OSD OSD Display OSD Display On On On On The displayed image may differ depending on the model Displays or hides a menu item on the screen Source OSD Off On Not Optimum Mode OSD Off On No Signal OSD Off On MDC OSD Off On ...

Страница 97: ...upgrade 1 Connect the product to a computer via a digital signal such as DVI or HDMI Click the BMP image file converted from an SW code The image below will appear on the screen of the product 2 While a BMP image onto which the software code has been converted is displayed on the screen select Software Upgrade 3 If a more recent version than the current software version is detected you will be ask...

Страница 98: ...s No The displayed image may differ depending on the model Reset all the values for a setting Reset All All Settings return to default settings i Yes No The displayed image may differ depending on the model Reset all the settings for the display ...

Страница 99: ...e individual SET Only a SET where the ID corresponds to the transmitter setting becomes activated MDC Connection Selects a port to receive the MDC inputs from RS232C MDC Communicates with the MDC via a RS232C MDC cable RJ45 MDC Communicates with the MDC via an RJ45 MDC cable Network Setting IP Setting Manual Auto IP Address Manually enter the IP Address if IP Setting is set to Manual Subnet Mask M...

Страница 100: ...n and click Install 9 Installation progress will be displayed 10 Click Finish in the displayed InstallShield Wizard Complete window 11 The MDC Unified shortcut icon will be created on the desktop after installation Uninstallation 1 Select Settings Control Panel on the Start menu and double click Add Delete Program 2 Select MDC Unified from the list and click Change Remove MDC installation can be a...

Страница 101: ...to easily control multiple display devices simultaneously using a PC Connecting to MDC Using MDC via RS 232C serial data communications standards An RS 232C serial cable must be connected to the serial ports on the PC and monitor RS232C IN RS232C OUT RS232C OUT RS232C IN RS232C IN ...

Страница 102: ...ay device and connect the device to the PC One display device can connect to another using an RS 232C serial cable Connection using a direct LAN cable Multiple products can be connected using the RJ45 port on the product and the LAN ports on the HUB RJ45 MDC HUB ...

Страница 103: ...103 Connection using a cross LAN cable Multiple products can be connected using the RS232C IN OUT port on the product RJ45 MDC RS232C OUT RS232C OUT RS232C IN RS232C IN ...

Страница 104: ...Port No MAC and Connection Type connection status Set ID Range and detected devices Each connection can contain a maximum of 100 devices connected in serial daisy chain fashion All the LFDs detected in a connection are displayed in the Device list where the user can make groups and send commands to detected devices Connection list modification options Connection modification options includes Add E...

Страница 105: ...set to admin After logging in for the first time make sure to change the password to ensure security To change the password go to Home User Settings After you are logged in User Login admin appears at the right bottom of the program To log in automatically when the program restarts select the Auto Login checkbox in the User Login window ...

Страница 106: ...r all the LFDs connected in daisy chain of a selected connection There can be a maximum of 100 LFDs in a connection The Set ID is assigned sequentially in the daisychain running from 1 to 99 and then finally to Set ID 0 ID for the last 100th LFD is set to 0 ...

Страница 107: ...py the setting of one LFD and apply it to multiple selected LFDs You can select specific tab categories or all tab categories for cloning using the copy setting option window To delete the settings you have configured click the Paste Settings button ...

Страница 108: ...the maximum number of times the MDC command will be retried in case of there being no reply or a corrupted reply from an LFD The retry count value can be set using the MDC options window The retry count value must be between 1 10 The default value is 1 ...

Страница 109: ...d The default user ID and password are admin Make sure to change the password after the first login 2 Click Add to add a display device SET ID Range Select a range of the unique ID assigned to a monitor If the connection is established via RS232C go to Serial and specify the COM Port If the connection is established via Ethernet enter the IP that was entered for the display device ...

Страница 110: ...ed device or change the input source or volume of the device Choose display devices from the list of sets and select the Home tab Select an item and change the corresponding setting Power On Power on a selected display Off Power off a selected display Input Input Source Change the input source Input sources available can vary depending on the Display Device Models The input source can be changed o...

Страница 111: ...s menu shows a list of display devices which have following errors fan error temperature error brightness sensor error or lamp error Select a display device from the list The Repair button will be enabled Click the Refresh button to refresh the error status of the display device The recovered display device will disappear from the Fault Device List Fault Device Alert Display device in which error ...

Страница 112: ...out the login window will appear prompting you to enter user information even if the Auto Login checkbox is selected Screen Adjustment Custom The screen settings contrast brightness etc can be adjusted Choose display devices from the list of sets and select the Picture tab Select an item and change the corresponding screen setting Picture Mode Adjust the picture mode for the selected display devic...

Страница 113: ...n Plus function Clear Set the level of Auto Motion Plus to clear This mode is suitable to display vivid images Standard Set the level of Auto Motion Plus to standard Smooth Set the level of Auto Motion Plus to smooth This mode is suitable to display smooth images Custom Customize the level of screen burn in or flickering Demo This function demonstrates the technology of Auto Motion Plus The result...

Страница 114: ...the video Size Picture Size Adjust the screen size for the selected display device The Detail item will be disabled if Picture Size is set to a mode that does not support detailed configuration The buttons can be used to adjust Zoom The screen can be relocated using the up down left right buttons Detail You can view details of the selected screen size PC Screen Adjustment Frequency adjustment or f...

Страница 115: ...ice a pop up message window appears when the product receives a 3D signal 3D Optimization The overall adjustment of 3D effect 3D Expert Pattern View a 3D pattern 3D Effect Adjust 3D effects like perspective and depth for your preferred 3D viewing experience Auto Automatically adjust the perspective and depth settings in accordance with the 3D input source Manual Manually adjust the perspective and...

Страница 116: ... motion LED Motion Plus Removes blur and judder from scenes with larger amounts of rapid movement to provide a clearer picture Color Space Adjusts the range and variety of color the color space available to create images Auto Native Custom To adjust Color Red Green Blue and Reset set Color Space to Custom White Balance Adjust the colour temperature for a more natural picture R Offset G Offset B Of...

Страница 117: ...y Balance L R Adjust the volume of the left and right speakers of the selected display device SRS TS XT Enable or disable the SRS TS XT effect for the selected display device System Setup Video Wall Choose display devices from the list of sets and select the System tab The Video Wall function can be used to display part of a whole picture or repeat the same picture on each of connected multiple di...

Страница 118: ... Preview are enabled when Video Wall is set to on Note that if multiple sets are selected Preview is enabled only if the settings for H and V match the layout of the selected sets To change the Position select a set and drag it to a new position The range of screen divider settings may differ depending on the model PIP Basic information required to adjust PIP will appear in the menu screen PIP wil...

Страница 119: ...he standby mode to activate if an input source is not detected Fan Temperature Configure the settings required to detect the fan speed and internal temperature for the product s protection Fan Control Select a method to configure the fan speed Fan Speed Setting Configure the fan speed Temperature Detect the internal temperature by specifying the range of temperature ...

Страница 120: ... set Button Lock to Off OSD Display Source OSD Select whether to display a message when the Source is changed Not Optimum Mode OSD Select whether to display a message when a non compatible mode is selected No Signal OSD Select whether to display a message when there is no input signal MDC OSD Select whether to display a message when settings are changed by the MDC ...

Страница 121: ...r On Time Set the time to power on the selected display device Volume Specify the volume of the display device when it is powered on by On Time Source Specify the input source of the display device when it is powered on by On Time Off Timer Repeat Specify the period for which you want to repeat the selected Timer Once EveryDay Mon Fri Mon Sat Sat Sun Manual Holiday Apply The Holiday Management set...

Страница 122: ...an be enabled or disabled in the Timer settings menu Add You can specify holidays Click the Add button in the Holiday Management window Delete Delete holidays check the corresponding checkboxes and click this button List of holidays View a list of holidays you have added Screen Burn Protection Pixel Shift Move the screen slightly at specified time intervals to prevent screen burn in ...

Страница 123: ...al Display the image retention preventive pattern set in Mode for a specified period of time from Start Time to End Time Mode Select a screen protective pattern to display Period Hour Specify the time interval to activate the Screen Saver function The option is enabled when Repeat is selected for Timer Time Sec Specify the duration to keep the Screen Saver function on The option is enabled when Re...

Страница 124: ...ion Automatically adjust the backlight of the selected display device at a specified time If Manual Lamp Control is adjusted Auto Lamp Control will automatically switch to Off Manually adjust the backlight for the selected display If Auto Lamp Control is adjusted Manual Lamp Control will automatically switch to Off Ambient Light Ambient Light detects ambient light intensity and automatically adjus...

Страница 125: ... display on the screen Timer Set the Start Time and End Time to display a message Message Position Select an orientation to display a message Message from Horizontal and Vertical Motion Specify the Direction and Speed to display a message Message Font Options Specify the message Size Foreground Color Foreground Opacity Background Color and Background Opacity ...

Страница 126: ...en of a display device Remote Control Enable or disable the remote control Reset Reset Picture Reset the screen settings Reset Sound Reset the sound settings Reset System Reset the system settings Reset All Reset the screen sound and system settings at the same time ...

Страница 127: ...ram to use the selected language Command Retry Count Specify the number of retry attempts when a command fails Error Status Interval Specify the time interval to query the display device in order to check if Fault Device has occurred Mail Alert Interval Specify the time interval for email notifications in the event when Fault Device occurs Edit Column Select the items you want to display in the li...

Страница 128: ...128 Monitor Window A window appears showing details for data transfer between the computer and display devices Filter View the program information Information ...

Страница 129: ...129 Other Functions Resizing a Window Place the mouse pointer on a corner of the program window An arrow will appear Move the arrow to customize the size of the program window ...

Страница 130: ...ck and select Group Edit in the display device list section on the left side of the program window The Add on the same level button is enabled only if at least one group is created 2 In the Edit Group window displayed click Add on the same level or Add on the sub level Add on the same level Create a group on the same level as the selected group ...

Страница 131: ...sub level Create a sub group under the selected group 3 Enter the group name Deleting Groups 1 Select a group name and click Edit 2 In the Edit Group window displayed click Delete 3 Click Yes The group will be deleted ...

Страница 132: ... click Rename 3 If a cursor appears in the old group name enter a new group name Schedule Management Creating Schedules Create and register a schedule on a group basis 1 Click All Schedule List in the schedule section on the left side of the program window The Add button will be enabled in the middle ...

Страница 133: ...ist of schedules will appear in the set list window Device Group Select a group Date Time Instant Execution Run the schedule immediately Timer Set the date time and interval to run the schedule Action Select a function that will activate at the specified time and interval Schedule Modification To modify a schedule select the schedule and click Edit Deleting a Schedule To delete a schedule select t...

Страница 134: ...menu For a display that supports the ID in a range of 0 to 99 the ID should be set between 0 and 99 The display you want to control does not appear on the other Control Info Grids Check that the display is powered on See the power status in the system information chart Ensure you select the input source the display is connected to The following message appears repeatedly Check that the display you...

Страница 135: ...splayed 2 When one display is selected Settings for the selected display are displayed 3 When two displays are selected e g in sequence of ID 1 and ID 3 The settings for ID 1 are displayed before the settings for ID 3 4 When the All Select checkbox is checked and all displays are selected The default settings are displayed ...

Страница 136: ...f the screen remains blank while the power LED blinks even when the product is correctly connected to a PC perform product testing 1 Power off both the PC and product 2 Disconnect all the cables from the product 3 Power on the product 4 If No Signal is displayed the product is operating normally Checking the Resolution and Frequency Not Optimum Mode will briefly be displayed if a mode that exceeds...

Страница 137: ...contact the graphics card or computer manufacturer for further details about how to adjust the screen settings Screen issue The power LED is off The screen will not switch on Make sure that the power cord is connected No Signal is displayed on the screen refer to Connecting to a PC Check that the product is connected correctly with a cable Check that the device connected to the product is powered ...

Страница 138: ...trast Screen color is inconsistent Go to Picture and adjust the Color Control settings White does not really look white Go to Picture and adjust the Color Control settings There is no image on the screen and the power LED blinks every 0 5 to 1 second The product is in power saving mode Press any key on the keyboard or move the mouse to return to the previous screen Sound issue There is no sound Ch...

Страница 139: ...Check if the batteries are flat Check for power failure Make sure that the power cord is connected Check for any special lighting or neon signs switched on in the vicinity Source device issue A beeping sound is heard when my PC is booting If a beeping sound is heard when your PC is booting have your PC serviced ...

Страница 140: ...cy in Monitor Settings Windows 8 Go to Settings Control Panel Appearance and Personalization Display Adjust resolution Advanced Settings Monitor and adjust the frequency in Monitor Settings How can I change the resolution Windows XP Go to Control Panel Appearance and Themes Display Settings and adjust the resolution Windows ME 2000 Go to Control Panel Display Settings and adjust the resolution Win...

Страница 141: ...tings or BIOS SETUP on the PC Windows Vista Set power saving mode in Control Panel Appearance and Personalization Personalize Screen Saver Settings or BIOS SETUP on the PC Windows 7 Set power saving mode in Control Panel Appearance and Personalization Personalize Screen Saver Settings or BIOS SETUP on the PC Windows 8 Set power saving mode in Settings Control Panel Appearance and Personalization P...

Страница 142: ... UD46C B Panel Size 46 inches 116 84 cm Display area 1018 3 mm H x 572 9 mm V 40 1 inches H x 22 6 inches V Dimensions W x H x D 1023 7 x 578 3 x 95 5 mm 40 3 x 22 8 x 3 8 inches Weight without stand 18 2 kg 40 1 lb VESA 600 x 400 mm 23 6 x 15 7 inches Specifications Chapter 11 ...

Страница 143: ...External Ambient Sensor SBBA option Output DVI Out Loopout Audio Out RS232C Out IR Out Optional Network USB3 0 2port USB2 0 2port LAN DP out RS232C Plug and Play This monitor can be installed and used with any Plug and Play compatible systems Two way data exchange between the monitor and PC system optimizes the monitor settings Monitor installation takes place automatically However you can customi...

Страница 144: ...1999 5 EC The official Declaration of Conformity may be found at http www samsung com go to Support Search Product Support and enter the model name This equipment may be operated in all EU countries USA only Dispose unwanted electronics through an approved recycler To find the nearest recycling location go to our website www samsung com recyclingdirect or call 877 278 0799 ...

Страница 145: ...ected to a PC with a power saving function PowerSaver Normal Operation Power saving mode Power off Power Button off Rating Typical Power Indicator On Green Blinking On Orange Power Consumption 120 W 113 W Less than 0 5 W Less than 0 5 W The displayed power consumption level can vary in different operating conditions or when settings are changed SOG Sync On Green is not supported To reduce the powe...

Страница 146: ...tted from your PC If the signal transmitted from the PC does not belong to the standard signal modes the screen may be blank with the power LED on In such a case change the settings according to the following table by referring to the graphics card user manual Resolution Horizontal Frequency kHz Vertical Frequency Hz Pixel Clock MHz Sync Polarity H V VESA 640 x 480 31 469 59 940 25 175 IBM 720 x 4...

Страница 147: ...0 108 000 VESA 1680 x 1050 65 290 59 954 146 250 VESA 1920 x 1080 67 500 60 000 148 500 Horizontal Frequency The time to scan one line connecting the right edge to the left edge of the screen horizontally is called the Horizontal Cycle and the inverse number of the Horizontal Cycle is called the Horizontal Frequency Unit kHz Vertical Frequency Like a fluorescent lamp the screen has to repeat the s...

Страница 148: ...ng com CANADA 1 800 SAMSUNG 726 7864 http www samsung com ca English http www samsung com ca_fr French MEXICO 01 800 SAMSUNG 726 7864 http www samsung com LATIN AMERICA ARGENTINE 0800 333 3733 http www samsung com BOLIVIA 800 10 7260 http www samsung com BRAZIL 0800 124 421 4004 0000 http www samsung com CHILE 800 SAMSUNG 726 7864 From mobile 02 482 82 00 http www samsung com COLOMBIA 01 800011211...

Страница 149: ...ALA 1 800 299 0013 http www samsung com latin Spanish http www samsung com latin_en English HONDURAS 800 27919267 http www samsung com latin Spanish http www samsung com latin_en English JAMAICA 1 800 234 7267 http www samsung com NICARAGUA 00 1800 5077267 http www samsung com latin Spanish http www samsung com latin_en English PANAMA 800 7267 http www samsung com latin Spanish http www samsung co...

Страница 150: ...UNG 800 726786 http www samsung com Samsung Electronics Czech and Slovak s r o Oasis Florenc Sokolovská 394 17 180 00 Praha 8 DENMARK 70 70 19 70 http www samsung com EIRE 0818 717100 http www samsung com ESTONIA 800 7267 http www samsung com FINLAND 09 85635050 http www samsung com FRANCE 01 48 63 00 00 http www samsung com GERMANY 0180 5 SAMSUNG bzw 0180 5 7267864 0 14 Min aus dem dt Festnetz au...

Страница 151: ...1SAMSUNG 172 678 48 22 607 93 33 http www samsung com PORTUGAL 808 20 SAMSUNG 808 20 7267 http www samsung com ROMANIA 08008 SAMSUNG 08008 726 7864 TOLL FREE No http www samsung com SERBIA 0700 SAMSUNG 0700 726 7864 http www samsung com SLOVAKIA 0800 SAMSUNG 0800 726 786 http www samsung com SPAIN 902 1 SAMSUNG 902 172 678 http www samsung com SWEDEN 0771 726 7864 SAMSUNG http www samsung com SWIT...

Страница 152: ...0 800 614 40 http www samsung com MONGOLIA 7 800 555 55 55 http www samsung com RUSSIA 8 800 555 55 55 http www samsung com TADJIKISTAN 8 10 800 500 55 500 http www samsung com UKRAINE 0 800 502 000 http www samsung com ua Ukrainian http www samsung com ua_ru Russian UZBEKISTAN 8 10 800 500 55 500 http www samsung com ASIA PACIFIC AUSTRALIA 1300 362 603 http www samsung com CHINA 400 810 5858 http...

Страница 153: ... samsung com NEW ZEALAND 0800 SAMSUNG 0800 726 786 http www samsung com PHILIPPINES 1 800 10 SAMSUNG 726 7864 for PLDT 1 800 3 SAMSUNG 726 7864 for Digitel 1 800 8 SAMSUNG 726 7864 for Globe 02 5805777 http www samsung com SINGAPORE 1800 SAMSUNG 726 7864 http www samsung com TAIWAN 0800 329 999 0266 026 066 http www samsung com THAILAND 1800 29 3232 02 689 3232 http www samsung com VIETNAM 1 800 5...

Страница 154: ..._ar Arabic MOROCCO 080 100 2255 http www samsung com OMAN 800 SAMSUNG 726 7864 http www samsung com ae English http www samsung com ae_ar Arabic SAUDI ARABIA 9200 21230 http www samsung com ae English http www samsung com ae_ar Arabic TURKEY 444 77 11 http www samsung com U A E 800 SAMSUNG 726 7864 http www samsung com AFRICA ANGOLA 91 726 7864 http www samsung com BOTSWANA 0800 726 000 http www s...

Страница 155: ...NAMIBIA 8197267864 http www samsung com NIGERIA 0800 726 7864 http www samsung com SENEGAL 800 00 0077 http www samsung com SOUTH AFRICA 0860 SAMSUNG 726 7864 http www samsung com TANZANIA 0685 88 99 00 http www samsung com UGANDA 0800 300 300 http www samsung com ZAMBIA 211350370 http www samsung com ...

Страница 156: ...omer requests software installation and setup for the product If a service technician removes cleans dusts or foreign materials inside of the product If customer requests an installation additionally after purchasing a product through home shopping or online A Product damage caused by customer s fault Product damage caused by customer s mishandling or wrong repair If a product damage is caused by ...

Страница 157: ...ness users should contact their supplier and check the terms and conditions of the purchase contract This product and its electronic accessories should not be mixed with other commercial wastes for disposal Correct disposal of batteries in this product Applicable in countries with separate collection systems The marking on the battery manual or packaging indicates that the battery in this product ...

Страница 158: ...s not affect product performance The number of sub pixels by panel type 6 220 800 Run Auto Adjustment to improve the picture quality If noise is still found even after auto adjustment adjust Coarse or Fine Leaving the screen fixed on a stationary image for an extended period of time may cause afterimage burn in or defective pixels Activate power saving mode or a dynamic screen saver if you will no...

Страница 159: ... Source Drain DataBus Line TFT Gate PixelElectrode ITO Storage Capaccitor Cs Color Filter Common Electrode ITO The best way to protect the product from afterimage burn in is switching the power off or setting the PC or system to run a screen saver when not in use Also Warranty service may be limited depending on instruction guide Powering Off Screen Saver and Power Saving Mode Power off the produc...

Страница 160: ...T TIME OZ348 20 30 FLIGHT TIME OZ348 20 30 Regular Text color Change Use bright colors of similar brightness Interval Change text color and background color every 30 minutes FLIGHT TIME OZ348 20 30 FLIGHT TIME OZ348 20 30 FLIGHT TIME OZ348 20 30 FLIGHT TIME OZ348 20 30 Move and change text every 30 minutes as shown below FLIGHT TIME OZ348 FLIGHT TIME OZ348 20 30 Step 1 Step 2 Step 3 20 30 Regularl...

Страница 161: ...ding premium content DivXⓇ DivX CertifiedⓇ and associated logos are trademarks of DivX Inc and are used under license ABOUT DIVX VIDEO DivXⓇ is a digital video format created by DivX Inc This is an official DivX CertifiedⓇ device that plays DivX video Visit www divx com for more information and software tools to convert your files into DivX video ABOUT DIVX VIDEO ON DEMAND This DivX CertifiedⓇ dev...

Страница 162: ...isplayed 60 times in one second Horizontal Frequency____ The time required to scan a single line from the left to the right side of the screen is called a horizontal cycle The reciprocal number of a horizontal cycle is called horizontal frequency Horizontal frequency is measured in kHz Source____ Input source refers to a video source device connected to the product such as a camcorder or video or ...

Отзывы: