background image

4

• Protect the power cord. Power supply cords should be routed so that they won’t be walked

on or pinched by objects placed on or against them. Pay particular attention to cords at
plugs, convenience receptacles, and the point where they exit from the unit.

• Unplug the TV from the wall outlet and disconnect the antenna or cable system during a

lightning storm or when left unattended and unused for long periods of time. This will pre-
vent damage to the unit due to lightning and power-line surges.

• Avoid overhead power lines. An outside antenna system should not be placed in the vicinity

of overhead power lines or other electric light or power circuits or where it can fall into such
power lines or circuits. When installing an outside antenna system, be extremely careful to
keep from touching the power lines or circuits. Contact with such lines can be fatal.

• Do not overload the wall outlet or extension cords. Overloading can result in fire or electric

shock.

• Do not insert anything through the openings in the unit, where they can touch dangerous

voltage points or damage parts. Never spill liquid of any kind on the TV.

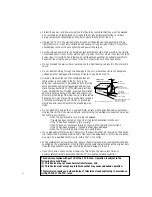
• Ground outdoor antennas. If an outside antenna or

cable system is connected to the TV, be sure the
antenna or cable system is grounded so as to provide
some protection against voltage surges and built-up
static charges. Section 810 of the National Electrical
Code, ANSI/NFPA No.70-1984, provides information
about proper grounding of the mast and supporting
structure, grounding of the lead-in wire to an antenna
discharge unit, size of grounding conductors, location
of antenna discharge unit, connection to grounding
electrodes, and requirements for the grounding elec-
trode.

• Do not attempt to service the TV yourself. Refer all servicing to qualified service personnel.

Unplug the unit from the wall outlet and refer servicing to qualified service personnel under
the following conditions:

- when the power-supply cord or plug is damaged
- if liquid has been spilled on the unit or if objects have fallen into the unit
- if the TV has been exposed to rain or water
- if the TV does not operate normally by following the operating instructions
- if the TV has been dropped or the cabinet has been damaged
- when the TV exhibits a distinct change in performance

• If you make adjustments yourself, adjust only those controls that are covered by the operat-

ing instructions. Adjusting other controls may result in damage and will often require exten-
sive work by a qualified technician to restore the TV to normal.

• When replacement parts are required, be sure the service technician uses replacement parts

specified by the manufacturer or those that have the same characteristics as the original part.
Unauthorized substitutions may result in additional damage to the unit.

• Upon completion of any service or repairs to this TV, ask the service technician to 

perform safety checks to determine that the TV is in a safe operating condition.

ANTENNA
LEAD IN WIRE

ANTENNA
DISCHARGE UNIT
(NEC SECTION 810-20)

GROUNDING
CONDUCTORS
(NEC SECTION 810-21)

GROUND CLAMPS

POWER SERVICE GROUNDING
ELECTRODE SYSTEM
(NEC ART 250, PART H)

GROUND CLAMP

ELECTRIC
SERVICE
EQUIPMENT

NEC — NATIONAL ELECTRICAL CODE

EXAMPLE OF 
ANTENNA GROUNDING

This device complies with part 15 of the FCC Rules.  Operation is subject to the 
following two conditions:
(1) This device may not cause harmful interference, and
(2) This device must accept any interference that may cause undesired operation.

This television receiver provides display of television closed captioning in accordance
with §15.119 of the FCC rules.

Содержание TX-P2670WHF

Страница 1: ...X P3275HF TX P2670WHF TX P2745FP TX P3245FP TX P3234HF AA68 02942A 00 1 800 SAMSUNG 1 800 726 7864 Samsung Electronics America Service Division 400 Valley Road Suite 201 Mount Arlington NJ 07856 www s...

Страница 2: ...cable entry as practical Caution FCC CSA regulations state that any unauthorized changes or modifica tions to this equipment may void the user s authority to operate it Caution To prevent electric sho...

Страница 3: ...t or table where it can fall A falling TV can cause serious injury to a child or adult and serious damage to the appliance Use only with a cart stand tripod bracket or table recommended by the manu fa...

Страница 4: ...c trode Do not attempt to service the TV yourself Refer all servicing to qualified service personnel Unplug the unit from the wall outlet and refer servicing to qualified service personnel under the f...

Страница 5: ...images on screen such as the dark side bars on non expanded standard format television video and programming should be limited to no more than 15 of the total television viewing per week Additionally...

Страница 6: ...igital Visual Interface 22 Connecting a Camcorder 23 Installing Batteries in the Remote Control 24 Chapter 3 Operation 25 Turning the TV On and Off 25 Plug Play Feature 25 Viewing the Menus and On Scr...

Страница 7: ...wapping the Contents of the PIP image and Main image 63 Changing the PIP Channel 64 Using the V Chip USA 65 Setting Up Your Personal ID Number PIN 65 How to Enable Disable the V Chip 66 How to Set up...

Страница 8: ...ings that can be stored in the TV s memory Automatic channel tuning for up to 181 channels A special filter to reduce or eliminate reception problems Fine tuning control for the sharpest picture possi...

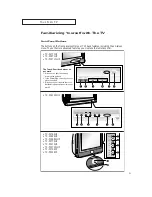
Страница 9: ...the remote control YOUR NEW TV TX P2798HF TX P3298HF TX P3098WHF TX P2775HF TX P3275HF TX P3075WHF TX P2745FP TX P3245FP TX P2771HF TX P3271HF TX P3071WHF The Touch Sensitive buttons do not work 1 Did...

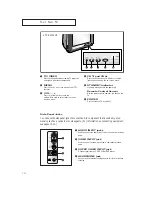
Страница 10: ...S VHS VCR or DVD player HEADPHONE jack Connect a set of external headphones to this jack for private listening TV VIDEO Press to change between viewing TV programs and signals from other components ME...

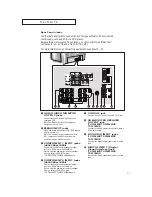
Страница 11: ...NT 1 INPUT jacks 480i 480p 1080i Connect to the audio and component output jacks of a DVD player or Set Top Box Note Only black and white signals are output from a monitor in DVD DTV mode TX P2745FP T...

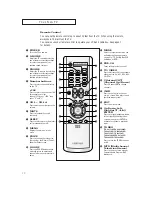
Страница 12: ...ays the main on screen menu P SIZE Press to change the screen size Your choices are Normal Zoom1 Zoom2 or Wide screen R SURF Press the R SURF button to auto matically return to a preferred channel aft...

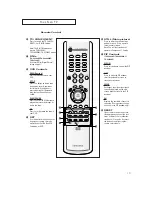
Страница 13: ...are set ting up your remote control to operate your Set Top Box VCR Cable box or DVD STILL Main picture Press to stop the action during a particular scene Press again to resume normal video Note The...

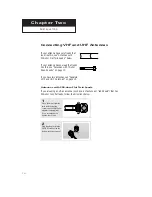
Страница 14: ...as see Separate VHF and UHF Antennas on page 15 Antennas with 300 ohm Flat Twin Leads If you are using an off air antenna such as a roof antenna or rabbit ears that has 300 ohm twin flat leads follow...

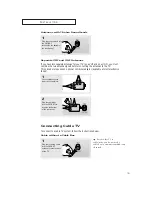
Страница 15: ...r into the VHF UHF ter minal on the bottom of the rear panel INSTALLATION Separate VHF and UHF Antennas If you have two separate antennas for your TV one VHF and one UHF you must combine the two anten...

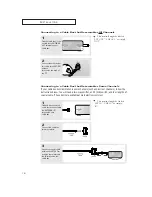
Страница 16: ...of the TV Connecting to a Cable Box that Descrambles Some Channels If your cable box descrambles only some channels such as premium channels follow the instructions below You will need a two way spli...

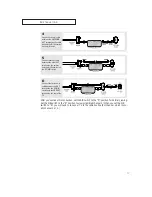
Страница 17: ...itch 6 Connect the last coaxial cable between the OUT terminal on the RF A B switch and the VHF UHF terminal on the rear of the TV INSTALLATION After you ve made this connection set the A B switch to...

Страница 18: ...is usually included with a VCR If not check your local electronics store If you have a mono non stereo VCR use the Y connector not supplied to hook up to the left and right audio input jacks of the T...

Страница 19: ...jacks you are using are underneath the number 1 2 Connect a set of audio cables between the AUDIO OUT jacks on the VCR and the AUDIO INPUT 1 jacks on the TV 1 To begin follow steps 1 3 in the previou...

Страница 20: ...PUT Y V PB PR jacks on the TV and the DVD OUT Y PB PR jacks on the DVD player Connecting a Second VCR to Record from the TV Your TV can send out signals of its picture and sound to be recorded by a se...

Страница 21: ...re shown below TX P2745FP TX P3245FP 480p only 2 Connect a set of audio cables between the AV 3 INPUT VCR or AV 2 INPUT VCR jacks on the TV and the AUDIO OUT jacks on the Set Top Box 3 Connect a video...

Страница 22: ...s on the TV and the AUDIO OUT jacks on the Set Top Box 3 Connect a DVI cable between the DIGITAL INPUT jack on the TV and the DVI OUT jack on the Set Top Box 1 Connect a coaxial cable between the ANTE...

Страница 23: ...are usually found on the side or back of the camcorder Connecting a Camcorder The side panel jacks on your TV make it easy to connect a camcorder to your TV They allow you to view the camcorder tapes...

Страница 24: ...long time The remote control can be used up to about 23 feet from the TV Assuming typical TV usage the bat teries last for about one year 2 Install two AAA size batteries Make sure to match the and e...

Страница 25: ...lug Play Feature When the TV is initially powered On five basic customer settings proceed automatically and subsequently Setting the language Video signal source Ant input check Auto pro gram and Cloc...

Страница 26: ...pressing the or button refer to Setting the clock on page 34 6 When you have finished press the MENU button The message Enjoy your watching is displayed 7 If you want to reset this feature 1 Press the...

Страница 27: ...Setup The on screen menus disappear from the screen after thirty seconds You can also use the MENU CHANNEL and VOLUME buttons on the control panel of the TV to make selections 1 Press the INFO button...

Страница 28: ...Language 1 Press the MENU button to display the menu Press the button to select Setup then press the ENTER button 2 Press the or button to select the appropriate language English Espa ol or Fran ais 3...

Страница 29: ...the Video Signal source Before your television can begin memorizing the available channels you must specify the type of signal source that is connected to the TV i e an antenna or a cable system 1 Pr...

Страница 30: ...omatic Method The TV automatically cycles through all of the available channels and stores them in memory This takes about one to two minutes Press MENU at any time to interrupt the memorization proce...

Страница 31: ...press the ENTER button 2 Press the or button to select Add Erase then press the ENTER but ton 3 Press the button Press the or button or the number buttons to select the channel you want to add or eras...

Страница 32: ...or not memorized To select a channel over 100 press the 100 button For channel 122 press 100 then 2 then 2 To change to single digit channels 0 9 faster press 0 before the single digit For channel 4 p...

Страница 33: ...on to select Channel Press the ENTER button 3 Press the button to select Labeling Press the button to begin labeling The left most field will be highlighted Each label has four fields See top paragrap...

Страница 34: ...hours digits will be highlighted Press the or button repeatedly until the correct hour appears When selecting the hours be sure to select the proper time of day AM or PM You can change the hours by p...

Страница 35: ...Time then press the ENTER button 2 Press the button to select Auto Clock Set menu then press the ENTER button 3 Press the button to select Auto clock set On 4 Press the button to select PBS Channel W...

Страница 36: ...Zone is selected then press the or to change the Time zone Sequence ATL EAST CEN MTN PAC ALAS HAW 6 Press the button to select DST Daylight saving time While DST is selected press the or button to ind...

Страница 37: ...button to increase or decrease the value of a particular item For example if you select Contrast pressing the button increases it Press the MENU button to exit After adjusting an item the gauge will...

Страница 38: ...lls your personalized picture settings Choose Dynamic for viewing the TV during the day or when there is bright light in the room only ANT and video mode Choose Standard for the standard factory setti...

Страница 39: ...zing the Sound The sound settings can be adjusted to suit your personal perferences Alternatively you can use one of the automatic settings See next page 3 Press the or button to highlight a particula...

Страница 40: ...cally recalls your personalized sound settings Choose Standard for the standard factory settings Choose Music when watching music videos or concerts Choose Movies when watching movies Choose Speech wh...

Страница 41: ...the MENU button to display the menu Press the button to select Setup then press the ENTER button 2 Press the or button You will switch between viewing the signals com ing from equipment con nected to...

Страница 42: ...he VCR or DVD mode 4 Enter 3 digits of the VCR or DVD code listed on the next page for your brand of VCR or DVD Make sure you enter 3 digits of the code even if the first digit is a 0 If more than one...

Страница 43: ...43 SPECIAL FEATURES VCR Codes DVD Codes...

Страница 44: ...t turn on repeat steps 2 3 and 4 but try one of the other codes listed for your particular brand of cable box If no other codes are listed try each cable box code 000 through 077 6 Once your remote co...

Страница 45: ...press the ENTER button After you adjust the fine tuning will appear when you press INFO while watching this channel 2 Press the button to select Fine tune 3 Press the or button to adjust the fine tuni...

Страница 46: ...ption a low noise preamplifier boosts the incoming signal 1 Select the appropriate channel Press MENU to display the menu Press the button to select the Channel then press the ENTER button Pressing or...

Страница 47: ...tilt depending on the TV s location When this occurs follow the steps below 1 Press the MENU button to display the menu then press the ENTER button 2 Press the button to select Tilt 3 Press the or bu...

Страница 48: ...the menu then press the ENTER button 2 Press the button to select DNIe 3 Press the or button to select DNIe Off On or Demo Press the MENU button to exit On Switches on the DNIe mode Demo The screen be...

Страница 49: ...e Reduction feature to help reduce any static and ghosting that may appear on the screen 1 Press the MENU button to display the menu then press the ENTER button 2 Press button to select Digital NR 3 P...

Страница 50: ...P mode When the Aspect button is selected and then the appropriate OSD On Screen Display is displayed the Channel Up Down but tons don t operate for about three seconds Press the P SIZE button to chan...

Страница 51: ...1 Press the MENU button to display the menu then press the ENTER button 2 Press the button to select Color tone 3 Press the or button to select Normal Warm 1 Warm 2 Cool 2 or Cool 1 according to perso...

Страница 52: ...t the R Surf to 5 minutes then switch channels After minutes the TV will return to the original channel To use the R Surf feature 1 While you are watching the channel to which you want to return press...

Страница 53: ...ime then press the ENTER button 2 Press the button to select On time Press the button to select the On time hours The hours digits will be highlighted Press the or button repeatedly to select the appr...

Страница 54: ...After about 5 seconds the sleep display will disappear from the screen and the time interval will be set Setting the Sleep Timer The sleep timer automatically shuts off the TV after a preset time fro...

Страница 55: ...ext at the bottom of the menu tells you if the incoming audio is stereo SAP or mono 1 Press the MENU button to display the menu Press the button once to select the Sound then press the ENTER but ton C...

Страница 56: ...u automat ically adjust the volume of the desired channel by lowering the sound output when the modulation signal is high or by raising the sound output when the modula tion sig nal is low BBE TX P279...

Страница 57: ...TX P2745FP TX P3245FP TX P3234HF Turbo sound emphasizes the bass and treble frequencies to add fullness to the sound Woofer TX P2798HF TX P3298HF TX P3098WHF Woofer sound emphasizes the bass frequenci...

Страница 58: ...y sound when the TV is powered on or Off 1 Press the MENU button to display the menu Press the button to select the Setup then press the ENTER button 2 Press the button to select Melody then press the...

Страница 59: ...tles for the hearing impaired or foreign language trans lations All VCRs record the closed caption signal from television programs so home record ed video tapes also provide closed captions Most pre r...

Страница 60: ...s automatically converted into the Normal mode Activating Picture in Picture 1 Press the MENU button to display the menu then press the ENTER button 2 Press the button to select PIP then press the ENT...

Страница 61: ...image Selecting a Signal Source External A V for PIP 1 Press the MENU button to display the menu then press the ENTER button 2 Press the button to select PIP then press the ENTER button Press the but...

Страница 62: ...ect PIP On 3 Press the to select the Size then press the button repeatedly to select the Double Screen Large Small or Stock ticker Press the MENU button to exit Quick way to access the PIP size Just p...

Страница 63: ...he button to select PIP then press the ENTER button Press the button to select PIP On 3 Press the to select the Swap then press the button The image in the PIP win dow will appear on the main screen a...

Страница 64: ...en press the ENTER button Press the button to select PIP On 3 Press the to select the Channel then press the button Press the or button to change the channel that appears in the PIP window Press the M...

Страница 65: ...press the ENTER button The Enter Pin screen will appear Enter your 4 digit PIN number 3 After entering a valid PIN number the V chip screen will appear Press the button and select Change pin 4 While...

Страница 66: ...en press the ENTER button 2 Press the button to select the V chip then press the ENTER button The Enter Pin screen will appear Enter your 4 digit PIN number 2 Press the button to select the V chip the...

Страница 67: ...he or button and then repeat the process Note 1 The TV Y7 TV PG TV 14 and TV MA have additional options See the next step to change any of the following sub ratings FV Fantasy violence D Dialog L Adul...

Страница 68: ...e the U or B is blinking press the or button to change the sub rating Press the MENU button once to save the TV guidelines A TV Rating will be selected BLUE and no letters will blink To exit this scre...

Страница 69: ...will automati cally block any category that is more restrictive For example if you block the PG 13 category then R NC 17 and X will automatically be blocked also SPECIAL FEATURES How to Reset the TV a...

Страница 70: ...n press the ENTER button The Enter Pin screen will appear Enter your 4 digit PIN number 3 After entering a valid PIN number the V chip screen will appear Press the button and select Change pin 4 While...

Страница 71: ...lect the Setup then press the ENTER button 2 Press the button to select the V chip then press the ENTER button The Enter Pin screen will appear Enter your 4 digit PIN number 2 Press the button to sele...

Страница 72: ...TV Rating press the or button and then repeat the process Note 1 The TV Y7 TV PG TV 14 and TV MA have additional options See the next step to change any of the following sub ratings FV Fantasy violenc...

Страница 73: ...h sub rating While the U or B is blinking press the or button to change the sub rating Press the MENU button once to save the TV guidelines A TV Rating will be selected BLUE and no letters will blink...

Страница 74: ...ect MPAA rating then press the ENTER but ton 4 The MPAA rating screen will appear Repeatedly press the button to select a particular MPAA category Pressing the button will cycle through the MPAA categ...

Страница 75: ...tter U or B will be displayed Press the or button to select U or B Press the MENU button to save the settings and to clear all screens 3 The V chip screen will appear Press the button to select Canadi...

Страница 76: ...n to temporarily disable the V Chip Lock E Exempt programming includes news sports documentaries and other information programming talk shows music videos and variety programming G General 8 ans 8 Gen...

Страница 77: ...ing the Demonstration TX P2798HF TX P3098WHF TX P3298HF To become familiar with the various menus provided by your television you can view the in built demonstration 1 Press the MENU button to display...

Страница 78: ...Adjust the antenna No picture or sound Try another channel Press the TV VIDEO button Make sure the TV is plugged in Check the antenna connections No color wrong colors or tints Make sure the program...

Страница 79: ...etely Using Your TV in Another Country If you plan to take your TV with you to a foreign country please be aware of the different television systems that are in use around the world A TV designed for...

Отзывы: