background image

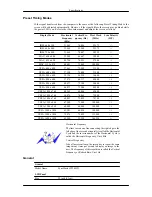
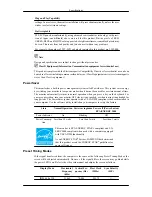
Preset Timing Modes

If the signal transferred from the computer is the same as the following Preset Timing Modes, the
screen will be adjusted automatically. However, if the signal differs, the screen may go blank while
the power LED is on. Refer to the video card manual and adjusts the screen as follows.

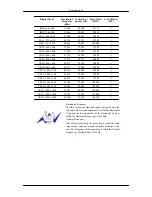
Display Mode

Horizontal
Frequency

(kHz)

Vertical Fre-

quency (Hz)

Pixel Clock

(MHz)

Sync Polarity

(H/V)

IBM, 640 x 350

31.469

70.086

25.175

+/-

IBM, 640 x 480

31.469

59.940

25.175

-/-

IBM, 720 x 400

31.469

70.087

28.322

-/+

MAC, 640 x 480

35.000

66.667

30.240

-/-

MAC, 832 x 624

49.726

74.551

57.284

-/-

MAC, 1152 x 870

68.681

75.062

100.000

-/-

VESA, 640 x 480

37.861

72.809

31.500

-/-

VESA, 640 x 480

37.500

75.000

31.500

-/-

VESA, 800 x 600

35.156

56.250

36.000

+/+

VESA, 800 x 600

37.879

60.317

40.000

+/+

VESA, 800 x 600

48.077

72.188

50.000

+/+

VESA, 800 x 600

46.875

75.000

49.500

+/+

VESA, 1024 x 768

48.363

60.004

65.000

-/-

VESA, 1024 x 768

56.476

70.069

75.000

-/-

VESA, 1024 x 768

60.023

75.029

78.750

+/+

VESA, 1152 x 864

67.500

75.000

108.000

+/+

VESA, 1280 x 960

60.000

60.000

108.000

+/+

VESA, 1280 x 1024

63.981

60.020

108.000

+/+

VESA, 1280 x 1024

79.976

75.025

135.000

+/+

VESA, 1680 x 1050

65.290

59.954

146.250

-/+

Horizontal Frequency
The time to scan one line connecting the right edge to the
left edge of the screen horizontally is called the Horizontal
Cycle and the inverse number of the Horizontal Cycle is
called the Horizontal Frequency. Unit: kHz
Vertical Frequency
Like a fluorescent lamp, the screen has to repeat the same
image many times per second to display an image to the
user. The frequency of this repetition is called the Vertical
Frequency or Refresh Rate. Unit: Hz

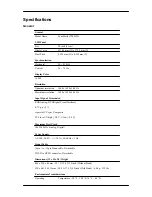
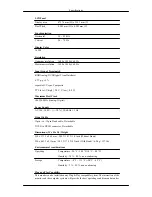
General

General

Model Name

SyncMaster T220HD

LCD Panel

Size

22 inch (55 cm)

Specifications

Содержание T220HD - SyncMaster - 22" LCD Monitor

Страница 1: ...SyncMaster T200HD T220HD LCD Monitor User Manual...

Страница 2: ...t touch Ground to prevent an electric shock Power When not used for extended period of time set your computer to DPM If using screen saver set it to active screen mode The images here are for referenc...

Страница 3: ...the provided power cord of another product Otherwise this may result in fire or electric shock Installation Be sure to contact an authorized Service Center when installing your monitor in a location...

Страница 4: ...ury Make sure to install the specified wall mount Install your product in a well ventilated location Ensure that there is a clearance of more than 10 cm from the wall Otherwise it may result in fire d...

Страница 5: ...ith a dry cloth Do not use chemicals such as wax benzene alcohol thinner mos quito repellant lubricant or cleaner These may change the appear ance of the product surface and peel off the indication la...

Страница 6: ...and left while only holding the power cord or signal cables Otherwise it may fall and result in electric shock damage to the product or fire due to damage to the cable Make sure that the ventilating o...

Страница 7: ...injury and or damage the product If you use the product in a location exposed to vibrations it may damage the product and result in fire When moving the product turn the power off and disconnect the p...

Страница 8: ...ycling The customer can return used or rechargeable batteries to a nearby public recycling center or to a store selling the same type of the battery or rechargeable battery Do not turn the product ups...

Страница 9: ...injury and or damage to the product Good Postures When Using the Monitor When using the product use it in the correct position Keep your back straight while looking at the product The distance between...

Страница 10: ...items are missing contact your dealer Contact a local dealer to buy optional items Unpacking Without stand With stand Monitor Monitor Manuals Quick Setup Guide Warranty Card Not available in all loca...

Страница 11: ...ital audio optic output ca ble Others Remote Control BN59 00678A Batteries AAA X 2 Not available in all loca tions Cleaning Cloth Cable holding ring Stand Body Stand Base Note Cleaning Cloth is only p...

Страница 12: ...re to see an animation clip MENU Use this button to open the on screen menu and to exit from the on screen menu or to close the screen adjustment menu VOL Moves from one menu item to another horizonta...

Страница 13: ...e See PowerSaver described in the manual for further information regarding power saving functions For energy conservation turn your monitor OFF when it is not needed or when leaving it unattended for...

Страница 14: ...IGITAL AUDIO OUT OPTICAL Connect the DIGITAL AUDIO OUT OPTI CAL terminal of your product to the digital sound output or standard sound output terminal of the DVD home theater or amplifier using a digi...

Страница 15: ...ing the Anti Theft Kensington Lock 1 Insert the locking device into the Kensington slot on the Monitor and turn it in the locking direction 2 Connect the Kensington Lock cable 3 Fix the Kensington Loc...

Страница 16: ...IN 2 Connect the HDMI IN 2 terminal at the back of your product to the HDMI terminal of your digital output device using a HDMI cable Connect your headphones to the Headphone con nection terminal Note...

Страница 17: ...is used to select MMS multi channel for a DTV 5 VOL Adjusts the audio volume 6 TOOLS Use to quickly select frequently used functions 7 Down Up Left Right buttons Moves from one menu item to another h...

Страница 18: ...ces that are connected to the monitor at the time 14 PRE CH This button is used to return to the immediately previous channel 15 CH In TV mode selects TV channels 16 MUTE Adjusts the audio volume 17 R...

Страница 19: ...monitor PC Using the DVI Digital connector on the video card Connect the DVI Cable to the DVI D Port on the back of your Monitor DVI D Connect the HDMI PC DVI D AUDIO IN port on the rear side of the...

Страница 20: ...o Other devices Note This monitor allows the user to connect it to such input devices as a DVD player a VCR or cam corder or a DTV or TV without disconnecting the PC The configuration at the back of t...

Страница 21: ...ional for installation if possible To connect the RF cable to the antenna input terminal Keep the copper wire portion of the RF cable straight 2 Turn on the monitor 3 Select TV using the TV DTV 4 Sele...

Страница 22: ...in red or blue For single family houses install an UHF antenna to receive digital broadcasting Connecting HDMI Note You can connect digital output devices to your monitor You can enjoy better screen...

Страница 23: ...minal 4 Select HDMI using the SOURCE button Note If you just connect using the DVI to HDMI cable without connecting to the sound source you cannot hear sound Connecting the audio output terminal of a...

Страница 24: ...r Note If no sound is emitted from the monitor you need to use an amplifier For information on how to connect a speaker and amplifier refer to the respective user manuals provided by their manufacture...

Страница 25: ...Tilt angle Note You can tilt the monitor upwards at an angle of 1 to 21 Connections...

Страница 26: ...ating system you have Prepare a blank disk and download the driver program file at the Internet web site shown here Internet web site http www samsung com Worldwide Installing the Monitor Driver Autom...

Страница 27: ...rt your Manual CD into your CD ROM drive 2 Click Start and Control Panel Then double click on Appearance and Personalization 3 Click Personalization and then Display Settings 4 Click Advanced Settings...

Страница 28: ...osted on Samsung Monitor homepage 6 Click Update Driver in the Driver tab 7 Check the Browse my computer for driver software checkbox and click Let me pick from a list of device drivers on my computer...

Страница 29: ...that matches your monitor from the list of monitor models on the screen and click Next 10 Click Close Close OK OK on the following screens displayed in sequence Microsoft Windows XP Operating System...

Страница 30: ...Click Display icon and choose the Settings tab then click Advanced 4 Click the Properties button on the Monitor tab and select Driver tab 5 Click Update Driver and select Install from a list or then c...

Страница 31: ...owing message window then click the Continue Anyway button Then click OK button Note This monitor driver is under certifying MS logo and this installation doesn t damage your system The certified driv...

Страница 32: ...n is active click the Properties button then follow next steps continually 5 Click Driver and then click on Update Driver then click on the Next button 6 Choose Display a list of the known drivers for...

Страница 33: ...clicking Test If the screen is not normal change to a different mode lower mode of resolution colors or frequency Note If there is no Mode at All Display Modes select the level of resolution and vert...

Страница 34: ...on refer to Help F1 in the software program How to install the Natural Color software Insert the CD included with the Samsung monitor into the CD ROM Drive Then the initial screen of the program Natur...

Страница 35: ...a feature providing optimum viewing environment depending on the contents of the image you are watching Currently five different modes are available Entertain Internet Text Dynamic Contrast and Custo...

Страница 36: ...the case adjust the Brightness and Contrast by using the OSD menu MENU MENU EXIT Contrast Brightness Sharpness Not available in MagicBright mode of Dynamic Contrast You can use the on screen menus to...

Страница 37: ...rtical stripes Coarse adjustment may move the screen image area You may relocate it to the center using the horizontal control menu Fine Removes noise such as horizontal stripes If the noise persists...

Страница 38: ...Image Reset Image parameters are replaced with the factory default values MENU MENU EXIT Resolution Displays the resolution set on the PC Picture Options Color Tone Adjusting the Monitor...

Страница 39: ...hanged Available in PC DVI mode only Cool Normal Warm Custom MENU MENU EXIT R Gain G Gain B Gain Adjusts the individual R G B color controls MENU MENU EXIT Size You can switch the Size Wide 4 3 MENU M...

Страница 40: ...omatic picture settings Dynamic Standard and Movie that are preset at the factory You can activate either Dynamic Standard or Movie Dynamic Selects the picture for high definition in a bright room Sta...

Страница 41: ...e Backlight Adjust the screen brightness by adjusting the LCD backlight Contrast Adjust the Contrast Brightness Adjust the Brightness Sharpness Adjust the Sharpness Color Adjusts the picture color Tin...

Страница 42: ...ct ratio of the input signals 16 9 Sets the picture to 16 9 wide mode Zoom1 Magnifies the size of the picture on the screen Zoom 2 Magnifies the size of the picture more than Zoom1 Wide Fit Enlarges t...

Страница 43: ...evel Auto Automatically recognizes and reduces screen noise MENU MENU EXIT HDMI Black Level When a DVD or set top box is connected to your TV via HDMI it may cause a degradation in the screen quality...

Страница 44: ...uality viewing experience Film mode is supported in TV Component 480i 1080i and HDMI 480i 1080i Off Auto MENU MENU EXIT Reset Picture parameters are replaced with the factory default values OK Cancel...

Страница 45: ...uilt in high fidelity stereo amplifier Standard Choose Standard for the standard factory settings Music Choose Music when watching music videos or concerts Movie Choose Movie when viewing movies Speec...

Страница 46: ...the left and right sound balance and the low or high volume as required MENU MENU EXIT Multi Track Options Preferred Language You can select the audio language Available in DTV Mode Only MENU MENU EX...

Страница 47: ...gnal Stereo Choose for channels that are broadcasting in stereo SAP Choose to listen to the Separate Audio Program which is usually a foreign language trans lation Available in Analog TV Mode Only MEN...

Страница 48: ...of using the home theater Off On MENU MENU EXIT Channel Available Modes PC DVI TV Component HDMI Note The default setting may different depending on the selected Input Mode input signal source selecte...

Страница 49: ...appear on the screen Air Cable MENU MENU EXIT Auto Program The TV automatically cycles through all of the available channels and stores them in memory In rare cases Auto program may miss a few channe...

Страница 50: ...scrambled channels from the list by tuning the digital cable channels This process may take up to 20 30 minutes Available in Digital Cable TV Mode Only MENU MENU EXIT Channel List You can manage the...

Страница 51: ...rite menu MENU MENU EXIT Name If channel name information is broadcast when you store the channels either manually or automatically the names are assigned to the channels directly You can however chan...

Страница 52: ...eception quality or you will not receive them at all So unlike analog channels you cannot fine tune a digital channel You can however adjust your antenna to improve the reception of available digital...

Страница 53: ...tting may different depending on the selected Input Mode input signal source selected in External Input List and the selected resolution Plug Play You can manage the entire configuration MENU MENU EXI...

Страница 54: ...ly the language of the OSD MENU MENU EXIT Time Clock You can set the current time Clock Mode Auto Manual MENU MENU EXIT Clock Set Note Clock Set are available only when Clock Mode set to Manual MENU M...

Страница 55: ...Note DST are available only when Clock Mode set to Auto Depending on the broadcast station and signal the auto time may not be set correctly If this occurs set the time manually The Antenna or cable m...

Страница 56: ...is necessary in order to use the various timer features of the product Three different On Off Timer Settings can be made MENU MENU EXIT V Chip Protects children from viewing inappropriate programs by...

Страница 57: ...more restrictive The rating titles For example Humor Level etc and TV ratings For example DH MH H etc may differ depending on the broadcasting station If you forget the PIN press the remote control b...

Страница 58: ...MPAA Rating MENU MENU EXIT Canadian English MENU MENU EXIT Canadian French MENU MENU EXIT Adjusting the Monitor...

Страница 59: ...Downloadable U S Rating MENU MENU EXIT Change PIN MENU MENU EXIT Caption Enables or disables the Caption feature and sets the appearance of closed caption text Caption Adjusting the Monitor...
Страница 60: ...ment information carried in the program CC3 Secondary Synchronous Caption Service Alternate program related caption data typically second language captions CC4 Special Non Synchronous Use Captions Sim...

Страница 61: ...t White Black Red Green Blue Yellow Magenta Cyan Foreground Opacity Default Transparent Translucent Solid Flashing Background Opacity Default Transparent Translucent Solid Flashing Return to Default M...

Страница 62: ...dium High Sets the melody volume to high MENU MENU EXIT Light Effect You can turn on off the LED on the front of monitor according to the situation Use it for saving power or when the LED dazzles your...

Страница 63: ...to reduce power consumption When watching TV at night set the Energy Saving mode option to High to reduce eye fatigue as well as power consumption Off Turns off the energy saving function Low Sets the...

Страница 64: ...Note The default setting may different depending on the selected Input Mode input signal source selected in External Input List and the selected resolution Source List Use to select PC TV or other ext...

Страница 65: ...control is SOURCE button PC DVI TV Component HDMI1 HDMI2 MENU Edit Name Name the input device connected to the input jacks to make your input source selection easier PC DVI Component HDMI1 HDMI2 MENU...

Страница 66: ...ideo cable then turn on both your computer and the monitor If your monitor screen remains blank after using the previous procedure check your video controller and computer system your monitor is funct...

Страница 67: ...the video cables are properly connected to the computer 2 Check if the computer beeps more than 3 times when booting If it does request an after service for the main board of the computer 3 If you in...

Страница 68: ...are listed Q Screen is blank and power indicator is off A Ensure that the power cord is firmly connected and the LCD monitor is on Refer to the Con necting the monitor Q Check Signal Cable message A...

Страница 69: ...n you press the MENU button check the cable connection between the monitor and the computer to ensure that the connector is properly connected 3 Problems related to Audio Note Problems related to audi...

Страница 70: ...Appearance and Themes Display Screen Saver Set the function in the BIOS SETUP of the computer Refer to the Windows Computer Man ual A Windows ME 2000 Set the resolution at the Control Panel Display S...

Страница 71: ...broadcasting has an aspect ratio of 4 3 HD broadcasting has an aspect ratio of 16 9 similar to a cinema screen Therefore to enjoy the full benefits of digital TV it is better to purchase an HD digital...

Страница 72: ...g a common broadcasting facility for your apartment or tenement house it has to adjust and send digital TV signals so that they are compatible to shared viewing which is the original purpose of the co...

Страница 73: ...nal Terminated RGB Analog DVI Digital Visual Interface 0 7 Vp p 5 separate H V sync Composite TTL level V high 2 0 V V low 0 8 V Maximum Pixel Clock 146 250 MHz Analog Digital Power Supply AC 100 240...

Страница 74: ...es with the Electromagnetic Compatibility Directives for residential use and can be used in all areas including common residential areas Class B equipment emits less electromagnetic waves than Class A...

Страница 75: ...17 40 000 VESA 800 x 600 48 077 72 188 50 000 VESA 800 x 600 46 875 75 000 49 500 VESA 1024 x 768 48 363 60 004 65 000 VESA 1024 x 768 56 476 70 069 75 000 VESA 1024 x 768 60 023 75 029 78 750 VESA 11...

Страница 76: ...V 10 50 60 Hz 3 Hz Signal Cable 15pin to 15pin D sub cable Detachable DVI D to DVI D connector Detachable Dimensions W x H x D Weight 520 x 373 5 x 86 5 mm 20 5 X 14 7 X 3 4 inch Without Stand 520 x...

Страница 77: ...t has not been used for a certain amount of time The monitor automatically returns to normal operation when you press a key on the keyboard For energy conservation turn your monitor OFF when it is not...

Страница 78: ...768 56 476 70 069 75 000 VESA 1024 x 768 60 023 75 029 78 750 VESA 1152 x 864 67 500 75 000 108 000 VESA 1280 x 960 60 000 60 000 108 000 VESA 1280 x 1024 63 981 60 020 108 000 VESA 1280 x 1024 79 97...

Страница 79: ...performing the Auto Adjustment function in display screen that is appeared as window termination button is pressed If there s still noise after the automatic adjustment use the Fine Coarse adjustment...

Страница 80: ...image is displayed for a long time a slight difference in electric charge accumu lates between the two electrodes which encase the liquid crystal This may cause the liquid crystal to build up in a ce...

Страница 81: ...rence in luminance Avoid using Grey colors which can cause Image retention easily Avoid Colors with big difference in luminance Black White Grey Ex Recommended settings Bright colors with little diffe...

Страница 82: ...12 hours there may be slight difference in voltage between electrodes that work the liquid crystal LC in a pixel The voltage difference between electrodes increases with time forcing the liquid cryst...

Страница 83: ...EL SALVADOR 800 6225 http www samsung com latin GUATEMALA 1 800 299 0013 http www samsung com latin HONDURAS 800 7919267 JAMAICA 1 800 234 7267 http www samsung com latin NICARAGUA 00 1800 5077267 PA...

Страница 84: ...w samsung ee LATVIA 800 7267 http www samsung com lv LITHUANIA 8 800 77777 http www samsung lt KAZAKHSTAN 8 10 800 500 55 500 http www samsung kz KYRGYZSTAN 00 800 500 55 500 RUSSIA 8 800 555 55 55 ht...

Страница 85: ...rtical Frequency The screen must be redrawn several times per second in order to create and display an image for the user The frequency of this repetition per second is called the Vertical Frequency o...

Страница 86: ...allows the viewer to fine tune the TV channel to ob tain the best viewing conditions The Samsung LCD TV has both automatic and manual channel fine tuning features to enable the viewer to adjust their...

Страница 87: ...SD Standard Definition In HD 480 line double beaming 480i is used SD provides a screen quality somewhere between HD and the existing an alog method It exhibits a two times better screen quality than a...

Страница 88: ...ered trademark of Samsung Electronics Co Ltd Microsoft Windows and Win dows NT are registered trademarks of Microsoft Corporation VESA DPM and DDC are registered trademarks of Video Electronics Standa...

Отзывы: