Samsung SyncMaster TC180 Скачать руководство пользователя страница 7

1-4

Major Safety Precautions

1-4

Safety Precautions

Icons used for safety precautions

Meaning of Signs

Power Related


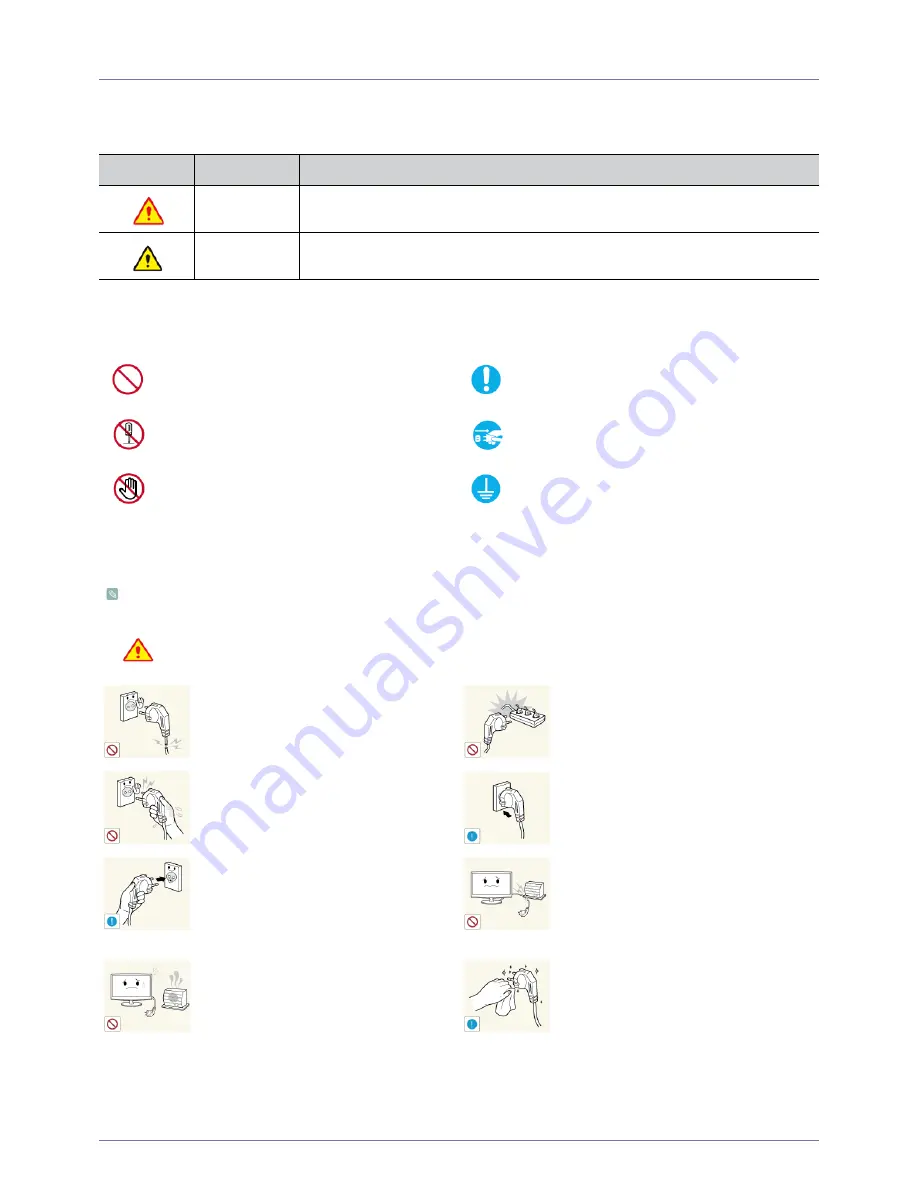
The following images are for your reference and may differ depending on models and countries.


 Warning

ICON

NAME

MEANING

Warning

Failing to follow the precautions marked with this sign, may result in a serious injury or 
even a fatality.

Caution

Failing to follow the precautions marked with this sign, may result in a personal injury or 
property damage.

Do not perform.

Must be followed. 

Do not disassemble. 

The power plug must be unplugged from the 
wall outlet. 

Do not touch. 

Must be grounded to prevent electric shock. 

Avoid using a damaged power cord or plug or a 
loose power outlet.

Otherwise, it may result in electric shock or 
fire.

Avoid connecting multiple electric appliances to 
a single wall outlet.

Otherwise, it may result in fire due to 
overheating of the wall outlet.

Avoid plugging in or unplugging the power 
supply with wet hands.

Otherwise, it may result in electric shock.

Plug the power plug in firmly.

Otherwise, it may result in fire.

Make sure to connect the power cord to a 
grounded wall outlet (for insulation class 1 
equipment only). 

Otherwise, it may result in electric shock or 
injury.

Avoid bending or twisting the power cord 
excessively and avoid placing heavy objects on 
the cord.

Otherwise, it may result in electric shock or 
fire due to a damaged power cord.

Keep the power cord and the product away 
from a heater.

Otherwise, it may result in electric shock or 
fire.

If the pins of the power plug or the wall outlet 
are covered in dust, clean it using a dry cloth.

Otherwise, it may result in fire.

Содержание SyncMaster TC180

Страница 1: ...SyncMaster TC180 LCD Monitor User Manual The color and the appearance may differ depending on the product and the specifications are subject to change without prior notice to improve the performance ...

Страница 2: ...necting with a PC 2 10 Connecting a Stereo Cable 2 11 Connecting USB 2 12 Connecting Headphones 2 13 Connecting MIC 2 14 Kensington Lock 2 15 USING THE PRODUCT What is a network monitor 3 1 Plug Play 3 2 Standard Signal Mode Table 3 3 Installing the Device Driver 3 4 Product Operating Buttons 3 5 Using the Screen Adjustment Menu OSD On Screen Display 3 6 INSTALLING THE SOFTWARE Using Windows Embed...

Страница 3: ...Contact SAMSUNG WORLDWIDE 6 3 Correct Disposal of This Product Waste Electrical Electronic Equipment Europe only 6 4 ...

Страница 4: ...Electronics Co Ltd The contents of this manual may not be partially or in whole reproduced distributed or used in any form without the written permission of Samsung Electronics Co Ltd The SAMSUNG logo and SyncMaster are the registered trademarks of Samsung Electronics Co Ltd Microsoft Windows and Windows NT are the registered trademarks of Microsoft Corporation VESA DPM and DDC are the registered ...

Страница 5: ...olution x 3 Example If the maximum resolution is 1366 x 768 the number of sub pixels is 1366 x 768 x 3 3 147 264 Clean the product with a soft damp cloth Do not clean the product with an inflammable substance such as benzene or thinner or with a wet cloth This may result in a problem with the product Do not scratch the screen with your fingernails or a sharp object This may result in scratches or ...

Страница 6: ...m the monitor To avoid electric shock be sure you disconnect the cable by gripping the plug and do not touch the cable with wet hands 3 Wipe the monitor screen using a clean soft dry cloth Do not use a cleaning agent that contains surfactant alcohol or solvents Otherwise the exterior may discolor or crack or the panel coating may come off Do not spray water or cleaning agent directly onto the moni...

Страница 7: ... may result in electric shock or fire Avoid connecting multiple electric appliances to a single wall outlet Otherwise it may result in fire due to overheating of the wall outlet Avoid plugging in or unplugging the power supply with wet hands Otherwise it may result in electric shock Plug the power plug in firmly Otherwise it may result in fire Make sure to connect the power cord to a grounded wall...

Страница 8: ...ntilated location such as inside a bookshelf or closet Otherwise it may result in fire due to internal over heating Keep a distance of at least 4 inches 10 cm from the wall when installing the product for ventilation Otherwise it may result in fire due to internal over heating Keep the plastic bags used to pack the product away from children If children place the plastic bags over their heads they...

Страница 9: ...se it may result in a problem with the product or injury If the product is installed in a location where the operating conditions vary considerably a serious quality problem may occur due to the surrounding environment In this case install the product only after consulting one of our service engineers about the matter Places exposed to microscopic dust chemicals too high or low temperature high hu...

Страница 10: ...d contact a service center When cleaning the product do not spray water directly over the product parts Make sure that water does not enter the product Otherwise it may result in fire electric shock or a problem with the product If the product generates a strange noise a burning smell or smoke unplug the power plug immediately and contact a service cen ter Otherwise it may result in electric shock...

Страница 11: ...lowerpot beverage cosmetics or drugs or a metal object over the product If water or an alien substance enters the product turn the power off unplug the power cord and contact a service center Otherwise it may result in a problem with the product electric shock or fire Displaying a still image for a long time may create a persistent image or stain on the screen If you do not use the product for a l...

Страница 12: ...the product or injury Maintain the correct posture when using this product Straighten your back Keep a distance of 45 50 cm 18 20inches from your eyes to the screen Look down at the screen and face the screen forwards Maintain the correct posture when using this product Adjust the angle of the product so that light is not reflected onto the screen Keep your elbow at a right angle and keep your arm...

Страница 13: ...wing contents have been included Store the packaging box in case you need to move the Product at a later stage Monitor The color and the appearance may differ depending on the product and the specifications are subject to change without prior notice to improve the performance CONTENTS Quick Setup Guide Warranty Card User Manual Power Cord OPTIONAL PARTS Keyboard USB Mouse USB D Sub Cable Stereo Ca...

Страница 14: ...tect the product and place the product onto the cloth so that the front of the product is facing downwards Do not remove the stopper pin before installing the base Hold the main body of the product with your hand as shown by the figure Insert the stand base into the stand connection part in the direction shown in the figure Turn the connecting screw at the bottom of the stand fully so that it is c...

Страница 15: ...ions are subject to change without prior notice to improve the performance Disassembly is in the reverse order of assembly After the installation of the base stand the monitor up as shown in the figure Now you can remove the stopper pin to adjust the stand Caution Avoid lifting the product holding only the stand ...

Страница 16: ...he product and the specifications are subject to change without prior notice to improve the performance Lift up the monitor stand to the maximum angle with your left hand and remove the back decoration cover with your right hand as shown in the figure Remove the two screws The stand can be detached after removing the screws Remove the stand arm in the direction shown in the figure ...

Страница 17: ...epending on the corresponding specifications Do not use screws that are incompatible with the standard VESA specifications and do not assemble them using excessive force This may result in damage to the product or injury due to the product falling Samsung shall not be held liable for any damage or injury Samsung shall not be held liable for any damage to the product or injury caused by using a sta...

Страница 18: ...Installing the Product 2 5 2 5 Connecting to your Network The connecting part may differ depending on the product model Connect between the LAN port on the product and your network using a LAN cable ...

Страница 19: ...Connecting Power To use the product connect the power cable to a power outlet and the POWER port on the product The input voltage is switched automatically When the product is connected to a PC you can turn the product on and use it ...

Страница 20: ...nnecting to another Monitor Connect between the VIDEO OUT port on the product and the D Sub port on your monitor using a D Sub cable Connect to the VIDEO OUT port to display the same picture on another monitor For presentation purposes ...

Страница 21: ...2 8 Installing the Product 2 8 Connecting a SERIAL Cable Devices which support RS 232C connection interface can be connected The connecting part may differ depending on the product model ...

Страница 22: ...Installing the Product 2 9 2 9 Connecting to your Printer Devices which support D SUB 25 pin connection interface can be connected The connecting part may differ depending on the product model ...

Страница 23: ...10 Connecting with a PC Connect the RGB IN port of the product to the D Sub port of your PC with a D Sub cable The connecting part may differ depending on the product model Use the RGB IN port to directly connect the monitor to a PC ...

Страница 24: ...stalling the Product 2 11 2 11 Connecting a Stereo Cable Connect the AUDIO IN port on the rear side of the monitor to the sound card of the PC The connecting part may differ depending on the product model ...

Страница 25: ...ch as a mouse keyboard and external storage devices DSC Digital Still Camera MP3 external storage etc The connecting part may differ depending on the product model You can use a USB device such as a mouse keyboard Memory Stick or external hard disk drive by connecting them to the USB port of the monitor without connecting them to the PC ...

Страница 26: ...the Product 2 13 2 13 Connecting Headphones Connect your headphones to the Headphone connection terminal The connecting part may differ depending on the product model You may connect your headphones to the monitor ...

Страница 27: ...2 14 Installing the Product 2 14 Connecting MIC Connect the microphone cable to the MIC port on the monitor You may connect your microphone to the monitor ...

Страница 28: ...for more information To lock the product follow these steps 1 Wrap the Kensington lock cable around a large stationary object such as a desk or chair 2 Slide the end of the cable with the lock attached through the looped end of the Kensington lock cable 3 Insert the locking device into the Kensington slot on the Monitor 4 Lock the lock These are general instructions For exact instructions see the ...

Страница 29: ...n it allows you to connect an external device DSC MP3 external storage media to the USB port and play music movies and games You also can share the screen being displayed on your network monitor with other users by connecting a projector or other display device to its VGA OUT port You can use this functionality for video conferencing and a variety of shared tasks In addition because Windows XP is ...

Страница 30: ...o the optimal resolution When the PC is turned off connect the product and the PC and turn the power on Right click over the Desktop and select Properties from the pop up menu In the Settings tab set the resolution to the optimal resolution The message appears up to 3 times if the resolution has not been set to the optimal resolution You can select a language with these buttons MENU If you press t...

Страница 31: ...ost position on the screen is called the horizontal cycle and the reciprocal of the horizontal cycle is called the horizontal frequency The horizontal frequency is represented in kHz Vertical Frequency A panel must display the same picture on the screen tens of times every second so that humans can see the picture This frequency is called the vertical frequency The vertical frequency is represente...

Страница 32: ...ung Electronics website http www samsung com and download the driver 1 Insert the driver installation CD ROM into the CD ROM drive 2 Click on Windows Driver 3 Complete the remaining installation steps according to the instructions displayed on the screen 4 Select the model of your product from the model list 5 Check if the appropriate resolution and screen refresh rate are displayed in the Control...

Страница 33: ...y to one of the following functions If the user presses the Customized Key after setting it the configured function will be performed MagicBright MagicColor Color Effect Image Size You can set the function of the Customized Key by selecting SETUP RESET Customized Key in the OSD Adjust items in the menu When OSD is not on the screen press the button to adjust volume When OSD is not on the screen pu...

Страница 34: ...is function is only available in Analog mode Press this button to turn the product on or off Speakers Power LED This LED is turned on when the product works normally For more information on the power saving function refer to the power saving function in More Information When not using the product for a long time unplugging the power cord is recommended to minimize power consumption Icon Descriptio...

Страница 35: ...Source On Timer Volume Display Time Customized Key INFORMA TION Menu Description Brightness Controls the screen brightness This menu is unavailable when MagicBright is set to Dynamic Contrast mode Contrast Controls the contrast of the pictures displayed on the screen This menu is unavailable when MagicBright is set to Dynamic Contrast mode This menu is unavailable when MagicColor is set to Full mo...

Страница 36: ...e picture setting appropriate for watching sports games that include lots of movement Movie This mode provides brightness and sharpness settings similar to those of a TV for the best entertainment environment movie DVD etc Dynamic Contrast Controls the picture contrast automatically so that bright and dark pictures are balanced overall Coarse Removes vertical noise lines line pattern from the scre...

Страница 37: ...e according to your preference This menu is unavailable when MagicColor is set to Full mode or Intelligent mode Color Tone You can set the color temperature according to your preference Cool Sets the color temperature of the screen to a cooler color Normal Sets the color temperature of the screen to the standard color temperature Warm Sets the color temperature of the screen to a warmer color Cust...

Страница 38: ... The picture is displayed in full screen regardless of the aspect ratio of the input signal A signal not in the standard mode table is not supported If the resolution is set to the optimal resolution the aspect ratio does not change whether the Image Size is set to Auto or Wide Menu H Position You can adjust the horizontal position of the OSD Menu V Position You can adjust the vertical position of...

Страница 39: ...et On Timer Source Used to adjust the mode when the product is automatically turned on Analog Client This menu is enabled if On Timer is set On Timer Volume Automatically adjusts the volume to a certain level when the product is turned on This menu is enabled if On Timer is set Display Time The OSD automatically disappears if no action is taken by the user You can determine the time to wait before...

Страница 40: ...e default icons that appear on the User Desktop are Citrix Xendesktop Online plug in Remote Desktop Connection Internet Explorer VMWare View Client 2X Client You can also run this connection from the Start menu The audio volume icon VNC server icon and system time are displayed on the User Taskbar When logged on as a user there are many restrictions that protect the system from incorrect user acti...

Страница 41: ...mote desktop connection must be installed on the client You must also be connected to the Internet A broadband Internet connection is good for high performance However because the remote desktop transmits a minimum set of data including the display data and keyboard data to control the host remotely a broadband Internet connection is not required You can run a remote desktop on a low bandwidth Int...

Страница 42: ...ick Start and then click Remote Desktop Connection Or double click the Remote Desktop Connection icon The Remote Desktop Connection window will open 2 Enter the host computer name You can configure detailed settings by clicking the Options button The Help file is not available with this Monitor 3 Options General Enter the login information to connect to the host computer Enter your username and pa...

Страница 43: ...Installing the Software Local Resource Specify whether to use the hard disks and ports Programs Specify whether to display the Desktop or run an application whenever you are connected The default is Desktop ...

Страница 44: ...ing the Software 4 1 Experience You can select your connection speed and select and share environmental options Advanced Protect your personal information for when your monitor is connected to a remote desktop ...

Страница 45: ... administrator the previous administrator connection will be disconnected In RealVNC the server and the viewer communicate via the VNC protocol You must install a RealVNC server on the computer you wish to control remotely and a VNC viewer on the computer which remotely controls the computer where the RealVNC server is installed Hence the RealVNC server program is installed on a WES client By usin...

Страница 46: ...e to write to the cache due to a lack of memory If this message is displayed you have to deactivate EWF to flush the EWF cache The user can double click the EWF icon on the tray at the bottom right of the screen to call the EWF Manager A user can also change the EWF configuration by entering EWF management commands at the command prompt This task requires the administrator privilege Enable disk wr...

Страница 47: ...changed disable the FBWF change it and enable it again You can control the FBWF using the various options of the fbwfmgr command at a command prompt Setting the FBWF Current FBWF status Displays the current status of the FBWF Enabled or Disabled Boot command Displays the FBWF command that will be performed at the next boot up Used memory Displays the size of the RAM the FBWF is using If the curren...

Страница 48: ...ed This is the recommended setting for normal use On with no exceptions This settings blocks all unwanted access to your client including all requests to programs and services selected in the Exceptions tab Use this setting when you need to protect your client to the maximum extent Off Not recommended Turning off the Windows Firewall may make your client and network more vulnerable to viruses and ...

Страница 49: ...em with a device driver When problems occur after installing a new program or device When the client computer is infected with a virus When Windows Embedded Standard fails to start How to Recover the System Recovery Using USB Memory By following these steps you can save all necessary files to USB memory and boot up with the backed up system on the USB memory and recover the system Perform system f...

Страница 50: ...XE server Boot the client via the network Recover the system using the Windows Embedded Standard image and the Backup Recovery Utility saved on the PXE server via the network For more information refer to the PXE Server User Manual ...

Страница 51: ...colors on the product and matches the colors on the product with the colors of the printed pictures For more information refer to the online help of the software F1 The Natural Color is provided online You can download it from the website below and install http www samsung com us consumer learningresources monitor naturalcolorexpert pop_download html ...

Страница 52: ...rt the computer after the installation The MagicTune icon may not appear depending on the computer system and the product specifications If the shortcut icon does not appear press the F5 key Restrictions and Problems with the Installation MagicTune The installation of MagicTune may be affected by the graphics card motherboard and the networking environment System Requirements OS Windows 2000 Windo...

Страница 53: ...ove Programs to remove the software 5 Select Yes to start removing MagicTune 6 Wait until a message box appears informing you that the software has been removed completely For technical support the FAQ frequently asked questions or information about the software upgrade for MagicTune please visit our website http www samsung com ...

Страница 54: ...t the computer after the installation The MultiScreen icon may not appear depending on the computer system and the product specifications If the shortcut icon does not appear press the F5 key Restrictions and Problems with the Installation MultiScreen The MultiScreen installation may be affected by the graphics card motherboard and the networking environment Operating System OS Windows 2000 Window...

Страница 55: ...nd the PC are properly connected perform the self diagnosis function according to the procedures below 1 Turn the product and the PC off 2 Separate the signal cable from the product 3 Turn the product on 4 If the product is working properly the Check Signal Cable message appears In this case if a blank screen is displayed again make sure that there is no problem with the PC and the connection The ...

Страница 56: ...and Contrast If MagicBright is set to Dynamic Contrast the display brightness can differ according to the input signal THE ON SCREEN ADJUSTMENT MENU OSD DOES NOT APPEAR Did you cancel the screen adjustment Check if the OSD Adjustment Lock function is set to Off THE COLOR IS WEIRD THE PICTURE IS DISPLAYED IN BLACK AND WHITE Is the entire screen displayed in the same color as if viewing the screen t...

Страница 57: ...h ics card driver WHEN I CONNECT THE MONITOR THE UNKNOWN MONITOR PLUG PLAY VESA DDC MONITOR FOUND MESSAGE IS DISPLAYED Did you install the device driver for the product Install the device driver referring to the descriptions about the driver installation Check if all the Plug Play VESA DDC functions are sup ported referring to the User Manual of the graphics card Install the device driver referrin...

Страница 58: ...nge the resolution by selecting Control Panel Appearance and Themes Display Settings Windows ME 2000 Change the resolution by selecting Con trol Panel Display Settings Windows Vista Change the resolution by selecting Control Panel Appearance and Personalization Personalization Resolution Windows 7 Change the resolution by selecting Control Panel Appearance and Personalization Display Adjust sreen ...

Страница 59: ...z Display Color 16 7 M Resolution Optimum resolution 1366 x 768 60 Hz Maximum resolution 1366 x 768 60 Hz Input Signal Terminated RGB Analog 0 7 Vp p 5 Separate H V sync Composite TTL Level V high 2 0 V V low 0 8 V Maximum Pixel Clock 85 5 MHz Analog Digital Power Supply This product supports 100 240 V Since the standard voltage may differ from country to country please check the label on the back...

Страница 60: ...t turned off and you can turn the screen on again by pressing any key or clicking the mouse However the power saving function only works when the product is connected to a computer that provides the power saving function If there is no power cut off switch the power consumption is 0 only when the power cord is disconnected The actual power consumption may be different from the indicated power cons...

Страница 61: ...ALVADOR 800 6225 http www samsung com GUATEMALA 1 800 299 0013 http www samsung com HONDURAS 800 7919267 http www samsung com JAMAICA 1 800 234 7267 http www samsung com NICARAGUA 00 1800 5077267 http www samsung com PANAMA 800 7267 http www samsung com PERU 0 800 777 08 http www samsung com PUERTO RICO 1 800 682 3180 http www samsung com REP DOMINICA 1 800 751 2676 http www samsung com TRINIDAD T...

Страница 62: ...w samsung com POLAND 0 801 1SAMSUNG 172678 022 607 93 33 http www samsung com PORTUGAL 80820 SAMSUNG 726 7864 http www samsung com RUMANIA 1 08010 SAMSUNG 72678 doar din reţeaua Romtelecom tarif local 2 021 206 01 10 din orice reţea tarif normal http www samsung com SERBIA 0700 Samsung 0700 726 7864 http www samsung com SLOVAKIA 0800 SAMSUNG 726 7864 http www samsung com SPAIN 902 1 SAMSUNG 902 17...

Страница 63: ...8888 021 5699 7777 http www samsung com JAPAN 0120 327 527 http www samsung com MALAYSIA 1800 88 9999 http www samsung com PHILIPPINES 1 800 10 SAMSUNG 726 7864 1 800 3 SAMSUNG 726 7864 1 800 8 SAMSUNG 726 7864 02 5805777 http www samsung com SINGAPORE 1800 SAMSUNG 726 7864 http www samsung com TAIWAN 0800 329 999 http www samsung com THAILAND 1800 29 3232 02 689 3232 http www samsung com VIETNAM ...

Страница 64: ...More Information 6 3 AFRICA NIGERIA 0800 SAMSUNG 726 7864 http www samsung com SOUTH AFRICA 0860 SAMSUNG 726 7864 http www samsung com ...

Страница 65: ...nt possible harm to the environment or human health from uncontrolled waste disposal please separate these items from other types of waste and recycle them responsibly to promote the sustainable reuse of material resources Household users should contact either the retailer where they purchased this product or their local government office for details of where and how they can take these items for ...

Отзывы: