background image

Using the product

3-2

S24B150NL

DISPLAY MODE

HORIZONTAL 

FREQUENCY (KHZ)

VERTICAL 

FREQUENCY  (HZ)

PIXEL CLOCK (MHZ)

SYNC POLARITY (H/

V)

IBM, 720


x


400

31.469

70.087

28.322

-/+

MAC, 640 x 480

35.000

66.667

30.240

-/-

MAC, 832


x


624

49.726

74.551

57.284

-/-

MAC, 1152 x 870

68.681

75.062

100.000

-/-

VESA, 640


x


480

31.469

59.940

25.175

-/-

VESA, 640 x 480

37.861

72.809

31.500

-/-

VESA, 640 x 480

37.500

75.000

31.500

-/-

VESA, 800 x 600

35.156

56.250

36.000

+/+

VESA, 800 x 600

37.879

60.317

40.000

+/+

VESA, 800 x 600

48.077

72.188

50.000

+/+

VESA, 800 x 600

46.875

75.000

49.500

+/+

VESA, 1024 x 768

48.363

60.004

65.000

-/-

VESA, 1024 x 768

56.476

70.069

75.000

-/-

VESA, 1024 x 768

60.023

75.029

78.750

+/+

VESA, 1152 x 864

67.500

75.000

108.000

+/+

VESA, 1280


x


720

45.000

60.000

74.250

+/+

VESA, 1280 x 800

49.702

59.810

83.500

-/+

VESA, 1280 x 1024

63.981

60.020

108.000

+/+

VESA, 1280 x 1024

79.976

75.025

135.000

+/+

VESA, 1440 x 900

55.935

59.887

106.500

-/+

VESA, 1600 x 900

60.000

60.000

108.000

+/+

VESA, 1680


x


1050

65.290

59.954

146.250

-/+

VESA, 1920


x


1080

67.500

60.000

148.500

+/+

Содержание SyncMaster S19B150N

Страница 1: ...er S19B150N S22B150N S24B150NL Monitor User Manual The color and the appearance may differ depending on the product and the specifications are subject to change without prior notice to improve the per...

Страница 2: ...l Resolution 3 1 Standard Signal Mode Table 3 2 Installing the Device Driver 3 3 Product Operating Buttons 3 4 Using the Screen Adjustment Menu OSD On Screen Display 3 5 INSTALLING THE SOFTWARE Natura...

Страница 3: ...may not be partially or in whole reproduced distributed or used in any form without the written permission of Samsung Electronics Co Ltd The SAMSUNG logo and SyncMaster are the registered trademarks o...

Страница 4: ...n normal for approximately 1 ppm parts per million pixels The number of sub pixels by panel type The number of Sub Pixels Max Horizontal Resolution x Max Vertical Resolution x 3 Example If the maximum...

Страница 5: ...void electric shock be sure you disconnect the cable by gripping the plug and do not touch the cable with wet hands 3 Wipe the monitor using a soft slightly damp cloth that has been squeezed Do not us...

Страница 6: ...rwise it may result in electric shock or fire Avoid connecting multiple electric appliances to a single wall outlet Otherwise it may result in fire due to overheating of the wall outlet Avoid plugging...

Страница 7: ...such as inside a bookshelf or closet Otherwise it may result in fire due to internal over heating Keep a distance of at least 10 cm from the wall when installing the product for ventilation Otherwise...

Страница 8: ...roblem may occur due to the surrounding environment In this case install the product only after consulting one of our service engineers about the matter Places exposed to microscopic dust chemicals to...

Страница 9: ...e repair or modify the product yourself Otherwise it may result in fire or electric shock If the product needs to be fixed contact a service center When cleaning the product do not spray water directl...

Страница 10: ...k or fire Avoid placing a liquid container such as a vase flowerpot beverage cosmetics or drugs or a metal object over the product If water or an alien substance enters the product turn the power off...

Страница 11: ...t for a long time do not touch the product Keep small accessories away from the children Take care when adjusting the angle of the product or the height of the stand If your hand or finger is caught y...

Страница 12: ...tents have been included Store the packaging box in case you need to move the Product at a later stage Monitor The cables provided may vary depending on the product you purchase Contents Installation...

Страница 13: ...rds Insert the Stand Connector into the Stand in the direction shown by the figure Check if the Stand Connector is firmly connected Turn the connecting screw at the bottom of the stand fully so that i...

Страница 14: ...erse order of the assembly Hold the main body of the product with your hand as shown by the figure Push the assembled stand into the main body in the direction of the arrow as shown in the figure Caut...

Страница 15: ...the PC When the graphics card provides D Sub Analog output Connect the RGB IN port of the product to the D Sub port of the PC with the D Sub cable 2 Connect the power adapter to DC jack on the rear of...

Страница 16: ...tion You must purchase the Kensington Lock separately To lock the product follow these steps 1 Wrap the Kensington lock cable around a large stationary object such as a desk or chair 2 Slide the end o...

Страница 17: ...message appears up to 3 times if the resolution has not been set to the optimal resolution To set the resolution to the optimal resolution When the PC is turned off connect the product and the PC and...

Страница 18: ...e displayed or only the Power LED may be turned on Therefore configure it as follows referring to the User Manual of the graphics card S19B150N S22B150N DISPLAY MODE HORIZONTAL FREQUENCY KHZ VERTICAL...

Страница 19: ...600 35 156 56 250 36 000 VESA 800 x 600 37 879 60 317 40 000 VESA 800 x 600 48 077 72 188 50 000 VESA 800 x 600 46 875 75 000 49 500 VESA 1024 x 768 48 363 60 004 65 000 VESA 1024 x 768 56 476 70 069...

Страница 20: ...1 469 70 087 28 322 MAC 640 x 480 35 000 66 667 30 240 MAC 832 x 624 49 726 74 551 57 284 MAC 1152 x 870 68 681 75 062 100 000 VESA 640 x 480 31 469 59 940 25 175 VESA 640 x 480 37 861 72 809 31 500 V...

Страница 21: ...or Samsung Electronics website http www samsung com and download the driver 1 Insert the driver installation CD ROM into the CD ROM drive 2 Click on Windows Driver 3 Complete the remaining installatio...

Страница 22: ...the OSD in order to maintain the current settings or to prevent the settings from being changed by another person On If you press and hold the MENU button down for 10 seconds the OSD Adjustment Lock...

Страница 23: ...e product on or off The buttons on the right of the product are touch type buttons Touch the buttons lightly with your finger Power LED This LED is turned on when the product works normally For more i...

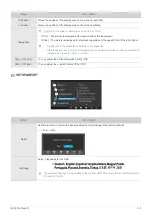
Страница 24: ...epeat Time Customized Key Display Time Menu Transpar ency INFORMA TION Menu Description Brightness Controls the screen brightness This menu is unavailable when Bright is set to Dynamic Contrast mode T...

Страница 25: ...een refresh rate Cinema This mode provides brightness and sharpness settings similar to those of a TV for the best entertainment environment movie DVD etc Dynamic Contrast Controls the picture contras...

Страница 26: ...tures according to your preference This menu is unavailable when Color is set to Full mode or Intelligent mode Blue You can adjust the blue color value of pictures according to your preference This me...

Страница 27: ...o of the input signal A signal not in the standard mode table is not supported If the resolution is set to the optimal resolution the aspect ratio does not change whether the Image Size is set to Auto...

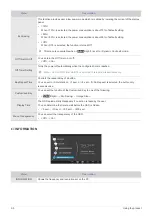
Страница 28: ...ff automatically when the configured time is reached When On of Off Timer On Off is selected This function is available only Key Repeat Time Controls the repeat delay of a button You can set to Accele...

Страница 29: ...e displayed colors on the product and matches the colors on the product with the colors of the printed pictures For more information refer to the online help of the software F1 The Natural Color is pr...

Страница 30: ...tart the computer after the installation The MagicTune icon may not appear depending on the computer system and the product specifications If the shortcut icon does not appear press the F5 key Restric...

Страница 31: ...ge or Remove Programs to remove the software 5 Select Yes to start removing MagicTune 6 Wait until a message box appears informing you that the software has been removed completely For technical suppo...

Страница 32: ...t the computer after the installation The MultiScreen icon may not appear depending on the computer system and the product specifications If the shortcut icon does not appear press the F5 key Restrict...

Страница 33: ...d the PC are properly connected perform the self diagnosis function according to the procedures below 1 Turn the product and the PC off 2 Separate the signal cable from the product 3 Turn the product...

Страница 34: ...t Refer to the Brightness Contrast If Bright is set to Dynamic Contrast the display brightness can differ according to the input signal The on screen adjustment menu OSD does not appear Did you cancel...

Страница 35: ...re the color again in accordance with the new graph ics card driver When I connect the monitor the Unknown monitor Plug Play VESA DDC monitor found message is displayed Did you install the device driv...

Страница 36: ...ows XP Change the resolution by selecting Control Panel Appearance and Themes Display Settings Windows ME 2000 Change the resolution by selecting Con trol Panel Display Settings Windows Vista Change t...

Страница 37: ...OG TTL level V high 2 0V V low 0 8V Maximum Pixel Clock 95MHz Analog Power Supply This product supports 100 240 V Since the standard voltage may differ from country to country please check the label o...

Страница 38: ...V V low 0 8V Maximum Pixel Clock 185MHz Analog Power Supply This product supports 100 240 V Since the standard voltage may differ from country to country please check the label on the back of the prod...

Страница 39: ...Vp p 5 separate H V sync Composite SOG TTL level V high 2 0V V low 0 8V Maximum Pixel Clock 164MHz Analog Power Supply This product supports 100 240 V Since the standard voltage may differ from countr...

Страница 40: ...aving it unattended for long periods The PowerSaver system operates with a VESA DPM compliant video card installed in your computer Use the software utility installed on your computer to set up this f...

Страница 41: ...sung com DOMINICA 1 800 751 2676 http www samsung com ECUADOR 1 800 10 7267 http www samsung com EL SALVADOR 800 6225 http www samsung com GUATEMALA 1 800 299 0013 http www samsung com HONDURAS 800 27...

Страница 42: ...NDS 0900 SAMSUNG 0900 7267864 0 10 Min http www samsung com NORWAY 815 56 480 http www samsung com POLAND 0 801 1SAMSUNG 172 678 48 22 607 93 33 http www samsung com PORTUGAL 808 20 SAMSUNG 808 20 726...

Страница 43: ...om ASIA PACIFIC AUSTRALIA 1300 362 603 http www samsung com NEW ZEALAND 0800 SAMSUNG 0800 726 786 http www samsung com CHINA 400 810 5858 http www samsung com HONG KONG 852 3698 4698 http www samsung...

Страница 44: ...g com SAUDI ARABIA 9200 21230 http www samsung com U A E 800 SAMSUNG 726 7864 http www samsung com AFRICA CAMEROON 7095 0077 http www samsung com COTE D IVOIRE 8000 0077 http www samsung com GHANA 080...

Страница 45: ...ble harm to the environment or human health from uncontrolled waste disposal please sepa rate these items from other types of waste and recycle them responsibly to promote the sustainable reuse of mat...

Отзывы: