background image

14

English

Connections

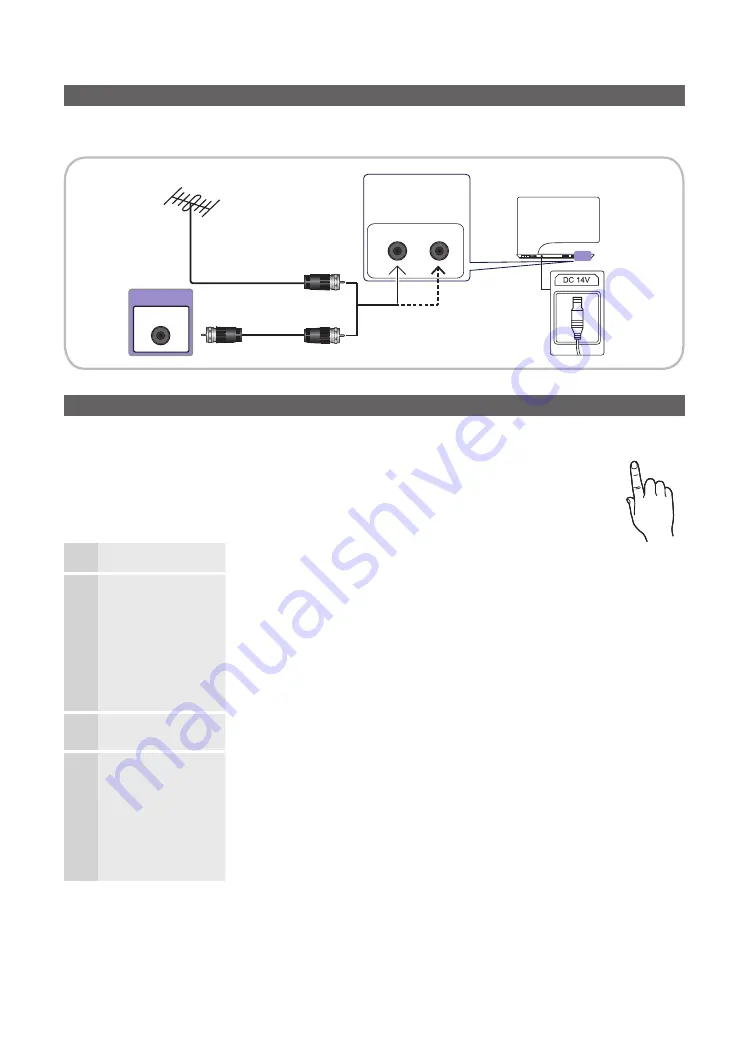
Connecting to an Antenna

When the TV is initially powered on, basic settings proceed automatically.


Connecting the power cord and antenna. 

Plug & Play (Initial Setup)

When you turn the TV on for the first time, a sequence of on-screen prompts will assist in configuring basic 
settings. To turn on the TV, press the 

POWER

P

 button.


Plug & Play

 is available only when the 

Source

 is set to TV.


To return to the previous step in the Plug & Play sequence, select 

Previous

, and then press 

ENTER

E

.


Before turning on the TV, make you have connected the TV to an antenna or cable connection.

1

Selecting the OSD 
Language

Press the 

 or 

 button to select a language. Press 

ENTER

E

 twice when done.

2

Setting up the Network Set up your network connection. Press the 

ENTER

E

 button to start. If you do not know 

your network set up information or want to set to it later, select 

Skip

. We suggest you skip 

network connection setup now and refer to Network Settings section of this manual for set 
up requirements and instructions(p. 32) . You can set up the network connection later using 
the Network menu.


When network connection settings are complete, Software Upgrade is available. 
Select Next to upgrade TV software. Your TV will automatically upgrade, if your TV 
need a software upgrade. If you want to upgrade later, select the Skip. For more 
information, refer to "Software Upgrade"(p.40).

3

Selecting the usage
mode

Press the 

 or 

 button to select 

Home Use

, and then press the 

ENTER

button twice.


y

Select the 

Home Use

 mode. 

Store Demo

 mode is for retail environments.

4

Setting the 

Clock

Mode

Press the 

 or 

 button to select 

Auto

 or 

Manual

, and then press 

ENTER

E

 twice.


If you selected 

Auto

, you’ll go to the Time Zone screen. On the Time Zone screen, use 

the 

 or 

 button to select your zone, and then press 

ENTER

E

. When done, press 

ENTER

E

.


If you selected 

Manual

, you’ll go to the Date and Time screen. Select Date or Time, 

and then press 

ENTER

E

. Then, use the number buttons or the 

 or 

 button to 

set the date or time. Use the 

 or 

 button to move between entry fields. When 

done setting the Date and Time, select 

Next

, and then press 

ENTER

E

.

P

POWER

INFO

GUIDE

ANT 1 IN

(AIR)

ANT 2 IN

(CABLE)

ANT OUT

CABLE

VHF/UHF Antenna

or

Содержание SyncMaster 9 Series

Страница 1: ...ED TV MONITOR MFM TV user manual Thank you for purchasing this Samsung product To receive more complete service please register your product at www samsung com register TA950 imagine the possibilities...

Страница 2: ...se follow below recommendations below Avoid displaying the same TV channel for long periods Always try to display a full screen image Reducing brightness and contrast will help to avoid the appearance...

Страница 3: ...ol Buttons Connections 14 14 Connecting to an Antenna 14 Plug Play Initial Setup 16 Connecting to an AV Device 18 Connecting to an Audio Device 19 Connecting to a PC 21 Changing the Input Source 22 Ne...

Страница 4: ...tric shock Plug the power plug in firmly y y Otherwise it may result in fire Make sure to connect the power cord to a grounded wall outlet for insulation class 1 equipment only y y Otherwise it may re...

Страница 5: ...esult in fire due to internal over heating Keep a distance of at least 10 cm 3 93 inches from the wall when installing the product for ventilation y y Otherwise it may result in fire due to internal o...

Страница 6: ...o not place the product face down on the floor y y This may damage the panel of the product When installing the product on a console or shelf make sure that the front of the product does not protrude...

Страница 7: ...ansing agent when cleaning the product This may result in the exterior being deformed or the print being removed If you can t get the product clean with just the supplied cloth use a soft damp cloth w...

Страница 8: ...it may result in electric shock or fire Avoid moving the product by pulling the power cord or antenna cable y y Otherwise it may result in electric shock fire or a problem with the product due to dama...

Страница 9: ...result in an electric shock Set the appropriate resolution and frequency for the product y y Otherwise it may result in eye strain Avoid turning the product upside down or move the product holding onl...

Страница 10: ...o high y y Having the sound too loud may damage your hearing Be careful that children do not place the batteries in their mouths when removed from the remote control Place the battery in a location th...

Страница 11: ...u to control all connected Samsung devices that support anynet with your Samsung TV s remote p 61 y y Multimedia Contents Allows you to play music files pictures and movies Accessories Please make sur...

Страница 12: ...control Source Toggles between all the available input sources In the on screen menu use this button as you would use the E Enter button on the remote control Turns the 3D image on or off P Power Pow...

Страница 13: ...hannel lists on the screen Displays the EPG Electronic Program Guide p 24 Displays information on the TV screen Exits the menu Gives direct access to channels Not Available Brazil only Press to select...

Страница 14: ...quirements and instructions p 32 You can set up the network connection later using the Network menu When network connection settings are complete Software Upgrade is available Select Next to upgrade T...

Страница 15: ...inutes For more information refer to Channel Auto Program Press the ENTERE button at any time to interrupt the memorization process 7 Enjoy your TV If you want to watch a broadcast program select Clos...

Страница 16: ...er of the external device about the HDMI version and if out of date request an upgrade x x Be sure to use an HDMI cable with a thickness of 14 mm or less x x Be sure to purchase a certified HDMI cable...

Страница 17: ...connecting to AV IN the color of the AV IN VIDEO jack green will not match the video cable yellow To obtain the best picture quality the Component connection is recommended over the A V connection R W...

Страница 18: ...l send 5 1 CH sound to the home theater receiver When the source is a digital component such as a DVD Blu ray player cable box STB Set Top Box satellite receiver and is connected to the TV via HDMI on...

Страница 19: ...n mode is not supported This product offers a game driver SyncMaster 3D Game Launcher TriDef 3D that allows you to play PC games with dynamic 3D images Install the SyncMaster 3D Game Launcher TriDef 3...

Страница 20: ...70Hz 31 469 70 087 28 322 VESA DMT 800 x 600 56Hz 35 156 56 250 36 000 VESA DMT 800 x 600 60Hz 37 879 60 317 40 000 VESA DMT 800 x 600 72Hz 48 077 72 188 50 000 75Hz 46 875 75 000 49 500 MAC 832 x 624...

Страница 21: ...ake your input source selection easier When connecting a PC to the HDMI IN 1 DVI port with HDMI cable you should set the TV to HDMI1 DVI mode under Edit Name When connecting a PC to the HDMI IN 1 DVI...

Страница 22: ...values your TV needs to access the Internet so you do not have to enter them manually Most home networks are Dynamic Networks Some networks require a Static IP address If your network requires a Stat...

Страница 23: ...s IP sharer that is not currently being used If the channel set for the wireless IP sharer is currently being used by another device nearby this will result in interference and communication failure x...

Страница 24: ...ifies the current channel and the status of certain audio video settings The Now Next guide shows daily TV program information for each channel according to the broadcasting time y y Scroll to view in...

Страница 25: ...the Information screen you can change or cancel a reserved information x x Cancel Schedules Cancel a show you have reserved to watch x x Edit Change a show you have reserved to watch x x Return Retur...

Страница 26: ...requently as favorites Refer to Using the favorite Channels for details on how to assign a channel to favorite x x Lock Unlock Lock a channel so that the channel cannot be selected and viewed This fun...

Страница 27: ...icture Mode O O MENUm Picture Picture Mode ENTERE Picture Mode Select your preferred picture type In HDMI1 DVI mode when a PC is connected you can only select Standard and Entertain Dynamic Suitable f...

Страница 28: ...abled only in HDMI mode Smart View 2 is enabled only in HDMI or DTV mode The picture size can vary depending on the input resolution when content is played using Videos under Smart Hub NOTE x x After...

Страница 29: ...White Balance Off On Controls the white balance in 10 point interval by adjusting the red green and blue brightness Available when the Picture Mode is set to Movie and when the external input is set...

Страница 30: ...on Windows XP Depending on the version of Windows and the video card the actual screens on your PC may differ in which case the same basic set up information will almost always be applied If not cont...

Страница 31: ...s that are broadcasting in mono or if you are having difficulty receiving a stereo signal Stereo Choose for channels that are broadcasting in stereo SAP Choose to listen to the Separate Audio Program...

Страница 32: ...network that requires a Static IP address Getting the Network Connection Values To get the Network connection values on most Windows computers follow these steps 1 Right click the Network icon on the...

Страница 33: ...hen select Next When you enter the Security key Security or PIN use u d l r buttons on your remote to select number characters You should be able to find the Pass Phrase on one of the set up screens y...

Страница 34: ...k Settings screen To enter it follow the directions of Network Settings 2 Select the One Foot Connection 3 Place the wireless router in parallel with the Samsung Wireless LAN Adapter giving a gap no l...

Страница 35: ...ptional y y By giving priority to Samsung TVs enjoy HD content without buffering y y Connection speed may vary based on the network environment Network Settings Ad Hoc You can connect to a mobile devi...

Страница 36: ...Sat Sun or Manual to set at your convenience If you select Manual you can set up the day you want to activate the timer The c mark indicates the day is selected Time Set the hour minute and am pm Volu...

Страница 37: ...tton Your PIN has been memorized The PIN press the remote control buttons in the following sequence which resets the pin to 0 0 0 0 POWER off MUTE 8 2 4 POWER on Other Features O O MENUm System ENTERE...

Страница 38: ...y Game Mode is not available in TV mode or HDMI1 DVI mode when a PC is connected After connecting the game console set Game Mode to On Unfortunately you may notice reduced picture quality If Game Mode...

Страница 39: ...est Use to check for picture problems Yes If the test pattern does not appear or there is noise in the test pattern select Yes There may be a problem with the TV Contact Samsung s Call Center for assi...

Страница 40: ...erate properly the connection may be broken Please retry downloading If the problem persists download by USB and upgrade Alternative Software backup If there is an issue with the new firmware and it i...

Страница 41: ...asses This product may not be compatible with 3D glasses other than the model specified above Power off the 3D glasses when you are not using them Leaving the glasses on drains the battery and decreas...

Страница 42: ...ompatible games will be added to SyncMaster 3D Game Launcher TriDef 3D You can also add games using the following methods Drag the icon or execution file of a game on the desktop into the SyncMaster 3...

Страница 43: ...ther nearby electromagnetic devices or wireless communications devices As the TV turns on the left and right sides of 3D pictures may overlap more than usual It may take time until the picture quality...

Страница 44: ...corded TV Videos Photos Music Schedule Man Source a Login b Sort by Edit Mode Settings You can search for various types of content that can be used on your TV Enter a keyword to search for media vario...

Страница 45: ...input 105Chang 4 2 Press the TTX MIX button on the remote 3 times to change the input mode from lower case to numbers 4 3 Press the 1 0 and 5 button in numerical order 4 4 Press the TTX MIX button on...

Страница 46: ...t of accounts Deactivate Account Withdraw membership from Smart Hub Service Manager Ticker Autorun You can set Ticker Autorun to come on when powering on the TV The Ticker application provides useful...

Страница 47: ...and Twitter Information Includes various information services such as news stocks and weather Other Includes other miscellaneous services My Account Displays the application list and your cyber cash b...

Страница 48: ...ICES EITHER EXPRESS OR IMPLIED INCLUDING BUT NOT LIMITED TO WARRANTIES OF MERCHANTABILITY OF SATISFACTORY QUALITY FITNESS FOR A PARTICULAR PURPOSE OF ACCURACY OF QUIET ENJOYMENT AND NON INFRINGEMENT O...

Страница 49: ...nd only the last part the host address should be changed e g IP Address 123 456 789 2 Using a LAN cable connect between the external modem and the PC onto which the Samsung AllShare PC Software progra...

Страница 50: ...each folder x x MP3 files with DRM that have been downloaded from a non free site cannot be played Digital Rights Management DRM is a technology that supports the creation distribution and management...

Страница 51: ...hift bar will appear Live TV is displayed on the left side of Timeshift bar I Love Music Ming Music_1 No Singer Music_2 No Singer Music_3 No Singer Music_4 No Singer Music_6 No Singer Music_5 No Singe...

Страница 52: ...is pressed a new frame will be appear x x To return to nomal speed playback press the PLAY r button NOTE x x The product does not play sound in Stop mode x x Stop motion operates only in the forward d...

Страница 53: ...least 5 400 rpm but a USB HDD of RAID type is not supported A USB storage device cannot record until it completes the Device Performance Test 2 Select Length to set up the recording time and then sele...

Страница 54: ...t the USB device must go through the Device Format and Device Performance Test again before you record with the Guide or Channel x x The Timeshift functions can only be used with a USB storage device...

Страница 55: ...me rate fps Bit rate Mbps Audio Codec avi mkv AVI MKV DivX 3 11 4 x 5 1 6 0 1920x1080 6 30 8 MP3 AC3 LPCM ADPCM DTS Core XviD 1920x1080 6 30 8 H 264 BP MP HP 1920x1080 6 30 25 MPEG4 SP ASP 1920x1080 6...

Страница 56: ...ot supported XVID MPEG4 SP ASP Below 1280 x 720 60 frame max Above 1280 x 720 30 frame max GMC 2 over is not supported Supports up to WMA 7 8 9 STD WMA 9 PRO does not support 2 channel excess multi ch...

Страница 57: ...st 4 Press the ENTERE button The message Selected items added to My Playlist is displayed 5 The newly created or updated playlist will be in the main Music page Playing My Playlist Select the My Playl...

Страница 58: ...ist To sort files in the file list select the Sorting by using the l r u d button And then press the ENTERE button Category Operations Recorded TV Videos Music Photos Default Default is sorted by Titl...

Страница 59: ...re Size You can adjust the picture size to your preference Sound Mode You can change the Sound Mode Picture Mode You can change the Picture Mode Subtitle You can view a subtitle You can select a speci...

Страница 60: ...the media function When the media function is on Media contents play can be controlled by a mobile phone or other devices that support DLNA DMC Media Shows a list of mobile phones or connected device...

Страница 61: ...MI IN jack of the home theater and the HDMI OUT jack of the corresponding Anynet device using an HDMI cable NOTE x x Connect the Optical cable between the DIGITAL AUDIO OUT OPTICAL jack on your TV and...

Страница 62: ...nu Shows the title menu of the connected device E g If a DVD recorder is connected the title menu of the DVD recorder will appear Depending on the device this menu may not be available Receiver Sound...

Страница 63: ...the EXIT button to exit If your receiver supports audio only it may not appear in the device list The receiver will work when you have properly connected the optical in jack of the receiver to the DI...

Страница 64: ...y Press the TOOLS button to display the Anynet menu and select a menu you want I want to exit Anynet y y Select View TV in the Anynet menu y y Press the SOURCE button on the TV remote control and sele...

Страница 65: ...o the manual provided with the Kensington Lock for additional information on proper use The Kensington Lock is not supplied by Samsung Please find a K icon on the rear of the TV A kensington slot is b...

Страница 66: ...ity can cause picture distortion This is not a TV issue y y Mobile phones used close to the TV within 3 3 ft may cause noise in the picture on analog and digital channels Color is wrong or missing y y...

Страница 67: ...ble is not connected to an audio input y y For antenna or Cable connections check the signal information A low signal level may cause sound distortion y y Perform the Sound Test as explained No Pictur...

Страница 68: ...hen connected to the PC Connect the USB to the TV and format it Formatting may fail intermittently y y f a Device Performance Test or formatting failed it means that there is a problem with the USB ha...

Страница 69: ...ou watch movies that have aspect ratios different from your TV y y Adjust the picture size options on your external device or the TV to full screen A Mode Not Supported message appears y y Check the s...

Страница 70: ...n the screen y y Select Home Use under Plug Play mode For details refer to Plug Play Feature Storage and Maintenance Do not spray water or a cleaning agent directly onto the product Any liquid that go...

Страница 71: ...vX Certified and associated logos are trademarks of DivX Inc and are used under license ABOUT DIVX VIDEO DivX is a digital video format created by DivX Inc This is an official DivX Certified device th...

Страница 72: ...condensing Tilt 1 1 20 1 Design and specifications are subject to change without prior notice For information about power supply and more about power consumption refer to the label attached to the pr...

Страница 73: ...27 Flesh Tone 29 Frequency 20 H HDMI 16 I Installation Space 2 L Language 37 License 71 M Mono 31 Music 57 N Navigate 24 P Password 45 Photos 58 Picture Size 28 PIP Picture in Picture 39 Plug Play 14...

Страница 74: ...5077267 http www samsung com HONDURAS 800 7919267 http www samsung com COSTA RICA 0 800 507 7267 http www samsung com ECUADOR 800 6225 http www samsung com EL SALVADOR 1 800 299 0013 http www samsung...

Отзывы: