background image

19

English

Adjusting Your Monitor

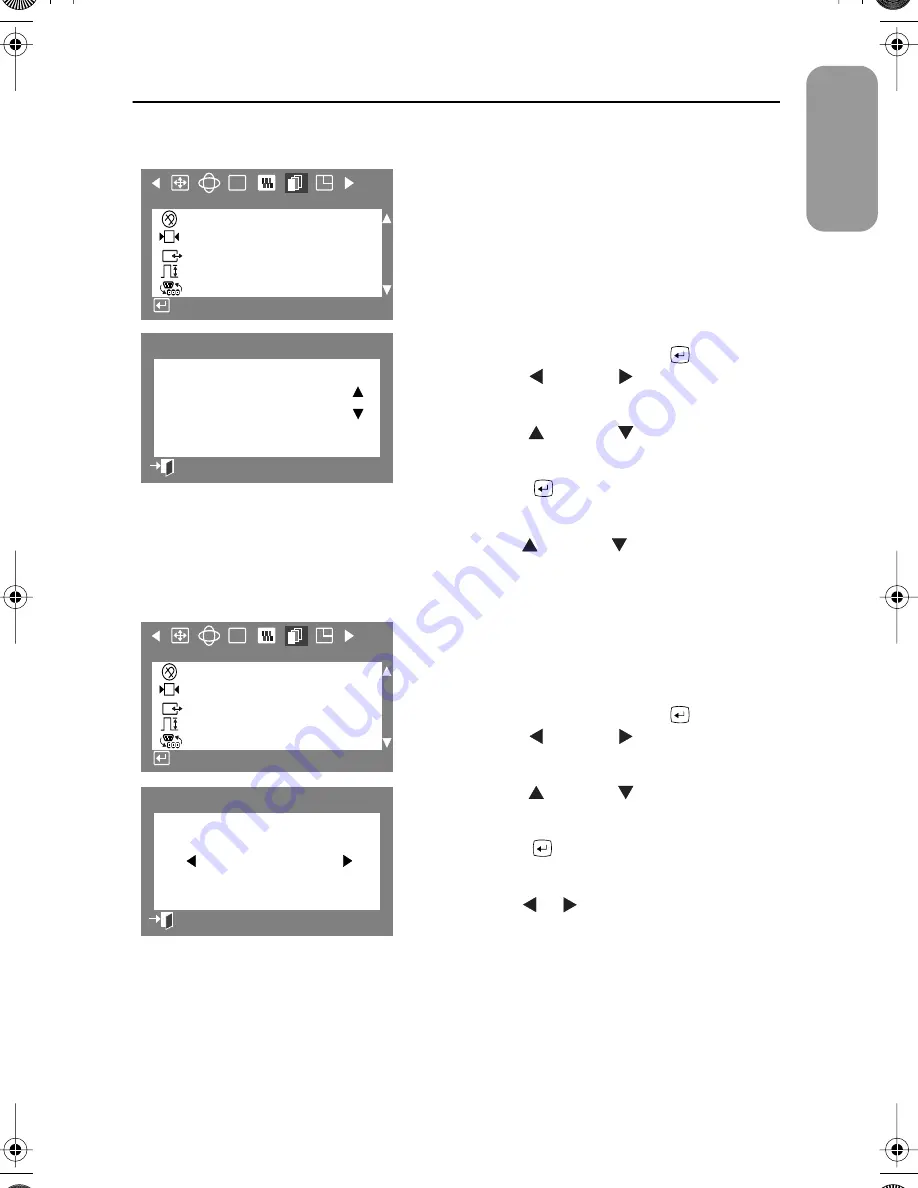
Sync. Input Type

Use this menu to set your monitor to the correct 
type of synchronization. Select “Separate” if the 
computer is sending a separate synchronization 
signal. Select “Sync. on Green” if the computer 
expects the monitor to synchronize with the green 
signal it sends. Refer to your computer or video 
card user’s manual to determine the correct setting. 

1

With the menu off, push the 

 button. 

Push the

button or

button until the 

“Advanced” screen is displayed.

2

Push the

button or

button to select 

Sync. Input Type

.

3

Push the 

 button to open the sync input 

type selection screen.

4

Use the

button or

button to select 

Separate

 or 

Sync. on Green

.

Video Input Level

Some video cards use video signals higher than 1.0 V 
which causes the display to be very bright. For those 
video cards, use this feature to select the 1.0 V Level.

1

With the menu off, push the 

 button. 

Push the

button or

button until the 

“Advanced” screen is displayed.

2

Push the

button or

button to select 

Video Input Level

.

3

Push the


 button to open the video input 

level selection screen.

4

Use the

or

buttons to select 0.7 V or 

1.0 V.

RGB

:

+++

G

A d v a n c e d

D e g a u s s
R e c a l l
S y n c .   I n p u t  Ty p e
Vi d e o   I n p u t   L eve l
D - S U B / B N C

A c c e s s   F u n c t i o n

:

S y n c .   I n p u t  Ty p e

S e p a r a t e
S y n c .   o n   G re e n

P rev i o u s   M e n u

RGB

:

+++

G

A d v a n c e d

D e g a u s s
R e c a l l
S y n c .   I n p u t  Ty p e
Vi d e o   I n p u t   L eve l
D - S U B / B N C

A c c e s s   F u n c t i o n

:

Vi d e o   I n p u t   L eve l

0 . 7  V             1 . 0  V

P rev i o u s   M e n u

700IFT2.book  Page 19  Monday, September 20, 1999  11:24 AM

Содержание SyncMaster 700IFT, 900IFT

Страница 1: ...SyncMaster 700IFT SyncMaster 900IFT Color Monitor Owner s Instructions...

Страница 2: ...rial The Samsung logo and SyncMaster are registered trademarks of Samsung Electronics Co Ltd Microsoft Windows and Windows NT are registered trademarks of Microsoft Corporation VESA DPMS and DDC are r...

Страница 3: ...Controls 8 Automatic Save 9 Direct Access Feature 9 OSD Lock Onlock 9 Information 10 Menu Features 11 Position 11 Size 12 Zoom 12 Parallel Rotation 13 Pincushion Trapezoid 13 Pinbalance 14 Linearity...

Страница 4: ...r monitor in a location with low humidity and a minimum of dust 8 Do not expose the monitor to rain or use it near water In kitchens near swimming pools etc If the monitor accidentally gets wet unplug...

Страница 5: ...our Monitor Please make sure the following items are included with your monitor If any items are missing contact your dealer Manual Power Cord Monitor and Stand Signal Cable Warranty Card Not availabl...

Страница 6: ...the instructions included with your adapter to set the pins on your adapter if necessary 5 Connect the signal cable with an adapter if necessary to the video port on the back of your computer This por...

Страница 7: ...erating system for the monitor driver insert the Driver diskette included with this monitor Driver installation is slightly different from one operating system to another Follow the directions as appr...

Страница 8: ...1 Click on START SETTINGS CONTROL PANEL DISPLAY ADVANCED PROPERTIES MONITOR tab HAVE DISK 2 Type the diskette letter in the box and click OK Self Test Feature Check STFC Your monitor provides a self...

Страница 9: ...onitor If your monitor screen remains blank after using the previous procedure check your video controller and computer system your monitor is functioning properly Getting Help If your monitor does no...

Страница 10: ...button to Exit the active menu or the OSD 3 buttons These buttons allow you to highlight and adjust items in the menu All menus automatically save your adjustments 3 seconds after you stop adjusting...

Страница 11: ...eload modes one for each signal frequency as listed in Display Modes on page 26 If you have made no adjustments the on screen menu disappears and the monitor does not save anything To exit without sav...

Страница 12: ...ent Horizontal Vertical frequencies received from the computer or video board is displayed along the bottom 2 Push the button once mor to see the user defined timing mode 3 Scroll down with the button...

Страница 13: ...ow these instructions to change the position of the monitor s entire display 1 With the menu off push the button Push the button or button until the Position Size screen is displayed 2 Push the button...

Страница 14: ...to change the horizontal Size of the monitor s viewing area Zoom Follow these instructions to get a close up or a longshot view of the monitor s viewing area 1 With the menu off push the button Push t...

Страница 15: ...he pincushion setting when the sides of the display are bowed in or bowed out adjust the trapezoid setting when the top or bottom of the display is too large or small 1 With the menu off push the butt...

Страница 16: ...earity Adjust the linearity setting when the display image is compressed at the left right or top bottom 1 With the menu off push the button Push the button or button until the Geometry screen is disp...

Страница 17: ...or Color 3 adjustment screen 4 The current color temperature is shown highlighted between 9300 and 5000K Use the button or button to adjust the color temperature 5 Adjust the color temperature as clos...

Страница 18: ...the button or button to adjust vertical moire Focus Use the focus control when the image displayed on the screen is not sharp in all areas 1 With the menu off push the button Push the button or button...

Страница 19: ...ed screen is displayed 2 Push the button or button to select Degauss 3 Push the button to execute the degauss function The degaussing screen will appear NOTE The monitor may buzz momentarily the image...

Страница 20: ...the button to select YES If you don t want to reset the monitor use the button to select NO NOTE If you have selected YES all settings listed above will be reset All other settings will remain the sam...

Страница 21: ...n screen 4 Use the button or button to select Separate or Sync on Green Video Input Level Some video cards use video signals higher than 1 0 V which causes the display to be very bright For those vide...

Страница 22: ...creen will blank then display the image from the new signal source Other computer A cable must be connected to both inputs to use this function Menu Position You can change the position where the OSD...

Страница 23: ...the language used in the menu The language chosen affects only the language of the OSD It has no effect on any software running on the computer 1 With the menu off push the button Push the button or b...

Страница 24: ...orizontal and vertical sync return This occurs when you move the computer s mouse or press a key on the keyboard This monitor is EPA ENERGY STAR compliant and NUTEK compliant when used with a computer...

Страница 25: ...the computer and the monitor Sync Out of Range appears Check the maximum resolution and the frequency on the video port of your computer Compare these values with the data in the Display Modes Timing...

Страница 26: ...ion Input Signal Terminated Video signal Analog video 0 7 Vpp positive at 75 Separate sync TTL Level positive or negative Composite sync TTL Level positive or negative Sync on green Composite sync 0 3...

Страница 27: ...D G GND B Reserved GND Sync Self Raster GND DDC Data H Sync V Sync DDC Clock Red Green Blue GND DDC Return GND R GND G GND B Reserved GND Sync Self Raster GND DDC Data H Sync Not Used DDC Clock Red Gr...

Страница 28: ...iming modes Display Mode Horizontal Frequency kHz Vertical Frequency Hz Pixel Clock MHz Sync Polarity H V IBM VGA2 720 x 400 31 469 70 087 28 322 IBM VGA3 640 x 480 31 469 59 940 25 175 VESA 800 x 600...

Страница 29: ...Menu position 20 N No Connection Check Signal Cable 23 0 OSD Lock Unlock 13 P Parallelogram 13 Pinbalance 14 Pincushion 13 Position 11 Position Size 11 Power 22 Power button 9 Power indicator 9 Power...

Отзывы: