background image

Dropping the product may cause damage to the product or personal injury.  
Using the product in a location prone to vibrations may shorten the lifetime of the 
product or may catch fire. 


When moving the monitor, turn off and unplug the power cord. Make sure that all 
cables, including the antenna cable and cables connected to other devices, are 
disconnected before moving the monitor.  
 

Failure to disconnect a cable may damage it and lead to fire or an electric shock. 


Place the product out of children’s reach, as they could damage by hanging onto it.  
 

A falling product could cause physical damage even death. 


When not using the product for an extended time period, keep the product 
unplugged.  
 

Otherwise, this may cause heat emission from the accumulated dirt or degraded 
insulation, leading to electric shock or fire.


Do not place children's favorite objects (or anything else that may be tempting) on the 
product.  
 

Children may try to climb on the product to retrieve an object.  
The product could fall, causing physical damage or even death. 


When lifting up or moving the monitor, do not lift the monitor upside down while 
holding only the stand.  
 

This may cause your monitor to fall, and become damaged or cause personal 
injury.


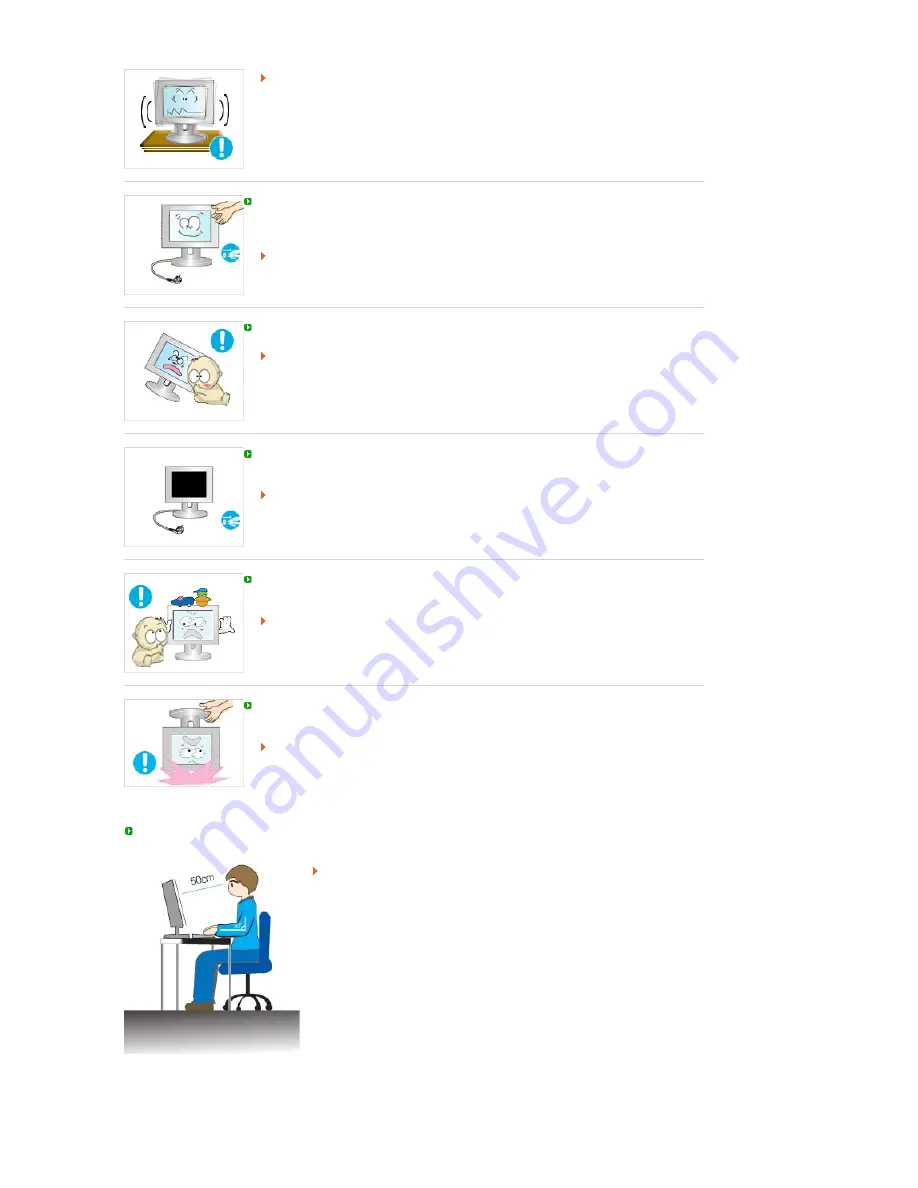
Good Postures When Using the Monitor


 Try to maintain a good posture when using the monitor.


z

Keep your back straight. 
 

z

Keep a distance of about 45 ~ 50 cm between your eyes and the 
monitor screen. Look at the screen from slightly above it, and have 
the monitor directly in front of you. 
 

z

Tilt the monitor upwards by 10 ~20 degrees. Adjust the monitor 
height so that the top of the monitor is slightly below eye level. 
 

z

Adjust the monitor angle so that there is no reflected light on the 
screen.Try to maintain your arms perpendicular to your armpits. 
 

z

Keep your arms level with the back of your hands. 
 

z

Keep the angle of the elbow perpendicular. 
 

z

Keep the angle of the knees at more than 90 degree. Do not let your 

Содержание SyncMaster 225MS

Страница 1: ...Install driver Install programs SyncMaster 225MS...

Страница 2: ...imes Do not disassemble Disconnect the plug from the outlet Do not touch Ground to prevent an electric shock Power When not used for extended period of time set your computer to DPMS If using a screen...

Страница 3: ...cessively bend the plug and wire nor place heavy objects upon them which could cause damage This may cause an electric shock or fire Do not connect too many extension cords or plugs to an outlet This...

Страница 4: ...e to the product or human body Install the monitor base in a showcase or shelf so that the end of the base does not protrude from the showcase or shelf Dropping the product may cause damage to the pro...

Страница 5: ...fied in the owner s manual When installing the product make sure to keep it away from the wall more than 10 cm 4 inches for ventilation purposes Poor ventilation may cause an increase in the internal...

Страница 6: ...cals such as wax benzene alcohol thinners insecticide air freshener lubricant or detergent Contact the Service Center or Customer Center for interior cleaning once a year Keep the product s interior c...

Страница 7: ...ure to do so may cause an electric shock or fire Do not try to move the monitor by pulling only the wire or the signal cable This may cause a breakdown electric shock or fire due to damage to the cabl...

Страница 8: ...d of time residual image or blurriness may appear Change the mode to energy save or set a screensaver to moving picture when you need to be away from the monitor for an extended period of time Adjust...

Страница 9: ...lse that may be tempting on the product Children may try to climb on the product to retrieve an object The product could fall causing physical damage or even death When lifting up or moving the monito...

Страница 10: ...e To prevent possible harm to the environment or human health from uncontrolled waste disposal please separate this from other types of wastes and recycle it responsibly to promote the sustainable reu...

Страница 11: ...ave Mode Ex z Turn the power off when using a stationary pattern z Use a Screen saver if possible z Set the Monitor to power off with the PC Display Properties Power Scheme Turn the power off for 4 ho...

Страница 12: ...atterns When the LCD panel is operated for a long time with a fixed pattern over 12 hours there may be slight difference in voltage between electrodes that work the liquid crystal LC in a pixel The vo...

Страница 13: ...make sure the following items are included with your monitor If any items are missing contact your dealer Contact a local dealer to buy optional items Unpacking Without Stand Monitor With Stand Monit...

Страница 14: ...r Driver Natural Color MagicTuneTM Cable Power Cord D sub Cable Audio Cable Sold separately S Video Cable RCA Cable Earphones Headphones Component Cable DVI Cable DVI to HDMI cable HDMI Cable RCA to s...

Страница 15: ...For documentations or works involving heavy text 3 Internet For working with a mixture of images such as texts and graphics 4 Game For watching motion pictures such as a game 5 Sports For watching mo...

Страница 16: ...incoming Analog signal The values of fine coarse and position are adjusted automatically Click here to see an animation clip PIP button Available in PC DVI Mode Only In PC or DVI Mode turns on Video s...

Страница 17: ...L External device sound input termina VIDEO External device video input terminal S VIDEO External device S video input terminal PC IN DVI D Connect the DVI D terminal at the back of your monitor to yo...

Страница 18: ...ock is a device used to physically fix the system when using it in a public place The locking device has to be purchased separately For using a locking device contact where you purchase it See Connect...

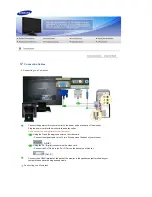
Страница 19: ...puter Using the D sub Analog connector on the video card Connect the signal cable to the 15 pin D sub port on the back of your monitor D SUB Using the DVI Digital connector on the video card Connect t...

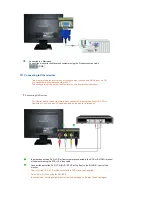
Страница 20: ...monitor has AV connection terminals to connect AV input devices like DVD VCR or Camcorder You may enjoy AV signals as long as the monitor is turned on Input devices such as DVD VCR or Camcorder are c...

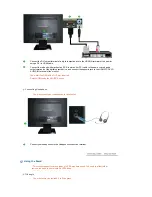
Страница 21: ...L port of the monitor with the AV RCA cable Connect the VIDEO OUT port of the DVD DTV Set Top Box to the PR PB Y input ports using a component video cable PR PB Y Select Component using the SOURCE but...

Страница 22: ...pposite jack to the HDMI PC DVI D AUDIO IN terminal of the monitor Then start the DVD with a DVD disc inserted Select HDMI using the SOURCE button Connecting Headphone You may connect your headphones...

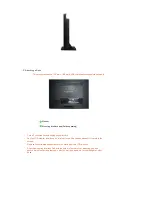
Страница 23: ...and unplug its power cord Lay the LCD monitor face down on a flat surface with a cushion beneath it to protect the screen Remove four screws and then remove the stand from the LCD monitor Align the mo...

Страница 24: ...r program file at the Internet web site shown below Internet web site http www samsung com Worldwide http www samsung com monitor U S A http www sec co kr monitor Korea http www samsungmonitor com cn...

Страница 25: ...E Windows NT Linux Microsoft Windows Vista Operating System Insert your Manual CD into your CD ROM drive Click Start and Control Panel Then double click on Appearance and Personalization Click Persona...

Страница 26: ...om Click Update Driver in the Driver tab Check the Browse my computer for driver software checkbox and click Let me pick from a list of device drivers on my computer Click Have Disk and select the fol...

Страница 27: ...screens displayed in sequence Microsoft Windows XP Operating System Insert the CD into the CD ROM drive Click Start Control Panel then click the Appearance and Themes icon Click Display icon and choo...

Страница 28: ...Click Update Driver and select Install from a list or then click the Next button Select Don t search I will then click Next and then click Have disk Click the Browse button then choose A D Driver and...

Страница 29: ...Samsung Monitor homepage http www samsung com Click the Close button then click the OK button continually Monitor driver installation is completed Microsoft Windows 2000 Operating System When you can...

Страница 30: ...vices and choose the monitor that corresponds to the one you connected to your computer and click OK Continue choosing Close button and OK button until you close the Display Properties dialogue box Mi...

Страница 31: ...will appear Click on Natural Color in the startup window to install the Natural Color software To install the program manually insert the CD included with the Samsung monitor into the CD ROM Drive cl...

Страница 32: ...it the MagicTune website It is recommended using MagicTune in Windows 2000 or later Uninstall The MagicTune program can be removed only by using the Add or Remove Programs option of the Windows Contro...

Страница 33: ...mage you are watching Then press the button again to circle through available preconfigured modes Custom Text Internet Game Sports Movie AV S Video Component Mode The Monitor has four automatic pictur...

Страница 34: ...the AUTO button is pressed the Auto Adjustment screen appears as shown in the animated screen on the center Auto adjustment allows the monitor to self adjust to the incoming PC signal The values of f...

Страница 35: ...en if you use the OSD adjustment lock function you can still adjust MagicBright Mode and Brightness and Contrast of the monitor MENU AUTO PIP MagicBright Menu Description Play Stop PC DVI MagicBright...

Страница 36: ...vie AV S Video Component Mode The Monitor has four automatic picture settings that are preset at the factory Then press the button again to circle through available preconfigured modes Dynamic Standar...

Страница 37: ...current mode PC DVI HDMI AV S Video and Component input signal Changing the source is only allowed for external devices that are connected to the monitor at the time PIP Available in PC DVI Mode Only...

Страница 38: ...escription Play Stop Source List Use to select PC or other external input sources connected to the Monitor Use to select the screen of your choice 1 PC 2 DVI 3 HDMI 4 AV 5 S Video 6 Component MENU MEN...

Страница 39: ...carefully chosen by our engineers the pre configured values may not be comfortable to your eyes depending on your taste If this is the case adjust the brightness and contrast by using the OSD menu 2...

Страница 40: ...djust the Sharpness 4 H Position Adjusts the screen location horizontally 5 V Position Adjusts the screen location vertically Coarse Fine Sharpness H Position V Position Auto Adjustment The values of...

Страница 41: ...a sharper image than in Standard mode 2 Standard Select this mode when the surroundings are bright This also provides a sharp image 3 Movie Select this mode when the surroundings are dark This will s...

Страница 42: ...op MagicColor MagicColor is a new technology that Samsung has exclusively developed to improve digital image and to display natural color more clearly without disturbing image quality MENU MENU 1 Off...

Страница 43: ...e input signal source selected in External Input List and the selected resolution Menu Description Play Stop PIP Turn the PIP Screen on or off You can view a picture from HDMI PC mode only AV S Video...

Страница 44: ...ent depending on the selected Input Mode input signal source selected in External Input List and the selected resolution Menu Description Play Stop Language You can choose one of 11 languages MENU MEN...

Страница 45: ...lable in PC Mode Only 2 Color Reset Color parameters are replaced with the factory default values Available in PC DVI Mode Only PC Image Reset PC Color Reset DVI Color Reset SRS TS XT SRS TS XT is a p...

Страница 46: ...t the computer in the applicable mode the safe mode for Windows ME XP 2000 and then change the frequency of the video card Refer to the Preset Timing Modes If the initial screen the login screen does...

Страница 47: ...nced Have you changed the video card or the driver Adjust screen image position and size using the OSD Have you adjusted the resolution or frequency to the monitor Adjust the resolution and frequency...

Страница 48: ...nd then install the program again You need to reboot the computer for it to operate normally after installing or removing the program Visit the MagicTune website and download the installation software...

Страница 49: ...vironment Useful Tips Your monitor provides a self test feature that allows you to check whether your monitor is functioning properly Self Test Feature Check Turn off both your computer and the monito...

Страница 50: ...trouble with the computer or the video card this can cause the monitor to become blank have poor coloring noise Video mode not supported etc In this case first check the source of the problem and then...

Страница 51: ...0 282 mm V Synchronization Horizontal 30 81 kHz Vertical 56 75 Hz Display Color 16 7M Resolution Optimum resolution 1680x1050 60Hz Analog Digital Maximum resolution 1680x1050 60Hz Analog Digital Inpu...

Страница 52: ...he pixels of RED GREEN BLUE and WHITE color seem to be bright sometimes or some of black pixels could be seen This is not from bad quality and you can use it without uneasiness For example the number...

Страница 53: ...50 31 469 70 086 25 175 IBM 640 x 480 31 469 59 940 25 175 IBM 720 x 400 31 469 70 087 28 322 MAC 640 x 480 35 000 66 667 30 240 MAC 832 x 624 49 726 74 551 57 284 MAC 1152 x 870 68 681 75 062 100 000...

Страница 54: ...Cycle and the inverse number of the Horizontal Cycle is called Horizontal Frequency Unit kHz Vertical Frequency Like a fluorescent lamp the screen has to repeat the same image many times per second t...

Страница 55: ...ILE 800 726 7864 SAMSUNG http www samsung com cl COLOMBIA 01 8000112112 http www samsung com co COSTA RICA 0 800 507 7267 http www samsung com latin ECUADOR 1 800 10 7267 http www samsung com latin EL...

Страница 56: ...RTUGAL 80 8 200 128 http www samsung com pt REPUBLIC OF IRELAND 0818 717 100 http www samsung com uk SLOVAKIA 0800 SAMSUNG 7267864 http www samsung com sk SPAIN 903 10 11 30 http www samsung com es SW...

Страница 57: ...create and display an image for the user The frequency of this repetition per second is called Vertical Frequency or Refresh Rate Unit Hz Example If the same light repeats itself 60 times per second t...

Страница 58: ...WHITE color seem to be bright sometimes or some of black pixels could be seen This is not from bad quality and you can use it without uneasiness For example the number of TFT LCD sub pixels that is co...

Страница 59: ...nmental Protection Agency EPA All other product names mentioned herein may be the trademarks or registered trademarks of their respective owners M XICO IMPORTADO POR SAMSUNG ELECTRONICS M XICO S A de...

Отзывы: