Samsung SV-647B Скачать руководство пользователя страница 8

GB

15

Displaying/Hiding On-Screen Information

Your VCR displays most information both on the VCR and the
television.
You can choose to display or hide this information on the television
screen (except for the Index, Programming MENU and 
VI functions, which cannot be hidden).

1

Press MENU on the remote control.
Result:

The programming menu is displayed.

2

Press the corresponding 

"

,

or 

buttons to select the 

USER SET

option.

3

Press the OK button to select this option.
Result:

The 

USER SET

menu is displayed.

4

Press the corresponding 

"

or

buttons, until the 

OSD

option is

selected.

5

To...

Press 

or

, until...

Display on-screen information

ON

is displayed.

Hide on-screen information

OFF

is displayed.

6

On completion, press MENU twice to exit the menu.

Your VCR output channel may need to be changed if the pictures
suffer from interference or if your TV cannot find the pictures. 
Also, you can change the VCR output channel to adjust the
frequency in which information is displayed on the screen. 

1

Press MENU on the remote control.
Result:

The programming menu is displayed.

2

Press the corresponding 

"

,

or 

buttons to select the

INSTALLATION

option.

3

Press the OK button to select this option.
Result:

The 

INSTALLATION

menu is displayed.

4

Press the corresponding 

"

or

buttons, until the 

VCR OUTPUT

CH

option is selected.

5

Select the required output channel (CH21~CH69) by pressing the

or 

buttons.

6

On completion, press MENU twice to exit the menu. 
Then tune your television again (see page 13).

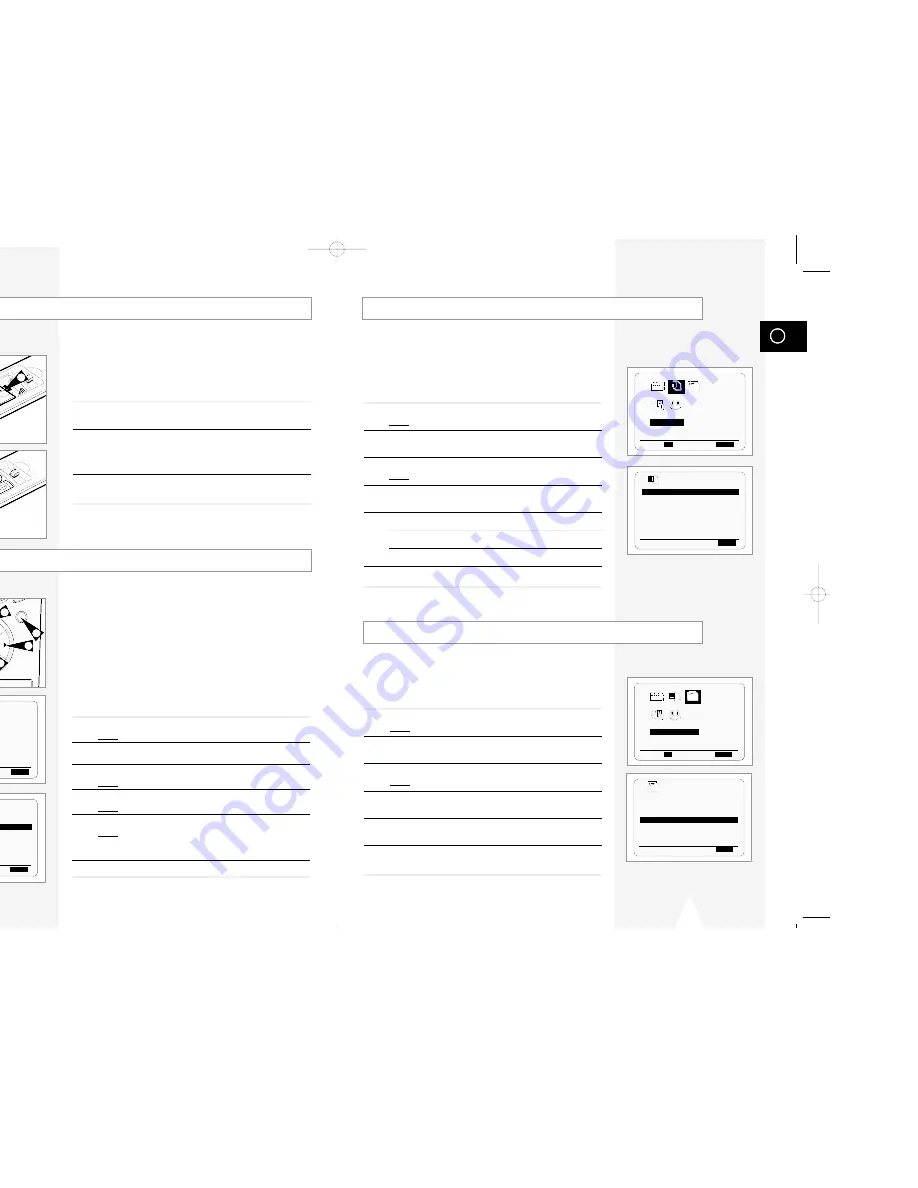
Setting the VCR Output Channel

INSTALLATION

PROG        OPTIONS     INSTALL

CLOCK       BONUS         LANG

  INSTALL

"

❷!!

➛❿!!

OK

END:

MENU

PTIONS  

USER SET

PROG        OPTIONS     INSTALL

CLOCK       BONUS         LANG

"

❷!!

➛❿!!

OK

END:

MENU

  OPTIONS   

OSD

:ON

TAPE SELECT

:E180

COLOUR SYSTEM   :AUTO
FORMAT 16:9     :AUTO
NICAM           :ON
ECO. MODE       :OFF
IPC             :ON

"

END:

MENU

INSTALL  

AUTO SET UP
MANUAL SET UP
AV-LINK SETTING

VCR OUTPUT CH :CH60

"

END:

MENU

GB

14

Setting the Date and Time

You must insert or replace the batteries in the remote control when
you:

Purchase the video cassette recorder

Find that the remote control is no longer working
correctly

1

Push the tab in the direction of the arrow to release the battery
compartment cover on the rear of the remote control.

2

Insert two AA, R6 or equivalent batteries, taking care to respect
the polarities:

+ on the battery with + on the remote control

– on the battery with – on the remote control

3

Replace the cover by aligning it with the base of the remote
control and pushing it back into place.

Do not mix different battery types (manganese and
alkaline for example).

Inserting Batteries in the Remote Control

Your VCR contains a 24-hour clock and calendar used to:

Automatically stop programme recording

Preset your VCR to record a programme automatically

You must set the date and time when:

You purchase the video cassette recorder

The time and date are set automatically from the
broadcast signal. If the signal is weak or ghosting
occurs, the time and date may not be set automati-
cally. In this case, they should be set manually. 

Do not forget to reset the time when you change
clocks from winter to summer time and vice versa.

1

Press MENU on the remote control.
Result:

The programming menu is displayed.

2

Press the corresponding 

"

,

or 

buttons to select the

CLOCK SET

option.

3

Press the OK button to select this option.
Result:

The 

CLOCK SET

menu is displayed.

4

Press 

or

to select the hour, minutes, day, month and year.

Result:

The option selected flashes.

5

Press the 

"

or

buttons to increase or decrease the value.

Result:

The day of the week is displayed automatically.

You can hold the 

"

or

buttons down to scroll more 

quickly through the values.

6

On completion, press MENU twice to exit the menu.

OK

REC

      MENU

SPEED

DUB

TV/VCR

TIMER

2

2

2

1

3

2

CLOCK SET

PROG        OPTIONS     INSTALL

CLOCK       BONUS         LANG

CLOCK    

 CLOCK

MON

AUTO CLOCK : ON

12:00   1/JAN/2001

➛❿!!!!!!!!!!!

"

END:

MENU

1

"

❷!!

➛❿!!

OK

END:

MENU

01293A SV-647B/XEU-GB2  7/27/02 5:02 PM  Page 14

Содержание SV-647B

Страница 1: ......

Страница 2: ...ING BACK Playing a Cassette 28 Adjusting Picture Alignment Manually 28 Intelligent Picture Control 29 Format 16 9 Wide Screen 30 Selecting the Colour Mode 30 Selecting the Audio Output Mode 31 tions CE THE RISK OF ELECTRIC MOVE REAR COVER NO E PARTS INSIDE REFER TO E PERSONNEL equipment is supplied with a ting a fuse The value of the fuse is e of the plug If it requires ved to BS1362 of the same r...

Страница 3: ...a Cassette in Slow Motion 32 ying a Sequence Frame by Frame 33 ure Search Fast Forward Rewind 33 rching for a Specific Sequence 34 o Repeat Play 35 rval Repeat Play 35 FUNCTION Tag Information Tag Function 36 rching using the Info Tag Information Tag Function 37 setting the title 37 eting the Info Tag 38 RATION S PDC Default 39 EOPLUS EXTEND 40 ng the Tape Counter 40 UNCTION OF THIS VCR Link Funct...

Страница 4: ... ADV INDEX TV VCR INPUT REPEAT VOL PROG TRK AUDIO REC MENU SPEED DUB TV VCR TIMER DISP SELECT VCR STANDBY ON BUTTON SLOW BUTTON SHUTTLE BUTTON V LOCK BUTTON CLEAR AND RESET BUTTON TV BUTTON VCR BUTTON VOLUME BUTTONS AUDIO MODE SELECTION BUTTON STOP BUTTON REWIND REVERSE PICTURE SEARCH BUTTON RECORD BUTTON MENU SELECTION BUTTON MENU SELECTION DOWN BUTTON RECORDING SPEED SELECTION BUTTON AUDIO DUBBI...

Страница 5: ...al coaxial Cable television network Satellite receiver Whenever you connect an audio or video system to your VCR ensure that all elements are switched off Refer to the documentation supplied with your equipment for detailed connection instructions and associated safety precautions TV R D L G AUDIO OUT SORTIE AUX VIDEO L AUDIO R AV2 DEC EXT AV1 EURO AV play Indicators cessories purchased a SAMSUNG ...

Страница 6: ...t Aerial Aerial Connector 2 TV AV2 SATELLITE IN AV1 EURO AV R D L G AUDIO OUT SORTIE SCART Cable TV 1 SCART Cable To receive television programmes a signal must be received from one of the following sources An outdoor aerial An indoor aerial A cable television network A satellite receiver Make sure that both the television and the VCR are switched off before connecting the cables 1 Remove the aeri...

Страница 7: ...eady for use 1 Connect the coaxial cable as indicated on page 10 Connecting Your VCR to the TV Using the Coaxial Cable 2 Plug the VCR into the mains Result A message appears 3 The PLEASE WAIT indication flashes on the television screen The number of stations automatically stored by the VCR depends on the number of stations that it has found The process will finish after a few minutes 4 The current...

Страница 8: ...D MENU INSTALL AUTO SET UP MANUAL SET UP AV LINK SETTING VCR OUTPUT CH CH60 END MENU ting the Date and Time You must insert or replace the batteries in the remote control when you Purchase the video cassette recorder Find that the remote control is no longer working correctly 1 Push the tab in the direction of the arrow to release the battery compartment cover on the rear of the remote control 2 I...

Страница 9: ...U INSTALL AUTO SET UP MANUAL SET UP AV LINK SETTING VCR OUTPUT CH CH60 END MENU MANUAL TUNING PR 1 CH MFT NAME MEMORY OK END MENU TV STATION TABLE PR CH NAME 1 027 BBCI 2 3 4 5 SWAPPING OK DELETE CLR RST MENU esetting the Stations Automatically UP IT 2 I ND MENU BE LOST NTINUE IT You do not need to preset the stations if you have already set them automatically see Plug Auto Set Up on page 12 Your ...

Страница 10: ...ss the MENU button three times to exit the menu Changing the Preset Station Table INSTALLATION PROG OPTIONS INSTALL CLOCK BONUS LANG INSTALL OK END MENU INSTALL AUTO SET UP MANUAL SET UP AV LINK SETTING VCR OUTPUT CH CH60 END MENU TV STATION TABLE PR CH NAME 1 027 BBCI 2 3 4 5 SWAPPING OK MENU TV STATION TABLE PR CH NAME 1 2 3 027 BBCI 4 5 SWAPPING OK MENU If you have stored a TV station That you ...

Страница 11: ... ON TAPE SELECT E180 COLOUR SYSTEM AUTO FORMAT 16 9 AUTO NICAM ON ECO MODE OFF IPC ON END MENU You can record a cassette at two different speeds SP Standard Play LP Long Play In Long Play modes Each cassette lasts twice as long The recording is of a slightly lower quality To record a cassette Press the SPEED button on the remote control until In standard play mode SP is displayed In long play mode...

Страница 12: ... VCR INPUT REPEAT VOL PROG TRK AUDIO DISP SELECT OK REC MENU 6 4 4 4 SPEED DUB TV VCR TIMER 5 cording a Programme Immediately tecting a Recorded Cassette Video cassettes have a safety tab to prevent accidental erasure When this tab has been removed you cannot record on the tape 1 If you wish to protect a cassette break off the tab using a small screwdriver 2 To re record over a protected cassette ...

Страница 13: ...ss the or buttons to select a character To move to the next or previous character press the or buttons respectivly If you wish to store the title press OK ng the VIDEOPLUS Feature Before presetting your VCR Switch on both the television and your VCR Check that the date and time are correct Insert the cassette on which the programme is to be recorded safety tab intact Up to six programmes can be pr...

Страница 14: ...pe to complete a timer recording in AUTO mode the VCR automatically switches to LP mode to record the whole programme ing the Timer Programming Feature MING ND MENU The Timer Programming feature allows you to preset the VCR to record a programme up to one month before that programme is to be broadcast Up to six programmes can be preset Before presetting a recording check that the date and time are...

Страница 15: ...ENU OPTIONS OSD ON TAPE SELECT E180 COLOUR SYSTEM AUTO FORMAT 16 9 AUTO NICAM ON ECO MODE OFF IPC ON END MENU PICTURE IPC OFF SOFTEN SHARPEN ON OFF The Picture Adjustment feature allows you to adjust the alignment manually to obtain the best possible picture When noise bars or streaks appear during playback adjust alignment manually by pressing the PROG TRK or buttons until the picture is clear an...

Страница 16: ...R SET menu is displayed 4 Press the corresponding or buttons until the FORMAT 16 9 option is selected 5 Press the button to select AUTO ON OFF AUTO Set when you use a wide TV The VCR automatically detects if programmes being played back or recorded are in normal or Wide Screen format ON The VCR always plays back and records in 16 9 Wide Screen format Set if the VCR cannot detect Wide Screen TV pro...

Страница 17: ...ncrease the speed respectively To return to the normal speed press the ll button twice 2 When playing back in slow motion picture interference may occur Press the PROG TRK or buttons to minimize this effect When you have been using the Slow Motion function for more than about five minutes the VCR will automatically play to protect the Cassette Video heads SLOW W LE K INPUT REPEAT G TRK DISP 1 GB3 ...

Страница 18: ... Frame h Fast Forward Rewind u to Fast Forward or Rewind and look for R will enter normal play mode While in play e or button The VCR will search at 5 yback speed layback mode press the II button OLD down the or button the VCR will e normal speed Releasing the button will arch at 5 times the normal speed To return to de press the II button arch mode if you press the button again ormal Fast Forward...

Страница 19: ... INFO TAG DELETE END MENU BONUS EASY OPERATION PROG OPTIONS INSTALL CLOCK BONUS LANG OK END MENU PDC VPS DEFAULT OFF VIDEOPLUS EXTEND OFF AUTO POWER OFF OFF REPEAT PLAY OFF NO OF INTERVAL REPEAT 5 INFO TAG DELETE END MENU BONUS BONUS arching for a Specific Sequence Each time you record a cassette on this VCR an index is automatically marked on the tape when recording starts The Search function all...

Страница 20: ...the recording date and programme position for up to 50 programmes You can select a programme and start playback by recalling the Info Tag directly from the Info Tag screen 1 If you want to recall the data of pre recorded tape press OK to select INFO TAG LIST screen You can display the data of the programme list 2 Press the or buttons to select the required programme 3 Press to search required prog...

Страница 21: ...esponding or buttons to select the EASY OPERATION option 3 Press the OK button to select this option Result The EASY OPERATION menu is displayed 4 Press the corresponding or buttons until the PDC VPS DEFAULT option is selected 5 Press button to select ON in PDC VPS DEFAULT option 6 On completion press MENU twice to exit the menu VPS PDC Default EASY OPERATION PROG OPTIONS INSTALL CLOCK BONUS LANG ...

Страница 22: ...Connection to your EasyLink nexTViewLink AV Link TV and a satellite receiver Connection to your EasyLink nexTViewLink AV Link TV 21 pins SCART cable DEOPLUS EXTEND To prevent delays or over runs the VCR has a function called Videoplus EXTEND allowing you to extend the recording time by up to 60 minutes Only use if PDC is not available or set to OFF 1 Press the MENU button on the remote control 2 P...

Страница 23: ...ached 2 Press the SPEED button to select the recording tape speed 3 Press two REC buttons to start recording Result The VCR automatically selects the same picture as you are watching on the TV and starts recording Depending on the picture sources the recording switches the method See next page 4 To stop a recording press STOP once This recording is not available on the timer programme recordings O...

Страница 24: ...audio cable into the AUDIO sockets on the front of the VCR Take care to respect the colour coding of the left and right channels 4 Plug the other end of the audio cable into the appropriate output connectors on the other system VCR camcorder or Hi Fi sound system Connecting an RCA Audio Video Input Cable AUX VIDEO L AUDIO R STANDBY ON EJECT AUX VIDEO L AUDIO R STANDBY ON 3 3 1 tures and TV Picture...

Страница 25: ... a while to activate the Assemble Edit function Result Record symbol flashes in the display 6 Select the source from which you wish to record by pressing The PROG TRK or buttons for television channels The INPUT button for the AV1 AV2 or AUX input sources 7 Press the ll button to start recording 8 When you have finished recording press MENU G REC II P S RE W F F STOP MENU With the Audio Dubbing fu...

Страница 26: ...ENU BONUS EASY OPERATION PROG OPTIONS INSTALL CLOCK BONUS LANG OK END MENU BONUS ng the TV Buttons on the Remote Control Your VCR remote control will work with Samsung televisions and compatible brands To determine whether your television is compatible follow the instructions below 1 Switch your television on 2 Point the remote control towards the television 3 Hold down the TV button and enter the...

Страница 27: ...arked aerial pattern your TV does not find the test pattern symbol on the rear of the VCR or the pattern when found suffers from 2 Carry out the instructions Tuning Your Television for the VCR interference it may be due to the VCR output see page 13 channel clashing with the normal TV 3 Carry out the instructions Setting the VCR output Channel transmissions in your area To prevent this see page 15...

Страница 28: ...1684 850063 WESTON SUB EDGE PROFESSIONAL ELECTRONIC TEL 01386 841773 HAMPSHIRE FAREHAM SOUND VISION TEL 01329 286551 FARNBOROUGH ICTV TEL 01252 510118 PORTSMOUTH ICTV TEL 01705 653654 SOUTHAMPTON OLYMPIC TV AUDIO TEL 01703 703401 HEREFORD HEREFORD J P MICRO SVCS TEL 01432 356353 HERTFORDSHIRE BALDOCK TECHNICAL REPAIR SVC TEL 01462 491144 MARKYATE TELETECH SVCS TEL 01582 841862 NORTH HUMBERISDE GOO...

Страница 29: ...be covered by this warranty force in any Country other than the one for which the product was originally designed and manufactured This warranty will not cover and no re imbursement will be made for such adaptation nor any damage which may result 5 This warranty covers none of the following a Periodic check ups maintenance and repair or replacement of parts due to normal wear and tear b Cost relat...

Отзывы: