background image

39

Exposure compensation

This camera automatically adjusts the exposure according to the 
ambient lighting conditions. You can also select the exposure value 
by using the [EV] menu.

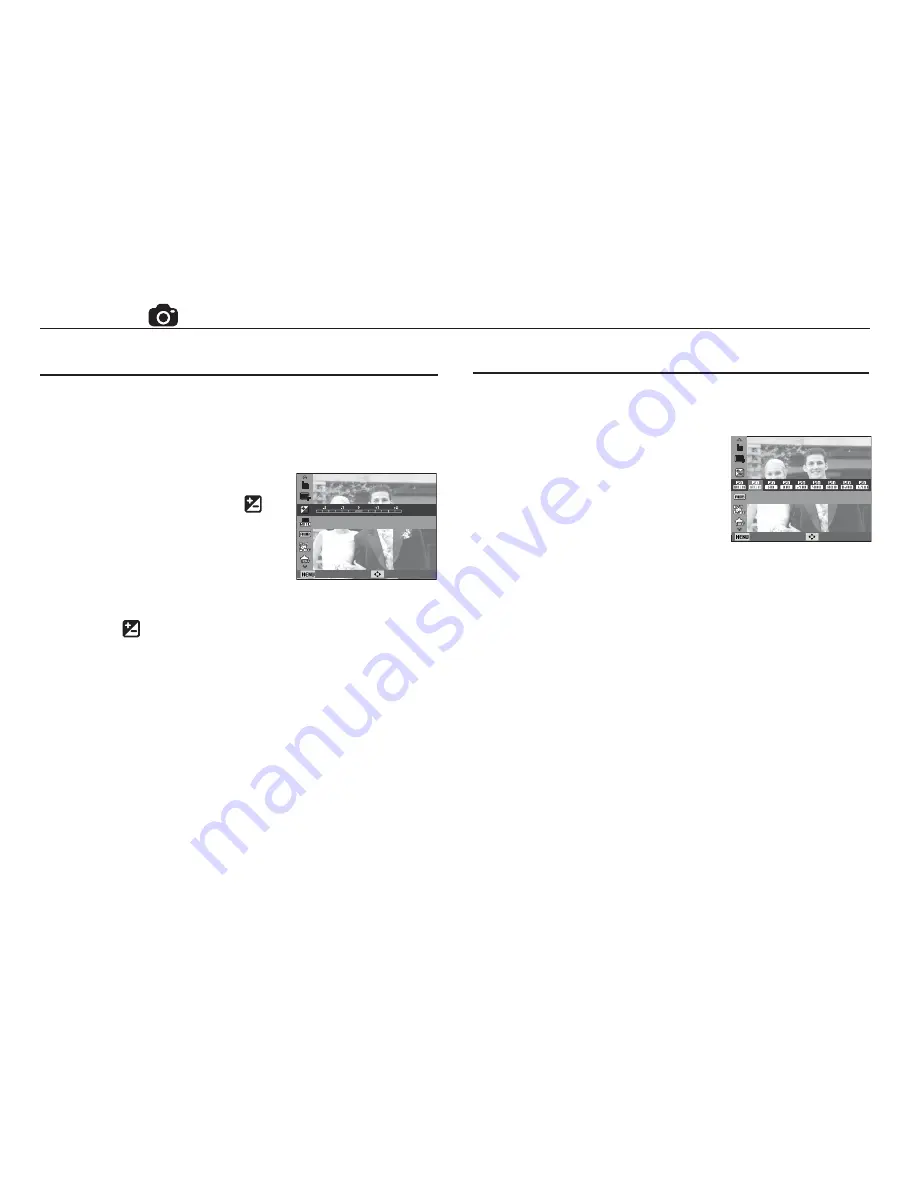
 Compensating Exposure

 1.  Click the Up/Down button from the 

Shooting menu to select [EV] ( 

 ). 

 2.  Use the Left and Right buttons to set 

the desired exposure compensation 
factor.

 3.  Press the OK button. The value you 

set will be saved and the Exposure Compensation setup mode 
will be closed. If you change the exposure value, the exposure 
indicator ( 

 ) will be displayed on the Left of the LCD monitor.

Ä

A negative exposure compensation value reduces the exposure. 

Note that a positive exposure compensation value increases the 
exposure and the LCD monitor will appear white or you may not 
get good pictures.

EV

Back Move

ISO

 [Auto] :  The camera's sensitivity is 

automatically changed by 
variables such as lighting value 
or subject brightness.

[ISO 80, 100, 200, 400, 800, 1600, 3200] :

You can increase the shutter speed while 
the same amount of light is present, by increasing the ISO sensitivity. 
However, the image may be saturated in high luminance. The higher 
the ISO value, the higher the camera’s sensitivity to light and therefore 
the greater its capacity to take pictures in dark conditions. However, 
the noise level in the image will increase as the ISO value increases, 
making the image appear coarse.

Ä

 When [Motion Capture] is set, ISO speed will be set to Auto.

Ä

 [ISO] is enabled only in [Program] mode.

You can select the ISO sensitivity when taking pictures.The speed or 
speci

fi

 c light-sensitivity of a camera is rated by ISO numbers.

ISO

Back Move

Shooting ( 

 ) 

Содержание ST60

Страница 1: ......

Страница 2: ...ge without prior notice for upgrading the camera functions Ä Microsoft Windows and Windows logo are registered trademarks of Microsoft Corporation incorporated in the United States and or other countries Ä Adobe and Reader are either trademarks or registered trademarks in the United States and or other countries Ä All brand and product names appearing in this manual are registered trademarks of th...

Страница 3: ...se do not cover the camera or Charger This may cause heat to build up and distort the camera body or cause a fire Always use the camera and its accessories in a well ventilated area Danger DANGER indicates an imminently hazardous situation which if not avoided will result in death or serious injury Do not attempt to modify this camera in any way To do so may result in fire injury electric shock or...

Страница 4: ...n unclear image and possibly causing camera malfunction Avoid obstructing the lens or the flash when you capture an image When using this camera in low temperatures you may experience the following These are not camera malfunctions and usually recover at normal temperature It takes longer to turn on the LCD monitor and the color may differ from the subject When changing the composition there may b...

Страница 5: ... to use Smart Movie Clip mode 056 Sound menu 056 Sound SETUP 026 Recording the movie clip without sound 027 Things to Watch Out for When Taking Pictures 028 Using the camera buttons to set the camera 028 POWER button 028 SHUTTER button 028 Smart button 029 Zoom W T Lever 030 Info DISP Up button 031 Macro Down button 032 Focus lock 033 Flash Left button 035 Self timer Right button 036 MENU button 0...

Страница 6: ...B PLAY 064 Starting play mode 064 Playing back a still image 064 Playing back a movie clip 065 Movie clip capture function 065 Playing back a recorded voice 066 Playing back a voice memo 066 LCD monitor Indicator 067 Using the camera buttons to set the camera 067 Play mode button 067 Thumbnail Enlargement Lever 067 Smart Album 070 Info DISP Up button 070 Play Pause OK button 071 Left Right Down ME...

Страница 7: ...oice memo 083 DPOF 085 Copy to Card 086 PictBridge 087 PictBridge Picture Selection 087 PictBridge Print Setting 088 PictBridge Reset 088 Important notes 090 Warning indicator 091 Before contacting a service center 093 Specifications 096 Transferring files to your computer for Windows 096 For Windows users SOFTWARE APPENDIX PICTBRIDGE 100 Transferring files to your computer for Mac 100 For Mac use...

Страница 8: ...al equipment contact your nearest Samsung dealer or Samsung service center Parts and accessories illustrated below may differ from exact appearance Package Contents Camera Rechargeable battery AC adapter USB cable Camera strap Software CD User manual included Quick Start Manual Sold Separately SD SDHC memory card see p 17 Camera case AV cable Battery charger ...

Страница 9: ...8 Identification of features Front Top Lens Lens cover Self timer lamp AF Lamp POWER button Smart button Shutter button Flash Zoom T Lever Digital zoom Zoom W Lever Thumbnail Microphone Strap eyelet ...

Страница 10: ...9 Identification of features Back 5 function button Play mode button MENU button LCD monitor Camera status lamp Fn Delete button MODE button USB AV DC terminal ...

Страница 11: ...pen the battery chamber cover slide it in the direction shown above Information Up button Flash Left button Self timer Right button Macro Down button OK Play Pause button Speaker Tripod socket Memory card slot Battery chamber Battery chamber cover Battery holder ...

Страница 12: ...cture When flash battery is charging The lamp blinks When the USB cable is inserted to a PC The lamp lights up LCD monitor turns off after initializing the device Transmitting Data with a PC The lamp blinks LCD monitor turns off When the USB cable is inserted into a printer The lamp blinks When the printer is printing The lamp blinks When the AF activates The lamp turns on The camera focus on the ...

Страница 13: ...e Ä These figures are measured under Samsung s standard conditions and shooting conditions and may vary depending on the user s methods Important information about battery usage When camera is not in use turn off the power Please remove the battery if the camera will not be used for long periods Batteries can lose power over time and are prone to leaking if kept inside the camera Low temperatures ...

Страница 14: ...charging LED of the AC Charger does not turn on or blink after inserting the rechargeable battery please check whether the battery is inserted correctly If you charge the battery with the camera power on the battery won t be fully charged Turn the camera off while charging the battery Charging LED of the AC charger Charging LED Being Charged Red LED is on Charging is complete Green LED is on Charg...

Страница 15: ...like necklace coin key watch and so on Ɣ Use the 2nd Advanced Lithium Batteries with the guarantee under the manufacturing company Ɣ Do not try to disassemble or perforate the product by using the sharp pin Ɣ Do not give a hard pressure on the product Ɣ Do not let the product fall down from the height or do not give a shock to the product Ɣ Do not exposure the product to the high temperature over ...

Страница 16: ...m the actual battery status Insert the battery as shown If the camera does not turn on after you have inserted battery please check whether the battery direction is right When the battery chamber cover is opened do not force the battery chamber cover this may damage it Connecting to a Power Source Inserting the memory card Insert the memory card as shown Turn off the camera s power before insertin...

Страница 17: ...he memory card will eventually reduce the memory card s performance Should this be the case you will need to purchase a new memory card Wear and tear on the memory card is not covered by the Samsung warranty The memory card is an electronic precision device Do not bend drop or subject the memory card to any heavy impact Do not store the memory card in an environment with strong electronic or magne...

Страница 18: ...t 00 28 07 About 00 41 16 About 01 50 06 About 01 29 16 About 02 37 17 About 03 46 15 The Zoom W T lever doesn t function during the movie recording The recording times can be changed by the zoom operation Several videos were recorded in succession to determine the total recording time The camera can use SD SDHC Memory Cards The SD SDHC memory card has a write protect switch that prevents image fi...

Страница 19: ...isplayed again after setting up the date time time zone and language Set up the date time time zone and language before using this camera Setting up the language 1 Select the Language menu by pressing the Up Down button and press the Right button 2 Select the desired sub menu by pressing the Up Down button and press the OK button Setting up the Time Zone 1 Select the Time Zone menu by pressing the...

Страница 20: ...p 38 8 Metering p 46 9 Flash p 33 10 Self timer p 35 11 Macro p 31 12 Face Detection p 41 13 Date Time 2010 01 01 01 00 PM p 60 14 Optical Digital Zoom bar Digital Zoom rate p 29 15 Camera shake Warning p 27 16 Auto Focus Frame p 45 17 DIS p 50 18 Drive mode p 49 19 Smart Filter Image Adjust Photo Style Selector p 47 48 46 20 ISO Voice p 39 52 21 White Balance p 40 22 Exposure compensation p 39 23...

Страница 21: ...utter Sound 1 Beep Sound 1 AF Sound On Volume Medium Off Low Medium High Start Sound Off Shutter Sound 1 Beep Sound 1 AF Sound On Volume Medium Exit Back Start Sound Shutter Sound Beep Sound AF Sound Volume Shooting Sound Display Settings Exit Change Shooting Sound Display Settings Exit Change Quality EV ISO White Balance Face Detection Photo Size Smart FR Edit Press the Up or Down button Shooting...

Страница 22: ...ory card If the memory card is not inserted an image will be stored on the internal memory If the memory card is inserted an image will be stored on the memory card 3 Close the battery chamber cover 4 Press the POWER button to turn on the camera 5 Select Smart Auto mode by pressing the MODE or Smart button 6 The camera selects a scene automatically An appropriate mode icon will appear at the top l...

Страница 23: ... conditions Landscape When shooting outdoor scenes White When shooting a white background Nights When shooting the nighttime scenes Night Portrait When shooting people in a dark outdoor place Backlight When shooting a backlit scenery without a portrait Backlight Portrait When shooting a backlit portrait Portrait When shooting a portrait Macro When shooting close ups Macro Text When shooting texts ...

Страница 24: ...tter button to capture an image How to use the Scene modes The scene modes are listed below Beauty Shot Take a photo of a person with options to hide facial imperfections Frame Guide Use this mode when you want someone else to take a picture for you from the angle you choose Night Use this for shooting still images at night or in other dark conditions Portrait To take a picture of a person Childre...

Страница 25: ...me Shutter mode This camera automatically adjusts the shutter speed and aperture values to the shooting environment However in Night scene mode you can set the shutter speed and aperture values to your preference Changing the Shutter speed and Aperture value 1 Select the Night mode p 21 2 Press the Fn button and Long Time shutter menu will be displayed 3 Configure the Long Time shutter value with ...

Страница 26: ... time allows Movie clips will still be recorded if the shutter button is released If you wish to stop recording press the shutter button again Ä Movie clip size and type are listed below Movie clip size 1280x720HQ 640x480 320x240 Selectable 1280x720HQ are the settings for recording high quality videos Movie clip file type MP4 H 264 Frame Rate 60 FPS 30 FPS 15 FPS Selectable The frame rate can be s...

Страница 27: ... sound Starting the recording mode Recording HD High Definition movie clips You can record HD High Definition movie clips 1280X720HQ 30 fps H 264 MPEG4 AVC is a standard for the digital video codec It supports a high quality movie clip in a small file size 1 Select the Movie mode by using the MODE button p 21 2 Press the MENU button to set the resolution to 1280 X 720 HQ 3 Press the Shutter button...

Страница 28: ...CB see page 49 function Avoid obstructing the lens or the flash when you capture an image Compose the image by using the LCD monitor Pressing the shutter button down half way Lightly press the shutter button to confirm focus and flash battery charge Press the shutter button all way down to take the picture Lightly press the shutter button Press the shutter button Things to Watch Out for When Takin...

Страница 29: ...fully starts the process for recording a movie clip Press the shutter button once and the movie clip is recorded for as long as the available recording time in the memory allows If you wish to stop recording press the shutter button again In Still image mode Pressing the shutter button down halfway activates the autofo cus and checks the condition of the flash Pressing the shutter button down full...

Страница 30: ...m Optical zoom When the menu window is not displayed this lever is used to control the optical or digital zoom This camera has a 4X optical zoom and a 5X digital zoom function Using both will offer a total zoom ratio of 20X TELE Zoom Optical zoom TELE Move the Zoom W T lever to the right to see the subject closer Digital zoom TELE Move the Zoom W T lever to the right once again in optical 4x zoom ...

Страница 31: ...de Take care not to touch the lens to avoid taking an unclear image and possibly causing camera malfunction If the image is dim turn the camera power off and on again to modify the lens position Take care not to press the lens as this may cause a camera malfunction When the camera is turned on take care not to touch the camera s moving lens parts as this may cause the resulting image to be dim and...

Страница 32: ...he macro mode is selected be particularly careful to avoid camera shake When you take a picture within 40cm Wide zoom or 50cm Tele zoom in the Macro mode select the Flash off mode Macro Down button While the menu is showing the Down button operates as a direction button When the menu is not showing you can use the Macro Down button to take macro pictures The distance ranges are shown below Press t...

Страница 33: ... the shutter button halfway and focus on the subject Using the Focus Lock 1 Ensure the subject is in the center of the autofocus frame 2 Press the shutter button halfway When the green auto focus frame lights up it means the camera is focused on the subject Be careful not to press the shutter button all the way down to avoid taking an unwanted picture 3 With the shutter button still pressed down o...

Страница 34: ... Selecting the Auto flash Flash Left button If you press the shutter button after selecting the flash the first flash fires to check the shooting condition Flash range and Power ratio of flash Do not move the camera until the second flash fires Using the flash frequently will reduce the life of the battery Under normal operating conditions the re charging time for the flash is usually within 4 sec...

Страница 35: ...sh operates with a slow shutter speed to obtain a balanced correct exposure In poor lighting conditions the camera shake warning indicator à will display on the LCD monitor Red eye reduction When a shot with red eye is detected this mode will reduce the red eye effect automatically Flash off The flash does not fire Select this mode when capturing images in a place or situation where flash photogra...

Страница 36: ...ing mode p 21 2 Press the Self timer Right button until the desired mode indicator displays on the LCD monitor A 10 second 2 second or Double Selftimer icon appears on the LCD monitor 3 When you press the shutter button the picture will be taken after the specified time has elapsed Selecting the 10 SEC self timer Self timer mode indicator Icon Mode Description 10SEC self timer Pressing the shutter...

Страница 37: ...hat enables the functions or the Fn button to bring up the menus below Mode Menu Available mode Page Shooting Photo Size Movie Size p 38 Quality Frame Rate p 38 EV p 39 ISO p 39 White Balance p 40 Face Detection p 41 Smart FR Edit p 44 Face Tone p 45 Face Retouch Focus Area p 45 Metering p 46 Photo Style Selector p 46 Smart Filter p 47 Image Adjust p 48 ACB p 49 Exit Back Quality EV ISO White Bala...

Страница 38: ...he Left Right button and then press the OK button Left Right button Up Down button Right OK button Exit Back Quality EV ISO White Balance Face Detection Photo Size Smart FR Edit Exit Back Quality EV ISO White Balance Face Detection Photo Size Smart FR Edit Exit Back Quality EV ISO White Balance Face Detection Photo Size Smart FR Edit Shooting Sound Display Settings Exit Change Quality EV ISO White...

Страница 39: ...lies with the DCF Design rule for Camera File system JPEG Joint Photographic Experts Group JPEG is the image compression standard developed by the Joint Photographic Experts Group This type of compression is most commonly used for compressing photos and graphics because it can compress the files efficiently Quality Frame rate You can select the compression ratio appropriate for your application of...

Страница 40: ...he LCD monitor will appear white or you may not get good pictures EV Back Move ISO Auto The camera s sensitivity is automatically changed by variables such as lighting value or subject brightness ISO 80 100 200 400 800 1600 3200 You can increase the shutter speed while the same amount of light is present by increasing the ISO sensitivity However the image may be saturated in high luminance The hig...

Страница 41: ...ance according to the shooting condition Ä Different lighting conditions may cause a color cast on your images White Balance Back Move Using the Custom White Balance White balance settings may vary slightly depending on the shooting environment You can select the most appropriate white balance setting for a given shooting environment by setting up the custom white balance 1 Select the Custom menu ...

Страница 42: ...n detect up to 10 persons When the camera recognizes many people at the same time it will focus on the nearest person The Digital zoom is not activated in this mode When the camera detects a target face the white color focus frame will be displayed over the target face and the grey color focus frame appears over the remaining faces Press the shutter button halfway down to focus on the face and the...

Страница 43: ...ton If you press the Shutter button the picture is taken in the normal way When taking a picture of smile shot showing teeth or keeping the smiley face of your subject helps detecting the smile face of the subject Detecting the smiling face or the blinking eyes may not be available if any of the following situations occurs If the subject is wearing sunglasses When the subject is not facing directl...

Страница 44: ... register favorite faces see page 44 Indicate faces that the camera automatically registers The same person can be recognized as a different person and vice versa depending on glasses brightness extreme change of pose or facial expressions If you register a new face when 14 faces are already registered the 14th face with the lowest priority is switched with the newly added face A maximum of 5 peop...

Страница 45: ...ars Your favorite faces are indicated with a on the face list Smart FR Edit You can register frequently shot faces or edit the registered face list prior to shooting This feature is available only when you use a memory card Smart FR Edit Back Move You can register up to 8 favorite faces The flash option will be set to Off If you register the same face twice you can delete one of the faces in the f...

Страница 46: ...Retouch by pressing the Up Down button 2 Select a desired face retouch by pressing the Left Right button and then press the OK button 3 Press the Shutter button to take an image Face Tone Back Move Face Retouch Back Move Auto Focus type You can select your preferred Focus Area according to the shooting conditions Center AF The rectangular area in the center of the LCD monitor will be focused Multi...

Страница 47: ...icture of small object like a flower or insects Ä If the subject is not the center of the focus area do not use the spot metering as this may result in an exposure error In this circumstance it is better to use exposure compensation Metering Back Move You can add various effects to the image without using image editing software Photo Style Selector Back Move 1 Select the desired Photo style select...

Страница 48: ...rt Filter Back Move 1 Select the desired Smart Filter by pressing the Left Right button and press the OK button 2 Press the Shutter button to take an image Smart Filter Icon Description Normal No effect Vignetting Apply the retro looking colors high contrast and strong vignette effect Fish eye Distort close objects to imitate the visual effect of a fisheye lens Shooting When you apply a smart filt...

Страница 49: ... only when the captured image is stored on the memory 1 Select Sharpness by pressing the Up Down button 2 Change the Sharpness by pressing the Left Right button 3 Press the Shutter button to take an image Saturation You can change the saturation of the image 1 Select Saturation by pressing the Up Down button 2 Change the saturation by pressing the Left Right button 3 Press the Shutter button to ta...

Страница 50: ...EV High resolution and picture quality increases file saving time which increases stand by time If the Continuous Motion Capture AEB sub menu is selected the flash will be off automatically If less than 3 pictures are available on the memory the AEB shooting is not available It is best to use a tripod for the AEB shooting as the time to save each image file is longer and blurring caused by camera ...

Страница 51: ...g conditions camera shake warning indicator à will display For best results only take pictures in situations where the camera shake warning indicator à is not displayed 4 If the subject is moving the captured image may be blurred 5 As the DIS uses the camera s digital signal processor it may take a little longer for the camera to process and save the images This function helps stabilize images cap...

Страница 52: ...released If you wish to stop recording press the shutter button again File type wav Record Back Move Record Exit Voice recording mode Voice Memo You can add your voice over to a stored still image Max 10 sec If the voice memo indicator is displayed on the LCD monitor the setting is completed Press the shutter button and take a picture The picture is stored on the memory card Voice memo will be rec...

Страница 53: ...e recording is paused the voice recording is cancelled The zoom sound may be recorded if you use the zoom while recording a video Voice recording mode Stop Record Recording the movie clip without voice You can record the movie without voice Select Off of Voice menu in the Movie clip mode icon will appear on the LCD monitor Press the Shutter button and a movie will record for as long as the memory ...

Страница 54: ...Full Status Smart mode Ŷ Smart mode Smart mode allows users to take a photo simply without setting any of the more complex functions available Even beginners can easily learn how to operate it Smart Movie Clip mode Smart Auto mode Ŷ You can use the Smart button at the top of the camera to start Smart mode ...

Страница 55: ...te p 38 7 Flash p 34 8 Self timer p 35 9 Date Time 2010 01 01 01 00 PM p 60 10 Optical Zoom bar p 29 11 Auto Focus Frame p 45 Smart mode display Mode selection using the Smart button You can use the Smart button at the top of your camera to select the correct smart mode Selecting modes Starting Smart mode Frame Rate is enabled only in Smart Movie mode Program mode Smart Auto mode Movie Clip mode S...

Страница 56: ...rd a movie clip simply without setting any of the more complex functions available 1 Use the Smart button to select Smart Movie Clip mode 2 Point the camera towards the subject and compose the image by using the LCD monitor 3 Press the shutter button once and movie clips are recorded for as long as the available recording time allows Movie clips will still be recorded if the shutter button is rele...

Страница 57: ...ff 1 2 3 Start up sound You can select the shutter sound Shutter sound Off 1 2 3 Shutter sound Sound menu If you set sound to ON a beep will sound when buttons are pressed letting you know the camera operation status Beep Sound sub menus Off 1 2 3 Beep sound Back Set Start Sound Off Shutter Sound 1 Beep Sound 1 AF Sound On Volume Medium Off Low Medium High Sound Back Set Start Sound Off Shutter So...

Страница 58: ...ault settings Ä Menus are subject to change without prior notice You can select whether the function description can be displayed on the window in recording mode Function Description sub menus Off The function description function can t be activated On The name and description of the option is displayed Function Description Display Sound Back Set Start Sound Off Shutter Sound 1 Beep Sound 1 AF Sou...

Страница 59: ...st the LCD brightness Sub menus Auto Dark Normal Bright Display Brightness You can select the image that is first displayed on the LCD monitor whenever the camera is turned on Sub menus Off Logo User Image Use a saved image for the start up image with the Start Image in the Resize menu in the play mode The start up image will not be deleted by Delete or Format menu The User images will be deleted ...

Страница 60: ... can t recognize or one that has been taken from another camera Always format the memory card using this camera If you insert a memory card that has been formatted using other cameras memory card readers or PCs you will get a Card Error message Settings All camera menu and function settings will be restored to their default values However values for Date Time Language and Video Out will not be cha...

Страница 61: ...ities London Cape Verde Mid Atlantic Buenos Aires Sao Paulo Newfoundland Caracas La Paz NewYork Miami Chicago Dallas Denver Phoenix LA San Francisco Alaska Honolulu Hawaii Samoa Midway Wellington Auckland Okhotsk Guam Sydney Darwin Adelaide Seoul Tokyo Beijing Hong Kong Bankok Jakarta Yangon Almaty Kathmandu Mumbai New Delhi Tashkent Kabul Abu Dhabi Teheran Moscow Athens Helsinki Rome Paris Berlin...

Страница 62: ...er a set amount of time in order to prevent unnecessary battery drainage Sub menus Off The power off function will not operate 1 min 3 min 5 min 10 min The power will turn off automatically if not used for the period of time specified After replacing the battery the power off setting will be preserved Note that the automatic power off function will not operate if the camera is in the PC Printer mo...

Страница 63: ...is connected to an external monitor the image and menus on the LCD monitor will be visible on the external monitor Selecting Video out type You can turn on and off the Auto Focus lamp Sub menus Off The AF lamp will not light up in low light conditions On The AF lamp will light up in low light conditions Auto Focus lamp Settings Back Set Video Out NTSC USB Auto AF Lamp On NTSC PAL Back Set Video Ou...

Страница 64: ...some parts of the image may not be displayed When the camera is connected to an external monitor the menu will be visible on the external monitor and the menu functions are the same as those indicated on the LCD monitor Setting the USB Settings If the camera is set to connect automatically to a PC or a printer using a USB cable you can manually set Computer or Printer USB sub menus Auto Automatica...

Страница 65: ...rted in the camera all the camera functions apply only to the internal memory Playing back a still image 1 Select the Play mode by pressing the play mode button Î Playing back a movie clip 1 Select the recorded movie clip that you want to play back by using the Left Right button 2 Press the OK button to play back a movie clip file To pause a movie clip file while playing it back press the OK butto...

Страница 66: ... the movie clip the first frame of the movie clip will be saved as a still image Press the down button Paused Playing back a recorded voice 1 Select the recorded voice that you want to play back by using the Left Right button 2 Press the OK button to play back a recorded voice file To pause a recorded voice file while playing it back press the OK button again To resume playback of the voice file p...

Страница 67: ...p 15 8 ISO 80 3200 p 39 9 Aperture value F3 2 F5 9 p 24 10 Shutter speed 8 1 2 000 11 Flash On Off p 33 12 Image size 4000X3000 320X240 p 38 13 Recording date 2010 01 01 p 60 Playing back a voice memo 1 Select a still image that has the voice memo 2 Press the OK button to play back the voice memo To pause the voice memo while playing it back press the OK button again To resume playback of the voic...

Страница 68: ...0 01 01 Using the camera buttons to set the camera In Play mode you can use the buttons on the camera to conveniently set up the Play mode functions Play mode button If you have turned on the camera by pressing the POWER button you can press the Play mode button once to switch to Play mode and press it again to switch to Recording mode You can turn the power on with the Play mode button The camera...

Страница 69: ... 3 1 3 12 11 5 Filter 2010 01 01 1 3 1 3 12 11 5 Filter 2010 01 01 1 3 1 3 12 11 5 Filter 2010 01 01 Ŷ Smart Album Filter 1 Press the MENU button in Smart Album mode 2 Selecting the desired category enables to categorize and search the files by using the Up Down button Ŷ Details of Each Category Category Description File Format Type Categorized depending on the file type e g picture video or voice...

Страница 70: ...immed Image size Maximum enlargement rate X12 5 X10 4 X10 3 X10 2 X8 1 X6 4 X3 2 Image enlargement 1 Select the picture you want to enlarge and move the Digital Zoom lever to the right Then the selected picture will be digitally enlarged 2 Different parts of the image can be viewed by pressing the 5 function button 3 Move the Thumbnail lever to the left to return the enlarged picture to its origin...

Страница 71: ...mage with a voice memo a voice file or a movie clip During playback Temporarily stops playback In Pause mode Resumes playback Info DISP Up button When the menu is displayed on the LCD monitor the Up button operates as a direction button When the menu is not displayed on the LCD monitor pressing the Info button will display image information on the LCD monitor Info DISP button Info DISP button Info...

Страница 72: ...on Left Right Down MENU buttons activate the following Left button While the menu is showing the Left button operates as a direction button While the menu is not showing press the Left button to select the previous image Right button While the menu is showing the Right button operates as a direction button While the menu is not showing press the Right button to select the next image Down button Wh...

Страница 73: ...g the LCD monitor In the Play mode pressing the MENU button displays the menu on the LCD monitor The menus you can set up in Play mode are as follows To capture an image after setting up the play menu press the Play mode button or shutter button Menu Tab Main Menu Sub Menu Page Edit Resize 2592X1944 2048X1536 p 74 1024X768 2592X1728 1800X1200 2592X1458 1920X1080 Start Image Rotate Right 90 Left 90...

Страница 74: ...he camera is connected to a PictBridge supporting printer direct connection to the camera sold separately with a USB cable Setting up the play back function using the LCD monitor Menu Tab Main Menu Sub Menu Secondary Menu Page Type Auto p 87 Plain Photo Fast Photo Quality Auto Draft Normal Fine Date Auto Off On File Name Auto Off On Reset Yes p 88 No Ä Menus are subject to change without prior not...

Страница 75: ... o o o o Resize A large sized image can be resized to a smaller sized image but not vice versa Only JPEG images can be resized Movie clip MP4 Voice recording WAV files can t be resized You can change the resolution of only those files compressed in the JPEG 4 2 2 format The resized image will have a new file name The Start Image image is stored not on the memory card but on the internal memory If ...

Страница 76: ...ssible to add various effects to your images by using this function 1 Press the play mode button and press the MENU button 2 Click the Up Down button from the Edit menu to select Photo Style Selector menu tab and press the OK button 3 Select a desired sub menu by pressing the Left Right button and press the OK button Back Move Photo Style Selector Photo Style Selector 4 The changed image is saved ...

Страница 77: ...menu to select Smart Filter menu tab and press the OK button 3 Select a desired sub menu by pressing the Left Right button and press the OK button Back Move Smart Filter Smart Filter Smart Filter Icon Description Normal No effect Miniature Make a photo of a life size location or object look like a photo of a miniature scale model Blurring parts of the photo makes the scene seem much smaller than i...

Страница 78: ... exposure to the light source Back Move ACB 1 Select by pressing the Left Right button and press the OK button 2 The Making New Image message is displayed and the image is saved as a new file name Red eye Removal Red eye effect can be removed from the captured image 1 Select by pressing the Left Right button and press the OK button 2 The Making New Image message is displayed and the image is saved...

Страница 79: ...hange the saturation of the image 1 Select by pressing the Left Right button and press the OK button Then a bar for selecting the saturation will be displayed 2 Change the saturation by pressing the Left Right button 3 Press the OK button and the image will be saved as a new file name Back Move Saturation Noise effect You can add noise to an image to add a more classic feel to your photo Back Move...

Страница 80: ...t button Back Set Images All Interval 1 sec Music Off Effect Off Start Play Repeat You can select image to view 1 Use the Up Down button to select the Images menu and press the Right button 2 Select a desired sub menu by pressing the Up Down button All All images saved on the Memory are played back Press the OK button to save the configuration Date Images taken in a specified date are played back ...

Страница 81: ...button to select the desired interval 3 Press the OK button to save the configuration Back Set Images All Interval 1 sec Music Off Effect Off Start 1 sec 3 sec 5 sec 10 sec The loading time depends on the image size and quality While the Multi Slide Show is playing only the first frame of a Movie file is displayed While the Multi Slide Show is playing the voice recording file will not display The ...

Страница 82: ...e unprotected files in the DCIM subfolder will be deleted Remember that this will permanently delete unprotected images Important shots should be stored on a computer before deletion takes place The startup image is stored on the camera s internal memory i e not on the memory card and it will not be deleted even if you delete all files on the memory Protecting images This is used to protect specif...

Страница 83: ...memo Off DPOF Delete Copy To Card Protect All Lock Unlock Start Stop Back Set Protect Face List Edit Voice memo Off DPOF Delete Copy To Card Off On Face List Edit Portrait images can be classified or deleted in the smart album according to their ranking This feature is available only when you use a memory card 1 Press the Up Down button to select the Face List Edit menu and press the Right OK butt...

Страница 84: ...e Some photo labs may not support the wide angle size print DPOF Standard This function allows you to embed printing quantity information on a stored image 1 Press the Up Down button and select the DPOF menu tab And then press the Right button 2 Press the Right button again and Standard sub menu will display 3 Select a desired sub menu by pressing the Up Down button and press the OK button Select ...

Страница 85: ...he Size menu and press the Right button again Sub menu will display 3 Select a desired sub menu by pressing the Up Down button and press the OK button Select Selection window to change the printed size of the image is displayed Up Down Left Right Select an image Zoom W T Lever Change the print size Fn button Your changes will be saved and the menu will disappear All Change print size of all saved ...

Страница 86: ...he Copy to Card command will copy only some of the images and display Memory Full message Then the system will return to the playback mode Please be sure to delete any unnecessary files to free up space before inserting the memory card into the camera When you move the images that are stored on the internal memory by doing Copy to Card to the card the next number of file names will be created on t...

Страница 87: ...nce the camera is turned on the camera automatically recognizes the printer and is connected to it Ä If automatic connection fails set the USB menu to Printer p 63 Ä For a printer that can enable removable disk set the USB menu to Printer PictBridge Easy printing When you connect the camera to printer in the Play back mode you can print a picture easily Pressing the Left Right button Selects a pre...

Страница 88: ... Size Auto Layout Auto Type Auto Quality Auto Images One Photo One Photo All Photos PictBridge Print Setting You can select the Paper Size Print Format Paper Type Print Quality Date Print and File Name Print menus for printed pictures 1 Press the MENU button and the PictBridge menu will display 2 Use the Up Down button to select the desired menu and then press the Right button 3 Use the Up Down bu...

Страница 89: ...ht or the inside of a vehicle in hot weather Environments where there is high magnetism or excessive vibration Areas with high explosives or highly flammable materials Do not leave this camera in places subject to dust chemicals like naphthalene and mothballs high temperature and high humidity Keep this camera with silica gel in a hermetically sealed box when not planning to use the camera for a l...

Страница 90: ...nt notes Camera Maintenance Use a soft brush available from photo stores to gently clean the lens and LCD assemblies If this does not work lens cleaning paper with lens cleaning fluid can be used Clean the camera body with a soft cloth Do not allow this camera to come into contact with solvent materials such as benzol insecticide thinners etc This may damage the body shell of the camera and also a...

Страница 91: ... card or internal memory is full Insert new memory card Delete the unnecessary image files No Image File There are no images stored on the memory Take images Insert a memory card that is holding some images File Error File error Delete the file Memory card error Contact a camera service center Low Battery There is low battery capacity Insert a charged battery or recharge the battery Tempered glass...

Страница 92: ... when pressing the Shutter button There is insufficient memory capacity Delete unnecessary image files The memory card has not been formatted Format the memory card p 59 The memory card is exhausted Insert a new memory card The memory card is locked Refer to Card Locked error message The camera s power is off Turn the camera power on The battery is exhausted Insert a charged battery or recharge th...

Страница 93: ...r The external monitor has not been connected properly with the camera Check the connection cables There are incorrect files on the memory card Insert a memory card that has correct files When using the PC s explorer the Removable Disk file does not show Cable connection is incorrect Check the connection The camera is off Turn the camera on The operating system is not Windows XP Vista 7 Mac OS 10 ...

Страница 94: ...tion 2EV 1 3EV steps ISO Auto 80 100 200 400 800 1600 3200 Flash Modes Auto Auto Red eye reduction Fill in flash Slow sync Flash off Red Eye Fix Range Wide 0 2m 3 5m Tele 0 4m 2 0m Recharging Time Approx 4 sec Sharpness Soft Soft Normal Vivid Vivid White Balance Auto Daylight Cloudy Fluorescent_H Fluorescent_L Tungsten Custom Voice Recording Voice Recording max 10 hours Voice Memo in Still Image m...

Страница 95: ...24X 768 Specifications Capacity 1GB Size Super Fine About 134 About 151 About 181 About 200 About 316 About 499 About 1822 Fine About 221 About 249 About 297 About 329 About 516 About 815 About 2816 Normal About 331 About 375 About 445 About 491 About 765 About 1191 About 3873 Ä These figures are measured under Samsung standard conditions and may vary depending on shooting conditions and camera se...

Страница 96: ... Dimensions WxHxD 90 9 x 56 x 16 5 mm excluding protrusions Weight Approx 96 3 g without battery and card Operating Temperature 0 40 C Operating Humidity 5 85 Software Intelli studio Adobe Reader Specifications are subject to change without prior notice All trademarks are the property of their respective owners ...

Страница 97: ...1024 X 768 pixels 16 bit color display compatible monitor 1280 X 1024 pixels 32 bit color display recommended Microsoft DirectX 9 0c or later For Windows users Using a self assembled PC or a PC and OS that are not supported may void your warranty The programs may not work properly on 64 bit Edition of Windows XP Vista and 7 Intelli studio may not perform correctly on some computers even when the c...

Страница 98: ...th the USB cable You must plug the end of the cable with the indicator light Ÿ into your camera If the cable is reversed it may damage your files The manufacturer is not responsible for any loss of data 1 Insert the installation CD in a compatible CD ROM drive 2 When the setup screen is displayed click Samsung Digital Camera Installer to start installation 3 Select programs to install and follow t...

Страница 99: ...the camera fails to connect a pop up window will appear Select Computer Disconnecting the camera for Windows XP The way to disconnect the USB cable for Windows Vista 7 is similar 1 If the status lamp on your camera is blinking wait until it stops 2 Click on the tool bar at the bottom right of your PC screen 3 Click the pop up message 4 Remove the USB cable Transferring files to your computer for W...

Страница 100: ... the Intelli studio icon on your Windows desktop The Intelli studio allows you to play back and edit files You can also upload files to websites such as Flickr or YouTube For details select Menu ĺ Help in the program You cannot edit files directly on the camera Transfer files to a folder on your computer before editing You cannot copy files in your computer to the camera Intelli studio supports th...

Страница 101: ... in the list 7 Select a file type 8 View files of the selected folder on your computer 9 Show or hide files of the connected camera 10 View files of the selected folder on the camera 11 View files as thumbnails in Smart Album or on a map 12 Browse folders in the connected device 13 Browse folders in your computer 14 Move to the previous or next folder 15 Print files view files on a map store files...

Страница 102: ...disk icon 4 Transfer photos or videos to the computer 1 Connect your camera to a Macintosh computer with the USB cable You must plug the end of the cable with the indicator light Ÿ into your camera If the cable is reversed it may damage your files The manufacturer is not responsible for any loss of data Transferring files to your computer for Mac ...

Страница 103: ... connected to the USB port located on the front of the computer the computer may not recognize the camera Connect the camera to the USB port located on the back of the computer Case 1 USB cable is not connected or it is not the supplied USB cable Connect the supplied USB cable Case 2 The camera is not recognized by your PC Sometimes the camera may appear under Unknown Devices in Device Manager Tur...

Страница 104: ...the DXSETUP exe file The DirectX will be installed Visit the Microsoft website for downloading the DirectX If a PC connected with the camera stops responding while Windows is starting In this case disconnect the PC and the camera and Windows will start If the problem happens continuously set the Legacy USB Support to disable and re start the PC The Legacy USB Support is in the BIOS setup menu The ...

Страница 105: ...ronic accessories should not be mixed with other commercial wastes for disposal Samsung Eco mark It is Samsung s own symbol mark is used to effectively communicate Samsung s environmental friendly product activities to the consumers The mark represents Samsung s continuous effort on development of environmental conscious products This Class B digital apparatus complies with Canadian ICES 003 Corre...

Страница 106: ......

Отзывы: