background image

English

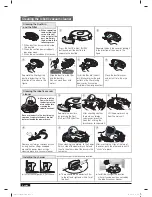
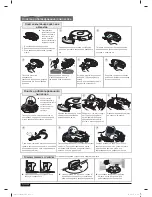
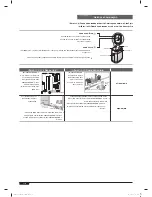
Separate the filter from the
dust bin by pulling it in the
direction of the arrow in the
figure.

Wipe the dust from the filter
and the dust bin.
(You can wash them with 
water.)

Install the filter into the dust 
bin. (Make sure that the grid 
pattern of the filter is facing
downwards. It cannot be 
installed in the wrong direction.)

Close the dust bin cover 
and install it into the main 
unit.

1.       When dust has accumulated inside
  the dust bin.
2. When the suction power suddenly
 becomes 

weak.

3. When the noise suddenly increases.

Press the Dust Bin Eject (PUSH) 
button and pull the dust bin to 
separate the dust bin.

▶     

When separating 
the dust bin, take 
care not to spill 
the dust out of the 
dust bin. Empty 
the dust bin in the 
following cases.

3

4

5

6

Separate the dust bin cover by pulling it 
in the direction of the arrow in the 
figure.

Cleaning the Dust Bin 
and the Filter

1

2


Separate the dust bin
by pressing the Dust
Bin Eject (PUSH) button.

Remove any foreign substances such 
as long hairs or strings wrapped 
around the power brush using a 
cleaning brush or a vacuum cleaner.

When cleaning is complete, fix the Power
Switch side of the power brush first and 
then fix the other side of the brush in the 
same way.

After inserting the 3 tips at the top of 
the cover, push the other end in until it  
“clicks” into place.

After checking whether
there are any foreign
substances, press the 
hook that is fixing the 
brush cover to separate it.

Lift the power brush up
from the main unit.

▶  

Must turn off the 
Power Switch at 
the bottom of the 
main unit before 
cleaning the 
robotic vacuum.

Because the dust in the dust bin may 
come out, separate the dust bin first 
before cleaning the power brush.

5

6

4

2

3

1

Cleaning the robotic vacuum 
cleaner

▶ 

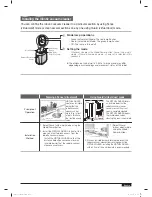
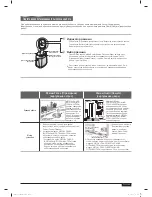
Install the charger on a flat surface.

▶   

There should be no obstacles 0.5m

  to the left and right and within 1m of
 the 

front.

▶    

Install the charger in a location

  where it can be easily accessed by
  the robotic vacuum cleaner.

Install the charger in the following location.

Installing the charger

abo

ut 0

.5m

about 0.5m

abo

ut 0

.5m

about 0.5m

abo

ut 1

m

about 1m

Cleaning the robotic vacuum cleaner

DJ68-00674N-1 EN.indd   2

DJ68-00674N-1 EN.indd   2

13. 01. 09   오후 8:14

13. 01. 09   오후 8:14

Содержание SR8875

Страница 1: ...ation Put the chair on top of the table while cleaning The cleaning robot hits the obstacles such as wall furniture etc NOTE When you turn the power switch off and then on all settings will be reset H...

Страница 2: ...ngs wrapped around the power brush using a cleaning brush or a vacuum cleaner When cleaning is complete fix the Power Switch side of the power brush first and then fix the other side of the brush in t...

Страница 3: ...rmed formed Distance Distance Detection Detection Sensor Sensor Installation Method Forming a Fence virtual wall Using Guard virtual door mode Principle of Operation VIRTUAL GUARD creates an invisible...

Страница 4: ...g This Robot Cleaner is a touching type cleaner to the obstacles Scheduled Cleaning Automatic Cleaning on a schedule when you are away Auto Cleaning Spot Cleaning Manual Cleaning Automatic Cleaning un...

Страница 5: ...SR8875 X X X Start Stop X X X X X X 1 2 3 4 auto Homing Charge 1 5 5 Run Stop 1 5 1 5 1 5 DJ68 00674N 2 RU indd 1 DJ68 00674N 2 RU indd 1 13 01 09 8 15 13 01 09 8 15...

Страница 6: ...1 2 3 X 3 4 5 6 1 2 3 5 6 4 2 3 1 X X 0 5 1 X 0 5 0 5 1 1 X DJ68 00674N 2 RU indd 2 DJ68 00674N 2 RU indd 2 13 01 09 8 15 13 01 09 8 15...

Страница 7: ...ard 1 VIRTUAL GUARD 1 2 2 3 3 VIRTUAL GUARD 1 Fence Mode Power 2 VIRTUAL GUARD VIRTUAL GUARD 1 Guard Mode Power 2 VIRTUAL GUARD VIRTUAL GUARD 30 VIRTUAL GUARD VIRTUAL GUARD Fence Guard DJ68 00674N 2 R...

Страница 8: ...X 23 5 5 Scheduled Cleaning Auto Spot Manual 1 5 x 1 5 Max 1 5 1 5 Turbo DJ68 00674N 2 RU indd 4 DJ68 00674N 2 RU indd 4 13 01 09 8 15 13 01 09 8 15...

Страница 9: ...W 23 5 5 Scheduled Cleaning 1 5x1 5 Turbo 1 5 1 5 DJ68 00674N 3 HE indd 1 DJ68 00674N 3 HE indd 1 13 01 09 8 11 13 01 09 8 11...

Страница 10: ...Guard Off 1 2 Guard Fence VIRTUAL GUARD VIRTUAL GUARD 1 2 3 VIRTUAL GUARD VIRTUAL GUARD 1 Fence 2 VIRTUAL GUARD VIRTUAL GUARD 30 1 Guard 2 VIRTUAL GUARD 30 VIRTUAL GUARD DJ68 00674N 3 HE indd 2 DJ68 0...

Страница 11: ...W 1 2 1 2 3 PUSH Dust Bin Eject 3 4 5 6 W 1 2 3 PUSH Dust Bin Eject 4 5 6 0 5 0 5 W W 0 5 W DJ68 00674N 3 HE indd 3 DJ68 00674N 3 HE indd 3 13 01 09 8 11 13 01 09 8 11...

Страница 12: ...VCR8875 W W W Start Stop W W W 5 Run Stop W W 1 2 3 4 Charge 1 5 1 5 1 5 W SR8875 DJ68 00674N 3 HE indd 4 DJ68 00674N 3 HE indd 4 13 01 09 8 12 13 01 09 8 12...

Отзывы: