Samsung SPP-R200 Скачать руководство пользователя страница 7

Rev. 1.00 

- 7 - 

SPP-R200

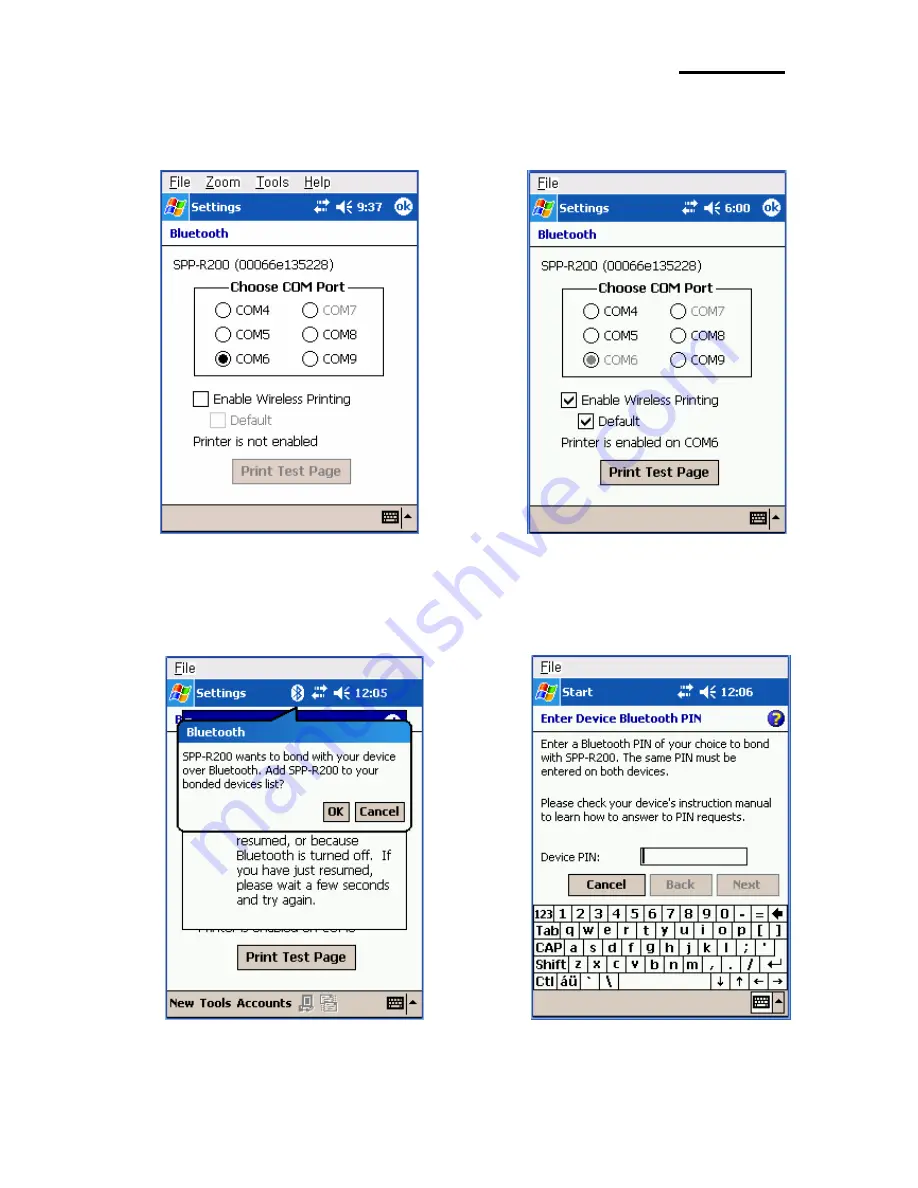
9) Select the COM port to be used.                    10) Check the “Enable Wireless Printing” 

and ”Default” checkboxes, and click the 

“Printer Test Page” button. 

11) Click the “OK” button.                             12) The PIN Code(Device PIN) 

  window appears (if the SPP-R200 

  security function is enabled). 

Содержание SPP-R200

Страница 1: ...Bluetooth Connection Manual SPP R200 Mobile Printer Rev 1 00 http www samsungminiprinters com...

Страница 2: ...ec PDA Device CN2B OS Pocket PC 4 20 0 5 4 2 Connecting with a SYMBOL PDA Device SYMBOL MC70 OS Windows Mobile 5 0 9 4 3 Connecting with an HP PDA Device iPAQ hx2700 OS Windows Mobile 5 1 1702 14 4 4...

Страница 3: ...terrupted Separate the printer and Bluetooth enabled device from such interrupting devices by a distance of at least 5m 3 General Sequence for Bluetooth Connections Bluetooth connection methods vary b...

Страница 4: ...rmec PDA Device CN2B OS Pocket PC 4 20 0 SYMBOL PDA Device SYMBOL MC70 OS Windows Mobile 5 0 HP PDA Device iPAQ hx2700 OS Windows Mobile 5 1 1702 Mobile Compia PDA Device M3 OS WinCE 5 0 InnoTeletek P...

Страница 5: ...Rev 1 00 5 SPP R200 4 1 Connecting with an Intermec PDA Device CN2B OS Pocket PC 4 20 0 1 Click the icon 2 Click Settings 3 Click Connections 4 Click the Bluetooth icon...

Страница 6: ...Rev 1 00 6 SPP R200 5 Click to check the On option 6 Click the Wireless Printing menu bar 7 Click the Device Discovery button 8 Select Devices of the SPP R200 and click the Connect button...

Страница 7: ...e COM port to be used 10 Check the Enable Wireless Printing and Default checkboxes and click the Printer Test Page button 11 Click the OK button 12 The PIN Code Device PIN window appears if the SPP R2...

Страница 8: ...R200 13 Input the PIN Code Device PIN 14 If after pressing the Print Test Page button and click Enter Default code 0000 the BT LED of the SPP R200 turns on and test printing is performed the connecti...

Страница 9: ...Rev 1 00 9 SPP R200 4 2 Connecting with a SYMBOL PDA Device SYMBOL MC70 OS Windows Mobile 5 0 1 Click the icon 2 Click Enable Bluetooth 3 Click the icon 4 Click Show BTExplorer...

Страница 10: ...Rev 1 00 10 SPP R200 5 Click File 6 Click New Connection 7 Click Associate Serial Port 8 Click the Next button...

Страница 11: ...9 Click the List window for 2 seconds and 10 Click Refresh the function folder appears 11 Bluetooth devices in the proximity are 12 Select the Device Address of the discovered SPP R200 and click the N...

Страница 12: ...0 13 The PIN Code window appears if the 14 Input the PIN Code and click Enter SPP R200 security function is enabled Default PIN Code 0000 15 The Serial port is registered as COM9 16 Click the SPP R200...

Страница 13: ...Rev 1 00 13 SPP R200 17 Click Connect 18 The Connection Successful message appears and the connection is complete when the BT LED of the SPP R200 turns on...

Страница 14: ...5 1 1702 1 To run Bluetooth first click the 2 Click the Bluetooth logo button icon at the lower right of the screen to activate the Bluetooth function 3 When activated the Bluetooth button turns 4 Cl...

Страница 15: ...Bluetooth Device 6 Click the SPP R200 icon from the Bluetooth devices displayed in the search results 7 The Pass Key window appears if the 8 Input the Pass Key and click Enter SPP R200 security functi...

Страница 16: ...Rev 1 00 16 SPP R200 9 Select BIXOLON SPP and click Next 10 Click Done 11 The SPP R200 shortcut is produced 12 Clicking the shortcut for 2 seconds brings up the function folder Click Connect...

Страница 17: ...Rev 1 00 17 SPP R200 13 The shortcut changes to show a green indicator as shown below The connection is complete when the BT LED of the SPP R200 turns on...

Страница 18: ...Rev 1 00 18 SPP R200 4 4 Connecting with a Mobile Compia PDA Device M3 OS WinCE 5 0 1 Click the icon 2 Click BT On 3 Click the icon 4 Click BT Manager...

Страница 19: ...Rev 1 00 19 SPP R200 5 Click Find All Devices 6 Click the Next button 7 Click Refresh 8 Click the SPP R200 from the Bluetooth devices in the search list and click Next...

Страница 20: ...00 20 SPP R200 9 The Pass Key window appears if the 10 Input the Pass Key and click Enter SPP R200 security function is enabled Default Pass Key 0000 11 Select BIXOLON SPP and click Next 12 Click Con...

Страница 21: ...Rev 1 00 21 SPP R200 13 The Connection Established message appears and the connection is complete when the BT LED of the SPP R200 turns on...

Страница 22: ...Rev 1 00 22 SPP R200 4 5 Connecting with an InnoTeletek PDA Device MC3000 OS WinCE 4 2 1 Click the sppui icon 2 Click the icon 3 Click the Inquiry button 4 Select SPP R200 and click OK button...

Страница 23: ...R200 5 The PIN Code window Select channel 6 Input the PIN Code and click Enter appears if the SPP R200 security function Default 0000 is enabled 7 The Serial port is registered as COM7 8 Click the My...

Страница 24: ...00 24 SPP R200 9 Click Storage 10 Click BTPrinter 11 Click InnoPrinter 12 The Port Opened Status message appears and the connection is complete when the BT LED of the SPP R200 turns on Click the TEXT...

Страница 25: ...Rev 1 00 25 SPP R200 13 Enter text to be printed in the Text window and click the Print button The text is printed by the Printer SPP R200...

Страница 26: ...etooth Dongle insert the CD in the PC and install Bluesoleil 2 Connect Bluetooth Dongle to the USB port of the PC 3 Click the Bluesoleil icon on the PC screen top 4 Click the red sphere at the center...

Страница 27: ...Rev 1 00 27 SPP R200 6 Click right button of the mouse above the SPP R200 Icon and select the Refresh Services 7 Enter the PIN Code in the Bluetooth Passkey window Default Passkey 0000...

Страница 28: ...If the Passkey PIN Code is correct and pairing is completed a red check symbol appears next to the SPP R200 icon 9 Click right button of the mouse above the SPP R200 Icon and select the Connect Blueto...

Страница 29: ...shown in the image below 11 The connection is complete when the BT LED of the SPP R200 turns on 12 When the connection is complete the message pictured below appears at the bottom right of the PC scre...

Отзывы: