background image

17

Getting to know the camcorder

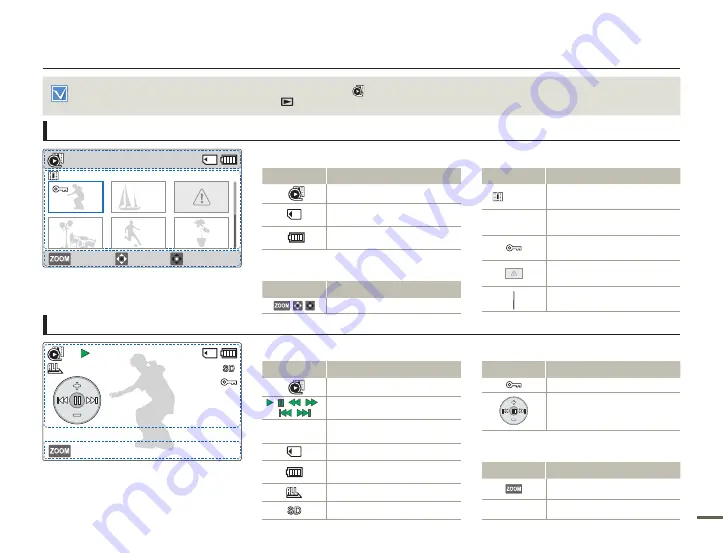
The On Screen Display (OSD) below appears in the video playback (

) mode only.

Press the [

MODE

] button to select the playback (

) mode. 

¬

page 26


Video playback mode: Thumbnail view

Video playback mode: Single view

0:00:00/0:00:55

100-0001

Thumbnail View

Top of the LCD screen

Indicator

Meaning

Video playback mode

/   / 

 / 

 / 

 / 

Playback status (playback/pause/
search/skip)

0:00:00/0:00:55

Time code (elapsed time / 
recorded time)

Storage media (memory card)

Battery info 
(remaining battery level)

PlayOption 

Video Resolution

Indicator

Meaning

Protect

Shortcut menu

Bottom of the LCD screen

Indicator

Meaning

Button guide

100-0001

File name (file number)

Normal

1/10

Photo

Move

Play

0:00:55

Top of the LCD screen

Indicator

Meaning

Video playback mode

Storage media (memory card)

Battery info 
(remaining battery level)

Bottom of the LCD screen

Indicator

Meaning


Button guide

Center of the LCD screen

Indicator

Meaning


0:00:55

Recorded time

1/10

Current video / total number of 
recorded videos

Protect

Error file

Scroll bar

Содержание SMX-F70BN

Страница 1: ...nual SMX F70BN SMX F70SN SMX F700BN SMX F700SN Memory Camcorder www samsung com register For video recording use a memory card that supports faster write speeds Recommended Memory Card 4MB s Class 4 o...

Страница 2: ...us near water 6 Clean only with dry cloth 7 Do not block any ventilation openings Install in accordance with the manufacturer s instructions 8 Do not install near any heat sources such as radiators he...

Страница 3: ...N This CAMCORDER may be equipped with either a polarized 2 wire AC line plug a plug having one blade wider than the other or a 3 wire grounding type plug a plug having a third grounding pin If you are...

Страница 4: ...d service personnel 26 DAMAGE REQUIRING SERVICE Unplug this CAMCORDER from the wall outlet and refer servicing to qualified service personnel under the following conditions a When the power supply cor...

Страница 5: ...unications However there is no guarantee that interference will not occur in a particular installation If this equipment does cause harmful interference to radio or television reception which can be d...

Страница 6: ...e sure to use a suitable plug adaptor IMPORTANT INFORMATION ON USE Thank you for purchasing this Samsung Camcorder Please read this user manual carefully before you use the camcorder and keep it handy...

Страница 7: ...pyright except for personal enjoyment Even if you record an event such as a show performance or exhibition for personal enjoyment we strongly recommend that you obtain permission beforehand For Open S...

Страница 8: ...ng the battery at a high temperature may cause an explosion Do not allow water or metal and inflammable matter to enter the camcorder or power adaptor Doing so may pose a fire hazard No sand or dust F...

Страница 9: ...of children If the lithium battery or memory card is swallowed by a child consult physician immediately Do not plug or unplug the power adaptor with wet hands There is a risk of electric shock Keep th...

Страница 10: ...or steam could damage the camcorder case or cause a malfunction Do not use the camcorder near dense exhaust gas generated by gasoline or diesel engines or corrosive gas such as hydrogen sulphide Doing...

Страница 11: ...sion electric shock or personal injuries caused by abnormal operation Place the camcorder on a stable surface that is well ventilated Keep important data separately Samsung is not responsible for data...

Страница 12: ...G THE SHORTCUT MENU OK GUIDE 27 SELECTING THE LANGUAGES 29 Getting ready to start recording 30 INSERTING AND EJECTING A MEMORY CARD NOT SUPPLIED 30 SELECTING A SUITABLE MEMORY CARD NOT SUPPLIED 31 REC...

Страница 13: ...tness 73 Auto LCD Off 73 Beep Sound 74 Shutter Sound 74 Auto Power Off 75 PC Software 75 Format 76 Default Set 76 Language 76 Connecting to a TV 77 CONNECTING TO A TV 16 9 4 3 77 VIEWING ON A TV SCREE...

Страница 14: ...D screen and press the Power button to turn on the camcorder Set the Lens cover open close switch to open page 15 2 To record videos press the Recording start stop button or to record photos press the...

Страница 15: ...ontrol Up Down Left Right button to select a desired video or photo and then press the Control OK button Normal 1 10 Photo Move Play 0 00 55 Viewing on a TV You can enjoy detailed brilliant quality vi...

Страница 16: ...ders directory on your PC 3 Double click the file you would like to play back Sharing videos photos on Web sites Share your contents with the world by uploading photos and videos directly to a web sit...

Страница 17: ...Video cable AD39 00184A User manual CD AD46 00418A Quick start guide AD68 06664A Carrying case AD69 00929A Memory card External battery charger IA BC9UA4 Optional accessories The exact appearance of...

Страница 18: ...on Zoom T W button 4 Recording start stop button 5 LCD screen 6 Memory card Jack cover USB jack Memory card slot AV jack AV CHG charging indicator 7 Internal speaker 8 Display button 9 Recording pause...

Страница 19: ...ook 6 Lens cover open close switch 7 Internal microphone 8 Battery release switch BATT 9 Tripod receptacle Rear 1 Mode indicator Recording mode Video Photo Playback mode 2 Recording start stop button...

Страница 20: ...cording mode Video Photo STBY z Operating status standby recording pause photo capturing 0 00 00 254Min Time counter video recording time remaining recordable time iSCENE Smart Auto Time Lapse REC Whi...

Страница 21: ...psed time recorded time Storage media memory card Battery info remaining battery level PlayOption Video Resolution Indicator Meaning Protect Shortcut menu Bottom of the LCD screen Indicator Meaning Bu...

Страница 22: ...er of recorded photos Storage media memory card Battery info remaining battery level Photo Resolution Indicator Meaning Protect Shortcut menu Bottom of the LCD screen Indicator Meaning Button guide 10...

Страница 23: ...battery 2 Push down and then lift the battery out in the direction shown in the figure Battery release BATT switch Use only Samsung approved batteries Do not use batteries from other manufacturers Oth...

Страница 24: ...ose to the wall outlet If you experience a malfunction while using the camcorder separate the power adaptor immediately from the wall outlet Do not use the power adaptor in a tight space such as betwe...

Страница 25: ...ttery level display The battery level display shows the amount of battery power remaining in the battery Battery Level Indicator State Message Fully charged 75 50 50 25 25 5 less than 5 Exhausted flic...

Страница 26: ...ng and playback times will be shorter when you use your camcorder in low temperatures We recommend using the power adaptor when using the Time Lapse REC function Continuous Recording without zoom The...

Страница 27: ...tery before using the camcorder outdoors in cold temperatures The cold temperature may shorten the length of time you can use the battery before needing to recharge it Carry the supplied USB cable and...

Страница 28: ...der for the extended time the following functions enable you to prevent unnecessary energy consumption Sleep mode The camcorder switches to the sleep mode when the LCD screen is closed and then if idl...

Страница 29: ...age media Internal rechargeable battery Your camcorder includes a internal rechargeable battery that retains the date and time settings even after the power is turned off Once this battery is depleted...

Страница 30: ...ack videos or photos This camcorder provides one recording mode for both video and photo recordings You can easily record videos or photos in the same mode without having to switch modes SWITCHING THE...

Страница 31: ...ect EV function Press the Control Left Right button to adjust the exposure while viewing the image on the LCD screen 3 Press the Control OK button to confirm your selection Press the Control OK button...

Страница 32: ...ayback Pause Access the shortcut menu Playback zoom Confirms selection UP iSCENE Zoom tele Increases the volume Moves the cursor up DOWN Focus Zoom wide Decreases the volume Moves the cursor down LEFT...

Страница 33: ...OK button 4 Press the MENU button to exit the menu The OSD language appears in the selected language Language options may be changed without prior notice The selected language remains even without th...

Страница 34: ...HC and SDXC cards Compatibility with this camcorder may vary depending on the card manufacturer and type To insert a memory card 1 Turn the camcorder off 2 Open the memory card cover as shown in the f...

Страница 35: ...correctly and your recordings may be lost The memory cards released after this camcorder may not be compatible with the camcorder When the camcorder operates with 4MB s Class 4 or above memory cards i...

Страница 36: ...e a soft dry cloth to clean the terminals if required Do not paste anything other than the label provided with the card on the label pasting area of the card Do not use a damaged memory card Be carefu...

Страница 37: ...figures in the table may differ depending on the actual recording conditions and subject The higher the resolution the more memory is used Lower resolution increases the recording time but the image...

Страница 38: ...LCD screen with your finger The screen opens up to 90 2 Rotate the LCD screen towards the lens You can rotate it up to 180 towards the lens and up to 90 backwards To view recordings more conveniently...

Страница 39: ...to the best angle for recording Use the Zoom lever or Zoom button to adjust the size of the subject page 40 2 Press the Recording start stop button The recording z indicator appears and recording sta...

Страница 40: ...the sound of the zoom mechanism etc When you record indoors or in the dark places ISO sensitivity is automatically adjusted It can make interference effects on images and you cannot view the images re...

Страница 41: ...er records the photo image without a shutter sound Video keeps recording even while you take photos 3 To stop recording press the Recording start stop button again Photos are captured in the video rec...

Страница 42: ...pletely saved on the storage media Do not turn off the camcorder or remove the memory card when taking photos as it may damage the storage media or data This camcorder provides one combined video and...

Страница 43: ...portrait outdoors at night 3 Press the Recording start stop button or PHOTO button pages 35 38 4 To cancel the SMART AUTO mode press the SMART AUTO button again The SMART AUTO and Anti Shake HDIS ico...

Страница 44: ...p to 130x page 61 To maintain sharp focus the minimum possible distance between the camcorder and subject is about 1cm about 0 39 inch for wide angle and 1m about 39 4 inches for telephoto Optical zoo...

Страница 45: ...k lighting influences recording when the subject is darker than the background The subject is in front of a window The subject is against a snowy background The subject is outdoors and the background...

Страница 46: ...ode you used the last time However you can choose the video or photo thumbnail view display options by using the Zoom lever Understanding how to change the operation modes You can easily change the pl...

Страница 47: ...hort time The selected videos play back according to the PlayOption setting page 67 3 To stop playback and return to the thumbnail view use the Zoom lever Do not power off the camcorder or eject the m...

Страница 48: ...n 0 and 10 If you close the LCD screen during playback you may not hear the sound from the speaker You can hear the recorded sound only when the playback is at normal speed Various playback operations...

Страница 49: ...ic in the Smart BGM Option page 67 CAPTURING PHOTOS WHILE PLAYING BACK VIDEO You can capture photos during video playback 1 Select the video thumbnail view You can easily switch between video and phot...

Страница 50: ...ys the photo you selected in full screen view and the shortcut menu for playback appears for a short time To view the previous next photo press the Control Left Right button 3 To return to the thumbna...

Страница 51: ...age is magnified starting from the center of the image You can zoom in from x1 3 to x2 0 3 Press the Control Up Down Left Right button to view the area you want on the magnified photo 4 To cancel use...

Страница 52: ...t the desired submenu item and then press the Control OK button 4 When you finish making settings press the MENU button to exit While you are using certain menu items some other menu items cannot be u...

Страница 53: ...o 53 Face Detection Off 55 EV 56 C Nite On 57 Focus Auto 57 Anti Shake HDIS Off 59 Digital Special Effect Off 60 Zoom Type Intelli Zoom 61 Cont Shot Off 62 Time Lapse REC Off 63 Guideline Off 65 Setti...

Страница 54: ...74 Auto Power Off M M M M M 5 Min 75 PC Software M M M M M On 75 Format M M M M M 76 Default Set M M M 76 Language M M M M M English 76 Menu options and default values may be changed without prior no...

Страница 55: ...ems Items Use On screen display Auto Use this setting for regular recording conditions The camcorder automatically adjusts the aperture value and shutter speed for optimum recording Sports For recordi...

Страница 56: ...rames per second Recorded files are encoded using Variable Bit Rate VBR VBR is an encoding system that automatically adjusts the bit rate according to the image being recorded High resolution images o...

Страница 57: ...pace to store photos in the memory Resolutions marked with are the resolutions of photos to be recorded when you set video resolution to 720X480 60p 4 3 White Balance Using the White Balance function...

Страница 58: ...hite balance and provide a more natural result When you set white balance manually the object you frame must be white Otherwise your camcorder may not detect an appropriate setting value The adjusted...

Страница 59: ...to three faces 254Min STBY 9999 1 60 The Face Detection indicator and Face Detection frame are not recorded When Face Detection frames a face it also adjusts the focus and exposure to optimal values f...

Страница 60: ...0 3 0 0 3 0 6 1 0 1 3 1 6 2 0 4 Confirm your selection by pressing the Control OK button The camcorder will apply the exposure value setting and the indicator and setting value appear To cancel the ad...

Страница 61: ...omatic You can also set the focus manually Select the recording mode by pressing the MODE button page 26 1 Press the MENU button Control Left Right button Focus 2 Select the desired submenu item with...

Страница 62: ...he Control Left Right button to adjust the focus Further subject Nearer subject Examples of the Manual focus mode When the subject is dark When the background is too bright When you view the subject t...

Страница 63: ...object When recording while walking or in a moving car The camcorder automatically activates the Anti Shake HDIS function in the Smart Auto mode Gross camcorder shake may not be entirely corrected ev...

Страница 64: ...utton 3 Press the MENU button to exit the menu Examples of 7 digital effect options Off Disables the function Blk Wht This mode changes the image into black and white Sepia This mode gives images a re...

Страница 65: ...is digitally processed more than the intelli or optical zoom modes As a result the image resolution may deteriorate The image quality may deteriorate depending on how much you zoom in on the subject...

Страница 66: ...sired submenu item with the Control Up Down button and then press the Control OK button 3 Press the MENU button to exit the menu The number of recordable photos depends on the photo s resolution and t...

Страница 67: ...d recording interval Sec with Control Up Down button 4 Move to the next setting Hr by pressing the Control Left Right button and then set the desired total recording time in the same way 5 Press the C...

Страница 68: ...0 Sec you need to set the recording time for the Time Lapse Recording to at least 30 or 15 minutes to record a minimum video length of 1 second 60 or 30 images Press the Recording start stop button if...

Страница 69: ...ntrol OK button 3 Press the MENU button to exit the menu Positioning a subject at the cross point of a guideline provides a balanced composition Guidelines are not recorded Submenu Items Items Use On...

Страница 70: ...ion 2 Select the desired submenu item with the Control Up Down button and then press the Control OK button Date Normal Normal 1 10 Photo Move Play 0 00 55 Date 1 10 Photo Date Play JAN 01 2011 0 10 31...

Страница 71: ...menu To play back the selected background music with a video press the SMART BGM button when the video plays back To stop the background music press the SMART BGM button again When you change a backgr...

Страница 72: ...to the selected option will appear Use the Control Left Right button to select Yes and then press the Control OK button Deleted images cannot be recovered Do not remove the power adaptor or memory ca...

Страница 73: ...he MENU button to protect the photos and videos you selected The message corresponding to the selected option appears Use the Control Left Right button to select Yes and then press the Control OK butt...

Страница 74: ...ss the Control OK button The following information for the selected file appears Date Duration Video only Size Resolution 3 Press the MENU button to exit the menu Submenu Items Items Use Start To star...

Страница 75: ...orded files in the order they were recorded 1 Press the MENU button p Control Left Right button p Settings p Control Up Down button p File No p Control OK button 2 Select the desired submenu item with...

Страница 76: ...OK button 2 Select the desired submenu and menu item with the Control Up Down button and then press Control OK button 3 Press the MENU button to exit the menu The date time appears on the LCD screen...

Страница 77: ...ff p Control OK button 2 Select the desired submenu item with the Control Up Down button and then press the Control OK button 3 Press the MENU button to exit the menu When the Auto LCD Off function is...

Страница 78: ...button on or off 1 Press the MENU button p Control Left Right button p Settings p Control Up Down button p Shutter Sound p Control OK button 2 Select the desired submenu item with the Control Up Down...

Страница 79: ...cting a USB cable between the camcorder and your PC Using the software you can download stored video and photo images on the camcorder to your PC s hard disk You can also edit video and photo files us...

Страница 80: ...card was formatted on other devices If the memory card was used to record on other devices If the camcorder cannot read the memory card A memory card with the protection tab set to lock will not be fo...

Страница 81: ...re you ve connected the camcorder to the correct input jacks The TV screen may not display the right image information if connected incorrectly Do not use excessive force when connecting the cables We...

Страница 82: ...ing on LCD and TV screen ratio Recording ratio Appearance on Wide Screen 16 9 TV Appearance on 4 3 TV Images recorded in a 16 9 ratio Images recorded in a 4 3 ratio Adjust the volume to a moderate lev...

Страница 83: ...ders with the supplied Audio Video cable 3 Start the playback on your camcorder and record it on the recording device Refer to the instruction manuals supplied with your recording device for details 4...

Страница 84: ...GHz or higher is recommended Notebook Intel Core2 Duo 2 2GHz or AMD Athlon X2 Dual Core 2 6GHz or higher is recommended RAM 1GB or higher is recommended Video Card NVIDIA GeForce 8500 or higher ATI R...

Страница 85: ...ow these steps 1 Click the Safely Remove Hardware icon on the taskbar 2 Select USB Mass Storage Device and then click Stop 3 If the Stop a Hardware device window appears click OK 4 Disconnect the USB...

Страница 86: ...or these applications we recommend an editing software designed for professional use For details select Help Help on the Intelli studio screen No Description 1 Menu items 2 Display files in the select...

Страница 87: ...photo you want double click to play back Playback starts and the controls appear Intelli studio supports the following file formats Video formats MP4 Video H 264 Audio AAC WMV WMV 7 8 9 Photo formats...

Страница 88: ...to You can choose YouTube twitter Flickr Facebook Picasa Email or another web site you want to use for your site management 4 Click Upload to start uploading A pop up window appears to open the web b...

Страница 89: ...ick OK 4 The folders in the storage media appear Different file types are stored in different folders 5 Copy and paste or drag and drop the files from the storage media to your PC If the Removable Dis...

Страница 90: ...00VIDEO 101VIDEO etc The maximum number of folders is 999 The camcorder can create a maximum of 9 999 les in a storage media Photos z As with video clip les the le number automatically increases when...

Страница 91: ...is is not a rated adaptor Use only the rated adaptor that we provided The power adaptor failed to authenticate Check the power adaptor s authenticity We recommend you use only genuine Samsung power ad...

Страница 92: ...r backing up important les to your PC or another storage media Release the Smart Auto You cannot operate some functions manually when SMART AUTO is activated Release the SMART AUTO function The number...

Страница 93: ...ed the maximum number and you cannot record Set File No to Reset and format the storage media Remember to back up important les before formatting Check the lens cover Lens cover is closed Open the len...

Страница 94: ...o button is pressed for about 5 minutes the camcorder is automatically turned off Auto Power Off To disable this option change the setting of Auto Power Off to Off Use the power adaptor Power cannot b...

Страница 95: ...ease the lock on the write protect tab of the memory card SDHC memory card etc if any page 31 You cannot format the memory card Release the lock on the write protect tab of the memory card SDHC memory...

Страница 96: ...s and the features you used Recording a fast moving subject increases the bit rate and consequently the amount of storage space required for the recording which can lead to a shorter available recordi...

Страница 97: ...camcorder the beep sound will automatically turn off There is a time difference between the point where you press the Recording start stop button and the point where the recorded video starts stops O...

Страница 98: ...ibility page 31 The Skip or Search function does not work properly If the temperature inside the camcorder is too high it cannot function properly Turn the camcorder off wait for a few moments and the...

Страница 99: ...eci cations Intelli studio does not function properly Exit the Intelli studio application and restart the Windows computer Intelli studio is not Mac OS compliant Set PC Software to On in the Settings...

Страница 100: ...e discharged page 25 Pressing a button will not turn on or operate the computer Remove the battery or unplug the power adaptor and then reconnect the power supply to the camcorder before turning it on...

Страница 101: ...or tissue Mould may form if the lens is left dirty If the lens looks dim turn off the camcorder and leave it off for about 1 hour LCD screen To prolong its service life do not rub the LCD screen with...

Страница 102: ...horized service center USING YOUR CAMCORDER ABROAD Each country or region has its own electric and color systems Before using your camcorder abroad check the following items Power sources The power ad...

Страница 103: ...e of the lens to its focal point in millimeters Longer focal lengths result in narrower angles of view and the subject is magnified Shorter focal lengths result in wider angles of view F No F Number T...

Страница 104: ...s Composite video out 1 0V p_p 75 analog Audio output 7 5dBm 47K analog stereo USB output mini USB B type USB2 0 High Speed General Power source 5 0V Using the power adaptor 3 7V Using Lithium Ion bat...

Страница 105: ...be presented to the authorized service center EXCLUSIONS WHAT IS NOT COVERED This warranty does not cover damage due to accident fire flood and or other acts of God misuse incorrect line voltage impro...

Страница 106: ...vironmentally safe recycling Business users should contact their supplier and check the terms and conditions of the purchase contract This product and its electronic accessories should not be mixed wi...

Страница 107: ...he 6 hazardous materials Cadmium Cd Lead Pb Mercury Hg Hexavalent Chromium Cr 6 Poly Brominated Biphenyls PBBs Poly Brominated Diphenyl Ethers PBDEs in our products QUESTIONS OR COMMENTS COUNTRY CALL...

Отзывы: