background image

65

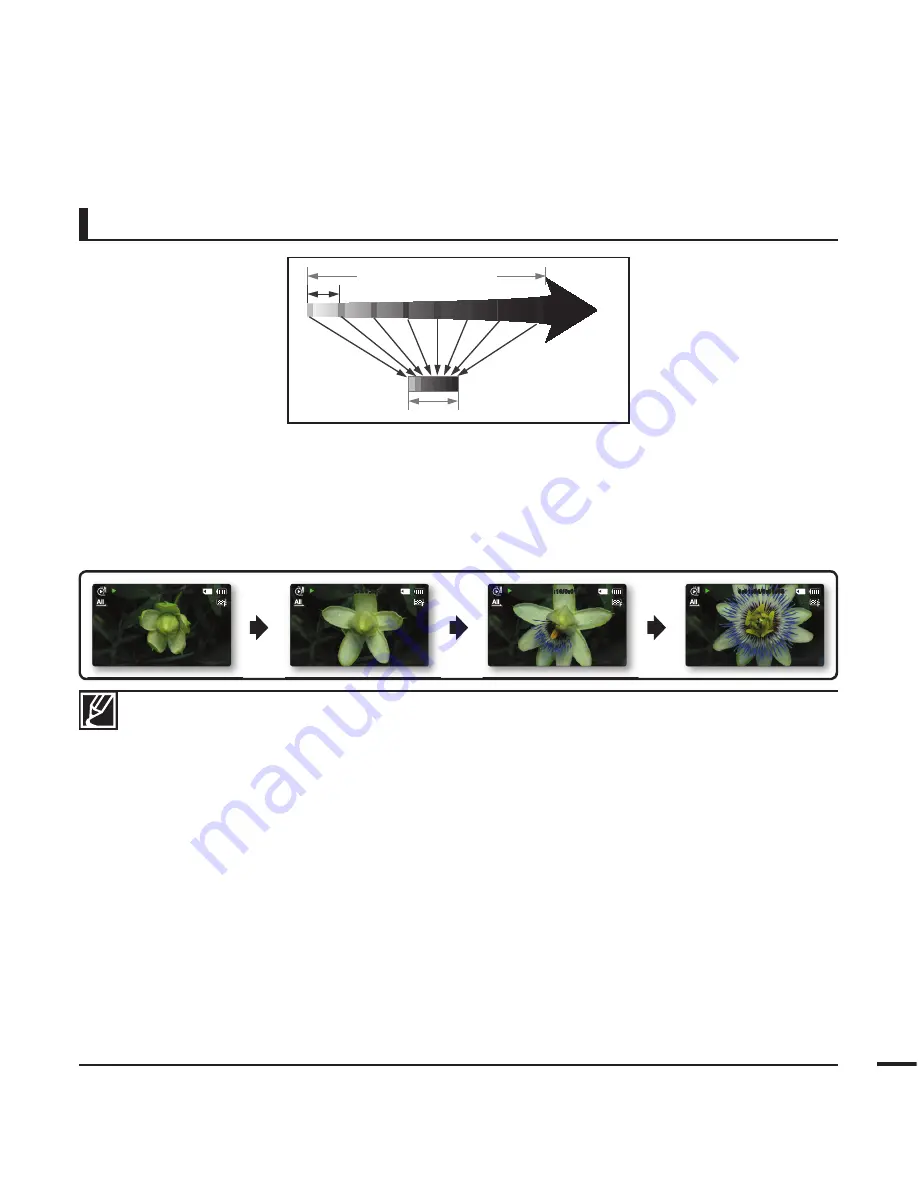
Example of Time Lapse Recording

The Time Lapse Recording function records image frames at the predefi ned interval over the 

total recording time to produce a time-lapse video. 

For example, the Time Lapse Recording is useful for fi lming in the following situations:

-  Blooming fl owers

-  A bird building a nest

-  Clouds rolling by in the sky

•  Time Lapse Recording mode is released once recording has been fi nished. To start another Time 

Lapse Recording, repeat steps 1-5.

•  30 captured images compose a video of 1 second length. Since the minimum length of a video 

to be saved by your camcorder is one second, the interval defi nes how long the Time Lapse 

Recording should be taken. For example, if you set the interval to “30 Sec,” Time Lapse Recording 

should be taken for at least 15 minutes to record a minimum video length of 1 second (30 images).

•  Once the Time Lapse Recording fi nishes recording for its total recording time, it switches to the 

standby mode.

•  Press the 

Recording start/stop

 button if you want to stop the Time Lapse Recording.

•  Audio is not recorded during Time Lapse Recording.

•  When a video recording fi lls up 1.8GB of storage memory, a new recording fi le is automatically 

started at that point.

•  When the battery charge was exhausted during the Time Lapse recording, it saves recording up to 

that point and switches to standby mode. After a while, it displays a warning message, then turns 

off automatically.

•  When the memory space of the storage media is insuffi cient during the Time Lapse Recording, it 

switches to the standby mode after saving the recording up to its maximum.

•  We recommend using the AC power adaptor for a Time Lapse Recording.

•  When a time lapse recording starts, a message of “Time Lapse Recording” blinks on the screen 

and it appeared to be as if the screen is stopped. This is a normal operation; do not remove the 

power source or memory card from the camcorder.

Total time of recording

Recording interval

Time for recording on the 
storage media (a video of the 
Time Lapse Recording.)

0:01:54/0:01:55

100-0001

0:01:16/0:01:55

100-0001

0:00:38/0:01:55

100-0001

0:00:00/0:01:55

100-0001

Содержание SMX-F40

Страница 1: ...ung com register SMX F40BN SMX F40SN SMX F40RN SMX F40LN SMX F43BN SMX F43SN SMX F43RN SMX F43LN SMX F44BN SMX F44SN SMX F44RN SMX F44LN SMX F400BN SMX F400SN SMX F400RN SMX F400LN User Manual Memory Camcorder ...

Страница 2: ...nimated preview in the video thumbnail mode When you highlight a thumbnail the selected thumbnail will show the video playback This animated thumbnail feature simplifies the way you search for a video clip Automatic scene detection User friendly SMART AUTO optimizes your memory camcorder to the recording conditions automatically providing beginners with the best performance Twice the memory option...

Страница 3: ...ct uploading of your contents to websites such as YouTube Flickr and Facebook Sharing the contents with your friends is simpler than ever before Make a digest of your video with Storyboard Printing This function captures 16 still images arbitrarily from the selected video and saves them into the storage media It presents a quick overview of your video helping you to understand the overall topic Va...

Страница 4: ...igns are here to prevent injury to you and others Please follow them explicitly After reading this section keep it in a safe place for future reference SAFETY WARNINGS before reading this user manual PRECAUTIONS Warning This camcorder should always be connected to an AC outlet with a protective grounding connection Batteries should not be exposed to excessive heat such as sunshine fire or similar C...

Страница 5: ...ng the files to a PC We also recommend you to copy it from your PC to other recording media for storage Refer to the software installation and USB connection guide Copyrights Please note that this camcorder is intended for individual use only Data recorded on the storage media in this camcorder using other digital analog media or devices is protected by the copyright act and cannot be used without...

Страница 6: ...nsource pdf in the provided CD ROM All the trade names and registered trademarks mentioned in this manual or other documentation provided with your Samsung product are trademarks or registered trademarks of their respective holders The SD logo is a trademark The SDHC logo is a trademark Microsoft Windows Windows Vista and DirectX are either registered trademarks or trademarks of the Microsoft Corp...

Страница 7: ...e blade or the third prong are provided for your safety If the provided plug does not fit into your outlet consult an electrician for replacement of the obsolete outlet 10 Protect the power cord from being walked on or pinched particularly at plugs convenience receptacles and the point where they exit from the apparatus 11 Only use attachment accessories specified by the manufacturer 12 Use only w...

Страница 8: ...her electric light or power circuits where it can fall into such power lines or circuits When installing an outside antenna system extreme care should be taken to keep from touching such power lines or circuits as contact with them might be fatal 23 OVERLOADING Do not overload wall outlets and extension cords as this can result in a risk of fire or electric shock 24 OBJECTS AND LIQUIDS Never push ...

Страница 9: ...e perchlorate NOTE This equipment has been tested and found to comply with the limits for a Class B digital device pursuant to part 15 of the FCC Rules These limits are designed to provide reasonable protection against harmful interference in a residential installation This equipment generates uses and can radiate radio frequency energy and if not installed and used in accordance with the instruct...

Страница 10: ...on cords as this may result in abnormal heat or fire Do not allow water or metal and inflammable matter to enter the camcorder or AC power adaptor Doing so may pose a fire hazard W 4 4 W No oil Oil entering the camcorder or AC power adaptor could cause electric shock malfunctions or defects L I O Do not disconnect the AC adaptor by pulling on its power cord as this could damage the power cord Do n...

Страница 11: ...a risk of fire or electric shock Do not plug or unplug the power cord with wet hands There is a risk of electric shock Keep the power cord unplugged when not in use or during lightning storms There is a risk of fire When cleaning the AC adaptor unplug the power cord There is a risk of malfunction or electric shock If the camcorder malfunctions immediately detach the AC adaptor or battery from the ...

Страница 12: ...ot expose the camcorder to insecticide Insecticide entering the camcorder could cause the product to fail to operate normally Turn the camcorder off and cover it with vinyl sheet etc before using insecticide E D I C I T C E S N I Do not use the camcorder near dense exhaust gas generated by gasoline or diesel engines or corrosive gas such as hydrogen sulphide Doing so may corrode the external or in...

Страница 13: ...oating could peel off or the case surface could deteriorate W 4 4 W Use the mains plug where it can be readily operable If any problem occurs with the product the mains plug must be removed to disconnect power completely Turning off the power button on the product does not completely disconnect the power w T T w Use Samsung approved accessories only Using products from other manufacturers may caus...

Страница 14: ...tching to the power saving mode 24 Setting the operation modes 24 Using the display touch button 25 Using the back light touch button 25 Using the LCD enhancer function 26 Shortcut menu OK guide 27 Shortcut function using the control joysticks 28 Setting the time zone and date time for the first time 29 Selecting the languages 30 Selecting the storage media SMX F43 F44 only 31 Inserting and removi...

Страница 15: ... 60 Digital Effect 61 Fader 62 Wind Cut 63 Zoom Type 64 Time Lapse REC 66 Guideline 67 Menu items 68 Multi View Option 69 Play Option 70 Delete 71 Protect 72 Story Board Print 73 Using VIEW 74 Copy SMX F43 F44 only 75 Edit Divide 76 Edit Combine 77 Slide Show 78 Slide Show Option 78 File Info 79 Menu items 80 Storage Type SMX F43 F44 only 80 Storage Info 81 Format 82 File No 82 Time Zone 84 Date T...

Страница 16: ...89 Auto Power Off 90 PC Software 90 TV Display 91 Default Set 91 Version 91 Language 92 Demo 93 Connecting to a normal standard definition TV 16 9 4 3 95 Dubbing to a VCR or DVD HDD recorder 96 Checking your computer type 97 What you can do with a Windows computer 98 Using the intelli studio program 102 Using as a removable storage device 104 Troubleshooting 114 Maintenance 115 Additional informat...

Страница 17: ...r This quick start guide introduces the basic operation and features of your camcorder See the reference pages for more information 5 1 Insert a memory card page 31 You can use commercially available SDHC SD High Capacity or SD memory cards with this camcorder Set the appropriate storage media page 30 SMX F43 F44 only 2 Insert the battery into the battery slot page 18 STEP1 Get ready VIEW W T CARD...

Страница 18: ...t the lens cover open close switch to open 2 Press the PHOTO button fully when you are ready Recording videos with H 264 format Taking photos Your camcorder is compatible with H 264 recording format which achieves efficient coding of high quality video with less capacity You can record videos in SD standard definition The default setting is TV Fine 720x480 60i page 47 You can not take photos while...

Страница 19: ...creen of your camcorder You can find your desired recordings quickly by using the thumbnail index view Viewing on a TV You can enjoy detailed brilliant quality videos on a connected TV pages 93 94 Simple and fun Enjoy the various features of Intelli studio on your Windows computer Using the Intelli studio program built in your camcorder you can import video photos onto your computer edit or share ...

Страница 20: ...to YouTube Flickr Facebook Share your contents with the world by uploading photos and videos directly to a web site with a single click Click on the Share Upload tab on the browser page 101 STEP5 Delete videos or photos If the storage media is full you cannot record new videos or photos Delete videos or photos data that have been saved on a computer from the storage media Then you can record new v...

Страница 21: ...corder includes a user manual CD and a quick start guide printed Optional accessories This is an optional accessory To buy one contact your nearest Samsung dealer WHAT S INCLUDED WITH YOUR CAMCORDER Your new camcorder comes with the following accessories If any of these items is missing from your box call Samsung s Customer Care Center Model name Color built in memory Memory card slot LCD screen L...

Страница 22: ...USB jack ⓑ Memory card slot ⓒ AV jack AV ⓓ CHG charging indicator ⓔ DC IN jack DC IN 7 Built in speaker 8 Display touch button 9 LCD Enhancer touch button 10 Back Light touch button 11 SMART AUTO touch button VIEW touch button 12 Power button 13 MODE button Front Left View LOCATION OF CONTROLS ⓑ VIEW W T VIEW W T CAR D 9 VARIOPLAN f 2 1 109 2mm F 1 8 ⓓ ⓒ ⓐ 13 ⓔ ⓑ ...

Страница 23: ... button 3 Battery pack slot 1 Zoom lever W T 2 PHOTO button 3 Grip belt 4 Grip belt hook 5 Lens cover open close switch 6 Internal microphone 7 Battery pack release switch BATT 8 Tripod receptacle Be careful not to cover the internal microphone and lens during recording Right Top Bottom View ...

Страница 24: ...Screen Display OSD is shown in Record mode only Press the MODE button to select the Record mode page 24 The above screen is an example for explanation It is different from the actual display The on screen indicators are based on an 16GB SDHC memory card capacity Functions marked with will not be kept when the camcorder is turned off and on again For enhanced performance the display indications and...

Страница 25: ...ontrol Bar Value 2 Menu name 3 Shortcut menu OK Guide Return 4 Value adjust down 5 Value adjust up The illustration above shows the EV Exposure Value screen Functions marked with will not be kept when the camcorder restarts The shortcut menu OK guide represents the most frequently accessed functions according to the selected mode Pressing the OK button will display a shortcut menu of frequently us...

Страница 26: ...hown in Video play mode only Press the MODE button to select the Play mode page 24 100 0006 Normal View 1 10 0 00 55 1 Move Play Photo 12 11 10 9 1 2 3 4 5 6 7 8 3 100 0001 JAN 01 2010 12 00 AM 0 00 00 0 00 55 1 2 3 4 5 6 7 8 9 4 11 10 Video Play mode Thumbnail View 1 Video Play mode 2 Copy Selected SMX F43 F44 only 3 Storage media Memory card or built in memory SMX F43 F44 only 4 Battery info Rem...

Страница 27: ...5 Multi View 1 2 3 4 5 Video Play mode Shortcut menu OK Guide 1 Forward playback search page 42 Skip Search Slow motion Frame by frame 2 Volume Down 3 Play Pause 4 Reverse playback search page 42 Skip Search Slow motion Frame by frame 5 Volume Up 0 00 00 0 00 55 100 0001 JAN 01 2010 12 00 AM 1 2 ...

Страница 28: ...Photo Play mode Thumbnail View 1 Photo Play mode 2 Protection 3 Storage media Memory card or built in memory SMX F43 F44 only 4 Battery info Remaining battery level 5 Now Total file number 6 Error File 7 Scroll bar 8 Delete Selected 9 Button Guide 10 Copy Selected SMX F43 F44 only 11 File name File number PRECHECK This On Screen Display OSD is shown in Photo Play mode only Press the MODE button to...

Страница 29: ...To view recordings more conveniently rotate the screen by 180 towards the lens then fold it back to the body Excessive rotation may damage the connective hinge between the screen and the camcorder When the LCD screen is rotated by 180 the left and right sides of the subject are shown in reverse which produces horizontally flipped image Remove fingerprints or dust on the screen with a soft cloth To...

Страница 30: ... pull out in the direction as shown in the diagram CONNECTING A POWER SOURCE Be sure to charge the battery pack before you start using your camcorder Use the IA BP210E battery pack only The battery pack may be charged a little at the time of purchase Use only Samsung approved battery packs Do not use batteries from other manufacturers Otherwise there is a danger of overheating fire or explosion Sa...

Страница 31: ... AC power adaptor will override the USB If the camcorder is turned on the battery will still charge but more charging time will be needed It is recommended you to keep the camcorder turned off while charging ġVIEW CARD ġVIEW W T CARD VIEW CARD ġVIEW CARD ġVIEW W CA RD CARD Charging the battery pack at low temperature may take longer or fail to fully charge green indicator will not turn on Please m...

Страница 32: ...tion Battery Level Indicator State Message Fully charged 100 75 75 50 50 25 25 5 less than 5 Exhausted flickers The device will soon turn off Change the battery pack as soon as possible flickers The device will be forced to turn off after 3 seconds Low battery The Battery Level Display shows the amount of battery power remaining in the battery pack Battery Level Display 0 00 00 475Min STBY 1 6M 99...

Страница 33: ...cuited It may cause leakage generate heat or cause fire Maintaining the battery pack The recording time is affected by temperature and environmental conditions We recommend only using the original battery pack that is available from your Samsung retailer When the battery reaches the end of its life please contact your local dealer The batteries have to be dealt with as chemical waste Make sure tha...

Страница 34: ...conditions The battery pack is not inserted correctly The battery pack is damaged The battery pack is worn out For the battery information only It is recommended that you use the AC power adaptor to power the camcorder from a household AC outlet when you perform settings on it play back or edit images or use it indoors Make the same connections as you do when charging the battery pack page 19 Usin...

Страница 35: ...e camcorder if there is no operation for 5 minutes To disable this option change the Auto Power Off setting to Off page 89 SWITCHING TO THE POWER SAVING MODE If you need to use camcorder for the extended time the following functions enable you to prevent unnecessary energy consumption The power saving mode does not work in the following situations When the camcorder has a cable connection USB or A...

Страница 36: ...Record mode Play mode Record mode Each time the operation mode changes the respective mode indicator lights on Mode Icon Functions Record mode To record videos or photos Play mode To play videos or photos or edit them SETTING THE OPERATION MODES Minimum display mode Switching the information display mode Full display mode basic operation of the camcorder This camcorder provides one record mode for...

Страница 37: ...d for a clear and bright image This effect is also implemented outdoors in bright daylight You can also adjust the screen brightness in two level increments which provides a brighter screen than using just one level increment for your recording 1 Touch the LCD Enhancer touch button LCD adjust indicator appears and the LCD brightens 2 You can switch the LCD Enhancer function in the following order ...

Страница 38: ...D screen 3 Press the OK button to confirm your selection Press the OK button to exit the shortcut menu Exposure value setting will be applied and indicator and setting value are displayed SHORTCUT MENU OK GUIDE The Shortcut menu OK guide cannot be used in the SMART AUTO mode The instruction above shows an example of setting EV mode in the Record mode The setting procedure could be different by men...

Страница 39: ...or up OK DOWN Focus Zoom tele Decreases the volume Decreases the volume during a slide show Moves the cursor down OK LEFT EV Search playback RPS Reverse Playback Search rate x2 x4 x8 x16 Previous Skip Playback Frame by frame playback Slow motion playback Reverse slow playback rate x1 2 x1 4 x1 8 x1 16 Previous image Moves to the previous menu OK RIGHT Quick View Search playback FPS Forward Playbac...

Страница 40: ...corder includes a built in rechargeable battery that retains the date and time settings even after the power is turned off Once the battery is depleted the previous date time values are all reset to defaults and you need to recharge the built in rechargeable battery The date time must be set again Charging the built in rechargeable battery The built in battery is always recharged while your camcor...

Страница 41: ...K button 4 Press the MENU button to exit the menu The OSD language is refreshed in the selected language Language options may be changed without prior notice Selected language is retained even without the battery pack or AC power adaptor The date and time format may change depending on the language you selected SELECTING THE LANGUAGES You can select the language that appears on the menu screen The...

Страница 42: ...ove Select Settings Format Storage Type Storage Info Int Memory Card STBY 0 00 00 475Min SCENE Using the built in memory SMX F43 F44 only This camcorder has an embedded 8GB SMX F43 only or 16GB SMX F44 only memory Using a memory card not supplied This camcorder has a card slot for access to SD and SDHC Secure Digital High Capacity You can use SD and SDHC cards on your camcorder Some cards are not ...

Страница 43: ... memory card inwards to pop it out 4 Pull the memory card out of the memory card slot and close the cover Your camcorder supports only SD Secure Digital and SDHC Secure Digital High Capacity cards Compatibility with this camcorder may vary depending on the card manufacturer and type To insert a memory card To eject a memory card VIEW W T CARD CAR D VIEW W T If a memory card is not inserted correct...

Страница 44: ...acity memory card An SDHC card is a higher version Ver 2 00 of SD card and supports capacity above 2GB Cannot be used with current SD enabled host devices Common cautions for memory cards Damaged data may not be recovered It is recommended you make a back up of important data separately on the hard disk of your PC Turning the power off or removing a memory card during an operation such as formatti...

Страница 45: ...atic electricity After a period of use the memory card may get warm This is normal and is not a malfunction The camcorder supports SD and SDHC memory cards for data storage preference The data storage speed may differ according to the manufacturer and production system SLC single level cell system faster write speed enabled MLC multi level cell system only lower write speed is supported For best r...

Страница 46: ...s For recording the 16 9 aspect ratio will use more memory than the 4 3 aspect ratio You can select the desired LCD display aspect ratio for recording or playback 16 9 Wide 4 3 aspect ratio page 49 Recordable time available for video Recordable number of photos Media Built in memory Memory Card Capacity 8GB 16GB 1GB 2GB 4GB 8GB 16GB 32GB TV Super Fine 720x480 60i 190min 380min 23min 47min 95min 19...

Страница 47: ...ecorded from the internal stereo microphone on the top front of the camcorder Take care that this microphone is not blocked Before recording an important video make sure to test the recording function to check if there is any problem with the audio and video recording Do not operate the Power button or remove a memory card while accessing the storage media Doing so may damage the storage media or ...

Страница 48: ...corder or remove the memory card when taking photos as it may damage the storage media or data For the on screen display information see pages 12 13 Adjust brightness and contrast of the LCD screen using menu items Doing so does not affect the recorded image page 86 Photo files conform to the DCF Design rule for Camera File system standard established by JEITA Japan Electronics and Information Tec...

Страница 49: ...file qUICK VIEW FUNCTION IN THE RECORD MODE OK Auto Exposure Auto Exposure Auto Exposure 1 6M 9999 0 00 00 475Min STBY SCENE Using the Quick View function you can view the most recently recorded video or photo image right after your recording The quick View function is not available in the following conditions The Quick View icon is dimmed in the Shortcut menu If the mode has been changed after th...

Страница 50: ...de by pressing the MODE button page 24 W T User friendly SMART AUTO optimises your camcorder to the recording conditions automatically providing beginners with the best performance Unavailable buttons during SMART AUTO operation MENU button OK button etc Most settings are automatically adjusted in SMART AUTO mode To set or adjust functions on your own release the SMART AUTO mode first SMART AUTO m...

Страница 51: ...age quality but during digital zoom the image quality may suffer Fast zooming or zooming in subject at a far distance may produce slow focusing If this occurs use Manual Focus page 58 It is recommended to use Anti Shake HDIS with handheld recording if the subject is zoomed in and enlarged Frequent use of the zoom function consumes more power Zooming during a recording may record operation sound of...

Страница 52: ...cordings will be stored in videos or photos thumbnail index view respectively When switching to Play mode after recording a video the video s thumbnail index view appears When switching to Play mode after recording a photo the photo s thumbnail index view appears How to change between video and photo thumbnail view You can simply switch between video and photo thumbnail view using the zoom lever N...

Страница 53: ...ove the zoom lever PLAYING BACK VIDEOS PRECHECK This function works only in Video Play mode You can find a desired video image quickly using the thumbnail index view 0 00 00 0 00 55 Multi View 100 0001 Normal View 1 10 0 00 55 Normal View Normal View 1 10 1 10 0 00 55 0 00 55 Photo Move Play Loading time of a video to be played back may become slow depending on the video resolution Video files may...

Страница 54: ...nt file to skip back to the previous file Frame by frame playback In pause mode use the Control joystick to play the video forward or backward one frame at a time To resume normal playback press the OK button Various playback operations basic playback 0 00 10 0 00 55 100 0001 0 00 00 0 00 55 Multi View 100 0001 Slow motion playback During pause holding the Control joystick reduces the playback spe...

Страница 55: ...n the LCD screen and press the Power button to turn on the camcorder page 23 Set the appropriate storage media SMX F43 F44 only page 30 If you want to playback images on a memory card insert a memory card 2 Press the MODE button to select the Play mode The thumbnail index view appears The thumbnail highlight is on the latest created or played file 3 Select the Photo thumbnail index view screen You...

Страница 56: ... selected some menu items may not be available to select and change Adjust the value of the selected menu item For example adjust the Aperture value by moving the Control joystick OK When you finish making settings press the MENU button to exit Using the MENU button Exit STBY 0 00 00 475Min Aperture Auto Manual Exit STBY 0 00 00 475Min Aperture Auto Manual While making the menu setting some menu i...

Страница 57: ...efault value Page iSCENE Auto 46 Video Resolution TV Fine 47 Photo Resolution 1696x960 16 9 48 16 9 Wide On 49 White Balance Auto 50 Aperture Auto 52 Shutter Speed Auto 53 EV 0 55 C Nite Off 56 Focus Auto 57 Anti Shake HDIS Off 59 Digital Effect Off 60 Fader Off 61 Wind Cut Off 62 Zoom Type Intelli Zoom 63 Time Lapse REC Off 64 Guideline Off 66 Settings 79 Possible ...

Страница 58: ...n screen display Auto Use this setting for the regular recording conditions The shutter speed and the aperture values are automatically adjusted for optimum recording Sports When recording rapidly moving subjects such as sports games Portrait When recording a portrait image use this setting to express the natural skin tone Spotlight When recording subjects under strong light For example stage spot...

Страница 59: ...ton Control joystick Video Resolution 2 Select the desired submenu item with the Control joystick and then press the OK button 3 Press the MENU button to exit the menu Submenu Items items contents on screen display TV Super Fine Videos recorded in 720x480 60i resolution at super fine image quality TV Fine Videos recorded in 720x480 60i resolution at fine image quality TV Normal Videos recorded in ...

Страница 60: ...ords in 1600x1200 resolution 800x600 4 3 Records in 800x600 resolution Photos recorded by your camcorder may not be displayed on another device if it does not support high resolution For photo development the higher the resolution the finer the image quality The number of recordable images varies depending on the recording environment page 34 High resolution images occupy more memory space than lo...

Страница 61: ...tick and then press the OK button 3 Press the MENU button to exit the menu 16 9 Wide You can select the desired LCD display aspect ratio for recording or playback 16 9 Wide 4 3 aspect ratio PRECHECK Select the Record mode by pressing the MODE button page 24 Please set the aspect ratio before recording The default setting is 16 9 Wide On Video resolution settings of Web Fine and Web Normal record m...

Страница 62: ...enu Submenu items items contents on screen display Auto Controls the white balance automatically depending on the recording conditions Daylight Controls the white balance according to the outdoor lighting Cloudy When recording in the shade or cloudy weather Fluorescent When recording under white fluorescent lights Tungsten When recording under halogen lamps and incandescent lights Custom WB You ca...

Страница 63: ...rce which refers to the relative warmth or coolness of white light A subject can be recorded under various types of lighting conditions indoors natural fluorescent candlelight etc Because the color temperature is different depending on the light source the subject tint will differ depending on the white balance settings Use this function for a more natural result When setting the white balance man...

Страница 64: ... or when skiing When the background is overly dark for example night scenery 1 Press the MENU button Control joystick Aperture 2 Select the desired submenu item with the Control joystick and then press the OK button 3 Press the MENU button to exit the menu Aperture The camcorder adjusts the aperture automatically depending on the subject and recording conditions You can also manually adjust the Ap...

Страница 65: ...and then press the OK button 3 Press the MENU button to exit the menu Shutter Speed The camcorder automatically sets the shutter speed depending on the scene s brightness You can also manually adjust the shutter speed according to the scene conditions PRECHECK Select the Record mode by pressing the MODE button page 24 0 00 00 475Min OK Adjust Exit STBY Manual Shutter 1 500 1 6M 9999 Submenu Items ...

Страница 66: ... 1 250 1 500 1 1000 Moving cars trains or other rapidly moving vehicles such as roller coasters 1 2000 1 4000 1 10000 Outdoor sports such as golf and tennis Do not aim at the sun Doing so might cause your camcorder to malfunction Take images of the sun only in low light conditions such as at dusk The image may not seem smooth when a high shutter speed is selected A higher shutter speed is recommen...

Страница 67: ... also manually adjust the exposure depending on the recording conditions PRECHECK Select the Record mode by pressing the MODE button page 24 Understanding EV Exposure Value Exposure value is the total amount of light allowed to fall on the photographic medium Image sensor during the process of taking photos or videos as well Manual exposure is recommended in situations When shooting using reverse ...

Страница 68: ...the MENU button to exit the menu Submenu Items items contents on screen display Off Disables the function Auto The memory camcorder automatically adjusts image brightness 1 30 Record a brighter image by extending the low shutter speed range to 1 30 1 15 Record a brighter image by fixing the shutter speed to 1 15 in a dark location When using C Nite the image takes on a slow motion like effect In a...

Страница 69: ... Detection is set will adjust focus and exposure to optimal values automatically The Face Detection may not operate depending on the recording conditions For example the Face Detection frame may appear when framing a face like shape even when the subject is not a person s face If this occurs turn off the Face Detection feature The Face Detection feature will not work when framing the side of a per...

Страница 70: ...e Control joystick to adjust the focus Manual focus is recommended in the following situations The subject is dark When the background is too bright Subject through a window that is stained or wet Subject with dense horizontal or sloping stripes Distant subject behind a nearby wire fence Walls atmosphere and other low contrast subject Emitting strong light or reflecting subject Focusing on a subje...

Страница 71: ...stable images caused by shaking movements when holding the camcorder PRECHECK Select the Record mode by pressing the MODE button page 24 Tip Use the Anti Shake function in the following cases Recording when using the zoom extensively Recording a close up picture of a small object Recording while walking or moving Recording through the window from inside a vehicle 1 Press the MENU button Control jo...

Страница 72: ...astel This mode applies a pale pastel drawing effect to an image Cosmetic This mode helps correct facial imperfections Step printing Technique of recording the image in segments Examples of 10 digital effect options Digital Effect Using the digital effect function gives your recording a creative look PRECHECK Select the Record mode by pressing the MODE button page 24 recording options 1 Press the ...

Страница 73: ...used one time 1 Press the MENU button Control joystick Fader 2 Select the desired submenu item with the Control joystick and then press the OK button 3 Press the MENU button to exit the menu Submenu Items items contents on screen display Off Disables the function In As soon as you start recording it will fade in Out When the recording is done it will fade out In Out When you start or stop recordin...

Страница 74: ...E button page 24 recording options 1 Press the MENU button Control joystick Wind Cut 2 Select the desired submenu item with the Control joystick and then press the OK button 3 Press the MENU button to exit the menu Submenu Items items contents on screen display Off Disables the function On Reduces wind noise when recording sound from the built in microphone Exit STBY 0 00 00 475Min SCENE Wind Cut ...

Страница 75: ...and then press the OK button 3 Press the MENU button to exit the menu Submenu Items items contents on screen display Optical Zoom Only optical zoom is available up to 52x Intelli Zoom The camcorder zooms the full width of the image sensor to obtain a larger zoom range without any deterioration in image quality Intelli zoom is available up to 65x Digital Zoom When this option is selected the camcor...

Страница 76: ...ith the Control joystick 4 Move to the next setting Hr by moving the Control joystick and set a desired total recording time in the same way 5 Press the OK button to finish the setting and press the MENU button to exit the menu 6 After setting the Time Lapse REC mode press the Recording start stop button The Time Lapse REC starts Depending on the selected total recording time and recording interva...

Страница 77: ...ess the Recording start stop button if you want to stop the Time Lapse Recording Audio is not recorded during Time Lapse Recording When a video recording fills up 1 8GB of storage memory a new recording file is automatically started at that point When the battery charge was exhausted during the Time Lapse recording it saves recording up to that point and switches to standby mode After a while it d...

Страница 78: ...k and then press the OK button 3 Press the MENU button to exit the menu Submenu Items items contents on screen display Off Cancels the guideline function Cross This is the basic guideline Use this when focusing a subject in the center Grid Use this when recording a subject in a horizontal or vertical composition or when shooting with the tele macro function Safety Zone Images beyond the left right...

Страница 79: ...Option Thumbnail index view only Normal View 68 Play Option Play All 69 Delete 70 Protect 71 Story Board Print 72 Copy 74 Edit Divide 75 Combine Thumbnail index view only 76 Slide Show 77 Slide Show Option 78 File Info 78 Settings 79 Possible Not possible Items marked with are available only with models SMX F43 F44 In general use of functions both in thumbnail display and full image display employ...

Страница 80: ... playback options This function is available only in the thumbnail index view screen 1 Press the MENU button Control joystick Multi View Option 2 Select the desired submenu item with the Control joystick and then press the OK button 3 You can use the Control joystick to select a sorted item Submenu Items items contents on screen display Normal View The thumbnails of video files are displayed seque...

Страница 81: ...em with the Control joystick and then press the OK button 3 Press the MENU button to exit the menu Submenu Items items contents on screen display Play All Plays back from the selected video to the last video Play One The selected video will be played Repeat All All videos will be played repeatedly A Repeat One The selected video will be played repeatedly Play Option Repeat All Play All Play One Ex...

Страница 82: ...t the desired videos or photos by pressing the OK button then press the MENU button to delete The indicator is displayed on the selected videos or photos Pressing the OK button toggles the selection and release All Files Deletes all videos or photos To protect important images from accidental deletion activate the image protection page 71 Protected images cannot be deleted To delete a protected im...

Страница 83: ...p selection menu will appear depending on the selected menu item In this case select the desired item with the Control joystick and the OK button Submenu Items items contents on screen display Select Files Protects selected videos or photos from deletion To protect individual videos or photos select the desired videos or photos by pressing the OK button then press the MENU button to confirm The in...

Страница 84: ...elect File 2 Use the Control joystick to select the desired videos and then press the OK button A message appears asking for your confirmation 3 Select Yes The printed storyboard image files appear on the LCD screen for about 3 seconds 16 pictures are randomly captured from the selected video and saved to the storage media Storyboard images are displayed in 4 3 aspect ratio Hence it may not displa...

Страница 85: ...tton 16 i Frame images appear on the LCD screen The 16 images from the selected video are selected arbitrarily If you want to save the storyboard image on the storage media press the PHOTO button Then you can find the saved storyboard image in the photo play mode page 43 If the recorded video is less than 8 seconds long all 16 i Frame thumbnails will not be extracted This function is available onl...

Страница 86: ... larger than the free space you will see an error message If a memory card is not inserted you cannot perform the Copy function Copied videos or photos have no protection even if the original is set to be protected Copying may take a while depending on the number of files and file size Copying may not operate if the battery charge is insufficient If available use the AC adaptor while copying to pr...

Страница 87: ...de the video first and then delete the image section you no longer need After dividing the video clip you can also combine other desired videos page 76 The second image of the divided image will be displayed at the end of the thumbnail index Example You can divide a video clip into two in order to delete a section you no longer need 1 Before dividing 2 Image is divided at 30 second point 3 After d...

Страница 88: ...ned video clip The combine function is not available in the following conditions Videos in different resolution formats TV Super Fine TV Fine TV Normal vs Web Fine Web Normal cannot be combined Videos in different aspect ratio cannot be combined 4 3 vs 16 9 wide The video file recorded in the Time Lapse REC mode and normal record file cannot be combined If the total size of the two files to be com...

Страница 89: ... 1 10 1 6M 100 0001 1 Press the MENU button Control joystick Slide Show Start 2 Press the OK button The indicator is displayed The Slide Show will start from the current image To end the slide show press the OK button again To return to the thumbnail view move the Zoom lever 4 background music files are stored in the camcorder by default When a slide show begins it plays background music in arbitr...

Страница 90: ...secutively Music If the Music is set to On the slideshow will play back with background music The background music is selected randomly from 4 sample music files stored File Info This camcorder shows you information on the recorded images PRECHECK Press the MODE button to select the Play mode page 24 1 Press the MENU button Control joystick OK File Info Select File The file information of the sele...

Страница 91: ... 85 LCD Brightness 0 86 LCD Color 0 86 Auto LCD Off On 87 Menu Design Misty White 87 Transparency 0 88 Beep Sound On 88 Shutter Sound On 89 Auto Power Off 5 Min 89 PC Software On 90 TV Display On 90 Default Set 91 Version 91 Language English 91 Demo On 92 Possible Not possible These menu items and default values may be changed without notice There are some functions you cannot activate simultaneou...

Страница 92: ...rol joystick OK Storage Info 2 Select the desired submenu item with the Control joystick and then press the OK button Move the Control joystick to select the desired storage type then press the OK button SMX F43 F44 only 3 Information on the selected storage type appears The screen displays the memory capacity of the selected storage and recordable time by video resolution Move the Control joystic...

Страница 93: ...ed recorded on other devices when this camcorder cannot read the memory card A memory card with the protection tab set to lock will not be formatted If there is no storage media inserted it can not be selected and will be dimmed in the menu You cannot format when the battery power is insufficient It is recommended to use the AC power adaptor to avoid power loss while formatting Do not remove the r...

Страница 94: ...s the MENU button to exit the menu Time Zone You can easily set the clock to the local time when using your camcorder while travelling Submenu Items items contents on screen display Home The clock will be used according to your setting on the Date Time Set menu Select it when using this camcorder for the first time or when returning the clock to your hometown date time setting Visit When you visit...

Страница 95: ...e Paris Berlin Stockholm Madrid Frankfurt 01 00 Guam Sydney Brisbane 10 00 Athens Helsinki Cairo Ankara 02 00 Solomon Islands 11 00 Moskva Riyadh 03 00 Wellington Fiji 12 00 Tehran 03 30 Samoa Midway 11 00 Abu Dhabi Muscat 04 00 Honolulu Hawaii Tahiti 10 00 Kabul 04 30 Alaska 09 00 Tashkent Karachi 05 00 LA San Francisco Vancouver Seattle 08 00 Calcutta New Delhi 05 30 Denver Phoenix Salt Lake Cit...

Страница 96: ...OK Date Type 2 Select the desired submenu item with the Control joystick and then press the OK button 3 Press the MENU button to exit the menu Submenu Items items contents on screen display 2010 01 01 The date is displayed in the year month two digit date 2010 01 01 JAN 01 2010 The date is displayed in the order of month date year JAN 01 2010 01 JAN 2010 The date is displayed in the order of date ...

Страница 97: ...the Control joystick and the OK button The date time is displayed on the LCD screen according to the selected option The date time will read JAN 01 2010 12 00 AM in the following cases When video or photo recording was made before setting the date time in the camcorder When the built in rechargeable battery is depleted Date Time Display You can set the date and time to be displayed on the LCD scre...

Страница 98: ...NU button Control joystick Settings Control joystick OK LCD Color 2 Move the Control joystick OK to adjust the LCD color red blue from 15 to 15 3 Press the MENU button to exit the menu When you set red and blue color range the higher the figures the brighter the LCD screen will be You can adjust the LCD color red blue from 15 to 15 using the Control joystick OK You can manipulate the color display...

Страница 99: ...eo the power saving mode starts by dimming the LCD screen When this Auto LCD Off function is enabled you can press any button on the camcorder to return LCD brightness to normal Auto LCD Off will be disabled in the following cases If the DC power cable AC power adaptor USB cable is connected 1 Press the MENU button Control joystick Settings Control joystick OK Menu Design 2 Select the desired subm...

Страница 100: ...Menu Design Exit Move Select STBY 0 00 00 475Min 40 SCENE 0 20 Beep Sound This setting allows operations such as touching tabs and buttons on the screen to be signaled by a beep 1 Press the MENU button Control joystick Settings Control joystick OK Beep Sound 2 Select the desired submenu item with the Control joystick and then press the OK button 3 Press the MENU button to exit the menu The Beep So...

Страница 101: ...bine Divide While in recording playing except pause Photo slide show To operate the camcorder again press the Power button Auto Power Off You can set your camcorder to automatically turn off if it is idle for 5 minutes without an operation This function will prevent unnecessary power consumption 1 Press the MENU button Control joystick Settings Control joystick OK Auto Power Off 2 Select the desir...

Страница 102: ...e camcorder is connected to the PC The PC Software is compatible with the Windows OS only TV Display You can enable or disable the On Screen Display OSD that appears on the TV screen when connecting your camcorder to a TV 1 Press the MENU button Control joystick Settings Control joystick OK TV Display 2 Select the desired submenu item with the Control joystick and then press the OK button 3 Press ...

Страница 103: ... After resetting the camcorder set Time Zone and Date Time Set page 28 Storage type is not restored after default setting SMX F43 F44 only page 80 Settings Default Set PC Software TV Display Exit STBY 0 00 00 475Min Select SCENE Version The version information may be changed without notice for improvement 1 Press the MENU button Control joystick Settings Control joystick OK Version 2 Press the MEN...

Страница 104: ...art set Demo to Off 1 Press the MENU button Control joystick Settings Control joystick OK Demo 2 Select the desired submenu item with the Control joystick and then press the OK button 3 To return to the normal screen press the MENU button Submenu Items items contents on screen display Off Disable the function On Enables the Demo function The Demo function does not operate in the following cases If...

Страница 105: ...he audio cable Do not use excessive force when connecting the cables It is recommended to use the AC power adaptor as the power source Before connecting make sure that the volume on the TV is turned down forgetting this may cause feedback from the TV speakers Carefully connect the input and output cables to the corresponding connections on the device the camcorder is being used with You can view t...

Страница 106: ...ed with TV in the video or photo record mode The audio output signal is supported as long as the camcorder is connected in the video playback mode This is not an error Image display depending on LCD and TV screen ratio Video Photo LCD TV 16 9 4 3 16 9 LCD 16 9 wide LCD 4 3 wide TV 16 9 wide TV 4 3 wide LCD 16 9 wide LCD 4 3 wide TV 16 9 wide TV 4 3 wide LCD 16 9 wide LCD 4 3 wide TV 16 9 wide TV 4...

Страница 107: ...ng device VCRs or DVD HDD recorders with the supplied composite AV cable 4 Start the playback on your camcorder and record it on the recording device Refer to the instruction manuals supplied with your recording device for details 5 When dubbing is finished stop the recording device and then your camcorder Yellow Yellow ġVIEW W T CAR D VIDEO AUDIO L R Camcorder VCRs or DVD HDD recorders Audio Vide...

Страница 108: ...e computer using the USB cable The built in editing software Intelli studio runs on the PC automatically once the camcorder is connected to a Windows computer When you specify PC Software On page 90 The built in software on your camcorder Intelli studio is not Macintosh compliant Play back or edit your recordings on the computer using the built in Intelli studio application page 100 You can also u...

Страница 109: ... Vista Windows 7 CPU Intel Pentium 4 3 0 GHz or higher AMD Athlon FX 2 2 GHz or higher Notebook Intel Core2 Duo 2 2GHz or AMD Athlon X2 Dual Core 2 6GHz above recommended RAM 1 GB and above recommended Video Card nVIDIA Geforce 7600GT or higher Ati X1600 series or higher Display 1024 x 768 16 bit color or higher 1280 x 1024 32 bit color recommended USB USB 2 0 Direct X DirectX 9 0c or higher Syste...

Страница 110: ...LI STUDIO PROGRAM Using the Intelli studio program built in your camcorder you can transfer video photo files onto your PC and edit them on your computer The Intelli studio offers the most convenient way for you to manage the video photo files by using the simple USB cable connection between the camcorder and your PC Step 1 Connecting the USB cable 1 Set the menu setting to PC Software On page 90 ...

Страница 111: ...iles only Displays photo files only Displays voice files only 7 Minimizes the Connected Device screen 8 Displays videos and photos in various ways Thumbnail Displays video and photo thumbnails Global Map Displays the location of shooting place with a map 9 Selects the Connected Device 10 Shows directories of My Folder and My Computer My Folder You can classify and manage videos and photos on your ...

Страница 112: ...o playback inside the thumbnail frame allowing you to search for a desired video with ease 4 Once you select the desired video or photo double click to play back Playback starts and playback controls appear With Intelli studio you can edit videos or photos in various ways Change Size Fine Tuning Image Effect Insert Frame etc To edit a file using the Intelli studio ensure to use a copy of the desir...

Страница 113: ...t For more information about Intelli Studio see the Help Guide by clicking the menu item Help Help Step 5 Sharing the video photos online Installing Intelli studio application on the Windows computer When the Intelli studio application is installed on a Windows computer it will run faster after connecting the camcorder to your computer Moreover the application can be updated automatically and run ...

Страница 114: ...est version 1 Check the PC Software Off setting page 90 2 Check the storage media If you have video or photos recorded on a memory card insert a memory card SMX F43 F44 only 3 Connect the camcorder to the PC with the USB cable page 96 The Removable Disk or Samsung window appears on the PC s screen after a moment The removable disk appears when connecting a USB Select Open folders to view files usi...

Страница 115: ... the file number automatically increases when a new image file is created The maximum file number allowed is the same as in video clip files A new folder stores files starting with SAM_0001 JPG The folder name increases in the order of 100PHOTO 101PHOTO etc Up to 9 999 files can be created in one folder A new folder is created when more than 9 999 files are created SDV_0001 MP4 DCIM VIDEO 100PHOTO...

Страница 116: ...ary files on the built in memory Use a memory card Back up files to your PC or another storage media and delete files Insert Card There is no memory card inserted in the card slot Insert a memory card Card Full There is not enough space to record on a memory card Delete unnecessary files on a memory card Use the built in memory SMX F43 F44 only Back up files to your PC or another storage media and...

Страница 117: ... SMART AUTO is activated Release SMART AUTO function Recovering Data The file was not created normally Wait until data recovery is finished Never turn off the power and eject memory card during recording Playback Message Icon Informs that Action Read Error Some problems occurred when reading data from storage media Format storage media using menus after backing up important files to PC or another ...

Страница 118: ... in hot weather after being indoors or inside a car where the air conditioner was running Note before sending your camcorder for repair If these instructions do not solve your problem contact your nearest Samsung authorized service center Depending on the problem the camcorder s built in memory SMX F43 F44 only may need to be initialised or replaced and the data will be deleted Be sure to back up ...

Страница 119: ...d the end of its lifespan and cannot be recharged Use another battery pack Displays Symptom Explanation Solution The TV screen or LCD display has distorted images or has stripes at the top bottom or on the left right It can occur when recording or viewing a 16 9 ratio image on a 4 3 ratio TV or vice versa For more details see the display specification Unknown image appears on the LCD screen The ca...

Страница 120: ...ase the lock on the write protect tab of the memory card SDHC memory card etc if any page 32 Copy all important recorded files to your PC before formatting Samsung shall not be responsible for any loss of data It is recommended that you copy the data to your PC or other storage media The data file name is not indicated correctly The file may be corrupted The file format is not supported by your ca...

Страница 121: ... features used Recording a fast moving subject increases the bit rate and consequently the amount of storage space required for the recording which can lead to a shorter available recording time The recording stops automatically There is no more free space for recording on the storage media Back up important files on your PC and format the storage media or delete the unnecessary files If you frequ...

Страница 122: ...ton and the point where the recorded video starts stops On your camcorder there may be a slight time delay between the point when you press Recording start stop button and the actual point where the recorded video starts stops This is not an error The recording stops The internal temperature of your camcorder is unusually high Turn off your camcorder and leave it for a while in a cool place Your c...

Страница 123: ...lor right White color left The Audio Video cable jack is not connected properly Make sure that the Audio Video cable jack is connected to the proper jack page 93 Playback on your camcorder Symptom Explanation Solution Pressing the playback Play Pause button did not start playing Press the MODE button to set Video Play mode Image files recorded on another camcorder may not play on your camcorder Ch...

Страница 124: ...n this case open the desired CD ROM drive that has the Intelli studio program in My Computer and run iStudio exe The image or sound on your camcorder is not played on your computer properly Video playback or sound may stop temporarily depending on your computer The video or sound copied to your computer is not affected If your camcorder is connected to a computer that does not support Hi speed USB...

Страница 125: ...te simultaneously The following list shows examples of unworkable combinations of functions and menu items If you want to set the desired functions do not set the following items first Menu Cannot Use Because of the following setting Anti Shake HDIS Video Resolution Web Fine Web Normal Back Light C Nite C Nite iSCENE Focus Face Detection C Nite iSCENE Aperture Manual Shutter Speed Manual Digital E...

Страница 126: ...mended that you put the camcorder in a box together with a small silica bag when storing it in a closet etc Do not store the camcorder in a place subject to strong magnetism or intense vibration This could cause malfunctions Detach the battery pack from the camcorder and store it in a cool place Leaving the battery pack attached or storing it at a high temperature could shorten its life Cleaning t...

Страница 127: ...e metal parts Copy the recorded files to your PC Samsung shall not be responsible for any lost data It is recommended that you copy the data from your PC to other media for storage Recorded contents may be lost due to a mistake when handling this camcorder or memory card etc Samsung shall not be responsible for compensation for damages due to the loss of recorded contents Refer to pages 32 33 for ...

Страница 128: ...ernal device it must be an NTSC system based TV or an external device and have the appropriate Audio Video jacks Otherwise you may need to use a separate video format transcoder NTSC PAL format converter NTSC compatible countries regions Bahamas Canada Central America Japan Korea Mexico Philippines Taiwan United States of America etc PAL compatible countries regions Australia Austria Belgium Bulga...

Страница 129: ...t 1 0V p_p 75Ω analog 7 5dBm 47KΩ analog stereo mini USB B type USB2 0 High Speed General Power source Power source type Power consumption Operating temperature Operating humidity Storage temperature Dimensions W x H x D Weight Internal MIC 5 0V Using AC adaptor 3 7V Using Lithium Ion battery pack Power supply 100V 240V 50 60Hz Lithium Ion battery pack 1 7W 1 9W LCD on 32 F 104 F 0 40 C 10 80 4 F ...

Страница 130: ...nted to the authorized service center EXCLUSIONS WHAT IS NOT COVERED This warranty does not cover damage due to accident fire flood and or other acts of God misuse incorrect line voltage improper installation improper or unauthorized repairs commercial use or damage that occurs in shipping Exterior and interior finish lamps and glass are not covered under this warranty Customer adjustments which a...

Страница 131: ...e the 6 hazardous materials Cadmium Cd Lead Pb Mercury Hg Hexavalent Chromium Cr 6 Poly Brominated Biphenyls PBBs Poly Brominated Diphenyl Ethers PBDEs in our products If you have any questions or comments relating to Samsung products please contact the SAMSUNG customer care center Samsung Electronics America inc 1 800 SAMSUNG 726 7864 www samsung com us ...

Отзывы: