background image

S

AVE

 T

HESE

 I

NSTRUCTIONS

Safety

P

RECAUTIONS TO

 A

VOID


P

OSSIBLE

 E

XPOSURE TO


E

XCESSIVE

 M

ICROWAVE


E

NERGY

:

(a) Do not attempt to operate this oven with the door open 

since open-door operation can result in harmful exposure to 
microwave energy. It is important not to defeat or tamper 
with the safety interlocks.

(b) Do not place any object between the front face of the oven 

and the door or allow soil or cleaner residue to accumulate 
on sealing surfaces.

(c) Do not operate the oven if it is damaged. It is particularly 

important that the oven door close properly and that there is 
no damage to the 
1) Door (bent or dented), 
2) Hinges and latches (broken or loosened), 
3) Door seals and sealing surfaces.

(d) The oven should not be adjusted or repaired by anyone 

except properly qualified service personnel.

WARNING

Always observe Safety Precautions when using your 
oven. Never try to repair the oven on your own – there is 
dangerous voltage inside. If the oven needs to be 
repaired, call 

1-800-361-3400 CANADA for the name of 

an authorized service center near you.

I

MPORTANT


S

AFETY

 I

NSTRUCTIONS

When using any electrical appliance, basic safety precautions 
should be followed, including the following:

WARNING

To reduce risk of burns, electric shock, fire, personal 
injury or exposure to excessive microwave energy:

• Read all safety instructions before using the appliance.
• Read and follow the specific “

Precautions to Avoid Exposure to 

Excessive Microwave Energy

” on this page.

• This appliance must be grounded. Connect only to properly grounded 

outlets. See “

Important Grounding Instructions

” on page 5 of this 

manual. 

• Install or place this appliance only in accordance with the installation 

instructions provided.

• Some items, like whole eggs and food in sealed containers, may 

explode if heated in this oven.

• Use this appliance only for its intended use as described in the 

manual. Do not use corrosive chemicals or vapors in this appliance. 
This type of oven is specifically designed to heat, cook, or dry food. It 
is not designed for industrial or laboratory use.

• As with any appliance, close supervision is necessary when used by 

children.

• Do not operate this appliance if it has a damaged cord or plug, if it is 

not working properly, or if it has been damaged.

• This appliance should be serviced only by qualified service 

personnel. Contact the nearest authorized service facility for 
examination, repair, or adjustment.

• Do not cover or block any of the openings on this appliance.

SMV7165STD_INSTRUCTION_GB.fm  Page 2  Wednesday, March 2, 2005  7:42 PM

Содержание SMV7165

Страница 1: ...Code No DE68 02701B Microwave Oven Owner s Manual SMV7165 SMV7165STD_INSTRUCTION_GB fm Page 1 Wednesday March 2 2005 7 42 PM ...

Страница 2: ...d including the following WARNING To reduce risk of burns electric shock fire personal injury or exposure to excessive microwave energy Read all safety instructions before using the appliance Read and follow the specific Precautions to Avoid Exposure to Excessive Microwave Energy on this page This appliance must be grounded Connect only to properly grounded outlets See Important Grounding Instruct...

Страница 3: ...st frozen beverages in narrow necked bottles The containers can break Dishes and containers can become hot Handle with care Carefully remove container coverings directing steam away from hands and face Remove lids from baby food before heating After heating baby food stir well and test temperature by tasting before serving Do not operate any other heating or cooking appliance beneath this applianc...

Страница 4: ...ot use paper products when appliance is operated in the Brown Combi Cook Book Menu Auto Cook Menu Speed Cook Menu mode Do not cover racks or any other part of the oven with metal foil unless special instruction in the cookbook or this manual This will cause overheating of the oven Use caution when heater features are in use Heater functions are Convection Brown Combi Preheat Warm Auto Cook Menu Co...

Страница 5: ...not cut or remove the third ground prong from the power cord under any circumstances Note Connect the oven only to a 20A greateror over dedicated circuit THE VENT FAN The fan will operate automatically under certain conditions see page 19 Take care to prevent the starting and spreading of accidental cooking fires while the vent fan is in use In the event of a grease fire on the surface units below...

Страница 6: ...uto Defrosting Button 13 Using the Handy Helper Button 14 Handy Helper Chart 14 Using the Kids Meals Button 14 Using the Snack Bar Button 15 Auto Defrosting Guide 15 Using the microwave setting cooking times Power levels 16 Multi stage Cooking Maximum of 3 stages 16 Using the More Less Buttons 16 Warming 17 Preheating the oven 17 Convection Cooking 17 Combination cooking COMBI Lo Bake 18 Combinati...

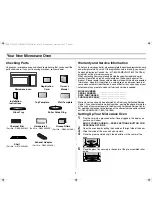
Страница 7: ...________________ PURCHASED FROM _______________________ Warranty service can only be performed by a Samsung Authorized Service Center If you should require warranty service provide the above information with a copy of your sales receipt to the Samsung Authorized Service Center For service assistance and the location of the nearest service center please call 1 800 SAMSUNG 1 800 726 7864 Setting Up ...

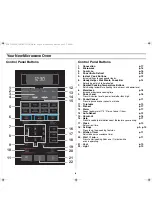
Страница 8: ... set a power level other than high 10 Pause Cancel p 11 Press to pause oven or correct a mistake 11 Turntable p 19 12 Preheat p 17 13 Warm p 17 Keeps food warm at 175 F for up to one 1 hour 14 Auto Reheat p 13 15 Combi Hi p 18 16 Help p 11 Press to see help information about the feature you are using 17 Clock p 10 Sets current time 18 Settings p 9 p 10 Press to set non cooking features 19 Kitchen ...

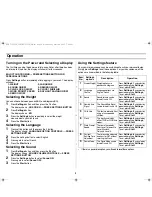
Страница 9: ...ess Settings to set these options For your convenience all the options are summarized in the following table If there is a power interruption you will need to reset these options Item No Settings options Description Operation 1 Display Weight Weight options are pounds and kilograms Press Settings 1 and select by repeatedly pressing Settings To set press Start 2 Language Choice Language options are...

Страница 10: ...t the clock You can check the current time while cooking is in progress by pressing the Clock button Setting the Word Speed 1 Press the Settings button and then press the 7 button The display shows WORD PROMPT SPEED PRESS SETTINGS BUTTON 2 Press the Settings button The display shows SLOWEST 3 Press Settings button repeatedly to select the Word Speed you wish to use SLOWEST SLOW NORMAL FAST FASTEST...

Страница 11: ...s Pause Cancel button twice To clear instructions you have just entered press Pause Cancel button once then re enter the instructions To cancel a timer setting press Pause Cancel button once Using the Help Button Your Microwave offers helpful instructions for many procedures When you need feature information and helpful hints press the Help button and then press the button that you want to get inf...

Страница 12: ...age from outer wrapping and follow package instructions for covering and standing After cooking let stand 1 3 min Pizza Reheat 1 Slice 2 Slices 3 Slices 4 Slices Put the pizza on a microwave safe plate with wide end of slice towards the outside edge of the plate Do not let slices overlap Do not cover Before serving let stand 1 2 min Frozen Dinner 8 10 oz 10 12 oz 12 14 oz Remove package from outer...

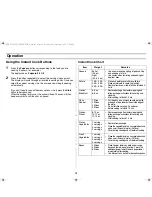
Страница 13: ...set the defrosting time power level and standing time Please note that defrosting foods which weigh more than 1 0 lbs will take several minutes longer than foods which weigh less 1 Press the Power Auto Defrost button The display shows SELECT ITEM WITH THIS BUTTON 2 Press the Power Defrost button 1 to 4 times and the items below will appear in sequence on the display Press once MEAT Press twice POU...

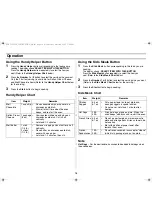
Страница 14: ...gs For the best texture buns should be added to hot dogs when the oven beeps Item Weight Remarks Melt Chocolate 1 cup chip Place chocolate chips or square in a microwave safe dish Stir well at half time when the oven beeps and re start the oven Soften Cream Cheese 1 package 8 oz Unwrap cream cheese and place on microwave safe dish Cut in half vertically Let stand 1 2 minutes Melt Butter 1 stick 1 ...

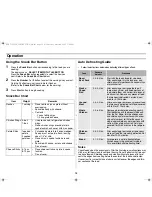
Страница 15: ...into 4 even wedges Scoop or cut out potato flesh leaving about 1 4 of skin Place skins in spoke fashion around plate Sprinkle with bacon onions and cheese Do not cover Cheese Sticks 5 7 pcs 8 10 pcs Place cheese sticks on plate in spoke fashion Do not cover Food Standard Amount Procedure Roast Beef Pork 2 5 6 0 lbs Start with the food placed fat side down After each stage turn the food over and sh...

Страница 16: ...s You can set multiple stages of cooking with your microwave Multi stage Cooking Maximum of 3 stages 1 Follow steps 1 and 2 in the One Stage Cooking section on the previous page The display shows THE FIRST STAGE COMPLETED PRESS START OR SET THE NEXT STAGE OF MICROWAVE CONVECTION BROWN OR COMBI When entering more than one cooking stage the Power Level button must be pressed before the second cookin...

Страница 17: ... shows PREHEAT DONE PLACE FOOD IN OVEN SET COOKING TIME OR PRESS START When the oven beeps place the food inside and follow the directions for convection baking Do not put any food in the oven during preheating During preheat you may hear noise from inside the oven This is simply the relay control sounding and is part of normal operation In Convection Preheat and Warm modes Convection Cooking The ...

Страница 18: ...seconds 25 minutes 30 seconds Not recommended cakes cookies breads for best result Combination cooking COMBI Hi Roast Microwave and Convection The combination cooking feature allows you to cycle automatically between Microwave and Convection cooking 1 Press the Combi Hi Roast button The display shows SET COOKING TIME WITH NUMERIC BUTTON 2 Use the number buttons to set a cooking time max time is 60...

Страница 19: ...ing and after cooking Turning the Light On Night Off Press to turn the Light On Night Off button on or off Press Light On Night Off once for on light twice for the night light and three times to turn the light off Turning the Vent Fan Hi Low Off The vent fan removes steam and other vapors from surface cooking Press Vent Fan Hi Low Off button once for high fan speed twice for low fan speed and thre...

Страница 20: ...e Testing Utensils If you are not sure whether a dish is microwave safe or not you can perform this test 1 Fill 1 cup of glass measuring cup with water and put it inside your oven next to the dish you want to test 2 Press the One Minute button once to heat them for one minute at High power The water should be warm and the dish you are testing should be cool If the dish is warm then it is absorbing...

Страница 21: ...t overcooking Foods with a non porous skin such as potatoes or hot dogs should be pierced to prevent bursting Frying with heating oil or fat is not recommended Fat and oil can suddenly boil over and cause severe burns Some ingredients heat faster than others For example a jelly doughnut will be hotter than the dough Keep this in mind to avoid burns Home canning in the microwave oven is not recomme...

Страница 22: ...the turntable roller ring and oven floor Make sure the turntable and roller ring are positioned correctly Using your microwave causes TV or radio interference This is similar to the interference caused by other small appliances such as hair dryers Move your microwave further away from other appliances like your TV or radio Care and Cleaning Follow these instructions to clean and care for your oven...

Страница 23: ...ht Replace the burned out bulb with a halogen lamp 120V 20W 1 To replace the bulb s first disconnect the power at the main fuse or circuit breaker panel or pull the plug 2 Remove the screw at the front of the light cover and lower the cover 3 Be sure the bulb s to be replaced are cool before removing After breaking the adhesive seal remove the bulb by gently turning Put in new bulb 4 Replace the l...

Страница 24: ...t brushing can be used to remove embedded dirt Rinse shake and let them dry before replacing To replace slide the filters in the frame slot on the left of the opening Pull up and to the right to lock into place Charcoal Filter The charcoal filter cannot be cleaned It must be replaced If the oven is installed on the wall or cabinet and not vented to the outside the air will be recirculated through ...

Страница 25: ...solve please call our service line 1 800 361 3400 Specifications Model Number SMV7165 Oven Cavity 1 6cuft Controls 10 power levels including defrost Timer 99 minutes 99 seconds Power Source 120 VAC 60 Hz Power Consumption 1500 Watts Power Output 950 Watts IEC 705 TEST Heater 1350 Watts Oven Cavity Dimensions 207 8 W X 109 32 H X 145 32 D Outside Dimensions 297 8 W X 1515 16 H X 1511 32 D Shipping ...

Страница 26: ...ipment systems utilities services parts supplies accessories applications installations repairs external wiring or connectors not supplied or authorized by SAMSUNG which damage this product or result in service problems incorrect electrical line voltage fluctuations and surges customer adjustments and failure to follow operating instructions cleaning maintenance and environmental instructions that...

Страница 27: ...27 Note SMV7165STD_INSTRUCTION_GB fm Page 27 Wednesday March 2 2005 7 42 PM ...

Страница 28: ...food by pressing POWER AUTO DEFROST button repeatedly or using the number buttons 3 Press START 4 When the oven beeps turn food over Press START to resume defrosting cycle Set Cooking Time and Power Levels 1 Use function buttons to set cooking time 2 To set higher power level press POWER LEVEL and use the number buttons to enter the power level 3 Press START to begin cooking EXCLUSIVE CANADIAN DIS...

Отзывы: