background image

using your microwave oven  

_13

USING Y

OUR MICROW

A

VE O

VEN

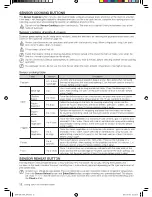
Sensor reheating table

Follow the instructions below when reheating different types of food.

Food

Amount

Procedure

Dinner plate 1 serving

(1 plate)

Use only precooked, refrigerated foods.

Cover the plate with vented plastic wrap or waxed paper tucked under the plate. If the 

food is not as hot as you would like after using the Sensor Reheat function, continue 

heating using additional time and power. 

Contents:

3-4 oz. meat, poultry or fish (up to 6 oz. with bone)

½ cup starch (potatoes, pasta, rice, etc.)

½ cup vegetables (about 3 - 4 oz.)

Casserole

1 to 4 

servings

Cover the plate with a lid or vented plastic wrap. If the food is not as hot as you would 

like after using the “

Sensor Reheat

” function, continue heating using additional time and 

power. Stir the food once before serving.

Contents:

Casserole, refrigerated foods.

Pasta: canned spaghetti and ravioli

Pasta

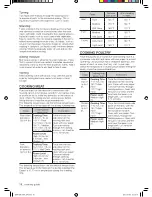
AUTO DEFROST BUTTON

To thaw frozen foods, enter the weight of the food, and the microwave automatically sets the defrosting time, power 

level and standing time. Press 

Enter/Start

 button to start defrosting. 

1. 

Press the

 Auto Defrost

 button. The display shows: 

ENTER WEIGHT.

2. 

Press the number buttons to directly enter the weight of the food.

3. 

Press 

Enter/Start

 button.

4. 

The oven will beep and the display will read 

TURN THE FOOD OVER

 twice during the defrosting process. Open 

the oven door, and turn the food over.

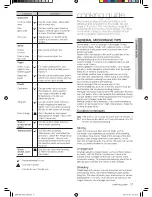
Auto defrosting table

Follow the instructions below when defrosting different types of food.

Food

Amount

Procedure

Roast Beef, 

Pork

2.5-6.0 lbs.

Start with the food placed fat side down. After each stage, turn the food over and shield 

any warm portions with narrow strips of aluminum foil. Let stand, covered for 10-20 

minutes.

Steaks, 

Chops, 

Fish

0.5-3.0 lbs.

After each stage, rearrange the food. If there are any warm or thawed portions of food, 

shield them with narrow, flat pieces of aluminum foil. Remove any pieces of food that are 

nearly defrosted. Let stand, covered for 5-10 minutes.

Ground 

Meat

0.5-3.0 lbs.

After each stage, remove any pieces of food that are nearly defrosted. Let stand, covered 

with foil for 5-10 minutes.

Whole 

Chicken 

2.5-6.0 lbs.

Remove giblets before freezing poultry. Start defrosting with the breast side down. After 

the first stage, turn the chicken over and shield any warm portions with narrow strips of 

aluminum foil. After the second stage, again shield any warm portions with narrow strips 

of aluminum foil. Let stand, covered for 30-60 minutes in the refrigerator.

Chicken 

Pieces

0.5-3.0 lbs.

After each stage, rearrange or remove any pieces of food that are nearly defrosted. Let 

stand for 10-20 minutes.

Check the food when you hear the oven signal. After the final stage, small sections may still be icy; let them stand 

to continue the thawing process. The food is not defrosted until all ice crystals have thawed. Shielding roasts and 

pieces of steak using small pieces of foil prevents the edges from being cooked before the center of the food has 

defrosted. Use narrow, flat, smooth strips of aluminum foil to cover edges and thinner sections of the food.

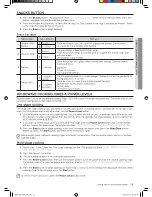
1 POUND DEFROST BUTTON

To thaw frozen 1.0 lbs foods, press this button, and the microwave automatically sets the defrosting time, power level 

and standing time. For defrosting ground meat, place the meat directly on top of the turntable tray using a piece of wax 

paper between the meat and microwave tray.

Do not use an extra plate, dish, or tray. Defrost and then let stand covered with foil for 5 to 10 minutes.

1. 

Press the

 1 Pound Defrost

 button. The display shows: 

1.0 LB.

2. 

Press the 

Enter/Start

 button to start defrosting.

3. 

The oven will beep and the display will read 

TURN THE FOOD OVER

 twice during the defrosting process. Open 

the oven door, and turn the food over.

4. 

If you do not turn the food over when 

TURN THE FOOD OVER

 is displayed, the oven will pause until you press the 

Enter/Start

 button.

SMH1926_XAA_EN.indd   13

2012-10-09   �� 3:33:17

Содержание SMH1926B/XAA

Страница 1: ...purchasing this Samsung product Please register your product at www samsung com register 1 800 SAMSUNG 726 7864 Microwave Oven user manual SMH1926 ENGLISH This manual is made with 100 recycled paper S...

Страница 2: ...d this manual to take full advantage of your microwave oven s many benefits and features WHAT YOU NEED TO KNOW ABOUT SAFETY INSTRUCTIONS Warnings and Important Safety Instructions in this manual do no...

Страница 3: ...away from heated surfaces including the back of the oven 15 Do not let the cord hang over edge of table or counter 16 When cleaning surfaces of the door and oven that come together when the door close...

Страница 4: ...ches cracks in the door or a door that is not lined up correctly If there is any damage do not operate the oven and notify your dealer immediately Make sure to install your oven in a location with ade...

Страница 5: ...Never try to repair the oven on your own there is dangerous voltage inside If the oven needs to be repaired contact an authorized service center near you Do not attempt to repair disassemble or modif...

Страница 6: ...ng This may result in damage to the appliance The steam or water spray may result in burns or injury Do not try to preheat the oven or operate it while empty Do not cook without the glass tray in plac...

Страница 7: ...button 13 1 Pound Defrost button 14 Soften Melt button 14 Kids Meals button 15 Snacks button 15 Microwave Cooking Times Power Levels 16 Custom Cook button 16 Warm Hold COOKWARE GUIDE 16 16 Microwave...

Страница 8: ...g com register When contacting Samsung please provide the specific model and serial number information which is usually located on the back or bottom of the product Please record these numbers in the...

Страница 9: ...UP YOUR MICROWAVE OVEN CHECKING THE CONTROL PANEL Display See page 12 See page 14 See page 13 See page 15 See page 10 11 See page 10 See page 10 See page 16 See page 10 See page 16 See page 14 See pag...

Страница 10: ...2 Sound ON Sound OFF 3 Clock display control 1 2 12HR 24HR 4 Display 1 2 3 Slow speed Normal speed Fast speed 5 Remind end signal 1 2 ON OFF 6 Demo mode 1 2 ON OFF 7 Daylight Saving time 1 2 ON OFF us...

Страница 11: ...o touch Use pot holders to touch the turntable during and after cooking METAL SHELF Use the metal shelf to cook more than one item at the same time CAUTION Do not use a microwave browning dish on the...

Страница 12: ...oz Follow the package instructions for covering and letting stand Use this button for frozen sandwiches breakfast entrees pancakes waffles etc Let the oven cool for at least 5 minutes before using it...

Страница 13: ...ith narrow flat pieces of aluminum foil Remove any pieces of food that are nearly defrosted Let stand covered for 5 10 minutes Ground Meat 0 5 3 0 lbs After each stage remove any pieces of food that a...

Страница 14: ...4 Refer to the Kids meals table Press the button repeatedly to cycle through the available items 2 Press the number 1 or 2 buttons to select the amount Refer to the Kids meals table for the serving s...

Страница 15: ...One stage cooking For simple one stage cooking you only need to set the cooking time The power level is automatically set to High If you want to set the power level to any other level use the Power Le...

Страница 16: ...ounts of food we recommend you apply the Warm and Hold function to by Food Type Food type Recommended Quantity Liquid 1 2 cups Dry 5 10 oz cookware guide For food to cook in the microwave oven the mic...

Страница 17: ...ng tough Foods with a non porous skin such as potatoes or hot dogs should be pierced to prevent bursting Putting heating oil or fat in the microwave is not recommended Fat and oil can suddenly boil ov...

Страница 18: ...is time to complete cooking in the center without overcooking the outer areas All liquids such as soup or hot chocolate should be shaken or stirred when cooking is complete Let liquids stand a moment...

Страница 19: ...towards the edge of the dish and the tips toward the center When cooking cut vegetables always cover the dish with a lid or vented microwavable plastic wrap Whole unpeeled vegetables such as potatoes...

Страница 20: ...to clean spills on the outside of your microwave oven as they occur Use a soft cloth and warm soapy water Rinse and dry CAUTION Do not get water into the vents Never use abrasive products or chemical...

Страница 21: ...URNTABLE AND ROLLER RINGS Clean the roller rings periodically and wash the turntable as required You can wash the turntable safely in your dishwasher STORING AND REPAIRING YOUR MICROWAVE OVEN If you n...

Страница 22: ...fuses Plug a different appliance into the outlet If the other appliance doesn t work call a qualified electrician to repair the wall outlet Plug the oven into a different outlet The display is workin...

Страница 23: ...r replacing the charcoal filter in the user s manual Turntable rotates improperly Make sure you have not put too much food on the turntable If the food is too large or too heavy the turntable may oper...

Страница 24: ...ing including but not limited to damage which occurs in shipment delivery and installation applications and uses for which this product was not intended altered product or serial numbers cosmetic dama...

Страница 25: ...note note SMH1926_XAA_EN indd 25 2012 10 09 3 33 50...

Страница 26: ...note note SMH1926_XAA_EN indd 26 2012 10 09 3 33 50...

Страница 27: ...note note SMH1926_XAA_EN indd 27 2012 10 09 3 33 50...

Страница 28: ...Electronics www samsung com ca English www samsung com ca_fr French www samsung com Please be advised that the Samsung warranty does NOT cover service calls to explain product operation correct improp...

Отзывы: