background image

Installation Instructions

13

B. 

RECIRCULATING 

(NON-VENTED DUCTLESS)

B1.

ADAPTING MICROWAVE 
BLOWER FOR RECIRCULATION

NOTE:

 The exhaust adaptor with damper is not 

needed for recirculating models. You may want to 
save them for possible future use.

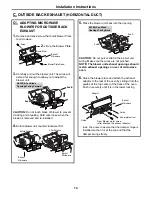
3.

Remove screw holds blower mortor and


carefully 

pull out the blower unit. The wires will extend far 
enough to allow you to adjust the blower unit.

CAUTION:

 Do not touch blade of blower for 

preventing crack and break. Hold outer case when 
the blower pull out or back into.

4.

Roll the blower unit 90° so that fan blade 
openings are facing toward the front of the 
microwave.

5.

Place the blower unit back into the opening.

CAUTION:

 Do not pull or stretch the blower unit 

wiring. Make sure the wires are not pinched.

6.

Secure blower unit to microwave with the screw.

B2.

INSTALLING THE CHARCOAL 
FILTER

1.

Remove screws on top of grille using a #1 
Phillips screwdriver.

2.

Open the door.

3.

Remove the grille.

After push left, Pull the grille straight off.

4.

Install the charcoal filter. When properly installed, 
the wire mesh of the filter should be visible from 
the front.

5.

Reinstall the grille and the screws.

6.

Close the door.

1.

Remove and save screw 
that holds blower plate to 
microwave.

2.

Lift up the 
blower plate.

Back of 
Microwave

 blower mortor screw

Before Roll

Back of 
Microwave

Back of 
Microwave

After Roll

Charcoal 
Filter

Insert mesh-side up

Содержание SMH1711S

Страница 1: ...s and ordinances Note to Installer Be sure to leave these instructions with the Consumer Note to Consumer Keep these instructions for future reference Skill level Installation of this appliance requir...

Страница 2: ...n Types 11 14 A Outside Top Exhaust 12 Installation Procedure For Exhaust Adaptor and Proper Damper Operation Check 12 Adjust Exhaust Adaptor 12 B Recirculating 13 Adapting Microwave Blower for Recirc...

Страница 3: ...EVERE OR FATAL SHOCK The power cord of this appliance is equipped with a three prong grounding plug which mates with a standard three prong grounding wall receptacle to minimize the possibility of ele...

Страница 4: ...lar to Round Transition Adaptor 5 Ft x 1 5 Ft Equivalent lengths of duct pieces are based on actual tests and reflect requirements for good venting performance with any vent hood Total Length 41 Ft OU...

Страница 5: ...s transitions wall and roof caps etc present additional resistance to airflow and are equivalent to a section of straight duct which is longer than their actual physical size When calculating the tota...

Страница 6: ...t between customer and installer PARTS INCLUDED HARDWARE PACKET You will find the installation hardware contained in a packet with the unit Check to make sure you have all these parts NOTE Some extra...

Страница 7: ...The space between the cabinets must be 30 wide and free of obstructions This microwave oven is for installation over ranges up to 36 wide If you are going to vent your microwave oven to the outside s...

Страница 8: ...template and for mounting NOTE You will have to reuse two screws in original loction of outcase after removing mounting plate B FINDING THE WALL STUDS 1 Find the studs using one of the following meth...

Страница 9: ...ottom as the inside depth of the front overhang 3 For this type of installation with front overhang only align the mounting tabs with this horizontal line not touching the cabinet bottom as described...

Страница 10: ...on of stud NOTE DO NOT MOUNT THE PLATE AT THIS TIME NOTE Holes A B and C are inside area E If none of A B and C is in a stud find a stud somewhere in area E and draw a forth circle to line up with the...

Страница 11: ...for Outside Top Exhaust except for non vented models And exhaust adaptor is shipped assembled to the filler upper Select the type of ventilation required for your installation and proceed to that sec...

Страница 12: ...ou will need to make adjustments to assure proper alignment with your house exhaust duct after the microwave is installed A2 ADJUST THE EXHAUST ADAPTOR Open the top cabinet and adjust the exhaust adap...

Страница 13: ...e front of the microwave 5 Place the blower unit back into the opening CAUTION Do not pull or stretch the blower unit wiring Make sure the wires are not pinched 6 Secure blower unit to microwave with...

Страница 14: ...pinched NOTE The blower unit exhaust openings should match exhaust openings on rear of microwave oven 6 Close the blower plate and attach the exhaust adaptor to the rear of the oven by sliding it int...

Страница 15: ...ical duct and non vented ductless B ATTACH THE MOUNTING PLATE TO THE WALL Attach the plate to the wall using toggle bolts At least one wood screw must be used to attach the plate to a wall stud 1 Remo...

Страница 16: ...D PERSONAL SAFETY WE RECOMMEND THAT TWO PEOPLE INSTALL THIS MICROWAVE OVEN IMPORTANT Do not grip or use handle during installation NOTE If your cabinet is metal use the nylon grommet around the power...

Страница 17: ...e exhaust adaptor 2 Seal exhaust duct joints using duct tape Cabinet Front Self Aligning Screw Equivalent to Depth of Cabinet Recess Microwave Oven Top Filler Block Cabinet Bottom Shelf 5 Insert the 2...

Страница 18: ...ions 2 Remove all packing material from the microwave oven 3 Install turntable and ring in cavity 4 Replace house fuse or turn breaker back on 5 Plug power cord into a dedicated 15 amp electrical outl...

Страница 19: ...Installation Instructions 19 NOTE...

Страница 20: ...Code No DE68 03587A 03...

Отзывы: