background image

35

Chapter 3. Server power, controls, and options

This chapter describes the controls and indicators, and provides the information 
needed to turn on and turn off the server.

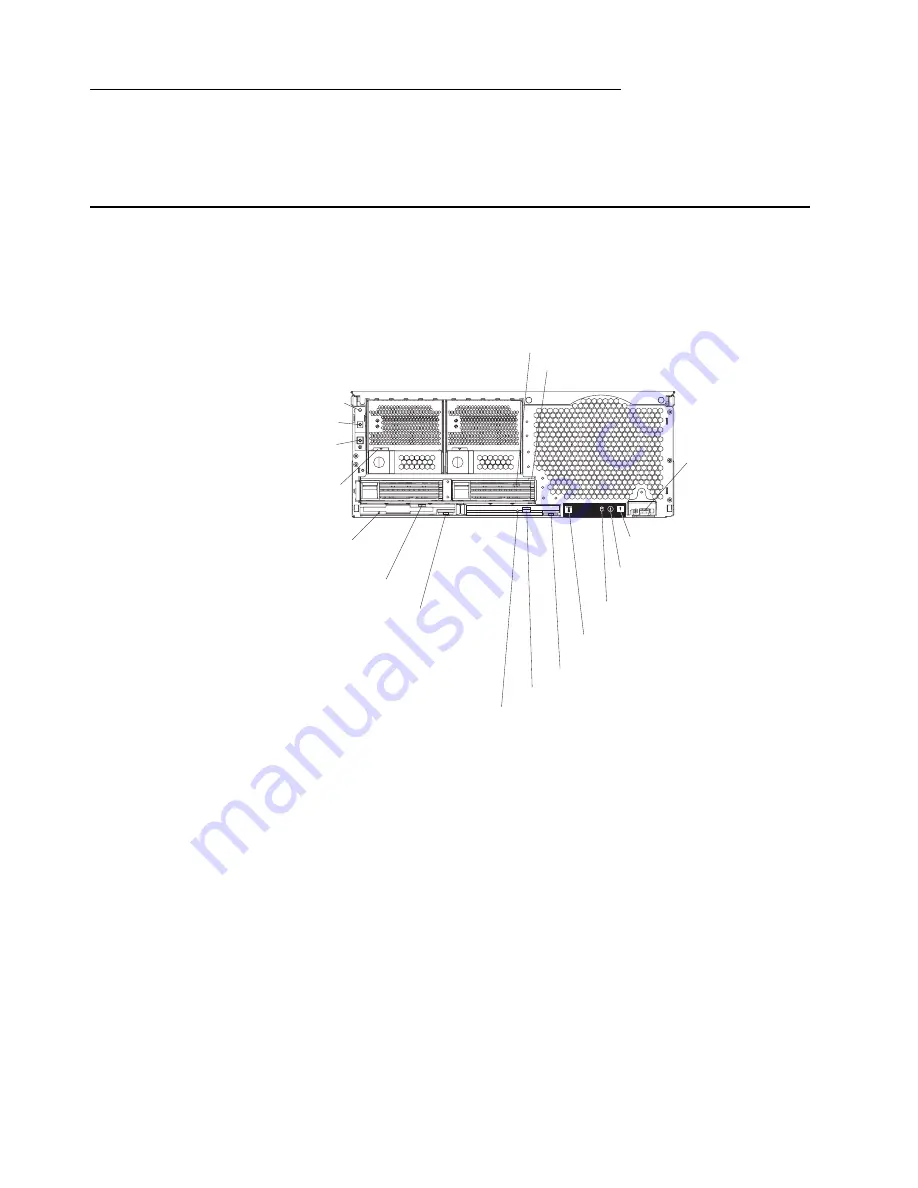
Server controls and indicators

The following section identifies the controls and indicators on the front and rear of your 
server.

Front view

Power-on light:  This green light turns on and stays on when you turn on your server, 
and it blinks when the server is in Standby mode.

Hard disk drive activity light:  When this green light is on, it indicates that the hard 
disk drive is in use.

Hard disk drive error light:  When this amber light is on, it indicates that there is a 
problem with the hard disk drive.

USB port: This is an automatically configured port that you can use to connect one or 
more USB devices to the front of the server, using Plug and Play technology.

System-error light:  When this amber light is on, it indicates a system error has 
occurred.

Information light: When this amber light is on, it indicates information about a system 
error has been placed in the System Error log.

SCSI activity light: When this green light is on, it indicates that there is activity on the 
SCSI bus.

Power button

Reset button

Power-on light

Hard disk drive activity light (green)

Hard disk drive error light (amber)

USB port

System-error light
(amber)

Information light
(amber)

SCSI activity light
(green)

Locator light
(blue)

CD-ROM drive eject button

CD eject button

CD-ROM drive activity light

Power supply
latch

Diskette drive
activity light

Diskette eject
button

Diskette drive
eject button

Содержание SmartServer 3840

Страница 1: ...Installation Guide ...

Страница 2: ... Copyright SAMSUNG Electronics co LTD All rights reserved ...

Страница 3: ...ompleting the installation 29 Working with cables 30 SMP expansion cabling 31 Power cabling 31 RXE expansion cabling 31 SCSI cabling 32 USB cabling 32 Video cabling 32 Auxiliary pointing device cabling 32 Keyboard cabling 32 Gigabit Ethernet cabling 32 RXE Management cabling 32 Remote Supervisor Adapter cabling 33 Chapter 3 Server power controls and options 35 Server controls and indicators 35 Fro...

Страница 4: ...stallation Guide ServerGuide startup problems 48 Troubleshooting charts 49 Light Path Diagnostics feature overview 52 Identifying problems using the Light Path Diagnostics 54 Light Path Diagnostics table 55 ...

Страница 5: ...ämän tuotteen lue turvaohjeet kohdasta Safety Information Avant d installer ce produit lisez les consignes de sécurité Vor der Installation dieses Produkts die Sicherheitshinweise lesen Prima di installare questo prodotto leggere le Informazioni sulla Sicurezza Les sikkerhetsinformasjonen Safety Information før du installerer dette produktet Antes de instalar este produto leia as Informações sobre...

Страница 6: ...onnect or disconnect any cables or perform installation maintenance or reconfiguration of this product during an electrical storm Connect all power cords to a properly wired and grounded electrical outlet Connect to properly wired outlets any equipment that will be attached to this product When possible use one hand only to connect or disconnect signal cables Never turn on any equipment when there...

Страница 7: ... or regulations Statement 3 CAUTION When laser products such as CD ROMs DVD drives fiber optic devices or transmitters are installed note the following Do not remove the covers Removing the covers of the laser product could result in exposure to hazardous laser radiation There are no serviceable parts inside the device Use of controls or adjustments or performance of procedures other than those sp...

Страница 8: ...e device and the power switch on the power sup ply do not turn off the electrical current supplied to the device The device also might have more than one power cord To remove all electrical current from the device ensure that all power cords are disconnected from the power source 18 kg 39 7 lb 32 kg 70 5 lb 55 kg 121 2 lb 1 2 ...

Страница 9: ...rt that has the following label attached Hazardous voltage current and energy levels are present inside any compo nent that has this label attached There are no serviceable parts inside these components If you suspect a problem with one of these parts contact a ser vice technician ...

Страница 10: ...x Installation Guide ...

Страница 11: ...label located on the left side of the bezel just above the hard disk drives Record your product information in this table Product name _________________________________________________ Type _________________________________________________ Model number _________________________________________________ Serial number _________________________________________________ N O T E F O R P R O P E R A IR F ...

Страница 12: ...DRAM video memory at 125 MHz Size 4U Height 17 8 cm 7 inches 4U Depth 69 85 cm 27 5 inches Width 48 3 cm 19 inches Maximum weight 50 kg 110 lb depending on your configuration Integrated functions Broadcom 5700 10 100 1000 Ethernet controller Light Path Diagnostics Adaptec 7899W Dual Ultra160 SCSI controller Remote Supervisor Adapter service processor ASM interconnect peer to peer port Ethernet por...

Страница 13: ...ntially hazardous procedure step or situation Danger These statements indicate situations that can be potentially lethal or extremely hazardous to you A danger statement is placed just before the description of a potentially lethal or extremely hazardous procedure step or situation Before you begin Before you begin to install options in your server read the following information Become familiar wi...

Страница 14: ...m To avoid damage keep static sensitive devices in their static protective package until you are ready to install them To reduce the possibility of electrostatic discharge observe the following precautions Limit your movement Movement can cause static electricity to build up around you Handle the device carefully holding it by its edges or its frame Do not touch solder joints pins or exposed print...

Страница 15: ... E R A IR F LO W R E P LA C E FA N W IT H IN 2 M IN U T E S F R O N T O F B O X N O T E F O R P R O P E R A IR F LO W R E P LA C E FA N W IT H IN 2 M IN U T E S F R O N T O F B O X EMC Shield For single SMP Module SMP baffle Retention bracket SMP Expansion Module DIMM Heat sink Microprocessor Fan 4 Hard disk drive CD ROM drive VRM Cover Thumbscrews DIMM access doors Fan 3 Fan 1 Fan 2 Hot swap powe...

Страница 16: ...6 Installation Guide ...

Страница 17: ...ew the information in Before you begin on page 3 Working inside a server with power on on page 4 and Handling static sensitive devices on page 4 2 Press the release latch on the left half of the top cover to the left 3 Using the finger hole in the release latch open the left half of the cover then open the right half of the cover Attention For proper cooling and airflow close the cover before turn...

Страница 18: ... adapter fol low the instructions that come with the adapter Video adapters are not supported Some long adapters have extension handles or brackets installed Before install ing the adapter you must remove the extension handle or bracket You can install both PCI and PCI X adapters in the same bus However if you install a PCI adapter and a PCI X adapter in the same bus the PCI X features of the PCI ...

Страница 19: ...tem attempts to start the first device found The search order is CD ROM disk drives inte grated SCSI devices PCI X slots 1 2 6 5 3 4 and the integrated Ethernet controller Note You can use the Configuration Setup Utility program to change the boot precedence for your server Select Start Options from the Configura tion Setup Utility program main menu Installing adapters The Active PCI X slots in yo...

Страница 20: ... sure the adapter is correctly seated in the connector Improperly seated adapters might cause damage to the I O board or to the adapter d Push down on the blue adapter guide to keep the adapter steady e Close the tab then push down on the blue adapter retention latch until it clicks into place securing the adapter 6 Connect the internal cables to the adapter 7 If you have other options to install ...

Страница 21: ...is cable to the adapter and to the SCSI backplane The following procedure describes the internal cabling needed to install a ServeRAID adapter Complete the following steps to cable the ServeRAID adapter 1 Review the information in Safety on page v Before you begin on page 3 and Handling static sensitive devices on page 4 2 Turn off the server and disconnect all power cords and external cables then...

Страница 22: ...e opposite end of the SCSI cable and connect it to the SCSI backplane connector 8 Reinstall fans 3 and 4 9 If you have other options to install or remove do so now 10 Go to Completing the installation on page 29 SCSI backplane connector Front of server ...

Страница 23: ...ansion Module installed in the server an SMP baffle must be installed in place of the upper SMP module to ensure proper cooling of the server When the minimum number of microprocessors are present in the SMP Expansion Module a microprocessor baffle must be installed in microprocessor socket 4 to ensure proper cooling within the server Before removing or installing SMP Expansion Modules you must re...

Страница 24: ...les and power cords 3 Remove the retention bracket or brackets from the server a Remove the shipping thumbscrews from the right side of the server b Open the cover c Grasp the retention bracket by the right edge and lift it up and out of the server Store the retention bracket or brackets in a safe place for use later Note If there is one SMP Module installed you will need to remove the SMP baffle ...

Страница 25: ...e server 5 Grasp each of the locking levers on the top of the SMP modules and lift them up slightly 6 Working from the right side of the server rotate the two locking levers toward you until they are fully extended as shown For use with one SMP Module For use with two SMP Modules EMC shields Thumbscrews N O T E F O R P R O P E R A IR F L O W R E P L A C E F A N W IT H IN 2 M IN U T E S F R O N T O...

Страница 26: ...on Module on a flat level surface b Rotate the two locking levers until they are fully extended beyond the edge of the SMP Expansion Module cover Do not force the locking levers past the position shown in the illustration N O T E F O R P R O P E R A IR F L O W R E P L A C E F A N W IT H IN 2 M IN U T E S F R O N T O F B O X N O T E F O R P R O P E R A IR F L O W R E P L A C E F A N W IT H IN 2 M I...

Страница 27: ...Chapter 2 Installing options 17 c Using the locking levers lift the front edge of the cover off the SMP Module d Lift the cover off the SMP Expansion Module ...

Страница 28: ...mage and ensure proper server operation after you install a replacement or an additional microprocessor use a microprocessor that has the same cache size and type clock speed and internal and external clock frequencies as the microprocessors already installed in the individual SMP Expansion Module For a list of microprocessors supported by your server see the ServerProven list at http www sec co k...

Страница 29: ...er on page 7 for details 3 Remove the SMP Expansion Module in which you plan to install the microproces sor then remove the module cover and determine the socket where the micropro cessor is to be installed For details see Removing an SMP Expansion Module and cover on page 14 Important Before continuing you should determine which type of microproces sors are installed in your server The easiest wa...

Страница 30: ...oprocessor easily loosen one heat sink cap tive mounting screw first This allows one corner of the heat sink to be lifted off of the microprocessor then you can loosen the other captive mounting screw and remove the heat sink b Using a screwdriver loosen the two captive mounting screws on the heat sink alternating between screws until they release from the SMP board then remove the heat sink c Lif...

Страница 31: ...d then 4 a Ensure that the microprocessor locking lever is in the open position to permit plugging in the microprocessor b Remove the protective tape from the microprocessor socket c Align the triangle icon on the microprocessor with the triangle icon on the socket and press the microprocessor gently into the socket Attention Make sure that the microprocessor is aligned correctly before you procee...

Страница 32: ...l or remove do so now 12 Close the cover on the server then reinstall the server in the rack cabinet and connect all external cables For details see Completing the installation on page 29 13 Turn on the server Important If your server will not start after replacing or installing a microproces sor you might have installed a microprocessor of a different type or the VRM is not installed properly Ver...

Страница 33: ...e the most current levels of system software installed Your server comes with a minimum of four 512 MB DIMMs installed in slots 1 3 5 and 7 in the SMP Expansion Module When installing additional DIMM modules you must install four DIMMS at a time and in the order described in this section using the instructions in the Installing DIMMS procedure on page 24 to maintain performance Contact your resale...

Страница 34: ...s on handling these devices see Handling static sensitive devices on page 4 1 Review the information in Safety on page v Before you begin on page 3 and Handling static sensitive devices on page 4 2 Turn off the server and peripheral devices and disconnect all external cables and power cords Then open the server cover see Opening the cover on page 7 for details 3 If necessary remove the top SMP Exp...

Страница 35: ... is firmly seated in the connector c If a gap exists between the DIMM and the retaining clips the DIMM has not been properly installed In this case open the retaining clips and remove the DIMM then reinsert the DIMM 7 Close the DIMM access door or reinstall the SMP Expansion Module cover see Reinstalling an SMP Expansion Module and cover on page 26 8 If you have other options to install or remove ...

Страница 36: ...l the SMP Expansion Module cover 1 Install the cover on the SMP Expansion Module a Set the cover on top of the expansion module b Extend the locking levers as shown in the illustration then let the cam on the front of the cover fall into the cam opening on the SMP Expansion Module circuit board c Release the locking levers and align the rear of the cover with the rear edge of the circuit board d P...

Страница 37: ...elief to hold the SMP module steady b Being careful not to damage the components on the center plane place the SMP Expansion Module into the server c Release the handle and slide the SMP Expansion Module toward the center plane until it stops Locking levers Handle Locking levers Handle N O T E F O R P R O P E R A IR F L O W R E P L A C E F A N W IT H IN 2 M IN U T E S F R O N T O F B O X N O T E F...

Страница 38: ...lowing illustra tion e Install the retention bracket Note If there are two SMP Expansion Modules installed in your server you must install the retention bracket for each of the SMP Expansion Modules Be sure to install the bottom retention bracket first then repeat steps 2a through 2e for the top SMP Expansion Module Locking levers Cover Handle Center plane ...

Страница 39: ...efer to the Rack Installation Instructions that came with your server for detailed information on how to install the server in a rack cabinet 3 Connect the external cables and power cords then turn on the peripheral devices and the server N O T E F O R P R O P E R A IR F L O W R E P L A C E F A N W IT H IN 2 M IN U T E S F R O N T O F B O X N O T E F O R P R O P E R A IR F L O W R E P L A C E F A ...

Страница 40: ...ables together 2 Use hook and loop fasteners to secure the cable bundles to the vertical rails of the rack cabinet 3 When possible separate data and power cables 4 Do not secure cables too tightly Overtightening can cause internal damage to the cables Connecting cables This section describes how to connect cables to the SMP Expansion Port system power connectors RXE Expansion Port SCSI port USB po...

Страница 41: ...p and operate with one cable attached between the two SMP Expansion Modules Power cabling Your server uses two power cords that can be connected to a primary power unit inside the rack cabinet such as a properly grounded power distribution unit or uninterruptible power supply UPS or to an external source such as a properly grounded electrical outlet Attach the power supply power cords as follows 1...

Страница 42: ... option and how to connect it to your server refer to the documentation that comes with the option Keyboard cabling Your server has one keyboard port located on the back of the server Use this port to connect the server to a keyboard or optional console switch You can also connect a USB keyboard to the server using one of the USB ports After installing a USB keyboard you might need to use the Conf...

Страница 43: ...Chapter 2 Installing options 33 Remote Supervisor Adapter cabling Your server comes with a Remote Supervisor Adapter ...

Страница 44: ...34 Installation Guide ...

Страница 45: ...e USB port This is an automatically configured port that you can use to connect one or more USB devices to the front of the server using Plug and Play technology System error light When this amber light is on it indicates a system error has occurred Information light When this amber light is on it indicates information about a system error has been placed in the System Error log SCSI activity ligh...

Страница 46: ...drive eject button Push this button to release a diskette drive from the server Diskette eject button Push this button to release a diskette from the drive Diskette drive activity light When this light is on it indicates that the diskette drive is in use Power supply latch This latch is used to secure the power supply in place Reset button Press this button to reset the server and run the power on...

Страница 47: ... group of ports and indicators located on the back of the server are used for system management information and control External power connector This connector is not supported on this server Error LED This amber light goes on when a system management error has occurred System power connector 1 System power connector 2 RXE Expansion Port B Keyboard port Auxiliary pointing device connector Remote S...

Страница 48: ...n when there is an active link connection on the Gigabit Ethernet controller for Ethernet port 1 Gigabit Ethernet port Gigabit Ethernet Signal cables are connected to the Gigabit Ethernet port This port supports 10 100 1000 speed connections RXE Expansion Port A Use this port to connect the server to a remote I O enclosure when only one SMP Expansion Module is installed Video port The signal cable...

Страница 49: ...r control button does not respond If the server is turned on and a power failure occurs the server will restart auto matically when power is restored If ac power is present and the server is in Standby mode the server can be turned on from the Remote Supervisor Adapter user interface When you plug in your server for the first time Wake on LAN can turn on the server If your server was previously tu...

Страница 50: ...move all electrical current from the device ensure that all power cords are disconnected from the power source 3 Press the power control button on the front of the server This will put the server in Standby mode Note You might need to press and hold the power control button for more than 4 seconds to cause an immediate shutdown of the server and to force it into Standby mode You can use this featu...

Страница 51: ... shut down of the operating system if this feature is supported by your operating sys tem The server can be placed in Standby mode from the Remote Supervisor Adapter user interface Complete the following steps to put the server into Standby mode 1 See the operating system documentation for the proper procedure to shut down the operating system Note Each operating system is different Read all the d...

Страница 52: ...42 Installation Guide ...

Страница 53: ...s program comes with the optional ServeRAID adapters and with server mod els that have a ServeRAID adapter preinstalled If the server has a ServeRAID adapter installed you must use the ServeRAID configuration program to define and configure the disk array subsystem before you install the operating system If your server model came with an operating system installed your disk array sub system is alr...

Страница 54: ...he default SCSI IDs Locate and correct configuration conflicts The following sections provide instructions for starting the SCSISelect Utility program Note If your server has a redundant array of independent disks RAID adapter installed use the configuration method that is supplied with the RAID adapter to view or change SCSI settings for devices attached to the adapter Complete the following step...

Страница 55: ...n You will need your copy of the NOS CD Note For information on the supported NOS versions refer to the Setup and Installa tion CD label Using the Remote Supervisor Adapter The Remote Supervisor Adapter is one of the products in the Advanced System Man agement ASM family It provides around the clock remote access and system man agement of your server and supports the following Remote management re...

Страница 56: ...erveRAID configuration programs Note If your server model came with an operating system installed see the software documentation provided with your server for configuration information A ServeRAID adapter enables you to use multiple physical SCSI hard disk drives as logical drives operating as a disk array To enable you to configure the ServeRAID controller the adapter comes with a CD containing t...

Страница 57: ...n problem Troubleshooting charts These charts list problem symptoms and steps to correct the problems See the Troubleshooting charts on page 49 for more information Diagnostic programs and error messages The system diagnostic programs are provided in ROM These programs test the major components of your server Light Path Diagnostics feature Use the Light Path Diagnostics feature to identify system ...

Страница 58: ... first in the boot sequence ServeRAID program cannot view all installed drives or cannot install NOS If you installed an optional ServeRAID adapter Ensure that there are no duplicate SCSI IDs or IRQ assignments Ensure that the hard disk drive is connected properly The Operating System Installation program continuously loops Free up more space on the hard disk drive ServerGuide will not start your ...

Страница 59: ...n the drive verify that 1 The diskette drive is enabled in the Configuration Setup Utility program 2 The diskette is good and not damaged Try another diskette if you have one 3 The diskette contains the necessary files to start the system 4 Your software program is working properly If the diskette drive in use light stays on or the system continues to bypass the diskette drive call for service Dis...

Страница 60: ...st update the memory configuration with the Configuration Setup Utility program 4 All banks of memory on the DIMMs are enabled The system might have automatically disabled a DIMM bank if it detected a problem or a DIMM bank could have been manually disabled If the items above are correct and the screen remains blank call for service The amount of memory displayed is less than the amount of memory ...

Страница 61: ...ns that came with the option 2 The option is installed correctly 3 You have not loosened any other installed options or cables 4 You updated the configuration information in the Configuration Setup Utility program Whenever memory or an option is changed you must update the configuration If the problem remains call for service An option that was just installed does not work An option that used to w...

Страница 62: ...ort is enabled and is assigned a unique address If the problem remains call for service Software To determine if problems are caused by the software verify that 1 Your system has the minimum memory requirements needed to use the software For memory requirements refer to the information that comes with the software Note If you have just installed an adapter or memory you might have a memory address...

Страница 63: ... off the server and all peripheral devices then disconnect all external cables from the server 2 Slide the server out of the rack cabinet 3 Open the top cover 4 Press and hold the Light Path Diagnostics blue button on the diagnostics panel The LEDs will be illuminated while the button is pressed Note You can illuminate the LEDs for a maximum of two minutes After that time the circuit that powers t...

Страница 64: ...Ds correspond to the numbers located on the system service label Note the lit LED and refer to the numbered block on the system service label that corresponds to the lit LED Then follow the instructions if any in the numbered block LEDs on the SMP Modules and system boards To locate the actual component that caused the error you must locate the lit LED next to that component For example A system e...

Страница 65: ...e is not too hot See Features and specifications on page 2 for temperature information If the problem remains have the system serviced FAN A fan has failed or is operating too slowly Note A failing fan can also cause the TEMP LED to be on Check the LEDs on the fans and replace the indicated fan SP The service processor has failed Remove ac power from the server and then restart the server If the p...

Страница 66: ...ailing adapter from the information in the error log try to determine the failing adapter by removing one adapter at a time from the failing PCI X bus and restarting the server after each adapter is removed If the problem remains have the system serviced Table 3 Light Path Diagnostics continued Lit LED on diagnostics panel Cause Action ...

Страница 67: ......

Отзывы: