background image

Basics

45

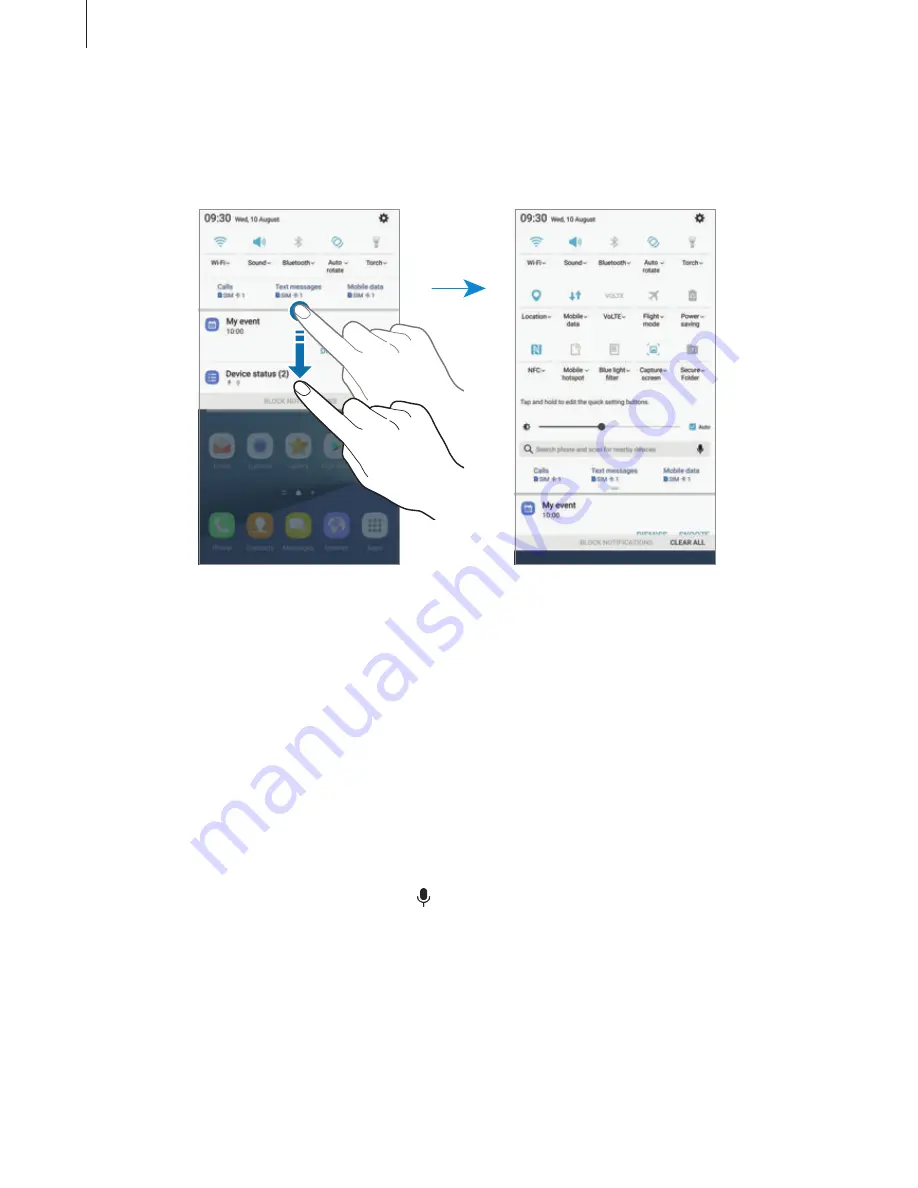
Using quick setting buttons

Tap quick setting buttons to activate certain features. Swipe downwards on the notification 
panel to view more buttons.

To view more detailed settings, tap the text under each button.
To rearrange buttons, tap and hold a quick setting button until all the quick setting buttons 
are displayed. Then, tap and hold a button, and then drag it to another location.

Finder

Search for a variety of content with a keyword or search for nearby devices.

Searching for content or nearby devices

Open the notification panel, swipe downwards on the notification panel, and then tap 

Search 

phone and scan for nearby devices

.

Enter a keyword in the search field or tap   and say a keyword.
To get more refined results, tap 

Filter

 under the search field, and then select filter details.

To search for nearby devices, tap 

Scan for nearby devices

. Refer to 

Quick connect

 for more 

information.

Содержание SM-N9300

Страница 1: ...www samsung com hk User Manual English HK 08 2016 Rev 1 0 SM N9300 ...

Страница 2: ...ays On Display 44 Notification panel 46 Entering text 48 Screen capture 49 Opening apps 50 Edge screen 58 S Pen features 68 Iris recognition 73 Fingerprint recognition 77 Secure Folder 80 Multi window 84 Samsung account 85 Device and data management 88 Quick connect 90 Sharing features 91 Emergency mode Applications 92 Installing or uninstalling apps 94 Phone 97 Contacts 101 Messages 103 Internet ...

Страница 3: ...ections 170 Sounds and vibration 171 Notifications 172 Display 174 Wallpapers and themes 174 Advanced features 177 Device maintenance 179 Applications 179 Lock screen and security 180 Cloud and accounts 182 Google 183 Accessibility 196 General management 197 Software update 197 User manual 197 About device 198 Appendix ...

Страница 4: ...se Extracting and using these materials for commercial or other purposes is an infringement of copyright laws Users are entirely responsible for illegal use of media You may incur additional charges for data services such as messaging uploading and downloading auto syncing or using location services depending on your data plan For large data transfers it is recommended to use theWi Fi feature Defa...

Страница 5: ...h force If the device is exposed to clean water dry it thoroughly with a clean soft cloth If the device is exposed to other liquids such as salt water ionised water or alcoholic beverage rinse it with clean water and dry it thoroughly with a clean soft cloth If you do not follow these instructions the device s performance and appearance may be affected If the device has been immersed in water or t...

Страница 6: ...devices Appearances and specifications are subject to change without prior notice You can purchase additional accessories from your local Samsung retailer Make sure they are compatible with the device before purchase Use only Samsung approved accessories Using unapproved accessories may cause the performance problems and malfunctions that are not covered by the warranty Availability of all accesso...

Страница 7: ...urpose jack USB Type C Front camera Speaker Edge screen Power key Touchscreen Edge screen Recents key Headset jack Home key Fingerprint recognition sensor Iris recognition LED LED indicator Proximity Light sensor SIM card Memory card tray Iris recognition camera GPS antenna ...

Страница 8: ...al to the device If you cover the device s antenna area with your hands or other objects while using certain features such as calls or the mobile data connection Using a Samsung approved screen protector is recommended Unapproved screen protectors may cause the sensors to malfunction Do not cover the proximity light sensor area with screen accessories such as a screen protector or stickers Doing s...

Страница 9: ...apps Tap and hold to launch the split screen view Home Press to turn on the screen while the screen is locked Press to return to the Home screen Press and hold to launch Google Back Tap to return to the previous screen Tap and hold to access additional options for the current screen Volume Press to adjust the device volume S Pen S Pen button S Pen nib Tweezers ...

Страница 10: ... the Air view feature S Pen button Hover the S Pen over the screen and press the S Pen button to display the Air command features While pressing and holding the S Pen button drag the S Pen over items to select them Tweezers Remove the S Pen nib with the tweezers when replacing the nib Detaching the S Pen Press the end of the S Pen to disengage it Then pull the S Pen from the slot To store the S Pe...

Страница 11: ...d 11 Replacing the S Pen nib If the nib is dull replace it with a new one 1 Firmly hold the nib with the tweezers and remove it 2 Insert a new nib into the S Pen Be careful not to pinch your fingers with the tweezers ...

Страница 12: ...rmation about the S Pen visit the Samsung website If the S Pen is not working properly take it to a Samsung Service Centre Battery Charging the battery Charge the battery before using it for the first time or when it has been unused for extended periods Use only Samsung approved chargers batteries and cables Unapproved chargers or cables can cause the battery to explode or damage the device Connec...

Страница 13: ...power adaptor into an electric socket Charging with a Micro USB cable Connect the Micro USB connector to charge the battery with a Micro USB cable Do not plug a Micro USB cable into your device s multipurpose jack Doing so may damage the device and the cable The Micro USB connector is used for charging the battery and connecting to a computer ...

Страница 14: ... s screen Your device The other device USB Connector The other device s USB cable The app selection pop up window that appears on your device is for data transfer Do not select an app from the pop up window Viewing the estimated charging time While charging open the Home screen and tap Apps Settings Device maintenance Battery The actual charging time may vary depending on the status of your device...

Страница 15: ...use multiple apps at once network apps or apps that need a connection to another device the battery will drain quickly To avoid losing power during a data transfer always use these apps after fully charging the battery Using a power source other than the charger such as a computer may result in a slower charging speed due to a lower electric current The device can be used while it is charging but ...

Страница 16: ...ing speed turn the device or its screen off when you charge the battery While charging the battery when the device is turned off the icon appears on the screen If the fast charging feature is not activated on the Home screen tap Apps Settings Device maintenance Battery Advanced settings and then tap the Fast cable charging switch to activate it You cannot use the built in fast charging feature whe...

Страница 17: ...e Fast wireless charging switch to deactivate it Deactivating this feature will reduce noise but may result in slower charging times Charging the battery Place the centre of the device s back on the centre of the wireless charger The estimated charging time will appear on the screen The actual charging time may vary depending on the charging conditions When using the wireless charger do not place ...

Страница 18: ...iting the apps and features available Network connections except for the mobile network will be deactivated 1 On the Home screen tap Apps Settings Device maintenance Battery MAX 2 Tap CUSTOMISE to change the power saving settings before entering maximum power saving mode 3 Tap APPLY After entering maximum power saving mode on the Home screen tap and select an app to use To remove apps tap Edit and...

Страница 19: ... the SIM or USIM card Samsung is not responsible for any damages or inconveniences caused by lost or stolen cards In some areas data transfer speeds may be slower if two SIM cards are inserted in the device than when one SIM card is inserted Some LTE services may not be available depending on the service provider For more information about service availability contact your service provider 2 5 4 1...

Страница 20: ...lace the primary SIM or USIM card on the tray 1 1 and the secondary SIM or USIM card on the tray 2 2 1 2 Tray 2 Tray 1 4 Gently press the SIM or USIM card into the tray to secure it If the card is not fixed firmly into the tray the SIM card may leave or fall out of the tray 5 Insert the tray back into the tray slot If you insert the tray into your device while the tray is wet your device may be da...

Страница 21: ...roSD card Use only a nano SIM card You cannot insert a nano SIM card and a microSD card in tray 2 at the same time Removing the SIM or USIM card 1 Insert the ejection pin into the hole on the tray to loosen the tray 2 Pull out the tray gently from the tray slot 3 Remove the SIM or USIM card ...

Страница 22: ...IM cards On the Home screen tap Apps Settings Connections SIM card manager and select a SIM or USIM card to access the following options Icon Change the icon of the SIM or USIM card Name Change the display name of the SIM or USIM card Network mode Select a network type to use with the SIM or USIM card Setting preferred SIM or USIM cards When two cards are activated you can assign voice calls messa...

Страница 23: ...ory card or corrupt the data stored in it Use caution to insert the memory card right side up The device supports the FAT32 and the exFAT file systems for memory cards When inserting a card formatted in a different file system the device will ask to reformat the card or will not recognise the card If the device does not recognise your memory card format it on your computer Frequent writing and era...

Страница 24: ...he hole on the tray to loosen the tray Ensure that the ejection pin is perpendicular to the hole Otherwise the device may be damaged 2 Pull out the tray gently from the tray slot When you remove the tray from the device the mobile data connection will be disabled ...

Страница 25: ...y card Before removing the memory card first unmount it for safe removal On the Home screen tap Apps Settings Device maintenance Storage Storage settings SD card Unmount 1 Insert the ejection pin into the hole on the tray to loosen the tray 2 Pull out the tray gently from the tray slot 3 Remove the memory card 4 Insert the tray back into the tray slot Do not remove the memory card while the device...

Страница 26: ...t cover loss of data resulting from user actions USB connector With the supplied USB connector On The Go Adaptor you can transfer data from other mobile devices or connect USB peripheral devices such as a mouse and keyboard to your device Use only the USB connector supplied with the device Transferring data from your previous device You can connect your previous device to your device with the USB ...

Страница 27: ...s to turn on the device When you turn on your device for the first time or after performing a data reset follow the on screen instructions to set up your device To turn off the device press and hold the Power key and then tap Power off Follow all posted warnings and directions from authorised personnel in areas where the use of wireless devices is restricted such as aeroplanes and hospitals Restar...

Страница 28: ...ansfer Transferring data via Smart Switch Transfer data between mobile devices via Smart Switch You can launch Smart Switch by tapping Apps Settings Cloud and accounts Smart Switch If you do not have the app download it from Galaxy Apps or Play Store Transferring data using a USB connector You can connect your previous device to your device with the USB connector and a USB cable to easily and quic...

Страница 29: ...Doing so may cause data loss or device damage Transferring data increases the battery power consumption of your device Ensure that your device is sufficiently charged before transferring data If the battery power is low data transfer may be interrupted Transferring data wirelessly viaWi Fi Direct Transfer data from your previous device to your device wirelessly viaWi Fi Direct 1 On the previous de...

Страница 30: ... and import the data to your device 1 On the computer visit www samsung com hk smartswitch to download Smart Switch 2 On the computer launch Smart Switch If your previous device is not a Samsung device back up data to a computer using a program provided by the device s manufacturer Then skip to the fifth step 3 Connect your previous device to the computer using the USB cable 4 On the computer foll...

Страница 31: ... and sign in to your Samsung account to use Samsung Cloud Refer to Samsung account for more information 1 On the previous device back up the data to your Samsung account 2 On your device tap Apps Settings Cloud and accounts Samsung Cloud Restore 3 Tap and select the previous device from the devices list 4 Tick the data types you want to restore and tap RESTORE NOW ...

Страница 32: ...evice may not recognise touch inputs close to the edges of the screen which are outside of the touch input area Leaving the touchscreen idle for extended periods may result in afterimages screen burn in or ghosting Turn off the touchscreen when you do not use the device It is recommended to use fingers or the S Pen when you use the touchscreen Tapping To open an app to select a menu item to press ...

Страница 33: ...hold an item or the screen for more than 2 seconds to access available options Dragging To move an item tap and hold it and drag it to the target position Double tapping Double tap on a webpage or image to zoom in Double tap again to return ...

Страница 34: ... Home screen or the Apps screen to view other panels Swipe upwards or downwards to scroll through a webpage or a list of items such as contacts Spreading and pinching Spread two fingers apart on a webpage map or image to zoom in a part Pinch to zoom out ...

Страница 35: ... widgets shortcuts to apps and more To view other panels swipe to the left or right The Home screen may appear differently depending on the region or service provider A widget An app A folder Edge panel handle Screen indicators Favourite apps Apps screen icon News screen indicator View the latest articles in various categories ...

Страница 36: ...evice s wallpaper theme or icons Widgets Add widgets to the Home screen Widgets are small apps that launch specific app functions to provide information and convenient access on your Home screen Screen grid Change the size of the grid to display more or less items on the Home screen and the Apps screen Adding items Tap and hold an app or a folder from the Apps screen and then drag it to the Home s...

Страница 37: ... top of the screen The item will move to the panel at the top of the screen Swipe to the left or right to move to another panel and drag the item to a new location Removing items Tap and hold an item and then drag it to Delete at the top of the screen Creating folders Create folders and gather similar applications to quickly access and launch apps 1 On the Home screen tap and hold an app and then ...

Страница 38: ...the left and then tap To move a panel tap and hold a panel preview and then drag it to a new location To remove a panel tap and hold a panel preview and then drag it to Delete at the top of the screen To set a panel as the main Home screen tap Using quick options On the Home screen tap and hold an app icon or folder to quickly access options Apps screen The Apps screen displays icons for all apps ...

Страница 39: ...ps A new folder containing the selected apps will be created 4 Tap Enter folder name and enter a folder name To change the folder colour tap To add more apps to the folder tap ADD tick the apps and then tap ADD You can also add an app by dragging it to the folder on the Apps screen To delete a folder select a folder with Only the folder will be deleted The folder s apps will be relocated to the Ap...

Страница 40: ...s bar may not appear at the top of the screen in some apps To display the status bar drag down from the top of the screen Icon Meaning No signal Signal strength Roaming outside of normal service area Preferred SIM or USIM card for calls GPRS network connected EDGE network connected UMTS network connected HSDPA network connected HSPA network connected LTE network connected LTE enabled models Wi Fi ...

Страница 41: ... method on the Apps screen tap Settings Lock screen and security Screen lock type and then select a method When you set a pattern PIN password fingerprint or iris for the screen lock method you can protect your personal information by preventing others from accessing your device After setting the screen lock method the device will require an unlock code whenever unlocking it Swipe Swipe in any dir...

Страница 42: ...incorrectly several times in a row and reach the attempt limit On the Apps screen tap Settings Lock screen and security Secure lock settings and tap the Auto factory reset switch to activate it Always On Display You can set the device to display information such as a clock calendar or image on the screen when it is turned off 1 On the Apps screen tap Settings Display Always On Display and tap the ...

Страница 43: ...ven when it is turned off Double tap a notification icon with your finger to view its notification You cannot open notifications with the S Pen If the screen is locked you must unlock it to view notifications You can open a pinned memo by double tapping with your finger without turning on the screen Controlling music playback when the screen is off You can control music playback when the screen is...

Страница 44: ... To open the notification panel drag the status bar downwards To close the notification panel swipe upwards on the screen You can open the notification panel even on the locked screen You can use the following functions on the notification panel Tap a notification and perform various actions Clear all notifications Launch Settings Block notifications from apps Quick setting buttons SIM and USIM ca...

Страница 45: ... button and then drag it to another location Finder Search for a variety of content with a keyword or search for nearby devices Searching for content or nearby devices Open the notification panel swipe downwards on the notification panel and then tap Search phone and scan for nearby devices Enter a keyword in the search field or tap and say a keyword To get more refined results tap Filter under th...

Страница 46: ...anguages Break to the next line Delete a preceding character Hide the keyboard Enter symbols Additional keyboard functions Enter numbers Change the input language Enter a space Changing the input language Tap the input language key to switch between the input languages Tap Languages and types Add input languages and then select the languages to use Changing the keyboard layout Tap Languages and ty...

Страница 47: ...text field and tapping If this feature is not activated open the Apps screen tap Settings Advanced features S Pen and then tap the Direct pen input switch to activate it Enter text by voice Change the voice input settings Start or pause entering text by voice Enter emoticons Enter kaomojis Open the text editing panel Change the keyboard settings Copying and pasting 1 Tap and hold over text 2 Drag ...

Страница 48: ... a screenshot while using the device and write on draw on crop or share the captured screen You can capture the current screen and scrollable area Capturing a screenshot Use the following methods to capture a screenshot Captured screenshots will be saved in Gallery Key capture Press and hold the Home key and the Power key simultaneously Quick setting button capture Open the notification panel swip...

Страница 49: ... Crop Crop a portion from the screenshot Only the cropped area will be saved in Gallery Share Share the screenshot with others If the options are not visible on the captured screen open the Apps screen tap Settings Advanced features and then tap the Smart capture switch to activate it Opening apps On the Home screen or the Apps screen select an app icon to open it To open an app from the list of r...

Страница 50: ...d message alerts and view the night clock on the Edge screen Using the Edge panels Drag the Edge panel handle towards the centre of the screen Then swipe to the left or right to switch between the Edge panels If the Edge panel handle is not visible open the Apps screen tap Settings Display Edge screen and then tap the Edge panels switch to activate it Edge panels Apps edge People edge Tasks edge E...

Страница 51: ... additional panels tap DOWNLOAD To rearrange panels tap Reorder and drag to another location Setting the Edge panel handle You can change the location size or transparency of the handle Drag the Edge panel handle towards the centre of the screen Then tap Handle settings Apps edge Quickly launch frequently used apps 1 Drag the Edge panel handle towards the centre of the screen 2 Swipe to the left o...

Страница 52: ...to quickly contact them and view notifications received from them 1 Drag the Edge panel handle towards the centre of the screen 2 Swipe to the left or right to open the People edge panel Adding contacts to the People edge panel Add frequently used contacts to the People edge panel and set them as your priority contacts Select a colour by tapping and select a contact to add Only contacts saved in C...

Страница 53: ...r will appear on the Edge screen Drag the tab towards the centre of the screen to view the details You can directly reply to the contact by tapping one of the communication options Contacting people from the People edge panel Open the People edge panel and tap a contact The communication buttons will appear on the screen Tap the desired button to call or send a message to the contact ...

Страница 54: ...ect calls On the Apps screen tap Settings Display Edge screen Edge lighting Quick reply and then tap the switch to activate it To edit the default rejection message tap the message text under Quick reply message OnCircle You can send images live emoticons and other fun messages to your friends This feature may not be available depending on the region or service provider You can use this feature on...

Страница 55: ...d creating events 1 Drag the Edge panel handle towards the centre of the screen 2 Swipe to the left or right to open theTasks edge panel 3 Tap a task to perform it Editing theTasks edge panel To add a task tap on the panel and tap a task from the tasks list To delete a task tap and hold a task on the panel and drag to Remove at the top of the panel To change the order of tasks tap and hold a task ...

Страница 56: ...een 1 On the Apps screen tap Settings Display Edge screen 2 Tap Edge feeds and tap the switch to activate it 3 Tick items to display To edit a feed tap EDIT To download additional items tap DOWNLOAD To rearrange items tap Reorder Then tap and hold on an item and drag it to another location Viewing Edge feeds 1 With the screen turned off swipe upwards then downwards or vice versa on the Edge screen...

Страница 57: ... Display feature Night clock Keep the clock on the Edge screen active to view it at night 1 On the Apps screen tap Settings Display 2 Tap Night clock and tap the switch to activate it 3 Set the duration that the night clock remains active To set the location of the night clock tap Night clock position and select a side The night clock feature can be set for a maximum of 18 hours The night clock fe...

Страница 58: ... S Pen When the screen is off or certain security features are activated removing the S Pen will not open the Air command panel Create note Add shortcuts Smart select Screen write Air command icon Translate Air command settings Adding shortcuts to the Air command panel Add shortcuts to frequently used apps or functions to the Air command panel On the Air command panel tap Add shortcuts and select ...

Страница 59: ...late for more information Magnify Hover the S Pen over an area of the screen to enlarge it Refer to Magnify for more information Glance Reduce an app to a thumbnail and hover the S Pen over the thumbnail to open the app in full screen view Refer to Glance for more information Add shortcuts Add shortcuts to frequently used apps to the Air command panel Air command icon When the Air command panel is...

Страница 60: ...ct a desired shape icon on the toolbar and drag the S Pen across the content you want to select Tap Auto select to automatically reshape the selected area If text is included in the selected area tap Extract text to recognise and extract text from the selected area 3 Select an option to use with the selected area Draw Write or draw on the selected area Share Share the selected area with others Set...

Страница 61: ...ze Select a quality Adjust the position 4 Tap Record to start capturing Before capturing a video make sure that the video is playing The maximum duration you can capture an area of the video for will be displayed on the screen When capturing an area from a video its sound will not be recorded 5 Tap Stop to stop capturing 6 Select an option to use with the selected area Draw Write or draw on the se...

Страница 62: ...ontinues across multiple screens such as a webpage tap Scroll capture to capture more content Tap SCROLL CAPTURE repeatedly until screen capture is complete and then tap DONE 3 Write a memo on the screenshot Eraser mode Undo Redo Pen mode 4 Select an option to use with the screenshot Crop Crop a portion of the screenshot Only the cropped area will be saved in Gallery Share Share the screenshot wit...

Страница 63: ...n screens that allow you to perform a screen capture 1 Open the Air command panel and tap Translate 2 Select the languages on the translator panel at the top of the screen 3 Hover the S Pen over the word you want to translate The translated word will appear above the original word Tap to listen to the pronunciation To view more definitions tap the translated word 4 To close the translator tap on t...

Страница 64: ...rge it 1 Open the Air command panel and tap Magnify 2 Select the magnification size from the magnifier panel at the top of the screen 3 Hover the S Pen over the area you want to enlarge The magnifier window will appear 4 To close the magnifier tap on the magnifier panel ...

Страница 65: ...p Glance The app will be reduced to a thumbnail at the bottom of the screen While browsing webpages hover the S Pen over the thumbnail to open the map app on the full screen and quickly search for places Thumbnail Hover the S Pen away from the screen to reduce the app to a thumbnail again To close the minimised app tap and hold the thumbnail and drag it to Remove at the top of the screen ...

Страница 66: ...indow Action buttons If this feature is not activated open the Apps screen tap Settings Advanced features S Pen and then tap the Air view switch to activate it Pen Select While pressing and holding the S Pen button drag the S Pen over text or item lists to select multiple items or text You can also copy and paste the selected items or text into another app or share them with others ...

Страница 67: ...inger Double tap with your finger to view the memo without turning on the screen To view memos open the Apps screen and tap Samsung Notes CATEGORIES Screen off memo If this feature is not activated open the Apps screen tap Settings Advanced features S Pen and then tap the Screen off memo switch to activate it If you do not perform any actions for one hour after opening a memo the memo will be auto...

Страница 68: ...the irises Be careful not to forget your pattern PIN or password If your irises are not recognised unlock the device using the pattern PIN or password you set when registering the irises and then re register your irises If your pattern PIN or password is forgotten you will not be able to use the device if you do not reset it Samsung is not responsible for any data loss or inconvenience caused by f...

Страница 69: ...se of this feature For better iris recognition The phone may not recognise your irises if Something prevents the camera from getting a good view of your irises e g glasses glare low eyelids recent eye surgery or a medical condition Something gets in the way of the camera or the LED e g a screen protector dirt damage to the camera The lighting is very different from when you recorded your irises e ...

Страница 70: ... 1 iris 4 Hold the device with the screen facing towards you and look at the screen 25 35 cm 5 Position your eyes inside the circles on the screen and open your eyes wide The iris recognition camera will scan your irises 6 When an iris lock pop up window appears tap ENABLE to use your irises to unlock the screen When you swipe in any direction on the locked screen the iris recognition screen will ...

Страница 71: ...urchase content from Galaxy Apps 1 On the Apps screen tap Settings Lock screen and security Irises 2 Unlock the screen using the preset screen lock method 3 Tap the Verify Samsung account switch to activate it 4 Sign in to your Samsung account Using irises to sign in to accounts You can use your irises to sign in to webpages that support password saving This feature is only available for webpages ...

Страница 72: ...e webpage Unlocking the screen with irises You can unlock the screen with your irises instead of using a pattern PIN or password 1 On the Apps screen tap Settings Lock screen and security Irises 2 Unlock the screen using the preset screen lock method 3 Tap the Iris unlock switch to activate it 4 On the locked screen swipe in any direction and position your eyes inside the circles on the screen to ...

Страница 73: ...s very low However in rare cases where separate fingerprints are very similar the sensor may recognise them as identical If you use your fingerprint as a screen lock method your fingerprint cannot be used to unlock the screen when turning on the device To use the device you must unlock the screen using a pattern PIN or password you set when registering the fingerprint Be careful not to forget your...

Страница 74: ...use a fingertip the device may not recognise your fingerprints Make sure to cover the entire Home key with your finger To improve recognition performance register fingerprints of the hand used most often to perform tasks on the device In dry environments static electricity can build up in the device Avoid using this feature in dry environments or before using the feature discharge static electrici...

Страница 75: ...ord for example when you purchase content from Galaxy Apps 1 On the Apps screen tap Settings Lock screen and security Fingerprints 2 Unlock the screen using the preset screen lock method 3 Tap the Verify Samsung account switch to activate it 4 Sign in to your Samsung account Using fingerprints to sign in to accounts You can use your fingerprints to sign in to webpages that support password saving ...

Страница 76: ...our fingerprint to verify your account and password to sign in to the webpage Unlocking the screen with fingerprints You can unlock the screen with your fingerprint instead of using a pattern PIN or password 1 On the Apps screen tap Settings Lock screen and security Fingerprints 2 Unlock the screen using the preset screen lock method 3 Tap the Fingerprint unlock switch to activate it 4 On the lock...

Страница 77: ... unlocked Secure Folder is a separate secured storage area The data in Secure Folder cannot be transferred to other devices via unapproved sharing methods such as USB orWi Fi Direct Attempting to customise the operating system or modifying software will cause Secure Folder to be automatically locked and inaccessible Before saving data in Secure Folder make sure to back up a copy of the data in ano...

Страница 78: ...unt password Setting auto lock for Secure Folder Set the device to automatically lock Secure Folder when it is not being used 1 On the Apps screen tap Samsung Secure Folder 2 Tap Settings Auto lock Secure Folder 3 Select a lock option To manually lock your Secure Folder tap Moving content Move content such as photos and contacts to Secure Folder The following actions are an example of moving an im...

Страница 79: ...ccounts to sync with the apps in Secure Folder 1 On the Apps screen tap Samsung Secure Folder 2 Tap Settings Accounts Add account 3 Select an account service 4 Follow the on screen instructions to complete the account setup Hiding Secure Folder You can hide the Secure Folder shortcut from the Home screen and the Apps screen 1 On the Apps screen tap Samsung Secure Folder 2 Tap Settings and tap the ...

Страница 80: ... their content and accounts will be deleted BACK UP AND UNINSTALL Back up content and uninstall Secure Folder To access data backed up from Secure Folder open the Apps screen and tap Samsung My Files My device Secure Folder Notes saved in Samsung Notes will not be backed up Multi window Introduction Multi window lets you run two apps at the same time in the split screen view You can also run multi...

Страница 81: ... recently used apps 2 Swipe upwards or downwards and tap on a recent app window The selected app will launch in the upper window 3 Swipe to the left or right to select another app to launch You can also launch the split screen view by tapping and holding ...

Страница 82: ...he app windows to access the following options Switch locations between app windows Drag and drop text or copied images from one window to another Tap and hold an item in the selected window and drag it to a location in another window Some apps may not support this feature Minimise the window Maximise the window Close the app ...

Страница 83: ...e Apps screen launch an app to use in the pop up view 2 Drag down diagonally from either end of the top edge The app screen will appear in the pop up view Minimise the window Close the app Maximise the window Drag and drop content Moving pop up windows To move a pop up window tap and hold the circle on a window and drag it to a new location ...

Страница 84: ...ng account Help Registering your Samsung account Registering a new Samsung account If you do not have a Samsung account you should create one 1 On the Apps screen tap Settings Cloud and accounts Accounts Add account 2 Tap Samsung account CREATE ACCOUNT 3 Follow the on screen instructions to complete creating your account Registering an existing Samsung account If you already have a Samsung account...

Страница 85: ...ce to the computer or vice versa Do not disconnect the USB cable from the device when you are transferring files Doing so may cause data loss or device damage The devices may not connect properly if they are connected via a USB hub Directly connect the device to the computer s USB port 1 Connect the device to the computer using the USB cable 2 Open the notification panel and then tap Device status...

Страница 86: ... Switch Connect the device to a computer and update the device to the latest software 1 On the computer visit www samsung com hk smartswitch to download and install Smart Switch 2 On the computer launch Smart Switch 3 Connect the device to the computer using a USB cable 4 If a software update is available follow the on screen instructions to update the device Do not turn off the computer or discon...

Страница 87: ...ckup data from Samsung Cloud using a Samsung account tap Restore Select a device and the data types you want to restore and tap RESTORE NOW The selected data will be restored to your device Using a Google account On the Apps screen tap Settings Cloud and accounts Backup and tap the Back up my data switch for the Google account to activate it Tap Backup account and select an account as the backup a...

Страница 88: ...l and then tap Search phone and scan for nearby devices 2 Tap Scan for nearby devices TheWi Fi and Bluetooth features will be activated and the device will automatically search for nearby devices 3 Select a device from the list and connect to it by following the on screen instructions The next steps may vary depending on the connected device Connecting to aTV Connect your device and aTV to view th...

Страница 89: ...n to the sound via the device s speaker while watching theTV You can connect a headset to the device so that others do not hear theTV sound RegisterTV DeregisterTV Register theTV to your device to use additional features such as Use as remote control Some files may be buffered during playback depending on the connection If theTV does not support High bandwidth Digital Content Protection HDCP you c...

Страница 90: ...y are not saved in your contacts list To use this feature your phone number must be verified Transfer files to device Share content with nearby devices viaWi Fi Direct or Bluetooth The visibility settings must be activated on the devices View content onTV SmartView View your device s displayed content on a larger screen via a wireless connection When you have a communication or sharing history the...

Страница 91: ... others sound an emergency alarm and more Press and hold the Power key and then tap Emergency mode Add more apps to use Make an emergency call Remaining battery power and usage time left Turn on the flash Make a call Send your current location information in a message Browse the Internet Access additional options Sound alarms The usage time left shows the time remaining before the battery power ru...

Страница 92: ... tap INSTALL To purchase and download apps where charges apply tap the price and follow the on screen instructions To change the auto update settings tap Settings Auto update apps and then select an option Play Store Purchase and download apps Tap Play Store on the Apps screen Installing apps Browse apps by category or search for apps by keyword Select an app to view information about it To downlo...

Страница 93: ...me apps to operate properly they may need permission to access or use information on your device When you open an app a pop up window may appear and request access to certain features or information Tap ALLOW on the pop up window to grant permissions to the app To view your app permission settings open the Apps screen and tap Settings Applications Select an app and tap Permissions You can view the...

Страница 94: ...ap Phone on the Apps screen 2 Enter a phone number If the keypad does not appear on the screen tap to open the keypad 3 Tap or to make a voice call Add the number to the contacts list Preview the phone number Hide the keypad Delete a preceding character Access additional options ...

Страница 95: ...e circle Making calls from call logs or contacts list Tap LOG or CONTACTS and then swipe to the right on a contact or a phone number to make a call Making an international call 1 Tap to open the keypad if the keypad does not appear on the screen 2 Tap and hold 0 until the sign appears 3 Enter the country code area code and phone number and then tap or Receiving calls Answering a call When a call c...

Страница 96: ...ive notifications The calls will be logged in the call log You can also block incoming calls from people that do not show their caller ID Tap the Block anonymous calls switch to activate the feature Options during calls During a voice call The following actions are available Access additional options Add call Dial a second call Extra volume Increase the volume Bluetooth Switch to a Bluetooth heads...

Страница 97: ...ap Contacts on the Apps screen 2 Tap and select a storage location 3 Enter contact information Select a storage location Add an image Open more information fields Scan contact information from a business card Enter contact information Depending on the selected storage location the types of information you can save may vary 4 Tap SAVE ...

Страница 98: ...ontact or tap UPDATE EXISTING to add the number to an existing contact Importing contacts Add contacts by importing them from other storages to your device 1 Tap Contacts on the Apps screen 2 Tap Settings Import export contacts IMPORT 3 Select a storage location to import contacts from 4 Select a storage location to save contacts to 5 TickVCF files or contacts to import and tap DONE Synching conta...

Страница 99: ...l Sharing profile Share your profile information such as your photo and status message with others using the profile sharing feature This feature may not be available depending on the region or service provider This feature is only available for contacts who have activated the profile sharing feature on their device On the Apps screen tap Contacts your profile Profile sharing and then tap the swit...

Страница 100: ...ync or move contacts to other accounts your contacts list may include duplicate contacts Merge duplicate contacts into one to streamline your contacts list 1 Tap Contacts on the Apps screen 2 Tap Settings Merge duplicate contacts 3 Tick contacts and tap MERGE Deleting contacts 1 Tap Contacts on the Apps screen 2 Tap Delete 3 Tick contacts and tap DELETE To delete contacts one by one open the conta...

Страница 101: ... charges for sending messages when you are roaming 1 Tap Messages on the Apps screen 2 Tap 3 Add recipients and tap COMPOSE 4 Enter a message Access additional options Enter a message Add recipients from the contacts list Enter emoticons Attach files Edit recipients Select a SIM or USIM card 5 Tap or to send the message ...

Страница 102: ...messages Block numbers 3 Tap INBOX or CONTACTS select a contact and then tap To manually enter a number tap Enter number and then enter a phone number Setting the message notification You can change notification sound display options and more 1 Tap Messages on the Apps screen 2 Tap Settings Notifications and then tap the switch to activate it 3 Change the notification settings Notification sound C...

Страница 103: ...ction Browse the Internet to search for information and bookmark your favourite webpages to access them conveniently Browsing webpages 1 On the Apps screen tap Samsung Internet 2 Tap the address field 3 Enter the web address or a keyword and then tap Go To view the toolbars drag your finger downwards slightly on the screen Bookmark the current webpage Open the homepage Move between pages Open the ...

Страница 104: ...tures such as screen capture In secret mode the device will change the colour of the toolbars Changing security settings You can change your password or the lock method Tap Settings Privacy Secret mode security Change password To set your registered fingerprint or irises as the lock method along with the password tap the Fingerprints or Irises switch to activate it Refer to Fingerprint recognition...

Страница 105: ...ccount If you have more than one email account you can set one as the default account Tap Settings Set default account Sending emails 1 Tap to compose an email 2 Add recipients and enter an email text 3 Tap SEND to send the mail Reading emails When Email is open the device will automatically retrieve new emails To manually retrieve emails swipe downwards on the screen Tap an email on the screen to...

Страница 106: ...ecord videos in places where you may violate other people s privacy Launching Camera Use the following methods to launch Camera Tap Camera on the Apps screen Press the Home key twice quickly On the locked screen drag outside the large circle Some methods may not be available depending on the region or service provider Some camera features are not available when you launch Camera from the locked sc...

Страница 107: ...odes Filter effects Switching cameras On the preview screen swipe upwards or downwards to switch between cameras Viewing shooting modes On the preview screen swipe from the left to the right to open the shooting modes list Viewing filter effects One the preview screen swipe from the right to the left to open the filter effects list You can apply a unique feel to your photos or videos This feature ...

Страница 108: ...you want to focus To focus on the centre of the screen tap Camera settings Switch between the front and rear cameras Quick settings Record a video Take a photo Filter effects Shooting modes Preview thumbnail Make faces appear brighter and clearer Current mode The preview screen may vary depending on the shooting mode and which camera is being used The camera automatically shuts off when unused Mak...

Страница 109: ...vated HDR mode is deactivated 2 Tap to take a photo or tap to record a video Without effect With effect Locking the focus AF and exposure AE You can lock the focus or exposure on a selected area to prevent the camera from automatically adjusting based on changes to the subjects or light sources Tap and hold the area to focus the AF AE frame will appear on the area and the focus and exposure settin...

Страница 110: ...ate white balance so images have a true to life colour range You can set the colour temperature Tap and drag your finger on the colour temperature bar Select a colour tone To create your own colour tone tap Tone 1 or Tone 2 Change the exposure value This determines how much light the camera s sensor receives For low light situations use a higher exposure If the shutter speed is set manually you ca...

Страница 111: ... or light sources In pro mode you can separate the exposure and focus and set them to different points This feature is only available when you set the shutter speed and the focus to Auto in pro mode 1 On the preview screen tap and hold the area to focus The AF AE frame will appear on the focus area 2 Drag the AF AE frame to the exposure area The exposure area will be separated from the focus area ...

Страница 112: ...ch as an empty sky or a plain wall 1 On the shooting modes list tap Panorama 2 Tap and move the device slowly in one direction 3 Tap to stop taking photos 4 On the preview screen tap the preview thumbnail Motion panorama You can take and view a panorama with motion When taking motion panoramas sound will not be recorded 1 On the panorama preview screen tap to activate the motion panorama feature a...

Страница 113: ...d its background stand out 6 Tap SAVE It is recommended that you position subjects within 50 cm of the device Position the subject that you want to focus on close to the device When taking photos ensure there is sufficient distance between the subject and the background The distance should be more than three times the distance between the device and the subject Hold the device steady and remain st...

Страница 114: ...ins lots of movement one or two slow motion sections will be created based on the biggest movements Editing slow motion sections 1 On the preview screen tap the preview thumbnail 2 Tap 3 Tap the screen and tap to pause playback 4 Drag the start bracket and the end bracket to the desired points to set the duration of the video to be played 5 Drag to select the area of the video to be played in slow...

Страница 115: ...view them as fast motion videos The frame rate is automatically adjusted to record smoother less shaky fast motion videos while walking travelling by vehicle and more In this mode auto focusing will not operate 1 On the shooting modes list tap Hyperlapse 2 Tap and select a frame rate option If you set the frame rate to Auto the device will automatically adjust the frame rate according to the chang...

Страница 116: ...e circular frame drag a corner of the frame 3 Tap and drag the adjustment bar to adjust the colour tone 4 Tap to take a photo Virtual shot Take a series of photos while circling a subject to create a view of the subject from multi angles You can view the subject from different angles by dragging your finger left or right on the photo 1 On the shooting modes list tap Virtual shot 2 Place a subject ...

Страница 117: ...ger left or right on the screen or slowly swivel the device left or right to view the subject from different angles Video collage Record videos to create a unique video collage You can edit the videos and share them with others 1 On the shooting modes list tap Video collage 2 Tap and select a collage type under the screen ratio you want to use To record a video to view it in a slow motion video co...

Страница 118: ... the recorded sound or insert background music Slow parts Select sections of the video in each frame to be played in slow motion This option appears when you select the Slow motion video option End tags Display the recording date and time on the video 5 When you are finished editing tap SAVE to save the video To share the video with friends tap SHARE ...

Страница 119: ... the Auto save switch to activate it You can view your videos in Gallery You can set the device to share your broadcast link via social network services while broadcasting On the preview screen tap Settings SNS settings and tap the switch next to social network services you want to use Starting your broadcast 1 On the shooting modes list tap Live Broadcast 2 Read the terms and conditions and then ...

Страница 120: ...7 Tap to end your broadcast The broadcast will be automatically uploaded toYouTube To share the link with others tap SHARE LINK You can create a shortcut to this feature on the Home screen by tapping Settings Add shortcut on home screen Watching a live broadcast Invited contacts can watch the broadcast by tapping the video link they received For public broadcasts viewers can search for your channe...

Страница 121: ...ck of the device to take a photo of yourself Alternatively show your palm to the front camera After recognising your palm a countdown timer will appear When the time is up the device will take a photo To use various shooting options for the front camera tap Ways to take pictures and then tap the switches to activate them Using the selfie flash When taking self portraits with the front camera in lo...

Страница 122: ...on of the spot to highlight or to adjust the brightness drag the adjustment bar towards the desired level Slim Face Adjust the face shape and make your face appear slimmer Large Eyes Make your eyes appear bigger Shape correction When your face is at the edges of the preview screen it will appear distorted Enable this option to correct your face shape After shape correction the background may appea...

Страница 123: ... the front camera tap Ways to take pictures and then tap the switches to activate them 5 Slowly swivel the device left and then right or vice versa to take a wide self portrait The device will take additional photos when the white frame moves to each end of the viewfinder window Make sure to keep the white frame inside the viewfinder window The subjects should remain still while taking wide self p...

Страница 124: ...ptured wide self portrait To save the wide self portrait as a video file tap SAVE AS NEW Downloading modes Download more shooting modes from Galaxy Apps On the shooting modes list tap DOWNLOAD Some downloaded shooting modes do not have access to every feature Camera settings Quick settings On the preview screen use the following quick settings The available options may vary depending on the shooti...

Страница 125: ...tivate the flash Focus on a subject inside the circular frame and blur the image outside the frame Camera settings On the preview screen tap The available options may vary depending on the shooting mode and which camera is being used Rear camera Picture size Select a resolution for photos Using a higher resolution will result in higher quality photos but they will take up more memory Tap the Save ...

Страница 126: ...shakes excessively The video resolution is high Shape correction Correct distortion in photos automatically Front camera Picture size Select a resolution for photos Using a higher resolution will result in higher quality photos but they will take up more memory Video size Select a resolution for videos Using a higher resolution will result in higher quality videos but they will take up more memory...

Страница 127: ...load them to the Internet To avoid this deactivate the location tag setting Review pictures Set the device to show photos after capturing them Quick launch Set the device to launch the camera by pressing the Home key twice quickly Storage location Select the memory location for storage Voice control Set the device to take photos or record videos with voice commands You can say Smile Cheese Capture...

Страница 128: ...es and videos by album or create stories to share with others Viewing images and videos Viewing images 1 On the Apps screen tap Gallery PICTURES 2 Select an image Access additional options Automatically adjust the image Share the image with others Delete the image Modify the image Add the image to favourites ...

Страница 129: ...Select a video to play Video files show the icon on the preview thumbnail Lock the playback screen Switch to the pop up video player Rewind or fast forward by dragging the bar Display your videos Skip to the previous video Tap and hold to rewind Skip to the next video Tap and hold to fast forward Access additional options Change screen ratio Pause and resume playback Create a GIF animation Drag yo...

Страница 130: ...ist On the Apps screen tap Gallery ALBUMS and select an album Viewing stories When you capture or save images and videos the device will read their date and location tags sort the images and videos and then create stories To create stories automatically you must capture or save multiple images and videos Creating stories Create stories with various themes 1 On the Apps screen tap Gallery STORIES 2...

Страница 131: ...es do not support the feature a link to the files will be sent to them via text message Link recipients may not be able to use some features The link will expire after a certain period Deleting stories 1 On the Apps screen tap Gallery STORIES 2 Tap and hold a story to delete and tap DELETE Syncing images and videos with Samsung Cloud You can sync images and videos saved in Gallery with Samsung Clo...

Страница 132: ...t an image or a video tap Share at the bottom of the screen and then select a sharing method Samsung Gear Samsung Gear is an app that allows you to manage your Gear wearable device When you connect your device to the Gear you can customise the Gear s settings and apps On the Apps screen tap Samsung Samsung Gear Tap CONNECTTO GEAR to connect your device to the Gear Follow the on screen instructions...

Страница 133: ...lve any problems you might encounter while using your device Feedback Support Suggestions This app s availability and supported features may vary depending on the region or service provider This app may appear in the Samsung folder depending on the region or service provider To submit your feedback or suggestions you must sign in to your Samsung account Refer to Samsung account for more informatio...

Страница 134: ...og which is optional to send will also be sent for a more accurate analysis Suggestions Send your ideas for new apps or features and your opinions about how features can be improved On the Apps screen tap Samsung Members Suggestions This feature may not be available depending on the region or service provider Support Check to see if there are any problems with your device s hardware and access cus...

Страница 135: ... or ones you have recorded View a list of the most popular games for Galaxy users Using Game Launcher 1 On the Apps screen tap Settings Advanced features Games and tap the Game Launcher switch to activate it Game Launcher will be added to the Home screen and the Apps screen When you deactivate the feature Game Launcher will be removed from the Home screen and the Apps screen 2 On the Apps screen t...

Страница 136: ...Decrease battery power consumption by lowering the resolution Save maximum power Dramatically decrease the battery power consumption by lowering the resolution and frame rate Battery power efficiency may vary by game Using GameTools You can set the GameTools icon to be displayed as a floating icon on game screens On the Apps screen tap Settings Advanced features Games and tap the GameTools switch ...

Страница 137: ...tions during games Tap to mute notification sounds and display only notifications for incoming calls and emergency alerts so that you can enjoy your games without being disturbed If you receive an incoming call a small notification will appear at the top of the screen Samsung Notes Introduction Create notes by entering text from the keyboard or by writing or drawing on the screen with the S Pen Yo...

Страница 138: ...recording and insert it into the note Voice recording will start immediately Enter text using the keyboard Write or draw with pens Paint with brushes Insert a voice recording Insert an image 3 When you are finished composing the note tap SAVE Composing notes in handwriting mode On the note composer screen tap Pen to write or draw with the S Pen Pen mode Redo Extend the page Eraser mode Selection m...

Страница 139: ...note line by line To only erase the area you touch with the S Pen tap once more and tap Erase touched area You can adjust the size of the eraser by dragging the size adjustment bar To clear the note tap ERASE ALL You can also erase an area in pen mode by tapping it while pressing and holding the S Pen button Even with a smaller eraser you may still not be able to precisely erase the intended part ...

Страница 140: ...ap the input and drag a corner of the frame that appears 3 Edit the input using the available options Cut Cut out the input To paste it to another location tap and hold the location and then tap Paste Copy Copy the input To paste it to another location tap and hold the location and then tap Paste Delete Delete the input To front Send the input to the front To back Send the input to the back ...

Страница 141: ...our Redo Post the painting to PEN UP Undo Change the brush s radius or opacity Change the brush type Eraser mode Insert the painting into the note Inserting images into a note On the note composer screen tap Image Tap CAMERA to take a photo or tap GALLERY or OTHER to select an image The image will be inserted into your note Inserting voice recordings into a note On the note composer screen tap Voi...

Страница 142: ...category 3 Select a note and tap Pin to home screen The note will be added to the Home screen On the Home screen tap and hold a note to move or resize it To replace the note with another one tap CHANGE Deleting notes 1 On the Apps screen tap Samsung Notes 2 Tap ALL or tap CATEGORIES and select a category 3 Tap and hold a note to delete To delete multiple notes tick more notes to delete 4 Tap DELET...

Страница 143: ...e for sharing artwork drawn with the S Pen Post your artwork view others artwork and get useful drawing tips Post your artwork Your profile View your recent activity history View artwork by category You can sign in to PEN UP with your Samsung account or other SNS accounts ...

Страница 144: ... to post and enter a title description and hashtag Add your artwork to post Add hashtags Share your artwork with your other SNS accounts Enter a description Select where to post the artwork Select a category Enter a title 3 Tap POST Posting artwork from other apps To post your artwork from Gallery or other drawing apps select the artwork from an app and tap Share PEN UP ...

Страница 145: ... a favourite You can also download artwork or set one as your wallpaper View the users who like the artwork Set the artwork as a favourite Repost the artwork View comments and add a comment To download artwork tap Save artwork Downloaded artwork will be saved in Gallery You can only download artwork permitted by owners ...

Страница 146: ...n 2 Tap or double tap a date If the date already has saved events or tasks in it tap the date and tap 3 Enter event details Select a calendar to use or sync with Attach a map showing the location of the event Enter the location of the event Add a note Enter a title Set a start and end date for the event Add more details Set an alarm 4 Tap SAVE to save the event ...

Страница 147: ...add accounts to sync with open the Apps screen and tap Calendar Manage calendars Add account Then select an account to sync with and sign in When an account is added it will appear on the list S Health Introduction S Health helps you manage your wellness and fitness Set fitness goals check your progress and keep track of your overall wellness and fitness Starting S Health When running this app for...

Страница 148: ...s Tap Samsung S Health on the Apps screen Trackers Goals and programmes To add items to the S Health screen tap Manage items and then select items under each tab TRACKERS Monitor your activities food intake and body measurements GOALS Set your daily fitness goals and view your progress PROGRAMMES Use customisable exercise programmes ...

Страница 149: ...tion may be stored until the completion of such purposes You can delete personal data stored by S Health by using the Reset data option in the Settings menu To delete any data you have shared with social networks or transferred to storage devices you must delete them separately You may share and or sync your data with additional Samsung services or compatible third party services that you select a...

Страница 150: ... up Set wake up command Set custom wake up command START and then follow the on screen instructions To set the device to launch SVoice using the wake up command while the device is locked tap and tap the Wake up in secured lock switch to activate it Using SVoice 1 Say the preset wake up command Alternatively open the Apps screen and tap Samsung SVoice When SVoice is launched the device begins voic...

Страница 151: ...oice recognition Speak clearly Speak in quiet places Do not use offensive or slang words Avoid speaking in dialectal accents The device may not recognise your commands or may perform unwanted commands depending on your surroundings or how you speak Setting the language On the Apps screen tap Samsung SVoice Language and then select a language The selected language is applied to SVoice only not to t...

Страница 152: ... text and distinguish between sound sources Making voice recordings 1 On the Apps screen tap Samsung Voice Recorder 2 Tap to start recording Speak into the microphone Tap to pause recording While making a voice recording tap BOOKMARK to insert a bookmark Change the recording mode Start recording 3 Tap SAVE to finish recording 4 Enter a file name and tap SAVE ...

Страница 153: ... speak loudly and clearly in a quiet place If the voice memo system language does not match the language you are speaking the device will not recognise your voice Before using this feature tap the current language to set the voice memo system language Playing selected voice recordings When you review interview recordings you can mute or unmute certain sound sources in the recording 1 On the Apps s...

Страница 154: ...ny cities around the world time an event or set a specific duration ALARM On the Apps screen tap Clock ALARM Setting alarms Tap in the alarms list set an alarm time select the days on which the alarm will repeat set other various alarm options and then tap SAVE To open the keypad to enter an alarm time tap the time input field To activate or deactivate alarms tap the switch next to the alarm in th...

Страница 155: ...then tap DELETE STOPWATCH 1 On the Apps screen tap Clock STOPWATCH 2 Tap START to time an event To record lap times while timing an event tap LAP 3 Tap STOP to stop timing To restart the timing tap RESUME To clear lap times tap RESET TIMER 1 On the Apps screen tap Clock TIMER 2 Set the duration and then tap START To open the keypad to enter the duration tap the duration input field 3 Tap DISMISS w...

Страница 156: ...lear the history tap HISTORY CLEAR HISTORY Radio Listening to the FM radio Tap Radio on the Apps screen Tap to turn on the FM radio Select the radio station you want from the stations list View the list of favourites stations Scan and save available stations automatically Enter radio station frequency manually Fine tune the frequency Record a song from the FM radio View the list of available stati...

Страница 157: ...Some apps may not be available or may be labelled differently depending on the region or service provider Chrome Search for information and browse webpages Gmail Send or receive emails via the Google Mail service Maps Find your location on the map search the world map and view location information for various places around you Play Music Discover listen to and share music on your device You can up...

Страница 158: ...m with others Photos Search for manage and edit all your photos and videos from various sources in one place Hangouts Send messages images and emoticons to your friends and have video calls with them Google Search quickly for items on the Internet or your device ...

Страница 159: ...t in use Connecting to aWi Fi network 1 On the Settings screen tap Connections Wi Fi and then tap the switch to activate it 2 Select a network from theWi Fi networks list Networks that require a password appear with a lock icon 3 Tap CONNECT Once the device connects to aWi Fi network the device will reconnect to that network each time it is available without requiring a password To prevent the dev...

Страница 160: ...uest Sending and receiving data You can share data such as contacts or media files with other devices The following actions are an example of sending an image to another device 1 Tap Gallery on the Apps screen 2 Select an image 3 Tap Share Wi Fi Direct tick a device to transfer the image to and then tap SHARE 4 Accept theWi Fi Direct connection request on the other device If the devices are alread...

Страница 161: ...example pirating copies of files or illegally tapping communications for commercial purposes Samsung is not responsible for the repercussion of illegal use of the Bluetooth feature Pairing with other Bluetooth devices 1 On the Settings screen tap Connections Bluetooth and then tap the switch to activate it The detected devices are listed 2 Select a device to pair with If the device you want to pai...

Страница 162: ...the device you want to pair with is not in the list request that the device turns on its visibility option 4 Accept the Bluetooth connection request on the other device Unpairing Bluetooth devices 1 On the Settings screen tap Connections Bluetooth The device displays the paired devices in the list 2 Tap next to the device name to unpair 3 Tap Unpair Device visibility Allow other devices to find yo...

Страница 163: ...h to activate it 2 Drag the limit adjustment bar upwards or downwards to set the limit 3 Drag the warning adjustment bar upwards or downwards to set a data usage alert level The device will alert you when the warning level is reached Flight mode This disables all wireless functions on your device You can use only non network services On the Settings screen tap Connections and tap the Flight mode s...

Страница 164: ... NFC tags or receive data Making payments with the NFC feature Before you can use the NFC feature to make payments you must register for the mobile payment service To register or get more information about the service contact your service provider 1 On the Settings screen tap Connections and tap the NFC and payment switch to activate it 2 Touch the NFC antenna area on the back of your device to th...

Страница 165: ...nections NFC and payment and tap the switch to activate it 2 Tap the Android Beam switch to activate it 3 Select an item and touch the other device s NFC antenna to your device s NFC antenna 4 When Touch to beam appears on the screen tap your device s screen to send the item If both devices try to send data simultaneously the file transfer may fail ...

Страница 166: ...e USB tethering to share the device s mobile data connection with a computer via USB When connected to a computer the device is used as a wireless modem for the computer Using the mobile hotspot Use your device as a mobile hotspot to share your device s mobile data connection with other devices 1 On the Settings screen tap Connections Mobile hotspot and tethering Mobile hotspot 2 Tap the switch to...

Страница 167: ...Select a SIM or USIM for messaging Mobile data Select a SIM or USIM card for data services Adaptive callback Set the device to display the SIM or USIM card selection pop up window when returning a call or calling from a message The pop up window will appear only if the SIM or USIM card used for the previous call or message is different from your preferred SIM or USIM card Dual SIM always on Set th...

Страница 168: ... control your device s MirrorLink apps on the vehicle s head unit monitor Refer to MirrorLink for more information Download booster Set the device to download files larger than 30 MB faster viaWi Fi and mobile networks simultaneously Refer to Download booster for more information VPN Set up and connect to virtual private networks VPNs Printing Configure settings for printer plug ins installed on t...

Страница 169: ... s MirrorLink apps on the vehicle s head unit monitor On the Settings screen tap Connections More connection settings MirrorLink Your device is compatible with vehicles that support MirrorLink version 1 1 or higher Connecting your device to a vehicle via MirrorLink When using this feature for the first time connect the device to aWi Fi or mobile network 1 Pair your device with a vehicle via Blueto...

Страница 170: ...may use only the fastest connection This feature supports HypertextTransmission Protocol HTTP 1 1 and Hypertext Transmission Protocol Secure HTTPS The feature cannot be used with other protocols such as FTP Sounds and vibration Change settings for various sounds on the device On the Settings screen tap Sounds and vibration Sound mode Set the device to use sound mode or silent mode Vibrate while ri...

Страница 171: ...touched Sound quality and effects Configure additional sound settings Notifications Change the notification settings for each app On the Settings screen tap Notifications To customise notification settings tap ADVANCED and select an app Allow notifications Allow notifications from the selected app Set as priority Display notifications at the top of the notification panel and include them in the al...

Страница 172: ...or the Edge screen Refer to Edge screen for more information Always On Display Set the device to display an image or information while the screen is turned off Refer to Always On Display for more information Night clock Set the device to use the Edge screen as a clock at night You can set the duration that the night clock stays on LED indicator Set the device to turn on the LED indicator while the...

Страница 173: ...scheduled switch to activate it and select an option Sunset to sunrise Set the device to apply the blue light filter at night and turn it off in the morning based on your location Custom schedule Set a specific time to apply the blue light filter Easy mode Easy mode provides an easier user experience by using a simpler layout and bigger icons on the Home screen Some app features may not be availab...

Страница 174: ...ettings that control them On the Settings screen tap Advanced features Excessive shaking or impact to the device may cause unintended input for some features S Pen Change the settings for using the S Pen Refer to S Pen features for more information about Air command Air view and Screen off memo Smart stay Set the device to prevent the display backlight from turning off while you are looking at the...

Страница 175: ...me apps and features Direct call Set the device to make a voice call by picking up and holding the device near your ear while viewing call message or contact details Smart alert Set the device to alert you if you have missed calls or new messages when you pick up the device This feature may not work if the screen is turned on or the device is not on a flat surface Easy mute Set the device to mute ...

Страница 176: ...instructions to add emergency contacts if you have not already done so To send help messages with audio recordings or photos tap the Attach audio recording or Attach pictures switch to activate it The Attach pictures option may not be available depending on the region or service provider Adding emergency contacts On the Settings screen tap Advanced features Send SOS messages Send messages to ADD T...

Страница 177: ... with a tap of your finger Battery Storage Device security RAM Using the quick optimisation feature On the Settings screen tap Device maintenance FIX NOW or OPTIMISE NOW The quick optimisation feature improves device performance through the following actions Clearing some memory Deleting unnecessary files and closing apps running in the background Managing abnormal battery usage Scanning for malwa...

Страница 178: ...s to set app power monitor options You can set the device to charge the battery more quickly Tap Advanced settings and tap the Fast cable charging switch to activate it Storage Check the status of the used and available memory On the Settings screen tap Device maintenance Storage The actual available capacity of the internal memory is less than the specified capacity because the operating system a...

Страница 179: ...n the locked screen Notifications on lock screen Set whether or not to show notification content on the locked screen and select which notifications to display Secure lock settings Change screen lock settings for the selected lock method Fingerprints Register your fingerprint to the device to secure the device or sign in to your Samsung account Refer to Fingerprint recognition for more information...

Страница 180: ...ster and manage accounts such as your Samsung account or Google account and transfer data to or from other devices via Smart Switch Regularly back up your data to a safe location such as Samsung Cloud or a computer so that you can restore it if the data is corrupted or lost due to an unintended factory data reset Samsung Cloud You can manage the content that you want to store securely in Samsung C...

Страница 181: ...lect an account service 3 Follow the on screen instructions to complete the account setup To sync content with your accounts select an account and select items to sync Removing accounts On the Settings screen tap Cloud and accounts Accounts select an account name select the account to remove and then tap Remove account Backup Change the settings for managing settings and data On the Settings scree...

Страница 182: ...e to automatically restore settings and app data from the Google server when apps are reinstalled Smart Switch Launch Smart Switch and transfer data from your previous device Refer toTransferring data from your previous device for more information On the Settings screen tap Cloud and accounts Smart Switch Google Configure settings for some features provided by Google On the Settings screen tap Goo...

Страница 183: ...sibility Using the Home key to open accessibility menus On the Settings screen tap Accessibility Direct access and then tap the switch to activate it Then select an accessibility menu to open when you press the Home key three times quickly You can access the following accessibility menus Accessibility Voice Assistant Universal switch Magnifier window Negative colours Greyscale Colour adjustment In...

Страница 184: ...e various finger gestures to control the screen while you are usingVoice Assistant One finger gestures Tapping Read aloud the item under your finger To explore the screen place a finger on the screen and move it on the screen Tapping twice Open the selected item While selected items are read aloud when you hear the item you want release your finger from the item Then tap anywhere on the screen twi...

Страница 185: ... Open the notification panel Three finger gestures Tapping Start reading items aloud from the top Tapping twice Start reading from the next item Tapping three times Read the last selected text and copy it to the clipboard Swiping to the left or right Open the contextual menu and scroll through the options Swiping upwards or downwards Change the text reading and selecting granularity Using the cont...

Страница 186: ...e screen off Set the device to read aloud notifications when the screen is turned off Use proximity sensor Set the device to pause voice feedback when you place your hand over the sensor at the top of the device Shake to continue reading Set the device to read aloud the text displayed on the screen when you shake the device You can select from various shaking speeds Read out phonetic alphabet Set ...

Страница 187: ... on when you press the Home key or tap the screen Currently activated features do not turn off when the screen is off On the Settings screen tap Accessibility Vision and then tap the Dark screen switch to activate it You can activate or deactivate this feature by pressing the Power key twice Reading passwords aloud Set the device to read the password aloud when you enter the password whileVoice As...

Страница 188: ...ld a key on the keyboard to enter additional characters available for the key A pop up window appears above the key showing available characters To select a character drag your finger on the pop up window until you hear the character you want and release it Vision Adding voice recordings to voice labels You can use voice labels to distinguish objects of similar shape by attaching labels to them Yo...

Страница 189: ...trast keyboard Increase the size of the Samsung keyboard and change the key colours to increase the contrast between the text and the background On the Settings screen tap Accessibility Vision and then tap the High contrast keyboard switch to activate it Displaying button shapes Display button shapes with frames to make them stand out On the Settings screen tap Accessibility Vision and then tap th...

Страница 190: ...he normal view Keyboards on the screen cannot be magnified When this feature is activated the performance of some apps such as Phone and Calculator may be affected Converting the screen to greyscale mode Display colours on the screen as grey tones On the Settings screen tap Accessibility Vision and then tap the Greyscale switch to activate it Reversing the display colours Improve screen visibility...

Страница 191: ... of your doorbell The device will detect and record the doorbell 3 Tap and ring your doorbell to check if it is recorded correctly When the device detects the doorbell sound tap OK To change the doorbell sound tap Change doorbell sound The device will vibrate when it detects sound and the alert will be saved as a log Setting flash notification Set the flash to blink when an alarm sounds or when yo...

Страница 192: ...eakers Use this if you have a hearing impairment or if a single earbud is more convenient On the Settings screen tap Accessibility Hearing and then tap the Mono audio switch to activate it Dexterity and interaction Universal switch You can control the touchscreen by connecting an external switch by tapping the screen or by using head movements and face gestures On the Settings screen tap Accessibi...

Страница 193: ...nels or swipe upwards or downwards to select other menus Using the cursor On the assistive menu tap Cursor You can control the screen using small finger movements on the touch area Drag your finger on the touch area to move the cursor Also tap the screen to select items under the cursor Use the following options Scroll left or right on the screen Scroll up or down the screen Magnify the area where...

Страница 194: ...tivate interaction control mode to restrict the device s reaction to inputs while using apps This feature is not available when you activate Palm swipe to capture Direct call Smart alert or Easy mute 1 On the Settings screen tap Accessibility Dexterity and interaction Interaction control 2 Tap the switch to activate it 3 Press and hold the Home key and theVolume Down key simultaneously while using...

Страница 195: ...n tap the switch to activate it To set the device to vibrate when you have unchecked notifications tap the Vibrate switch to activate it To set an interval between alerts tap Reminder interval To set apps to alert you to notifications select apps under Show notifications from Answering or ending calls Set to answer or end calls by pressing a button or using a voice command On the Settings screen t...

Страница 196: ... tap Accessibility Manage accessibility Share via Then select the accessibility files and tap DONE Select a sharing method and follow the on screen instructions to share the files General management Customise your device s system settings or reset the device On the Settings screen tap General management Language and input Select device languages and change settings such as keyboards and voice inpu...

Страница 197: ...onnected to aWi Fi network Scheduled software updates Set the device to install downloaded updates at a specified time User manual View help information to learn how to use the device and apps or configure important settings On the Settings screen tap User manual About device Access your device s information On the Settings screen tap About device Status View various device information such as the...

Страница 198: ...e SIM or USIM card You can disable this feature by using the Lock SIM card menu PUK Your SIM or USIM card is blocked usually as a result of entering your PIN incorrectly several times You must enter the PUK supplied by your service provider PIN2 When you access a menu requiring the PIN2 you must enter the PIN2 supplied with the SIM or USIM card For more information contact your service provider Yo...

Страница 199: ...rvice Centre Restarting the device If your device freezes or hangs you may need to close apps or turn off the device and turn it on again Forcing restart If your device is frozen and unresponsive press and hold the Power key and theVolume Down key simultaneously for more than 7 seconds to restart it Resetting the device If the methods above do not solve your problem perform a factory data reset On...

Страница 200: ... with the service provider s base station Move to another area and try again When using the device while moving wireless network services may be disabled due to issues with the service provider s network The battery icon is empty Your battery is low Charge the battery The battery does not charge properly For Samsung approved chargers Ensure that the charger is connected properly Visit a Samsung Se...

Страница 201: ...urroundings and the photography techniques you use If you take photos in dark areas at night or indoors image noise may occur or images may be out of focus Error messages appear when opening multimedia files If you receive error messages or multimedia files do not play when you open them on your device try the following Free some memory by transferring files to a computer or deleting files from yo...

Страница 202: ... or higher installed on your computer Your device cannot find your current location GPS signals may be obstructed in some locations such as indoors Set the device to useWi Fi or a mobile network to find your current location in these situations Data stored in the device has been lost Always make backup copies of all important data stored in the device Otherwise you cannot restore data if it is cor...

Страница 203: ... storing in any information storage and retrieval system without the prior written permission of Samsung Electronics Trademarks SAMSUNG and the SAMSUNG logo are registered trademarks of Samsung Electronics Bluetooth is a registered trademark of Bluetooth SIG Inc worldwide Wi Fi Wi Fi Protected Setup Wi Fi Direct Wi Fi CERTIFIED and theWi Fi logo are registered trademarks of theWi Fi Alliance All o...

Отзывы: