background image

Basics

37

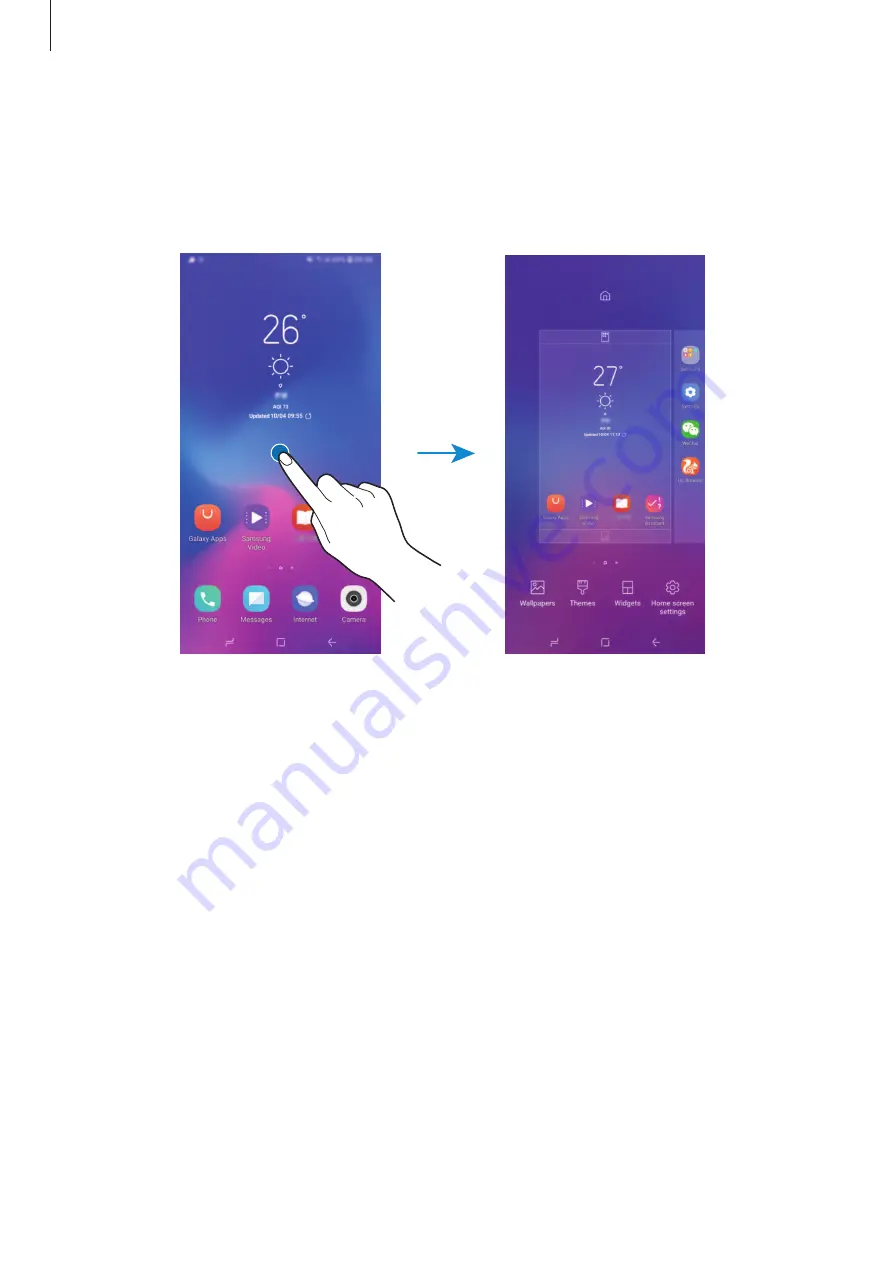
Editing the Home screen

On the Home screen, tap and hold an empty area, or pinch your f ngers together to access 
the editing options. You can set the wallpaper, add widgets, and more. You can also add, 
delete, or rearrange Home screen panels.

•  

Wallpapers

: Change the wallpaper settings for the Home screen and the locked screen.

•  

Themes

: Change the device’s theme. Visual elements of interface, such as colours, icons,

and wallpapers, will change depending on the selected theme.

•  

Widgets

: Widgets are small apps that launch specif c app functions to provide

information and convenient access on your Home screen. Tap and hold a widget, and
then drag it to the Home screen. The widget will be added on the Home screen.

•  

Home screen settings

: Change the size of the grid to display more or fewer items on the

Home screen and more.

Содержание SM-G6200

Страница 1: ...ng com cn User Manual English CHN 08 2018 Rev 1 0 Some contents are not in accordance with the equipment For more information please set the default language into Simplified Chinese and refer to the User Manual ...

Страница 2: ...up 25 Samsung account 26 Transferring data from your previous device 31 Understanding the screen 42 Notification panel 44 Entering text Apps and features 46 Installing or uninstalling apps 48 Phone 53 Contacts 56 Messages 58 Internet 60 Camera 75 Gallery 79 Multi window 82 Smart Manager 85 SamsungNotes 86 Calendar 87 SamsungHealth 91 SamsungAssistant 92 Voice Recorder 93 My Files 93 Clock 95 Calcu...

Страница 3: ...splay 106 Blue light filter 107 Screen saver 108 Advanced features 110 Dual Messenger 110 Apps 111 Wallpapers and themes 111 Lock screen and security 112 Face recognition 115 Fingerprint recognition 118 Accounts 118 Backup and restore 119 Accessibility 120 General management 122 Software update 122 User manual 123 About phone Table of Contents Settings 97 Introduction 97 Connections ...

Страница 4: ...ely responsible for illegal use of media You may incur additional charges for data services such as messaging uploading and downloading auto syncing or using location services depending on your data plan For large data transfers it is recommended to use theWi Fi feature If you have questions about an app provided with the device contact a Samsung Service Centre For user installed apps contact serv...

Страница 5: ...ce may feel hotter to the touch This does not affect the device s lifespan or performance and is in the device s normal range of operation If the battery becomes too hot the charger may stop charging Do the following when the device heats up Disconnect the charger from the device and close any running apps Wait for the device to cool down and then begin charging the device again If the lower part ...

Страница 6: ... extended periods When playing high quality games for extended periods When recording videos for extended periods When streaming videos while using the maximum brightness setting When connecting to aTV While multitasking or when running many apps in the background When using Multi window When updating or installing apps while recording videos When downloading large files during a video call When r...

Страница 7: ...feels hot for a prolonged period do not use it for a while If the device continues to overheat contact a Samsung Service Centre Device limitations when the device overheats When the device heats up the features and performance may be limited or the device may turn off to cool down The feature is only available on supported models If the device becomes hotter than usual a device overheating message...

Страница 8: ...sure containers Never use a damaged charger or battery Device layout and functions Package contents Refer to the quick start guide for package contents The items supplied with the device and any available accessories may vary depending on the region or service provider The supplied items are designed only for this device and may not be compatible with other devices You can purchase additional acce...

Страница 9: ...Basics 9 Device layout Front camera Receiver Power key Touchscreen LED indicator Volume key Proximity Light sensor Multipurpose jack USB Type C ...

Страница 10: ...ice If you cover the device s antenna area with your hands or other objects while using certain features such as calls or the mobile data connection Using a Samsung approved screen protector is recommended Unapproved screen protectors may cause the sensors to malfunction Do not cover the proximity light sensor area with screen accessories such as a screen protector or stickers Doing so may cause t...

Страница 11: ...lume Press to adjust the device volume Touch buttons Back button Home button Recents button Show and hide button When you turn on the device the touch buttons will appear at the bottom of the screen The touch buttons are set to the Recents button Home button and Back button by default Refer to Navigation bar touch buttons for more information ...

Страница 12: ...damage to the device Any damage caused by misuse is not covered by the warranty To save energy unplug the charger when not in use The charger does not have a power switch so you must unplug the charger from the electric socket when not in use to avoid wasting power 1 Connect the USB cable to the USB power adaptor 2 Plug the USB cable into the device s multipurpose jack 3 Plug the USB power adaptor...

Страница 13: ...harge for a few minutes before turning on the device If you use multiple apps at once network apps or apps that need a connection to another device the battery will drain quickly To avoid losing power during a data transfer always use these apps after fully charging the battery Using a power source other than the charger such as a computer may result in a slower charging speed due to a lower elect...

Страница 14: ...le device In some areas data transfer speeds may be slower if two SIM cards are inserted in the device than when one SIM card is inserted Use caution not to lose or let others use the nano SIM card Samsung is not responsible for any damages or inconveniences caused by lost or stolen cards Some LTE services may not be available depending on the service provider For more information about service av...

Страница 15: ...SIM card on the tray 1 1 and the secondary nano SIM card on the tray 2 2 The phone cannot support two CDMA cards at the same time in China 4 Gently press the nano SIM card into the tray to secure it If the card is not fixed firmly into the tray the SIM card may leave or fall out of the tray 5 Insert the tray back into the tray slot If you insert the tray into your device while the tray is wet your...

Страница 16: ... nano SIM card You cannot insert a nano SIM card and a microSD card in tray 2 at the same time Removing the nano SIM card 1 Insert the ejection pin into the hole on the tray to loosen the tray 2 Pull out the tray gently from the tray slot 3 Remove the nano SIM card 4 Insert the tray back into the tray slot ...

Страница 17: ...o receive new calls These situations apply to voice and video calls Customising nano SIM cards Launch the Settings app tap Connections SIM card manager and then select a nano SIM card to access the following options Icon Change the icon of the nano SIM card Name Change the display name of the nano SIM card Network mode Select a network type to use with the nano SIM card Setting preferred nano SIM ...

Страница 18: ... or corrupt the data stored in it Use caution to insert the memory card right side up The device supports the FAT and the exFAT file systems for memory cards When inserting a card formatted in a different file system the device will ask to reformat the card or will not recognise the card To use the memory card you must format it If your device cannot format or recognise the memory card contact the...

Страница 19: ...19 5 4 2 1 3 ...

Страница 20: ...ed 3 Place a memory card on the tray 2 with the gold coloured contacts facing downwards Tray 2 Tray 1 4 Gently press the memory card into the tray to secure it If the card is not f xed f rmly into the tray the memory card may leave or fall out of the tray 5 Insert the tray back into the tray slot If you insert the tray into your device while the tray is wet your device may be damaged Always make s...

Страница 21: ...ing information or right after transferring data Doing so can cause data to be corrupted or lost or cause damage to the external storage or device Samsung is not responsible for losses including loss of data resulting from the misuse of external storage devices Formatting the memory card A memory card formatted on a computer may not be compatible with the device Format the memory card on the devic...

Страница 22: ...Turning the device on and off f f f Power off Restarting the device f f f ...

Страница 23: ...n instructions to set up your device The initial setup procedures may vary depending on the device s software and the service provider 1 Turn on the device 2 Select your preferred device language and select 3 Select aWi Fi network and connect to it 4 Read and agree to the terms and conditions and tap AGREE Select a language ...

Страница 24: ...Set a screen lock method to protect your device You can protect your personal information by preventing others from accessing your device To set the screen lock method later tap No thank you Select features you want to use and complete the initial setup The Home screen will appear ...

Страница 25: ... on Samsung accounts launch the Settings app and tap Accounts Samsung account Help Registering your Samsung account Registering a new Samsung account If you do not have a Samsung account you should create one 1 Launch the Settings app and tap Accounts Add account 2 Tap Samsung account CREATE ACCOUNT 3 Follow the on screen instructions to complete creating your account Registering an existing Samsu...

Страница 26: ...ung account Remove account 3 Tap REMOVE enter your Samsung account password and then tap REMOVE ACCOUNT Transferring data from your previous device You can restore your data such as images contacts messages and apps from Samsung Cloud You can also copy them from your previous device via Smart Switch This feature may not be supported on some devices or computers Limitations apply Visit www samsung ...

Страница 27: ...our previous device to your device wirelessly viaWi Fi Direct 1 2 3 4 5 6 On the previous device launch Smart Switch If you do not have the app download it from Galaxy Apps On your device launch the Settings app and tap Accounts Smart Switch Place the devices near each other On the previous device tap WIRELESS SEND CONNECT On your device tap WIRELESS RECEIVE and select the previous device type Fol...

Страница 28: ...from www samsung com cn smartswitch Back up data from your previous device to a computer and import the data to your device 1 On the computer visit www samsung com cn smartswitch to download Smart Switch 2 On the computer launch Smart Switch If your previous device is not a Samsung device back up data to a computer using a program provided by the device s manufacturer Then skip to the f fth step 3...

Страница 29: ...aunch the Settings app tap Accounts Backup and restore tap Back up and then back up your data The data backup method may vary depending on your model Some data will not be backed up To check which data will be backed up launch the Settings app tap Accounts Samsung Cloud select your device under Backup and restore and then tap Back up Restoring data 1 On your new device launch the Settings app and ...

Страница 30: ...Cloud Launch the Settings app and tap Accounts Samsung Cloud You can immediately check your used memory and saved items such as GALLERY and SAMSUNG NOTES Tap each card and enter the next page You can change the settings or check the saved data You can check the backup data in your Samsung account by using the Backup and restore option Select your device and tap Restore data ...

Страница 31: ...pply excessive pressure to it with your fingertips Leaving the touchscreen idle for extended periods may result in afterimages screen burn in or ghosting Turn off the touchscreen when you do not use the device The device may not recognise touch inputs close to the edges of the screen which are outside of the touch input area It is recommended to use fingers when you use the touchscreen Tapping Tap...

Страница 32: ...ap and hold an item and drag it to the target position Double tapping Double tap the screen Swiping Swipe upwards downwards to the left or to the right Spreading and pinching Spread two fingers apart or pinch on the screen ...

Страница 33: ...revious screen Displaying or hiding the navigation bar Using the Show and hide button at the left side of the navigation bar you can set the navigation bar to be hidden or pinned on the screen when you use apps or features The navigation bar is pinned by default If you want to view fi es or use apps in full screen double tap the Show and hide button to hide the navigation bar To show the navigatio...

Страница 34: ...r and then select an option Show and hide button Add a button to hide or pin the navigation bar You can set whether or not to display the button for each app BACKGROUND COLOR Change the navigation bar s background colour Button layout Change the order of the buttons on the navigation bar ...

Страница 35: ...view other panels swipe to the left or right Moving items Tap and hold an item and then drag it to a new location To move the item to another panel drag it to the side of the screen You can also move frequently used apps to the shortcuts area at the bottom of the Home screen Widgets Navigation bar touch buttons Favourite apps Screen indicators ...

Страница 36: ... the app when a folder frame appears around the apps A new folder containing the selected apps will be created TapEnter folder name and enter a folder name Moving apps from a folder Tap and hold an app to drag it to a new location Deleting a folder Tap and hold a folder and then tapDelete folder Only the folder will be deleted The folder s apps will be relocated to the Home screen ...

Страница 37: ... and the locked screen Themes Change the device s theme Visual elements of interface such as colours icons and wallpapers will change depending on the selected theme Widgets Widgets are small apps that launch specif c app functions to provide information and convenient access on your Home screen Tap and hold a widget and then drag it to the Home screen The widget will be added on the Home screen H...

Страница 38: ... all apps including newly installed apps The Home screen will display shortcuts to apps and widgets To open the Apps screen swipe upwards or downwards on the Home screen To return to the Home screen swipe upwards or downwards on the Apps screen Alternatively tap the Home button or the Back button Home screen Apps screen ...

Страница 39: ...Signal strength Roaming outside of normal service area GPRS network connected EDGE network connected UMTS network connected HSDPA network connected HSPA network connected LTE network connected LTE enabled models Wi Fi connected Bluetooth feature activated Location services being used Call in progress Missed call New text or multimedia message Alarm activated Mute mode activated Vibration mode acti...

Страница 40: ...ge the screen lock method launch the Settings app tap Lock screen Screen lock type and then select a method When you set a pattern PIN password face or f ngerprint for the screen lock method you can protect your personal information by preventing others from accessing your device After setting the screen lock method the device will require an unlock code whenever unlocking it Swipe Swipe in any di...

Страница 41: ...ture the current screen and scrollable area Capturing a screenshot Use the following methods to capture a screenshot Captured screenshots will be saved in Gallery Key capture Press and hold theVolume Down key and the Power key simultaneously Quick setting button capture Open the notification panel swipe downwards on the notification panel and then tap Capture screen Swipe capture Swipe your hand t...

Страница 42: ...ill be saved inGallery Share Share the screenshot with others If the options are not visible on the captured screen launch theSettings app tap Advanced features and then tap the Smart capture switch to activate it Notification panel When you receive new notifi ations such as messages or missed calls indicator icons appear on the status bar To see more information about the icons open the notif cat...

Страница 43: ... to view more buttons To change feature settings tap the text under each button To view more detailed settings tap and hold a button To rearrange buttons tap Button order tap and hold a button and then drag it to another location Launch Settings Read data usage Clear all notifications Quick setting buttons View the notification details and perform various actions Access the notification settings ...

Страница 44: ... screen will appear Set the input language keyboard type and keyboard settings and then tap START Text entry is not supported in some languages To enter text you must change the input language to one of the supported languages Break to the next line Change the input language Delete a preceding character Enter symbols Enter numbers Additional keyboard functions View more keyboard functions Enter a ...

Страница 45: ...py or Cut The selected text is copied to the clipboard 4 Tap and hold where the text is to be inserted and tapPaste To paste text that you have previously copied tapClipboard and select the text Type to find sticker emoji and so on and add it into the message Type to find Y QWERTY SHUANGPING STROKE or other input methods Type to search the related information about the wording part you edited ...

Страница 46: ...nstalling apps Browse apps by category or tap the search field to search for a keyword Select an app to view information about it To download free apps tap INSTALL To purchase and download apps where charges apply tap the price and follow the on screen instructions To change the auto update settings tap Settings Auto update apps and then select an option Managing apps Uninstalling apps Tap and hol...

Страница 47: ...o grant permissions to the app To view your app permission settings launch the Settings app and tap Apps Select an app and tap Permissions You can view the app s permissions list and change its permissions To view or change app permission settings by permission category launch the Settings app and tap Apps App permissions Select an item and tap the switches next to apps to grant permissions If you...

Страница 48: ...e calls Making calls 1 Launch the Phone app and enter a phone number If the keypad does not appear on the screen tap to open the keypad 2 Tap or to make a voice call Preview the phone number Hide the keypad Delete a preceding character Access additional options ...

Страница 49: ...d dial numbers select a speed dial number and then add a phone number To make a call tap and hold a speed dial number on the keypad For speed dial numbers 10 and up tap the first digit s of the number and then tap and hold the last digit For example if you set the number 123 as a speed dial number tap 1 tap 2 and then tap and hold 3 Making calls from the locked screen On the locked screen drag out...

Страница 50: ...ng Quick decline messages enter a message and then tap Missed calls If a call is missed the icon appears on the status bar Open the notification panel to view the list of missed calls Alternatively launch the Phone app and tap RECENTS to view missed calls Blocking phone numbers Block calls from specific numbers added to your block list 1 Launch the Phone app and tap Settings Call blocking Black li...

Страница 51: ...d Activate or deactivate the speakerphone End the current call Record a call conversation Increase the volume When using the speakerphone keep the device away from your ears When you record a call conversation the file will be aved toMy Files Internal storage Call If the area around the rear camera and the fing rprint recognition sensor is covered unwanted noises may incur during a call Remove acc...

Страница 52: ...t 1 Launch the Phone app and tap RECENTS 2 Tap a caller s image or tap a phone number Details 3 Tap Create contact to create a new contact or tap Update existing to add the number to an existing contact Adding a tag to a phone number You can add tags to numbers without saving them to Contact This allows you to view the caller s information when they call without having them listed in Contact 1 Lau...

Страница 53: ...s Creating a new contact 1 Launch the Contacts app tap and then select a storage location 2 Enter contact information Depending on the selected storage location the types of information you can save may vary 3 Tap SAVE Add an image Open more information fields Select a storage location Enter contact information ...

Страница 54: ...ng account 1 Launch the Settings app tap Accounts and select the account to sync with 2 Tap Sync account and tap the Sync Contacts switch to activate it For the Samsung account tap Sync settings and tap the Contacts switch to activate it Searching for contacts Launch the Contacts app Use one of the following search methods Scroll up or down the contacts list Drag a f nger along the index at the ri...

Страница 55: ...er a group name To set a group ringtone tap Group ringtone and select a ringtone 3 Tap Add member select contacts to add to the group and then tap DONE 4 Tap SAVE Sending a group message You can send a group message to a group s members at the same time Launch the Contacts app tap Groups select a group and then tap Send message Deleting contacts 1 Launch the Contacts app and tap Delete 2 Select co...

Страница 56: ...he Messages app and tap 2 Add recipients and tap START 3 Enter a message To record and send a voice message tap and hold or say your message and then release your finger The recording icon appears only while the keyboard is hidden Access additional options Enter a message Make a call to the recipient Enter stickers Attach files Recipient Send the message 4 Tap or to send the message ...

Страница 57: ...ter a message and then tap or Blocking unwanted messages Block messages from specific numbers added to your block list 1 Launch the Messages app and tap Settings Block numbers and messages Blocked messages BLACK LIST 2 Tap Add manually or Add from Contacts Phone log 3 Enter a phone number or tick contacts and then tap DONE Setting the message notification You can change notification sound display ...

Страница 58: ...Enter the web address or a keyword and then tap Go To view the toolbars drag your f nger downwards slightly on the screen To switch between tabs quickly swipe to the left or right on the address f eld Bookmark the current webpage Quick menu Open the homepage Move between pages Open the browser s tab manager Access additional options Refresh the current webpage View your bookmarks saved webpages an...

Страница 59: ... secret mode In secret mode you cannot use some features such as screen capture In secret mode the device will change the colour of the toolbars Changing security settings You can change your password or the lock method Tap Settings Privacy Secret mode security Change password To set your registered fingerprint as the lock method along with the password tap the Fingerprints switch to activate it R...

Страница 60: ... photos or record videos in places where you may violate other people s privacy Launching Camera Use the following methods to launch Camera Launch the Camera app Press the Power key twice quickly On the locked screen drag outside the circle Some camera features are not available when you launch the Camera app from the locked screen or when the screen is turned off while the screen lock method is s...

Страница 61: ...deos tap the screen When the adjustment bar appears drag on the adjustment bar towards or To capture an image from the video while recording tap To change the focus while recording a video tap where you want to focus To use auto focus mode tap Preview thumbnail Take a photo Record a video Current mode Switch between the front and rear cameras Shooting modes Camera settings Options for current shoo...

Страница 62: ...device s camera features a wide angle lens Minor distortion may occur in wide angle photos or videos and does not indicate device performance problems The maximum recording time may reduce when you record video at high resolution Adding another camera button Add another camera button to the location you want on the screen to capture photos more conveniently Drag to the preview screen If another ca...

Страница 63: ...ontrol the zoom with one finger Drag on the zoom bar towards or Zooming features are available only when using the rear camera If you use the video zoom feature for a long time while recording a video the video quality may diminish to prevent your device from overheating Using the focus and exposure features Locking the focus AF and exposure AE You can lock the focus or exposure on a selected area...

Страница 64: ...he subject Use this feature in a place that has suÿcie nt light The background blur may not be applied properly in the following conditions The device or the subject is moving The subject is thin or transparent The subject has a similar colour or pattern to the background The subject or background is plain 1 On the shooting modes list tap LIVE FOCUS 2 Drag the background blur adjustment bar to the...

Страница 65: ...a photo taken with the Live focus feature When the background lighting appears in blurred points you can change the shape of the background blur Select a shape such as a heart star or flower to decorate the photo and make it look different Adjusting the background blur level Changing the shape of the background blur ...

Страница 66: ...el drag the background blur adjustment bar to the left or right To change the background blur shape drag the e ect list to the left or right and select an e ect you want The e ect list will appear only when the photo has blur shape in the background 3 Tap to save the photo Adjust the background blur level Change the background blur shape ...

Страница 67: ...7 Apps and features Live stickers Capture photos and videos with various live stickers 1 On the shooting modes list tap STICKERS 2 Tap and select a sticker 3 Tap to take a photo or tap to record a video ...

Страница 68: ...valuate the surroundings and determine the ideal mode for the photo On the shooting modes list tap AUTO Pro mode Capture photos and videos while manually adjusting various shooting options such as exposure value and ISO value On the shooting modes list tap PRO Select options and customise the settings and then tap to take a photo or tap to record a video Available options Select an ISO value This ...

Страница 69: ...en stitch them together to create a wide scene To get the best shots using panorama mode follow these tips Move the camera slowly in one direction Keep the image within the frame on the camera s viewfinder If the preview image is out of the guide frame or you do not move the device the device will automatically stop taking photos Avoid taking photos of indistinct backgrounds such as an empty sky o...

Страница 70: ...70 Hyperlapse mode 1 HYPERLAPSE 2 Auto 3 4 5 Beauty mode BEAUTY Selfie mode 1 2 SELFIE ...

Страница 71: ...71 3 4 Applying beauty effects 1 2 ...

Страница 72: ...the front camera After recognising your palm a countdown timer will appear When the time is up the device will take a photo 5 Slowly swivel the device left and then right or vice versa to take a wide self portrait The device will take additional photos when the white frame moves to each end of the viewfinder window Make sure to keep the white frame inside the viewf nder window The subjects should ...

Страница 73: ... the exposure of the shot Spot uses the light in a concentrated centre area of the shot to calculate the exposure of the shot Matrix averages the entire scene Camera settings On the preview screen tap Some options may not be available depending on the shooting mode REAR CAMERA Picture size Select a resolution for photos Using a higher resolution will result in higher quality photos but they will t...

Страница 74: ...amera button to Select an action to perform when you tap and hold the camera button PressVolume key to Set the device to use theVolume key to control the shutter or zoom in or out Shutter sound Enable or disable the shutter sound Reset settings Reset the camera settings FRONT CAMERA Picture size Select a resolution for photos Using a higher resolution will result in higher quality photos but they ...

Страница 75: ...r device You can also manage images and videos by album or create stories Viewing images 1 Launch the Gallery app and tap PICTURES 2 Select an image You can create an animated GIF or collage from multiple images On the list tap Create GIF or Create collage and then select images ...

Страница 76: ...elect a photo taken with the Live focus feature tapADJUST BACKGROUND BLUR to edit the blur level or change the shape of the background blur Viewing videos 1 Launch the Gallery app and tap PICTURES 2 Select a video to play Video f les show the icon on the preview thumbnail 3 Tap to play the video Pause and resume playback Drag your finger up or down on the left side of the playback screen to adjust...

Страница 77: ...ent such as a story or a GIF the content will also be displayed While viewing an image or on the video preview screen drag upwards on the screen File details will appear You can also view related content by tapping information on the screen Location Camera infomation File details Edit information Tags Location Camera infomation File details Edit information Tags ...

Страница 78: ...eated by default such as the Camera and Screenshots albums 1 Launch the Gallery app and tap ALBUMS 2 Tap Hide or unhide albums 3 Select albums to hide and tap APPLY To show albums again tap Hide or unhide albums deselect albums to show and then tap APPLY Deleting images or videos Deleting an image or a video Select an image or a video and tap at the bottom of the screen Deleting multiple images an...

Страница 79: ...Apps and features 79 Multi window Introduction Multi window lets you run two apps at the same time in the split screen view Some apps may not support this feature Split screen view ...

Отзывы: