background image

Apps and features

99

Recording super slow motion videos automatically

To capture the moment in super slow motion when motion is detected in the motion 
detection area, tap   to activate it. The motion detection feature will be activated and the 
motion detection area will appear on the preview screen.
Tap   to start recording. When motion is detected, the device will begin recording in super 
slow motion and save it as a video.

Super slow motion recording may start at an unwanted moment if there are 
conditions such as the following:

•  

When the device shakes.

•  

When another object is moving near the subject in the motion detection area.

•  

When recording under flickering light, such as in places with fluorescent lighting.

Slow motion mode

Record a video for viewing it in slow motion. You can specify sections of your videos to be 
played in slow motion.

On the shooting modes list, tap 

MORE


SLOW MOTION

.

Tap   to start recording.

When you are finished recording, tap   to stop.

On the preview screen, tap the preview thumbnail.

Tap 

Play slow motion video

.

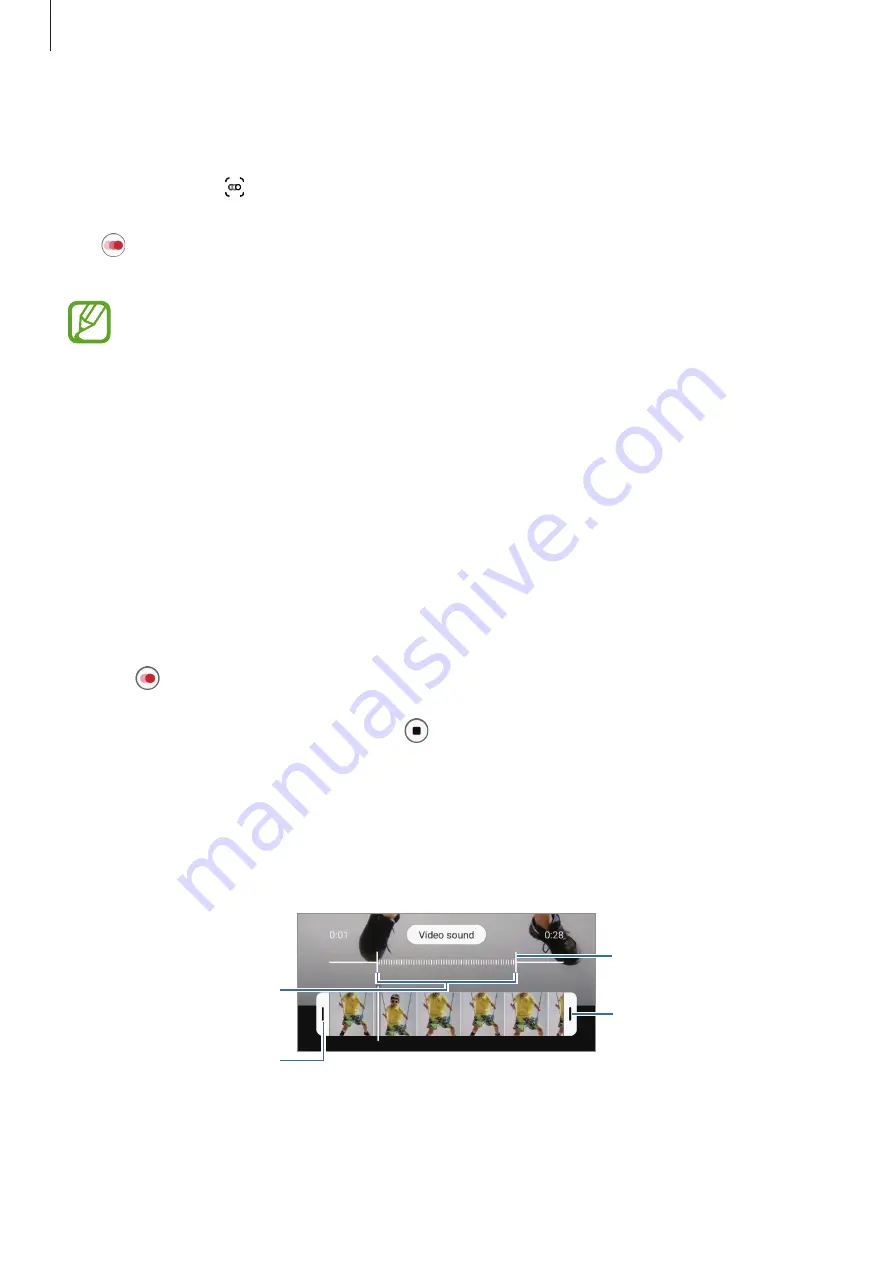
To edit the slow motion section, drag the section editing bar to the left or right.

Slow motion section

Start bracket

End bracket

Section editing bar

Содержание SM-F707B

Страница 1: ...www samsung com USER MANUAL English 05 2020 Rev 2 0 SM F707B ...

Страница 2: ... Entering text Apps and features 53 Installing or uninstalling apps 55 Bixby 60 BixbyVision 63 Bixby Routines 66 Phone 71 Contacts 76 Messages 79 Internet 81 Camera 103 Gallery 111 AR Zone 122 Always On Display 123 Edge lighting 125 Multi window 129 Samsung Daily 130 Samsung Pay 133 Samsung Health 137 Samsung Members 137 Samsung Notes 138 GalaxyWearable 138 Calendar 140 Reminder 142 Voice Recorder...

Страница 3: ...ttings 164 Introduction 164 Connections 165 Wi Fi 167 Bluetooth 168 NFC and payment 170 Data saver 171 Mobile data only apps 171 SIM card manager dual SIM models 172 Mobile Hotspot andTethering 173 More connection settings 175 Sounds and vibration 176 Dolby Atmos surround sound 176 Separate app sound 177 Notifications 177 App icon badges 178 Display 179 Dark mode settings 179 Blue light filter 180...

Страница 4: ...ce or apps to work improperly Software sound sources wallpapers images and other media provided with this device are licensed for limited use Extracting and using these materials for commercial or other purposes is an infringement of copyright laws Users are entirely responsible for illegal use of media You may incur additional charges for data services such as messaging uploading and downloading ...

Страница 5: ...f the touchscreen To set the touchscreen to automatically adjust its brightness based on the surrounding environment launch the Settings app tap Display and then tap the Adaptive brightness switch to activate it Depending on the region or model some devices are required to receive approval from the Federal Communications Commission FCC If your device is approved by the FCC you can view the FCC ID ...

Страница 6: ...it could be because the connected USB cable is damaged Replace the damaged USB cable with a new Samsung approved one When using a wireless charger do not place foreign materials such as metal objects magnets and magnetic stripe cards between the device and the wireless charger The wireless charging or fast charging feature is only available on supported models When the device heats up during use W...

Страница 7: ...ht When using the mobile hotspot and tethering feature When using the device in areas with weak signals or no reception When charging the battery with a damaged USB cable When the device s multipurpose jack is damaged or exposed to foreign materials such as liquid dust metal powder and pencil lead When you are roaming Do the following when the device heats up Keep the device updated with the lates...

Страница 8: ... the device will turn off Do not use the device until the device s temperature drops below the specified level If the second warning message appears during an emergency call the call will not be disconnected by a forced shut down Precautions for operating environment Your device may heat up due to the environment in the following conditions Use caution to avoid shortening the battery s lifespan da...

Страница 9: ...al accessories from your local Samsung retailer Make sure they are compatible with the device before purchase Use only Samsung approved accessories Using unapproved accessories may cause the performance problems and malfunctions that are not covered by the warranty Availability of all accessories is subject to change depending entirely on manufacturing companies For more information about availabl...

Страница 10: ...0 Device layout Unfolded Front camera Speaker Volume key Side key Power Bixby Fingerprint recognition sensor Main screen SIM card tray Proximity Light sensor Earphone jack Multipurpose jack USBType C Microphone ...

Страница 11: ...Basics 11 Folded NFC antenna MST antenna Wireless charging coil Main antenna Speaker Microphone GPS antenna Flash Cover screen Rear camera Dual ...

Страница 12: ...d objects that are affected by magnets Objects such as credit cards passbooks access cards boarding passes or parking passes may be damaged or disabled by the magnets in the device Do not fold the device toward the backside The device will be damaged When folding the device do not place any objects such as cards coins or keys on the Main screen The screen may be damaged This device is not water or...

Страница 13: ... If the device is covered with your hands while it is folded radio waves may be interfered with resulting in Bluetooth Wi Fi and other networks not having smooth connections Using a Samsung approved screen protector is recommended Unapproved screen protectors may cause the sensors to malfunction Do not cover the proximity light sensor area with screen accessories such as a screen protector sticker...

Страница 14: ...to turn the Cover screen on or off Press and hold to start a conversation with Bixby Refer to Using Bixby for more information Press twice or press and hold to launch the app or feature you set Side key Volume Down key Press simultaneously to capture a screenshot Press and hold simultaneously to turn off the device Setting the Side key Select an app or feature to launch by pressing the Side key tw...

Страница 15: ...evice folded at the angle you want When the device is folded within a certain range you can set the device upright without using a tripod When you fold the device the layout of some apps will automatically change For example when using the Camera app the shooting options at the top of the screen will go down for easier control Refer to Using camera with the device folded for more information If th...

Страница 16: ...ty Use only USBType C cable supplied with the device The device may be damaged if you use Micro USB cable To save energy unplug the charger when not in use The charger does not have a power switch so you must unplug the charger from the electric socket when not in use to avoid wasting power The charger should remain close to the electric socket and easily accessible while charging 1 Connect the US...

Страница 17: ...drain quickly To avoid losing power during a data transfer always use these apps after fully charging the battery Using a power source other than the charger such as a computer may result in a slower charging speed due to a lower electric current The device can be used while it is charging but it may take longer to fully charge the battery If the device receives an unstable power supply while char...

Страница 18: ...ing condition to prevent damage to the device Wireless charging The device has a built in wireless charging coil You can charge the battery using a wireless charger sold separately Fast wireless charging You can charge your device faster using the fast wireless charging feature A fan inside the charger may produce noise during fast wireless charging Launch the Settings app tap Device care Battery ...

Страница 19: ...t charge properly or may overheat Wireless charging coil 2 After fully charging disconnect the device from the wireless charger Precautions for wireless charging Do not place the device on the wireless charger with a credit card or radio frequency identification RFID card such as a transportation card or a key card placed between the back of the device and the device cover Do not place the device ...

Страница 20: ... not work properly It is recommended to remove any accessories and cover being used before using this feature Do not use earphones while sharing power Doing so may affect nearby devices 1 Open the notification panel swipe downwards and then tap Wireless PowerShare to activate it 2 Fold the device 3 Place the other device on the centre of your device with their backs facing When charging starts a n...

Страница 21: ...ary depending on the device s condition or the surrounding environment Setting the limit for power sharing You can set the device to stop power sharing when the remaining battery power drops below a certain level Launch the Settings app tap Device care Battery Wireless PowerShare Battery limit and then set the limit Nano SIM card and eSIM Insert the SIM or USIM card provided by the mobile telephon...

Страница 22: ...se the device may be damaged 2 Pull out the tray gently from the tray slot 3 Place the SIM or USIM card on the tray with the gold coloured contacts facing downwards 4 Gently press the SIM or USIM card into the tray to secure it If the card is not fixed firmly into the tray the SIM card may leave or fall out of the tray 5 Insert the tray back into the tray slot If you insert the tray into your devi...

Страница 23: ...ot be available depending on the region or service provider Activating SIM or USIM cards Launch the Settings app and tap Connections SIM card manager Select a SIM or USIM card and tap the switch to activate it Customising the eSIM and nano SIM card Launch the Settings app tap Connections SIM card manager and then select the eSIM or nano SIM card to access the following options Icon Change the icon...

Страница 24: ...cover may be damaged To avoid scratches on your device be careful not to allow foreign objects to come in between the cover and the device while using the cover 1 Remove the protective vinyl from your device 2 Clean both the mounting surfaces of your device and the cover to remove foreign objects 3 Remove the tape attached inside the cover 4 While your device is folded attach the cover from the to...

Страница 25: ...r the first time or after performing a data reset follow the on screen instructions to set up your device Turning the device off 1 To turn off the device press and hold the Side key and theVolume Down key simultaneously Alternatively open the notification panel and tap Side key Volume Down key 2 Tap Power off To restart the device tap Restart You can set the device to turn off when you press and h...

Страница 26: ...e you can make an emergency call send your current location information to others sound an emergency alarm and more To activate emergency mode press and hold the Side key and theVolume Down key simultaneously and then tap Emergency mode Alternatively open the notification panel and tap Emergency mode To deactivate emergency mode tap Turn off Emergency mode The usage time left shows the time remain...

Страница 27: ...our device 1 Press and hold the Side key for a few seconds to turn on the device 2 Select your preferred device language and select Select a language 3 Follow the on screen instructions to complete the setup The Home screen will appear If you do not connect to aWi Fi network you may not be able to set up some device features during the initial setup ...

Страница 28: ...ess 1 Launch the Settings app and tap Accounts and backup Accounts Add account Samsung account Alternatively launch the Settings app and tap 2 Tap Create account 3 Follow the on screen instructions to complete creating your account Signing in to your Samsung account If you already have a Samsung account sign in to your Samsung account You can also sign in using your Google account 1 Launch the Set...

Страница 29: ...amsung account password and then tap OK Transferring data from your previous device Smart Switch You can use Smart Switch to transfer data from your previous device to your new device Launch the Settings app and tap Accounts and backup Smart Switch This feature may not be supported on some devices or computers Limitations apply Visit www samsung com smartswitch for details Samsung takes copyright ...

Страница 30: ...nstructions to transfer data from the previous device After the data is done transferring you can view a list of the transferred data on your device Do not disconnect the USB cable or USB connector USBType C from the device when you are transferring files Doing so may cause data loss or device damage A USB connector may not be supplied depending on the region or model Certain USB connectors may no...

Страница 31: ...er data from your previous device After the data is done transferring you can view a list of the transferred data on your device Transferring backup data from a computer Transfer data between your device and a computer You must download the Smart Switch computer version app from www samsung com smartswitch Back up data from your previous device to a computer and import the data to your device 1 On...

Страница 32: ...puter using the USB cable 6 On the computer follow the on screen instructions to transfer data to your device Cover screen Main screen and Cover screen You can use the Main screen by unfolding the device or folding the device to the desired angle When you fully fold the device you can view information such as the clock or notifications on the Cover screen Main screen Cover screen ...

Страница 33: ...Viewing notifications When you receive new notifications they will appear on the Cover screen To view a notification swipe to the right on the clock and tap the notification icon To view notification details tap the notification and unfold the device The app will launch immediately and the notification can then be checked If the screen is locked you must unlock it to view notifications ...

Страница 34: ...se to your eyes Using a flash close to the eyes may cause temporary loss of vision or damage to the eyes 1 Press the Side key twice quickly to launch the Camera app 2 Face the rear camera 3 Show your palm to the camera or press theVolume key to take a selfie Answering or rejecting calls When a call comes in tap the Cover screen and drag to the right to answer the call To reject the call drag to th...

Страница 35: ... your fingertips It is recommended not to use fixed graphics on part or all of the touchscreen for extended periods Doing so may result in afterimages screen burn in or ghosting The device may not recognise touch inputs close to the edges of the screen which are outside of the touch input area It is recommended to use fingers when you use the touchscreen Tapping Tap the screen Tapping and holding ...

Страница 36: ...part or pinch on the screen Navigation bar soft buttons When you turn on the screen the soft buttons will appear on the navigation bar at the bottom of the screen The soft buttons are set to the Recents button Home button and Back button by default The functions of the buttons can change according to the app currently being used or usage environment ...

Страница 37: ...ear Tap More options and select an option you want Swipe from bottom The gesture hints will appear where the soft buttons are located To use the soft buttons drag the gesture hint of the desired button upwards Swipe from sides and bottom Swipe up from the bottom of the screen to move to the Home screen Swipe up and hold to view the list of recent apps Swipe inward from either side of the screen to...

Страница 38: ...evice s features It displays widgets shortcuts to apps and more The Apps screen displays icons for all apps including newly installed apps The screen may appear differently depending on the region or service provider A widget Navigation bar soft buttons Multi window tray Favourite apps Screen indicator ...

Страница 39: ...ps screen Alternatively tap the Home button or the Back button Home screen Apps screen Finder If you add the Apps button on the Home screen you can open the Apps screen by tapping the button On the Home screen tap and hold an empty area tap Home screen settings and then tap the Apps button switch to activate it The Apps button will be added at the bottom of the Home screen Apps button ...

Страница 40: ...nter a keyword Apps and content on your device will be searched If you tap on the keyboard you can search for more content Displaying the screen in landscape mode On the Home screen tap and hold an empty area tap Home screen settings and then tap the Rotate to landscape mode switch to activate it Rotate the device until it is horizontal to view the screen in landscape mode ...

Страница 41: ...olders Create folders and gather similar apps to quickly access and launch apps On the Home screen or the Apps screen tap and hold an app and then drag it over another app A new folder containing the selected apps will be created Tap Folder name and enter a folder name Adding more apps Tap on the folder Tick the apps to add and tap Done You can also add an app by dragging it to the folder Moving a...

Страница 42: ... panels Tap on the panel Wallpapers Change the wallpaper settings for the Home screen and the locked screen Themes Change the device s theme Visual elements of interface such as colours icons and wallpapers will change depending on the selected theme Widgets Widgets are small apps that launch specific app functions to provide information and convenient access on your Home screen Tap and hold a wid...

Страница 43: ...re most common The status bar may not appear at the top of the screen in some apps To display the status bar drag down from the top of the screen Some indicator icons appear only when you open the notification panel The indicator icons may appear differently depending on the service provider or model Icon Meaning No signal Signal strength Roaming outside of normal service area GPRS network connect...

Страница 44: ...k screen Folding the device or pressing the Side key turns off the screen and locks it Also the screen turns off and automatically locks if the device is not used for a specified period To unlock the screen swipe in any direction when the screen turns on If the screen is off press the Side key to turn on the screen Alternatively double tap the screen Locked screen ...

Страница 45: ...lock the screen PIN Enter a PIN with at least four numbers to unlock the screen Password Enter a password with at least four characters numbers or symbols to unlock the screen None Do not set a screen lock method Face Register your face to unlock the screen Refer to Face recognition for more information Fingerprints Register your fingerprints to unlock the screen Refer to Fingerprint recognition f...

Страница 46: ...l drag the status bar downwards To close the notification panel swipe upwards on the screen You can use the following functions on the notification panel View the notification details and perform various actions Clear all notifications Launch Settings Access the power options Access the notification settings Quick setting buttons Control connected nearby devices and SmartThings devices and scenes ...

Страница 47: ...button To view more detailed settings tap and hold a button To rearrange buttons tap Button order tap and hold a button and then drag it to another location Controlling media playback Take control of music or video playback easily using the Media feature You can also continue playback on another device 1 Open the notification panel and tap Media 2 Tap the icons on the controller to control the pla...

Страница 48: ... scrollable area How to capture a screenshot Use the following methods to capture a screenshot You can view the captured screenshots in Gallery Method 1 Key capture Press the Side key and theVolume Down key simultaneously Method 2 Quick setting button capture Open the notification panel swipe downwards on the notification panel and then tap Capture screen This feature may not be available dependin...

Страница 49: ...are the screenshot with others If the options are not visible on the captured screen launch the Settings app tap Advanced features Screenshots and screen recorder and then tap the Screenshot toolbar switch to activate it Screen record Record the screen while using your device 1 Open the notification panel swipe downwards and then tap Screen recorder to activate it 2 Select a sound setting and tap ...

Страница 50: ...next line Delete a preceding character Enter symbols Enter uppercase For all caps tap it twice Additional keyboard functions Enter a space View more keyboard functions Changing the input language Tap Languages and types Manage input languages and select the languages to use When you select two or more languages you can switch between the input languages by swiping to the left or right on the space...

Страница 51: ...ticons Enter stickers You can also enter your emoji stickers that look like you Refer to Using your emoji stickers in chats for more information Attach animated GIFs Enter text by voice Enter kaomojis CANGJIE QWERTY KEYBOARD Switch to the qwerty keyboard PINYIN QWERTY KEYBOARD Switch to qwerty pinyin mode STROKE KEYBOARD Switch to stroke mode Tap stroke keys to enter a character Tap when you are u...

Страница 52: ...ect the text Dictionary Look up definitions for words while using certain features such as when browsing webpages 1 Tap and hold over a word that you want to look up 2 Tap Dictionary on the options list If a dictionary is not preinstalled on the device tap Move to Manage dictionaries tap next to a dictionary and then tap Install to download it 3 View the definition in the dictionary pop up window ...

Страница 53: ...s tap Install To purchase and download apps where charges apply tap the price and follow the on screen instructions To change the auto update settings tap Auto update apps and then select an option Play Store Purchase and download apps Launch the Play Store app Installing apps Browse apps by category or search for apps by keyword Select an app to view information about it To download free apps tap...

Страница 54: ... Setting app permissions For some apps to operate properly they may need permission to access or use information on your device To view your app permission settings launch the Settings app and tap Apps Select an app and tap Permissions You can view the app s permissions list and change its permissions To view or change app permission settings by permission category launch the Settings app and tap ...

Страница 55: ...be connected to aWi Fi or mobile network To use Bixby you must sign in to your Samsung account Bixby is only available in some languages and certain features may not be available depending on your region Starting Bixby When you launch Bixby for the first time the Bixby intro page will appear You must select the language to use with Bixby sign in to your Samsung account according to the on screen i...

Страница 56: ...orresponding functions or show the information you requested While pressing and holding the Side key say what you want to Bixby and then release your finger from the key when you are finished speaking Alternatively say Hi Bixby and when the device emits a sound say what you want For example while pressing and holding the Side key say How s the weather today The weather information will appear on t...

Страница 57: ...uestion during a conversation while pressing and holding the Side key answer Bixby Or tap and answer Bixby If you are using headphones or Bluetooth audio devices or start a conversation by saying Hi Bixby you can continue the conversation without tapping the icon Launch the Bixby app and tap Automatic listening Hands eyes free only ...

Страница 58: ...is not recognised due to noisy environments or if you are in a situation where speaking is difficult you can communicate with Bixby via text Launch the Bixby app tap and then type what you want During the communication Bixby also will answer you through text instead of voice feedback Bixby usages Launching apps or services You can launch features quickly via Bixby You can also use various convenie...

Страница 59: ...e Bixby To view more ways to use Bixby launch the Bixby app and tap All capsules or Marketplace You can check out services supported by Bixby and examples of commands Some features may not be available depending on the region or service provider ...

Страница 60: ... Scan QR code Shopping Search including similar images Translate or extract text To use this feature the device must be connected to aWi Fi or mobile network The available features and search results may vary depending on the region or service provider This feature may not be available or you may not get correct search results depending on the image size format or resolution Samsung is not respons...

Страница 61: ...he shooting modes list and then tap BIXBY VISION 2 Select and keep the text within the screen to recognise it The translated text will appear on the screen To extract text tap If you tap you can use additional features with the extracted text such as sharing or saving it To change the source or target language tap the language settings panel at the bottom of the screen Searching for similar images...

Страница 62: ... device will search for it and show you the results 1 Launch the Camera app tap MORE on the shooting modes list and then tap BIXBY VISION 2 Select and keep the object within the screen to recognise it 3 Select a search result The information about the product will appear Reading QR codes Recognise QR codes and view a variety of information such as websites photos videos maps and business cards 1 L...

Страница 63: ...ng on silent mode and dark mode to not be jarring on your eyes and ears when you use the device before going to bed Adding routines Add routines to use your device more conveniently When you add a routine you can set its running condition to auto or manual Adding recommended routines When your device learns your usage patterns it will recommend adding useful or frequently used features as routines...

Страница 64: ...ct a routine you want and tap Save To set the routine s conditions and actions tap Edit Alternatively tap the condition or action you want to edit If you want to set the routine s running condition to manual tap Start button tapped This option will appear only when there are no running conditions set For manual routines you can add them to the Home screen as widgets and access them quickly When a ...

Страница 65: ...ng auto routines Auto routines will run automatically when their conditions are detected Running manual routines For manual routines which you set the running condition as Start button tapped you can run them manually by tapping the button whenever you want Launch the Settings app and tap Advanced features Bixby Routines My routines and tap next to the routine you want to run Alternatively tap the...

Страница 66: ...vate a routine tap the routine s switch or To edit a routine select a routine and tap Edit Alternatively tap the condition or action you want to edit To delete routines tap Delete tick routines to delete and then tap Delete Phone Introduction Make or answer voice and video calls Making calls 1 Launch the Phone app and tap Keypad 2 Enter a phone number ...

Страница 67: ...aunch the Settings app tap Advanced features Motions and gestures and then tap the Swipe to call or send messages switch to activate it Using speed dial Set speed dial numbers to quickly make calls To set a number to speed dial launch the Phone app tap Keypad or Contacts Speed dial numbers select a speed dial number and then add a phone number To make a call tap and hold a speed dial number on the...

Страница 68: ... address will appear This feature may not be available depending on the region or service provider Making an international call 1 Launch the Phone app and tap Keypad 2 Tap and hold 0 until the sign appears 3 Enter the country code area code and phone number and then tap Receiving calls Answering a call When a call comes in drag outside the large circle Rejecting a call When a call comes in drag ou...

Страница 69: ...tions The calls will be logged in the call log You can also block incoming calls from people that do not show their caller ID Tap the Block unknown callers switch to activate the feature Options during calls During a voice call The following actions are available Access additional options Add call Dial a second call The first call will be put on hold When you end the second call the first call wil...

Страница 70: ...evice away from your ears Adding a phone number to Contacts Adding a phone number to Contacts from the keypad 1 Launch the Phone app and tap Keypad 2 Enter the number 3 Tap Add to Contacts 4 Tap Create new contact to create a new contact or tap Update existing contact to add the number to an existing contact Adding a phone number to Contacts from the calls list 1 Launch the Phone app and tap Recen...

Страница 71: ...tap Recents 2 Tap a phone number 3 Tap Add note enter a tag and then tap Add When a call comes from that number the tag will show under the number Contacts Introduction Create new contacts or manage contacts on the device Adding contacts Creating a new contact 1 Launch the Contacts app and tap 2 Select a storage location The pop up window asking whether to select a storage location may not appear ...

Страница 72: ...e types of information you can save may vary 4 Tap Save Importing contacts Add contacts by importing them from other storages to your device 1 Launch the Contacts app and tap Manage contacts Import or export contacts Import 2 Select a storage location to import contacts from 3 TickVCF files or contacts to import and tap Done 4 Select a storage location to save contacts to and tap Import ...

Страница 73: ...te it For the Samsung account tap Sync settings and tap the Contacts switch to activate it Searching for contacts Launch the Contacts app Use one of the following search methods Scroll up or down the contacts list Drag a finger along the index at the right side of the contacts list to scroll through it quickly Tap at the top of the contacts list and enter search criteria Tap the contact Then take ...

Страница 74: ...count The profile sharing feature may not be available depending on the region or service provider The profile sharing feature is only available for contacts who have activated the profile sharing feature on their device 1 Launch the Contacts app and select your profile 2 Tap Tap here to share your profile and tap the switch to activate it To use the profile sharing feature your phone number must ...

Страница 75: ...members at the same time Launch the Contacts app tap Groups select a group and then tap Send message Merging duplicate contacts When you import contacts from other storages or sync contacts with other accounts your contacts list may include duplicate contacts Merge duplicate contacts into one to streamline your contacts list 1 Launch the Contacts app and tap Manage contacts Merge contacts 2 Tick c...

Страница 76: ... are roaming 1 Launch the Messages app and tap 2 Add recipients and enter a message To record and send a voice message tap and hold say your message and then release your finger The recording icon appears only while the message input field is empty Enter recipients Enter a message Enter stickers Attach files Recipient Send the message 3 Tap to send the message ...

Страница 77: ...ory and manage them easily 1 Launch the Messages app and tap Conversations 2 Tap New category Add category If the category option does not appear tap Settings and tap the Conversations categories switch to activate it 3 Enter a category name and tap Done 4 Select conversations to add to the category and tap Done Blocking unwanted messages Block messages from specific numbers added to your block li...

Страница 78: ... set an alert at an interval to let you know that you have unchecked notifications If this feature is not activated launch the Settings app tap Accessibility Advanced settings Notification reminders and then tap the switch to activate it Deleting messages 1 Launch the Messages app and tap Conversations 2 On the messages list select a contact or a phone number 3 Tap and hold a message then tap Dele...

Страница 79: ... 2 Tap the address field 3 Enter the web address or a keyword and then tap Go To view the toolbars drag your finger downwards slightly on the screen To switch between tabs quickly swipe to the left or right on the address field Bookmark the current webpage Open the homepage Move between pages Access additional options Refresh the current webpage Open the browser s tab manager View your bookmarks ...

Страница 80: ...o use a password for secret mode In secret mode the device will change the colour of the toolbars In secret mode you cannot use some features such as screen capture Changing security settings You can change your password or the lock method Tap Settings Privacy and security Secret mode settings Change password To use your registered biometric data as a lock method along with the password tap an opt...

Страница 81: ...e Some methods may not be available depending on the region or service provider Some camera features are not available when you launch the Camera app from the locked screen or when the screen is turned off while the screen lock method is set If photos you take appear blurry clean the camera lens and try again Taking photos 1 Tap the image on the preview screen where the camera should focus Spread ...

Страница 82: ...Cover screen The preview screen may vary depending on the shooting mode and which camera is being used The camera automatically shuts off when unused Make sure that the lens is not damaged or contaminated Otherwise the device may not work properly in some modes that require high resolutions Your device s camera features a wide angle lens Minor distortion may occur in wide angle photos or videos an...

Страница 83: ...ect an aspect ratio for photos Activate or deactivate the motion photo feature If you activate the feature a video clip will also be taken from a few seconds before tapping the camera button Stabilise a video Activate or deactivate the night hyperlapse feature Select a frame rate Select an aspect ratio for videos Apply a filter effect or beauty effects Record fun videos with virtual handwriting or...

Страница 84: ...ject inside the circular frame and blur the image outside the frame In FOOD mode adjust the colour tone Activate or deactivate the motion detection feature when recording super slow mo videos Change the recording time of super slow mo videos Changing shooting modes To change the shooting mode drag the shooting modes list to the left or right or swipe to the left or right on the preview screen Sele...

Страница 85: ...y When you fold the device the camera layout will automatically change Using the Cover screen You can view the viewfinder through the preview on the Cover screen You can also view related information such as the video recording icon and timer countdown on the Cover screen On the preview screen tap to turn on the Cover screen This feature is only available in some shooting modes ...

Страница 86: ... the screen 2 Face the rear camera 3 Show your palm to the camera or press theVolume key to take a selfie Selecting a camera for shooting On the preview screen select the camera you want and take a photo or record a video This feature is only available in some shooting modes Ultra wide The Ultra wide camera lets you take wide angle photos or record wide angle videos which look just like the actual...

Страница 87: ...lly recognises the subject and optimises the colour and any effects On the shooting modes list tap PHOTO and tap to take a photo Scene optimiser The camera adjusts the colour settings and applies the optimised effect automatically by recognising the subject On the shooting modes list tap PHOTO When the camera recognises the subject the scene optimiser button will change and the optimised colour an...

Страница 88: ...ot suggestions The camera suggests the ideal composition for the photo by recognising the position and angle of your subject On the preview screen tap and tap the Shot suggestions switch to activate it 1 On the shooting modes list tap PHOTO A guide will appear on the preview screen 2 Point the guide at the subject The camera recognises the composition and the recommended composition appears on the...

Страница 89: ...ds or tap to switch to the front camera for self portraits 3 Face the front camera To take self portraits with a wide angle shot of the landscape or people tap 4 Tap to take a photo Applying filter and beauty effects You can select a filter effect and modify facial features such as your skin tone or face shape before taking a photo 1 On the preview screen tap 2 Select a filter effect or beauty eff...

Страница 90: ...amera from automatically adjusting based on changes to the subjects or light sources Tap and hold the area to focus the AF AE frame will appear on the area and the focus and exposure setting will be locked The setting remains locked even after you take a photo Video mode The camera adjusts the shooting options automatically depending on the surroundings to record videos easily 1 On the shooting mo...

Страница 91: ...riety of results with just one shot Your device automatically captures the best shot and videos and creates photos with optimised filters or videos with certain sections repeated 1 On the shooting modes list tap SINGLETAKE 2 Tap and move the camera to capture the scene you want 3 When you are finished tap the preview thumbnail A variety of optimised results for the scene will appear To view other ...

Страница 92: ... the shutter speed A slow shutter speed allows more light in so the photo or video becomes brighter This is ideal for photos or videos of scenery or photos or videos taken at night A fast shutter speed allows less light in This is ideal for capturing photos or videos of fast moving subjects Adjust the colour tone Change the focus mode Drag the adjustment bar towards or to manually adjust the focus...

Страница 93: ... and then stitch them together to create a wide scene To get the best shots using panorama mode follow these tips Move the camera slowly in one direction Keep the image within the frame on the camera s viewfinder If the preview image is out of the guide frame or you do not move the device the device will automatically stop taking photos Avoid taking photos of indistinct backgrounds such as an empt...

Страница 94: ...esize the circular frame drag a corner of the frame 3 Tap and drag the adjustment bar to adjust the colour tone 4 Tap to take a photo Night mode Take a photo in low light conditions without using the flash When you use a tripod or place your device on a flat surface with it folded at the angle you want you can get brighter and steadier results 1 On the shooting modes list tap MORE NIGHT 2 Tap and ...

Страница 95: ...d edit it after taking a photo The available options may vary depending on the shooting mode Blur Big circle Zoom Colour point Spin Use this feature in a place that has sufficient light The background blur may not be applied properly in the following conditions The device or the subject is moving The subject is thin or transparent The subject has a similar colour to the background The subject or b...

Страница 96: ...adjustment bar to the left or right 3 When Ready appears on the preview screen tap to take a photo or tap to record a video Background effect intensity adjustment bar Background effects Editing the background of the Live focus photos You can also edit the background effect and the intensity of the background effect for a photo taken with the Live focus feature 1 Select a photo taken with the Live ...

Страница 97: ...to save the photo Super Slow mo mode Super slow motion is a feature that records a quickly passing moment slowly so that you can appreciate it later After the video is recorded background music will be added automatically Some super slow motion features may differ depending on the model Use this feature in a place that has sufficient light When recording a video indoors with insufficient or poor l...

Страница 98: ...ent in super slow motion and save it as a video 3 On the preview screen tap the preview thumbnail 4 Tap Play super slow mo video Random background music will automatically accompany the video during playback To edit the super slow motion section drag the section editing bar to the left or right Start bracket End bracket Super slow motion section Change the background music Section editing bar ...

Страница 99: ... conditions such as the following When the device shakes When another object is moving near the subject in the motion detection area When recording under flickering light such as in places with fluorescent lighting Slow motion mode Record a video for viewing it in slow motion You can specify sections of your videos to be played in slow motion 1 On the shooting modes list tap MORE SLOW MOTION 2 Tap...

Страница 100: ... and tap Play hyperlapse to view the video Customising camera settings On the preview screen tap Some options may not be available depending on the shooting mode Intelligent features Scene optimiser Set the device to adjust the colour settings and apply the optimised effect automatically depending on the subject or scene Shot suggestions Set the device to suggest the ideal composition for the phot...

Страница 101: ...ant to take with the front camera Using a higher resolution will result in higher quality videos but they will take up more memory Advanced recording options Set the device to use an advanced recording option If you activate the High efficiency video feature you can record videos in the High EfficiencyVideo Codec HEVC format Your HEVC videos will be saved as compressed files to conserve the device...

Страница 102: ...cessively The video resolution is high Pictures as previewed Set the device to save photos as they appear on the preview screen when taken with the front camera without flipping them Grid lines Display viewfinder guides to help composition when selecting subjects Location tags Attach a GPS location tag to the photo GPS signal strength may decrease in locations where the signal is obstructed such a...

Отзывы: