background image

Basics

5

•  

Modifying the device’s operating system or installing softwares from unofficial sources 
may result in device malfunctions and data corruption or loss. These actions are violations 
of your Samsung licence agreement and will void your warranty.

•  

Depending on the region or service provider, a screen protector is attached for protection 
during production and distribution. Damage to the attached screen protector is not 
covered by the warranty.

•  

You can see the touchscreen clearly even in strong outdoor sunlight by automatically 
adjusting the contrast range based on the surrounding environment. Due to the nature 
of the product, displaying fixed graphics for extended periods may result in afterimages 
(screen burn-in) or ghosting.


It is recommended not to use fixed graphics on part or all of the touchscreen for 
extended periods and turn off the touchscreen when not using the device.


You can set the touchscreen to turn off automatically when you are not using it. 
Launch the 

Settings

 app, tap 

Display


Screen timeout

, and then select the length 

of time you want the device to wait before turning off the touchscreen.


To set the touchscreen to automatically adjust its brightness based on the 
surrounding environment, launch the 

Settings

 app, tap 

Display

, and then tap the 

Adaptive brightness

 switch to activate it.

•  

Depending on the region or model, some devices are required to receive approval from 
the Federal Communications Commission (FCC). If your device is approved by the FCC, 
you can view the FCC ID of the device. To view the FCC ID, launch the 

Settings

 app and 

tap 

About phone


Status

.

•  

Depending on the region, you can view the regulatory information on the device. To 
view the information, launch the 

Settings

 app and tap 

About phone


Regulatory 

information

.

Содержание SM-A205G/DS

Страница 1: ...www samsung com USER MANUAL English 02 2019 Rev 1 0 SM A205G DS ...

Страница 2: ...9 Notification panel 51 Entering text Apps and features 54 Installing or uninstalling apps 56 Bixby Home 58 Reminder 62 Phone 67 Contacts 71 Messages 74 Internet 76 Email 77 Camera 91 Gallery 97 AR Emoji 103 Always On Display Galaxy A30 106 Multi window 109 Kids Home 111 Samsung Pay Galaxy A30 114 Samsung Pay mini Galaxy A30 114 GalaxyWearable 115 Samsung Members 116 Samsung Notes 117 Calendar 118...

Страница 3: ...146 Data saver 147 SIM card manager dual SIM models 147 Mobile Hotspot andTethering 149 More connection settings 151 Sounds and vibration 152 Dolby Atmos surround sound 152 Separate app sound 153 Notifications 153 App icon badges 154 Display 155 Blue light filter 156 Changing the screen mode or adjusting the display colour 157 Screensaver 158 Wallpapers and themes 158 Lock screen 159 Smart Lock 16...

Страница 4: ... registry settings or modified operating system software Attempting to customise the operating system may cause the device or apps to work improperly Software sound sources wallpapers images and other media provided with this device are licensed for limited use Extracting and using these materials for commercial or other purposes is an infringement of copyright laws Users are entirely responsible ...

Страница 5: ... on part or all of the touchscreen for extended periods and turn off the touchscreen when not using the device You can set the touchscreen to turn off automatically when you are not using it Launch the Settings app tap Display Screen timeout and then select the length of time you want the device to wait before turning off the touchscreen To set the touchscreen to automatically adjust its brightnes...

Страница 6: ...rformance and is in the device s normal range of operation If the battery becomes too hot the charger may stop charging Do the following when the device heats up Disconnect the charger from the device and close any running apps Wait for the device to cool down and then begin charging the device again If the lower part of the device overheats it could be because the connected USB cable is damaged R...

Страница 7: ... recording videos for extended periods When streaming videos while using the maximum brightness setting When connecting to aTV While multitasking or when running many apps in the background When using Multi window When updating or installing apps while recording videos When downloading large files during a video call When recording videos while using a navigation app When using large amount of dat...

Страница 8: ...ontinues to overheat contact a Samsung Service Centre Device limitations when the device overheats When the device heats up the features and performance may be limited or the device may turn off to cool down The feature is only available on supported models If the device becomes hotter than usual a device overheating message will appear To lower the device s temperature the screen brightness and t...

Страница 9: ...very cold or very hot temperatures Do not expose your device to direct sunlight for extended periods Do not use or store your device for extended periods in very hot areas such as inside a car in the summertime Do not place the device in any areas that may overheat such as on an electric heating mat Do not store your device near or in heaters microwaves hot cooking equipment or high pressure conta...

Страница 10: ...ces and specifications are subject to change without prior notice You can purchase additional accessories from your local Samsung retailer Make sure they are compatible with the device before purchase Use only Samsung approved accessories Using unapproved accessories may cause the performance problems and malfunctions that are not covered by the warranty Availability of all accessories is subject ...

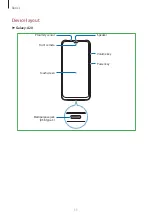
Страница 11: ...Basics 11 Device layout Galaxy A20 Front camera Speaker Power key Touchscreen Volume key Proximity sensor Multipurpose jack USBType C ...

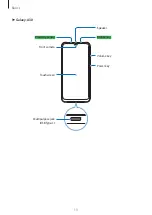
Страница 12: ...Basics 12 SIM card Memory card tray Flash Rear camera Dual GPS antenna MST antenna Speaker Microphone Earphone jack Main antenna NFC antenna NFC enabled models Fingerprint recognition sensor ...

Страница 13: ...Basics 13 Galaxy A30 Front camera RGB Sensor Power key Touchscreen Volume key Proximity sensor Multipurpose jack USBType C Speaker ...

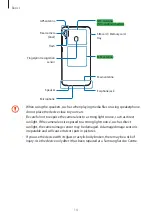
Страница 14: ...e the device close to your ears Be careful not to expose the camera lens to a strong light source such as direct sunlight If the camera lens is exposed to a strong light source such as direct sunlight the camera image sensor may be damaged A damaged image sensor is irreparable and will cause dots or spots in pictures If you use the device with its glass or acrylic body broken there may be a risk o...

Страница 15: ...ion Using a Samsung approved screen protector is recommended Unapproved screen protectors may cause the sensors to malfunction Do not cover the proximity sensor area with screen accessories such as a screen protector or stickers Doing so may cause the sensor to malfunction Do not allow water to contact the touchscreen The touchscreen may malfunction in humid conditions or when exposed to water Har...

Страница 16: ...on Recents button When you turn on the screen the soft buttons will appear at the bottom of the screen The soft buttons are set to the Recents button Home button and Back button by default Refer to Navigation bar soft buttons for more information ...

Страница 17: ...vice Any damage caused by misuse is not covered by the warranty Use only USBType C cable supplied with the device The device may be damaged if you use Micro USB cable To save energy unplug the charger when not in use The charger does not have a power switch so you must unplug the charger from the electric socket when not in use to avoid wasting power The charger should remain close to the electric...

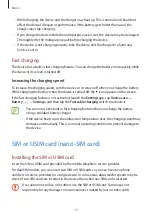
Страница 18: ...ons When the battery power is low the battery icon appears empty If the battery is completely discharged the device cannot be turned on immediately when the charger is connected Allow a depleted battery to charge for a few minutes before turning on the device If you use multiple apps at once network apps or apps that need a connection to another device the battery will drain quickly To avoid losin...

Страница 19: ...creen If the fast charging feature is not activated launch the Settings app tap Device care Battery Settings and then tap the Fast cable charging switch to activate it You cannot use the built in fast charging feature when you charge the battery using a standard battery charger If the device heats up or the ambient air temperature rises the charging speed may decrease automatically This is a norma...

Страница 20: ...Basics 20 Some LTE services may not be available depending on the service provider For more information about service availability contact your service provider Single SIM models ...

Страница 21: ...Basics 21 Dual SIM models ...

Страница 22: ...the gold coloured contacts facing downwards Place the primary SIM or USIM card on the SIM card tray 1 1 and the secondary SIM or USIM card on the SIM card tray 2 2 1 2 SIM card tray 2 SIM card tray 1 4 Gently press the SIM or USIM card into the SIM card tray to secure it If the card is not fixed firmly into the tray the SIM card may leave or fall out of the tray 5 Insert the tray back into the tra...

Страница 23: ...Basics 23 Correct card installation Single SIM models microSD card Nano SIM card Dual SIM models microSD card Nano SIM card 2 Nano SIM card 1 Use only a nano SIM card ...

Страница 24: ...M card manager Select a SIM or USIM card and tap the switch to activate it Customising SIM or USIM cards Launch the Settings app tap Connections SIM card manager and then select a SIM or USIM card to access the following options Icon Change the icon of the SIM or USIM card Name Change the display name of the SIM or USIM card Network mode Select a network type to use with the SIM or USIM card Setti...

Страница 25: ... or corrupt the data stored in it Use caution to insert the memory card right side up The device supports the FAT and the exFAT file systems for memory cards When inserting a card formatted in a different file system the device will ask to reformat the card or will not recognise the card To use the memory card you must format it If your device cannot format or recognise the memory card contact the...

Страница 26: ... to the tray to loosen the tray Ensure that the ejection pin is perpendicular to the hole Otherwise the device may be damaged 2 Pull out the tray gently from the tray slot When you remove the tray from the device the mobile data connection will be disabled ...

Страница 27: ...the tray slot If you insert the tray into your device while the tray is wet your device may be damaged Always make sure the tray is dry Fully insert the tray into the tray slot to prevent liquid from entering your device Removing the memory card Before removing the memory card first unmount it for safe removal Launch the Settings app and tap Device care Storage Storage settings SD card Unmount 1 I...

Страница 28: ...Samsung is not responsible for losses including loss of data resulting from the misuse of external storage devices Formatting the memory card A memory card formatted on a computer may not be compatible with the device Format the memory card on the device Launch the Settings app and tap Device care Storage Storage settings SD card Format Before formatting the memory card remember to make backup cop...

Страница 29: ...ss and hold the Power key and then tap Power off Follow all posted warnings and directions from authorised personnel in areas where the use of wireless devices is restricted such as aeroplanes and hospitals Restarting the device To restart the device press and hold the Power key and then tap Restart If your device is frozen and unresponsive press and hold the Power key and theVolume Down key simul...

Страница 30: ...de The usage time left shows the time remaining before the battery power runs out Usage time left may vary depending on your device settings and operating conditions Deactivating emergency mode To deactivate emergency mode tap Turn off Emergency mode Alternatively press and hold the Power key and then tap Emergency mode Initial setup When you turn on your device for the first time or after perform...

Страница 31: ...initial setup 6 Follow the on screen instructions to proceed the initial setup 7 Set a screen lock method to protect your device You can protect your personal information by preventing others from accessing your device To set the screen lock method later tap Not now 8 If the recommended apps screen appears select apps you want and download them 9 Sign in to your Samsung account You can enjoy Samsu...

Страница 32: ...ore Create your Samsung account with your email address To check the list of services that can be used with your Samsung account visit account samsung com For more information on Samsung accounts launch the Settings app and tap Accounts and backup Accounts Samsung account Help Registering your Samsung account Registering a new Samsung account If you do not have a Samsung account you should create ...

Страница 33: ... required information 3 Read and agree to the terms and conditions and tap Next to finish registering your Samsung account If a pop up window about using biometric data appears tap Register You can verify your Samsung account password via your biometric data such as fingerprints Refer to Samsung Pass for more information Removing your Samsung account When you remove your registered Samsung account...

Страница 34: ...e the right to transfer Transferring data wirelessly viaWi Fi Direct Transfer data from your previous device to your device wirelessly viaWi Fi Direct 1 On the previous device launch Smart Switch If you do not have the app download it from Galaxy Apps or Play Store 2 On your device launch the Settings app and tap Accounts and backup Smart Switch 3 Place the devices near each other 4 On the previou...

Страница 35: ...sfer data from external storage Transferring backup data from a computer Transfer data between your device and a computer You must download the Smart Switch computer version app from www samsung com smartswitch Back up data from your previous device to a computer and import the data to your device 1 On the computer visit www samsung com smartswitch to download Smart Switch 2 On the computer launch...

Страница 36: ...lay the imported data the data will be saved to a similar app Understanding the screen Controlling the touchscreen Do not allow the touchscreen to come into contact with other electrical devices Electrostatic discharges can cause the touchscreen to malfunction To avoid damaging the touchscreen do not tap it with anything sharp or apply excessive pressure to it with your fingertips It is recommende...

Страница 37: ...sics 37 Tapping Tap the screen Tapping and holding Tap and hold the screen for approximately 2 seconds Dragging Tap and hold an item and drag it to the target position Double tapping Double tap the screen ...

Страница 38: ...Basics 38 Swiping Swipe upwards downwards to the left or to the right Spreading and pinching Spread two fingers apart or pinch on the screen ...

Страница 39: ...cents button Home button and Back button by default The functions of the buttons can change according to the app currently being used or usage environment Back button Home button Recents button Button Function Recents Tap to open the list of recent apps Home Tap to return to the Home screen Tap and hold to launch the Google Assistant app Back Tap to return to the previous screen ...

Страница 40: ...screen tap the Gesture hints switch to deactivate it Setting the navigation bar Launch the Settings app tap Display Navigation bar and then select an option Navigation type Set the device to hide or display the navigation bar To hide the navigation bar tap Full screen gestures While the navigation bar is hidden you can use the soft buttons by dragging the gesture hint of the desired button upwards...

Страница 41: ... features It displays widgets shortcuts to apps and more The Apps screen displays icons for all apps including newly installed apps The screen may appear differently depending on the region or service provider A widget Navigation bar soft buttons Favourite apps Bixby Home indicator View your customised content ...

Страница 42: ... Apps screen Alternatively tap the Home button or the Back button Home screen Apps screen If you add the Apps button on the Home screen you can open the Apps screen by tapping the button On the Home screen tap and hold an empty area tap Home screen settings and then tap the Apps button switch to activate it The Apps button will be added at the bottom of the Home screen Apps button ...

Страница 43: ...creen in landscape mode Moving items Tap and hold an item and then drag it to a new location To move the item to another panel drag it to the side of the screen To add a shortcut to an app on the Home screen tap and hold an item on the Apps screen and then drag it to the top of the screen A shortcut to the app will be added on the Home screen You can also move frequently used apps to the shortcuts...

Страница 44: ...ed apps will be created Tap Enter folder name and enter a folder name Adding more apps Tap Add apps on the folder Tick the apps to add and tap Add You can also add an app by dragging it to the folder Moving apps from a folder Tap and hold an app to drag it to a new location Deleting a folder Tap and hold a folder and then tap Delete folder Only the folder will be deleted The folder s apps will be ...

Страница 45: ... Tap on the panel Wallpapers Change the wallpaper settings for the Home screen and the locked screen Themes Change the device s theme Visual elements of interface such as colours icons and wallpapers will change depending on the selected theme Widgets Widgets are small apps that launch specific app functions to provide information and convenient access on your Home screen Tap and hold a widget and...

Страница 46: ...in the table below are most common The status bar may not appear at the top of the screen in some apps To display the status bar drag down from the top of the screen Some indicator icons appear only when you open the notification panel Icon Meaning No signal Signal strength Roaming outside of normal service area GPRS network connected EDGE network connected UMTS network connected HSDPA network con...

Страница 47: ...sing the Power key turns off the screen and locks it Also the screen turns off and automatically locks if the device is not used for a specified period To unlock the screen swipe in any direction when the screen turns on If the screen is off press the Power key or double tap anywhere on the screen to turn on the screen Locked screen ...

Страница 48: ...rprints to unlock the screen Refer to Fingerprint recognition for more information You can set your device to perform a factory data reset if you enter the unlock code incorrectly several times in a row and reach the attempt limit Launch the Settings app tap Lock screen Secure lock settings unlock the screen using the preset screen lock method and then tap the Auto factory reset switch to activate...

Страница 49: ...panel drag the status bar downwards To close the notification panel swipe upwards on the screen You can use the following functions on the notification panel View the notification details and perform various actions Clear all notifications Launch Settings Search for content or apps stored on your device Access the notification settings Quick setting buttons Preferred SIM or USIM card for each opti...

Страница 50: ...in features Swipe downwards on the notification panel to view more buttons To change feature settings tap the text under each button To view more detailed settings tap and hold a button To rearrange buttons tap Button order tap and hold a button and then drag it to another location ...

Страница 51: ...supported languages Break to the next line Delete a preceding character Enter symbols Enter uppercase For all caps tap it twice Additional keyboard functions Enter a space View more keyboard functions Changing the input language Tap Languages and types Manage input languages and then select the languages to use When you select two or more languages you can switch between the input languages by swi...

Страница 52: ... it On a 3x4 keyboard a key has three or four characters To enter a character tap the corresponding key repeatedly until the desired character appears Additional keyboard functions Some features may not be available depending on the region or service provider Predict words based on your input and show word suggestions To return to the keyboard functions list tap Enter emoticons Enter stickers Atta...

Страница 53: ...as when browsing webpages 1 Tap and hold over a word that you want to look up If the word you want to look up is not selected drag or to select the desired text 2 Tap Dictionary on the options list If a dictionary is not preinstalled on the device tap Move to Manage dictionaries tap next to a dictionary and then tap INSTALL to download it 3 View the definition in the dictionary pop up window To sw...

Страница 54: ...apps tap INSTALL To purchase and download apps where charges apply tap the price and follow the on screen instructions To change the auto update settings tap Settings Auto update apps and then select an option Play Store Purchase and download apps Launch the Play Store app Installing apps Browse apps by category or search for apps by keyword Select an app to view information about it To download f...

Страница 55: ...r device When you open an app a pop up window may appear and request access to certain features or information Tap Allow on the pop up window to grant permissions to the app To view your app permission settings launch the Settings app and tap Apps Select an app and tap Permissions You can view the app s permissions list and change its permissions To view or change app permission settings by permis...

Страница 56: ...register and sign in to your Samsung account Opening Bixby Home 1 On the Home screen swipe to the right The Bixby Home screen will appear When launching this feature for the first time or after performing a data reset follow the on screen instructions to complete the setup 2 Swipe upwards or downwards to view recommended content Upcoming reminder Access additional options Recommended content 3 To ...

Страница 57: ...op displaying a card on the list drag the card to the right and tap Don t show again To hide a card from the list drag the card to the right and tap Hide for now Selecting apps to show as cards Add or delete apps to show as cards on the Bixby Home screen On the Bixby Home screen tap Cards and tap the switches next to items to add or delete them If an app is not installed on the device you must ins...

Страница 58: ... aWi Fi or mobile network To fully use this feature you must register and sign in to your Samsung account To use location reminders the GPS feature must be activated Starting Reminder You can start Reminder from Bixby Home 1 On the Home screen swipe to the right The Bixby Home screen will appear 2 Tap Get started on the Reminder card The Reminder screen will appear and the Reminder app icon will b...

Страница 59: ... a single memo or webpage address and view it later For example create a reminder to alert you to Water the flowers when I get home 1 Launch the Reminder app 2 Tap Write a reminder or and enter Water the flowers 3 Tap Place Set conditions Pick a place and set the location to home 4 Tap When I arrive at Done 5 Tap Save to save the reminder When you arrive at home the Water the flowers notification ...

Страница 60: ...owers when I get home Bixby will save what you said as a reminder Checking reminder notifications At the preset time or location a notification pop up window will appear Tap Complete or Snooze Viewing the reminders list Launch the Reminder app to view your reminders list To view reminder details select a reminder ...

Страница 61: ...at you do not need to be reminded of as complete On the reminders list select a reminder and tap Complete Alternatively drag the reminder to the left Restoring reminders Restore reminders that have been completed 1 On the reminders list tap Completed Edit 2 Tick items to restore and tap Restore Reminders will be added to the reminders list and you will be reminded at the preset times Deleting remi...

Страница 62: ... and video calls Making calls 1 Launch the Phone app and tap Keypad 2 Enter a phone number 3 Tap to make a voice call or tap to make a video call Preview the phone number Delete a preceding character Access additional options Add the number to the contacts list ...

Страница 63: ... dial tap Keypad or Contacts Speed dial numbers select a speed dial number and then add a phone number To make a call tap and hold a speed dial number on the keypad For speed dial numbers 10 and up tap the first digit s of the number and then tap and hold the last digit For example if you set the number 123 as a speed dial number tap 1 tap 2 and then tap and hold 3 Making calls from the locked scr...

Страница 64: ...all is missed the icon appears on the status bar Open the notification panel to view the list of missed calls Alternatively launch the Phone app and tap Recents to view missed calls Blocking phone numbers Block calls from specific numbers added to your block list 1 Launch the Phone app and tap Settings Block numbers 2 Tap Recents or Contacts select contacts and then tap Done To manually enter a nu...

Страница 65: ... the speakerphone When using the speakerphone keep the device away from your ears Mute Turn off the microphone so that the other party cannot hear you Keypad Hide Open or close the keypad End the current call During a video call Tap the screen to use the following options Access additional options Camera Turn off the camera so that the other party cannot see you Switch Switch between the front and...

Страница 66: ...and tap Recents 2 Tap a caller s image and tap Add or tap a phone number and tap Add to Contacts 3 Tap Create contact to create a new contact or tap Update existing to add the number to an existing contact Adding a tag to a phone number You can add tags to numbers without saving them to Contact This allows you to view the caller s information when they call without having them listed in Contact 1 ...

Страница 67: ...ting a new contact 1 Launch the Contacts app and tap 2 Select a storage location and tap Select 3 Enter contact information Select a storage location Add an image Open more information fields Enter contact information Depending on the selected storage location the types of information you can save may vary 4 Tap Save ...

Страница 68: ...contacts with online contacts saved in your web accounts such as your Samsung account 1 Launch the Settings app tap Accounts and backup Accounts and select the account to sync with 2 Tap Sync account and tap the Contacts switch to activate it For the Samsung account tap Sync settings and tap the Contacts switch to activate it Searching for contacts Launch the Contacts app Use one of the following ...

Страница 69: ...g the profile sharing feature The profile sharing feature may not be available depending on the region or service provider The profile sharing feature is only available for contacts who have activated the profile sharing feature on their device 1 Launch the Contacts app and select your profile 2 Edit your profile and tap Save 3 Tap Tap here to share your profile and tap the switch to activate it T...

Страница 70: ...members at the same time Launch the Contacts app tap Groups select a group and then tap Send message Merging duplicate contacts When you import contacts from other storages or sync contacts with other accounts your contacts list may include duplicate contacts Merge duplicate contacts into one to streamline your contacts list 1 Launch the Contacts app and tap Manage contacts Merge contacts 2 Tick c...

Страница 71: ...n you are roaming 1 Launch the Messages app and tap 2 Add recipients and enter a message To record and send a voice message tap and hold say your message and then release your finger The recording icon appears only while the keyboard is hidden Enter recipients Enter a message Enter stickers Attach files Recipient Send the message 3 Tap to send the message ...

Страница 72: ...tion To reply to the message tap Enter message enter a message and then tap To adjust the font size spread two fingers apart or pinch on the screen Blocking unwanted messages Block messages from specific numbers added to your block list 1 Launch the Messages app and tap Settings Block numbers and messages Block numbers 2 Tap Inbox and select a contact Or tap Contacts select contacts and then tap D...

Страница 73: ...der You can set an alert at an interval to let you know that you have unchecked notifications If this feature is not activated launch the Settings app tap Accessibility Advanced settings Notification reminders and then tap the switch to activate it Deleting messages 1 Launch the Messages app and tap Conversations 2 On the messages list select a contact 3 Tap and hold a message tap Delete To delete...

Страница 74: ...ternet app 2 Tap the address field 3 Enter the web address or a keyword and then tap Go To view the toolbars drag your finger downwards slightly on the screen To switch between tabs quickly swipe to the left or right on the address field Bookmark the current webpage Open the homepage Move between pages Access additional options Refresh the current webpage Open the browser s tab manager ...

Страница 75: ...ret mode the device will change the colour of the toolbars In secret mode you cannot use some features such as screen capture Changing security settings You can change your password or the lock method Tap Settings Privacy and security Set Secret mode lock Change password To set your registered biometric data as the lock method along with the password tap the Fingerprints switch to activate it Refe...

Страница 76: ...nt you can set one as the default account Tap Set default account Sending emails 1 Tap to compose an email 2 Add recipients and enter a subject line and text 3 Tap to send the mail Reading emails When Email is open the device will automatically retrieve new emails To manually retrieve emails swipe downwards on the top of the emails list Tap an email on the screen to read it If email syncing is dis...

Страница 77: ...e you may violate other people s privacy Launching Camera Use the following methods to launch Camera Launch the Camera app Press the Power key twice quickly On the locked screen drag outside the circle Some methods may not be available depending on the region or service provider Some camera features are not available when you launch the Camera app from the locked screen or when the screen is turne...

Отзывы: