Samsung SHC-737 Series Скачать руководство пользователя страница 17

COLOR CCD CAMERA

User Guide

32

COLOR CCD CAMERA

User Guide

33

How to Use the Camera

How to Use the Camera

•  When using AC power at 60Hz frequency, you can use the L/L type synchronization.
•  When the power is DC 12V, the SYNC. menu is fixed to the ‘INT’ mode.

•  MD areas show only MOTION DET menu. Therefore, MD areas don’t display on the 

monitor screen.

Notes

Notes


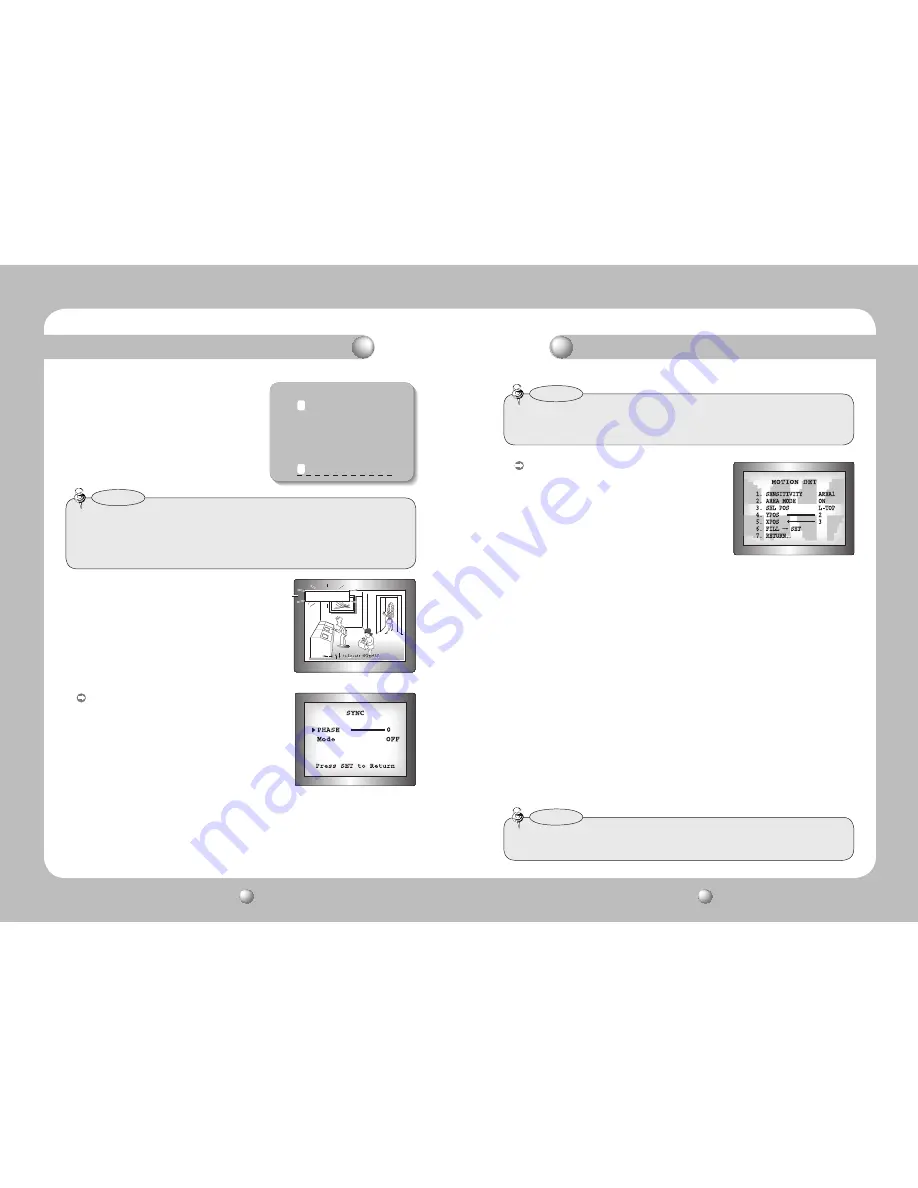
MOTION DET :


 If you connect an alarm device to this camera, 
you  can  monitor  activity  more  efficiently, 
because a signal is generated by the camera 
whenever motion is detected. The motion 
detection signal is output through the MD OUT 
port.

    ❶  

When the SPECIAL menu screen is displayed, press the Up and Down 
buttons so that the arrow indicates MOTION DET .

    2 

Set up the mode using the 4 direction buttons.


- SENSITIVITY :  You can select up to 8 MD areas. When SENSITIVITY number 

is high, motion detection sensitivity is increased to recognize 
even small movement.


- AREA MODE :  Determines whether to use the MD area selected in 

SENSITIVITY.


- SEL POS :  Determines which of the 4 vertices of each MD area is to be 

used.


- YPOS : Determines the coordinate of the vertical axis for SEL POS.


- XPOS : Determines the coordinate of the horizontal axis for SEL POS.


- FILL

SET :  Fills in a selected MD area. Fills in a selected MD area. The 

color of filling is sequentially selected as brown, orange, blue, 
cyan, yellowish green, yellow and red.


- RETURN :  Select this to save the MOTION DET menu settings and return to 

the SPECIAL menu.

    3 

Press the SET button.

    4 

 Use the 4 direction buttons to move 
to a desired letter and select the letter 
by pressing the SET button. Repeat 
this to enter multiple letters. You can 
enter up to 15 letters.

    5 

 Enter a title, move the cursor to ’POS’ and 
press the SET button. The entered title 
appears on the screen. Select the position to 
display the title on the screen by using the 4 
direction buttons and press the SET button.
When the position is determined, select 
’END’ and press the SET button to return to 
the SPECIAL menu.


CAMERA TITLE SETUP

A B C D E F G H I J K L M
N O P Q R S T U V W X Y Z
a b c d e f g h i j k l m
n o p q r s t u v w x y z

- . 0 1 2 3 4 5 6 7 8 9

← →

C L R   P O S   E N D

•  If you move the cursor to CLR and press the SET button, all the letters are deleted. To edit 

a letter, change the cursor to the bottom left arrow and press the SET button. Move the 

cursor over the letter to be edited, move the cursor to the letter to be inserted and then 

press the SET button.

Notes

 FRONT DOOR


SYNC :

   In areas where the supply is at 60Hz, 

you can synchronize the output phase 
of multiple cameras using the power 
synchronization function (Line-Lock) 
without using a synchronization signal 
generator.


- INT : Internal Synchronization Type


- L/L : Power Synchronization Type, Line-lock


• Press the SET button.


• You can select a desired phase from 0 to 359 when select 'phase'.


•  You can decide the synchronization between luminance and color signal 

when select the 'Mode' to TRACE.

Содержание SHC-737 Series

Страница 1: ...Super Vision at Ultra Low Light SHC 737 UserGuide Before installing and operating this product please read this manual thoroughly ENGLISH ...

Страница 2: ...erated in a commercial environment This equipment generates uses and can radiate radio frequency energy and if not installed and used in accordance with the instruction manual may cause harmful interference to radio communications Operation of this equipment in a residential area is likely to cause harmful interference in which case the user will be required to correct the interference at his own ...

Страница 3: ...NS UP FLIP H V REV D ZOOM SHARPNESS MOTION DETECTION and PRIVACY MASKING functions are provided RS 485 Communication Control Support Remote OSD menu control via an RS 485 interface is supported OSD The camera control is convenient by using 9 different foreign language O S D NTSC Korea English Spanish Japanese French Portuguese PAL English French German Spanish Italian Chinese Portuguese BLC By ado...

Страница 4: ... can t compensate for material loss and or personalinjuriesbyrobbery fire naturaldisasterorsomethinglikethistype Ignoring this information may result in material loss and or serious personal injuries including death Indicates Never Allowed Ignoring this information may result in material loss and or a slight injuries Indicates No Disassembling Warnings Cautions Warning Attention Special Mark Messa...

Страница 5: ...y any liquids Liquids may contain minerals that are corrosive to electronic components Do not expose the camera to radioactivity Components and Accessories 1 Ultra Low Light Color CCD Camera SHC 737 2 Instruction Manual 3 Auto Iris Lens Connector Plug 4 C MountAdapter 1 2 3 4 Overview 3 2 Front View 1 Tripod Mounting Bracket Screw Hole Used to fix theTripod Mounting Bracket to the top of the camer...

Страница 6: ...Day Night Mode by connecting an external signal to this port 8 MD Output Port Motion detection signals are output through this port 9 RS 485 Control Port You can control SETUP MENU through this port by using external controllers like a Remote controller that RS 485 Communication is supported For details see page 16 Video OUT Port Video signals are output through this port Connect this port to theV...

Страница 7: ... 2 Strip the insulation of the core of the auto iris lens cable to expose a 2mm length When Using Auto Iris Lens approx 8mm approx 2mm 3 Remove the cover of the auto iris lens connector plug and solder the lens cable to the connector pin of the plug 4 Fit the cover of the auto iris lens connector plug remove the protective glass cover from the front of the camera and fasten the auto iris lens by t...

Страница 8: ...Remove the protective glass cover at the front of this product and turn the CS Mount Lens clockwise to install it And set focus of camera using Back Focus Control Lever of camera side after combining CS Mount lens When Using a C Mount Lens 1 Remove the protective glass cover at the front of this product and turn the C Mount Adapter clockwise to install it 2 Turn the C Mount lens clockwise to insta...

Страница 9: ...turer When the resistance value of copper wire is at 20 C 68 F Copper wire size AWG 24 0 22mm2 22 0 33mm2 20 0 52mm2 18 0 83mm2 Resistance Ω m 0 078 0 050 0 030 0 018 Voltage Drop V m 0 028 0 018 0 011 0 006 RS 485 converter Example PC Serial Port COM1 Serial Cable RS 485 Converter Camera RS 485 Control Port The camera can be controlled by using external controllers like a Remote controller RS 485...

Страница 10: ...IGHT OFF 5 SSNR ON 6 DAY NIGHT AUTO 7 IMAGE ADJ 8 SPECIAL 9 EXIT Select the function using the UP or DOWN button Change the status using the LEFT or RIGHT button An item with the icon also has sub menus To select a sub menu select an item with the icon and press the Function Setup switch An item with the icon is unavailable due to function settings Notes How to Use the Camera How to Set up the Fun...

Страница 11: ...ing the installation position When the SHUTTER is set to MANUAL or A FLK mode SENS UP will be disabled Notes MAIN SETUP 1 LENS DC 2 EXPOSURE Using this function you can control screen brightness 1 When the SETUP menu screen is displayed select LENS by using the Up and Down buttons so that the arrow indicates LENS 2 Select the connected lens type by using the Left and Right buttons LENS DC Video Se...

Страница 12: ...L Select this to fine tuneWhite Balance manually SetWhite Balance first by using theATW orAWC mode After that switch to MANUAL mode fine tune theWhite Balance and then press the SET button How to Use the Camera How to Use the Camera AGC AUTO GAIN CONTROL The higher the gain level the brighter the screen but the higher the noise OFF Deactivates theAGC function LOW Allows automatic gain control from...

Страница 13: ...s dim 3 If the camera is directed towards a fluorescent light or is installed in a place where illumination changes dramatically theWhite Balance operation may become unstable Notes This camera is designed so that it delivers a distinctive subject and background at the same time even when the subject is in backlight unlike conventional cameras by adopting a proprietary SV IV DSP chip 1 When the SE...

Страница 14: ...ways displayed in color B W The picture is always displayed in black and white AUTO The mode is switched to Color in a normal environment but switches to B W mode when ambient illumination is low To set up the sswitching time or speed forAUTO mode press the SET button This function reduces the background noise in a low luminance environment 1 When the SETUP menu screen is displayed select SSNR by ...

Страница 15: ...n is changeable by installed environment Color B W B W Color Fast 2 5 lux 4 lux Slow 0 8 lux 6 lux When using a Video Auto Iris Lens if you set the lens level to low automatic switching between Color and Black White may not occur You cannot control the DAY NIGHT menu whenAGC in the EXPOSURE menu is OFF At this time the exchange between DAY mode and NIGHT mode operates as like selecting COLOR mode ...

Страница 16: ...de Notes SPECIAL 1 CAM TITLE OFF 2 SYNC INT 3 MOTION DET OFF 4 PRIVACY OFF 5 DIS OFF 6 COMM ADJ 7 LANGUAGE ENGLISH 8 RESET 9 RETURN SHARPNESS As you increase this value the picture outline becomes stronger and clearer Adjust this value appropriately depending on the sharpness of the picture RETURN Select this to save the settings for the IMAGE ADJ menu and to return to the SETUP menu PED LEVEL COL...

Страница 17: ... and red RETURN Select this to save the MOTION DET menu settings and return to the SPECIAL menu 3 Press the SET button 4 Use the 4 direction buttons to move to a desired letter and select the letter by pressing the SET button Repeat this to enter multiple letters You can enter up to 15 letters 5 Enter a title move the cursor to POS and press the SET button The entered title appears on the screen S...

Страница 18: ...isplay camera title on top left corner of the screen Press the SET button in the EXIT menu to save the current settings and exit the MAIN SETUP menu EXIT The chance of resolution decrease is existed because DIS function uses the digital zoom DIS doesn t operate when background illumination is too low DIS doesn t operate when object pattern is monotonic as like sky or white wall If DIS is enabled t...

Страница 19: ...hooting If you have trouble operating your camera refer to the following table If the guidelines do not enable you to solve the problem contact an authorized technician RS 485 Communication establishment initial value Item Camera ID BAUD RATE UART MODE RET PKT Initial value 1 9600 8 NONE 1 ENABLE 485 Control Board Connection Port RS 485 Control Port CONNECTIONTERMINAL TRX 485 CONNECTIONTERMINAL TR...

Страница 20: ...tative Address Equipment Type Environment CCTV Camera Model Name SHC 737P Beginning Serial NO C10S101000 Year of Manufacture 2009 01 15 Conformance to EN 50081 1 1992 EMC Directive 89 336 EEC and 92 31 EEC EN 50130 4 1996 We the undersigned hereby declare that the equipment specified above conforms to the above Directive s Manufacturer SAMSUNGTECHWIN CO LTD LegalRepresentativeinEurope Signature Si...

Страница 21: ......

Отзывы: