background image

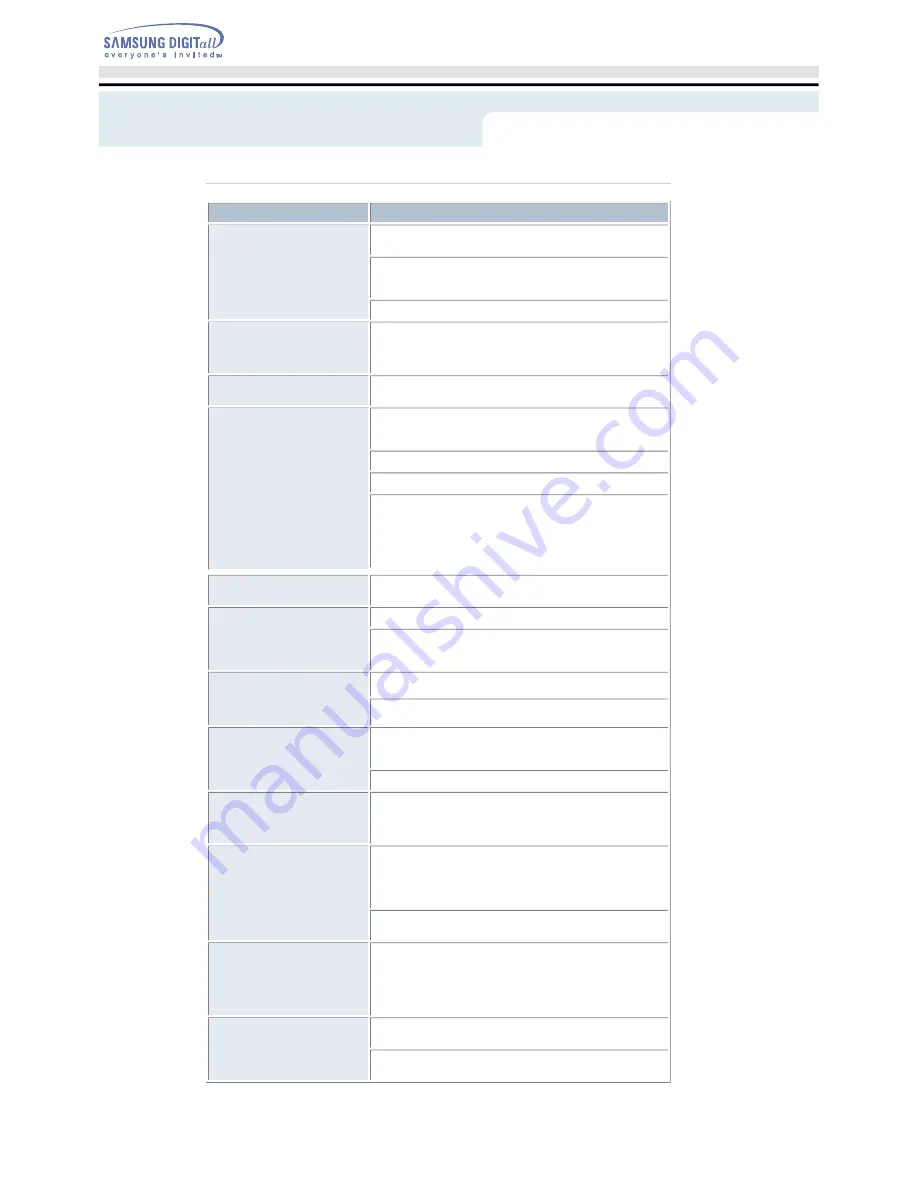
Problem

Meaning / Solution

The CD-RW Drive is not 
detected by the computer. 
 
After installing the CD-RW Drive, 
the PC gets slower. 

Check that the power, audio and IDE cables are correctly connected 
to the computer.

Change the IDE cable and reconnect it to the computer. 
Preferably, connect a second IDE cable to the CD-RW drive in 
master mode.

Check the position of the jumper in the master/slave select terminal.

The CD-RW Drive is not 
recognized by MS-DOS.

Reinstall the device driver or update it with the latest version by 
downloading it from the Samsung Web site. 

Http://samsung-ODD.com


Http://samsung.com

The CD-RW Drive is not 
detected by Windows.

This case may occur when there is a Windows installation problem; 
reinstall Windows.

No sound is heard from an 
audio CD.

Check whether the audio cable is correctly connected to the sound 
output terminal on the CD-RW drive and the sound card CD-IN 
terminal.

Check that the sound card is operational.

Adjust the volume control.

Run the CD player supplied with Windows or your sound card. 
You can listen to the CD by connecting headphones to the 
appropriate connector. 
If you have installed the appropriate player, such as Microsoft 
Windows Media Player, you can adjust the volume using the 
headphone volume control on the drive front panel.

A CD is not read or is read 
too slowly.

Check whether the CD is of good quality and clean it, if necessary.

The disc compartment will 
not open.

Check that the power cable is correctly connected.

Power off and disconnect the PC. 
Insert a pin or unfolded paper clip in the emergency hole and push 
firmly until the disc compartment opens.

When the MPEG software 
plays a Video CD, the pictures 
are not regular and the running 
speed is too slow.

Adjust the size of the replay screen.

After checking the display resolution, adjust it, if necessary.

The Disc is not in message is 
displayed even though a disc 
has been inserted.

The computer may not recognize the disc if you start playback too 
quickly after inserting the disc. Open and close the disc 
compartment and try again.

Clean the disc and try again.

The CD-RW Drive is not 
detected after it is connected to 
a sound card.

The interface mode of the sound card is AT-BUS. 
You must therefore connect the CD-RW Drive to the IDE port on the 
PC mother board, rather than to the sound card, or install an E-IDE 
compatible sound card.

When recording NERO or Easy 
CD Creator, 
it will be recorded not on a 
CD but a form of image file.

This seems to occur when you select the recording function as the 
system selects "Image Recorder" instead of SH-R522C(TS-H292C).
In this case, select a recorder from the menu items at the upper part 
of NERO or Easy CD Creator and then select SH-R522C(TS-
H292C) from the Recorder Selection window.

When installing the recording software, try not to install the software 
before the ROM drive as this makes the Image Recorder selected.

The Recorder cannot 
recognize the disc.

Use the firmware automatic upgrade function available at the ODD 
service website to download 
the newest firmware and then reinstall the recording software which 
is included in the bundle. 

Http://samsung-ODD.com


Http://samsung.com

The UDMA setting does not 
work.

The UDMA mode was enabled both in the BIOS setup and through 
the Control Panel, but the drive still operates only in PIO mode.

Delete the secondary port in the Control Panel, reboot the system 
and re-enable the UDMA mode.

Connecting the Cables

Troubleshootin

Содержание SH-R522C

Страница 1: ...S Optical Media Solution Customer Support Website Http samsung com offers the latest versions of firmware for ODD products user instructions and product information Select Model SH R522C TS H292C SH R522C TS H292C ...

Страница 2: ...Upgrading the Firmware Flash Memory System Requirements Introduction Front Rear Troubleshooting Solving Recording Problems Caution with errors Solving Technical Problems Setup Installing the CD RW Drive Connecting the Cables Installing the CD Record Utility Installing the Device Driver Setting Up the Device Driver Specifications Connecting the Cables Index ...

Страница 3: ...or damage to equipment Prohibited Important to read and understand at all times Do not disassemble Any change or modification not expressly approved by designated qualified personnel could void your authority to operate this device Always make sure that the disc does not have a crack before use If the disc has a crack especially around the center hole it is recommended to make a copy immediately a...

Страница 4: ...may cause the device to fall onto a hard surface resulting in damage or malfunction Do not place the drive in direct sunlight Avoid low or high temperature environments Avoid high humidity environments Connecting the Cables Safety Precaution Installation ...

Страница 5: ...d do not attempt to open the disc tray byforce Make sure to close all working programs before attempting to open the tray and always usethe open close button Do not insert a pin into the emergency opening while in operation Do not use cracked distorted or damaged discs In particular a disc with a crack on the inner tracks may break while in use Connecting the Cables Safety Precaution Other While O...

Страница 6: ...liquids as alcohol and benzene on the drive Do not disassemble attempt to repair or modify the device without express approval as directed in the manual Arbitrary removal of the bezel may cause the disc to pop out during operation To reduce the risk of damage electric shock and fire Connecting the Cables Safety Precaution Other ...

Страница 7: ...tton power off the computer insert a pin or unfolded paper clip in the hole and push firmly 2 LED Indicator Light GREEN Read Write 3 Eject button 4 Disc compartment the compartment opens and closes automatically when you press the Eject button Connecting the Cables Introduction Front ...

Страница 8: ...cumentation supplied with your sound card 3 Master slave select terminal Usually this is a pre set configuration as illustrated below Verify that the setting is as illustrated If it is not simply remove the jumper and place it in the correct position 4 Interface terminal This input output interface terminal is used to connect the 40 pin flat cable from the IDE interface to the CD RW Drive 5 Power ...

Страница 9: ...ove the cover from a free expansion slot and install the CD RW Drive as shown in the illustration Important Use the fixing screws provided with purchase and make sure the screws are tightened securely Insufficiently tightened screws may cause increased noise Screws for use M3 X 6 X 4 pieces Make sure to use the standardized screws supplied M3 X 6 To use screws other than M3 X 6 may result in malfu...

Страница 10: ...connector and the incline side of the CD RW Drive before connecting Connecting the E IDE cable Insert the IDE cable 40 pin which is connected to the hard disk to the interface terminal Place the red line of the cable close to the Pin 1 When using one E IDE cable Connect the cable to the SL Slave of the Master Slave Select Terminal at the rear of the CD RW drive a Slave Drive Choose the SL Jumper b...

Страница 11: ...t will work in the Master mode If the jumper is connected to SL Slave it will work in the Slave mode If the jumper is connected to CS CSEL you can control the device by using the host interface signal CSEL In general connection to MA is recommended Connecting the audio cable from a sound card Connect the 4 pin audio cable between the sound output terminal on the CD RW Drive and the audio input ter...

Страница 12: ...any existing software of the same type before installing this utility Installing the CD Record Utility Insert the disc supplied with the CD RW drive in the drive Follow the instructions displayed on the screen to install the utility Refer to the separate utility documentation for further details Store the utility disc in a safe place Connecting the Cables Setup ...

Страница 13: ...enclosed with the product that you purchased Installing the Device Driver For Windows98 2000 ME XP NT4 0 or higher version that uses a device driver provided by Windows there is no need to set up an extra device driver Refer to the steps below to see if Windows detects the drive Double click on the My Computer icon on your desktop Double click on the Control Panel folder Double click on the System...

Страница 14: ...iver folder When Setup is successfully completed click OK button or press the Enter key Reboot the computer Manual Setup Make the C SAMSUNG directory Copy the files from the diskette to the C SAMSUNG directory To do so type COPY D Ddriver C SAMSUNG after the C prompt and press Enter Edit the CONFIG SYS file Add the DEVICE C SAMSUNG SSCDROM SYS D SSCD000 V entry Edit the AUTOEXEC BAT file Add the C...

Страница 15: ...e Eject button Insert the disc CD with the label on the disc facing upwards and close the disc compartment by pressing the Eject button The indicator light comes on Play the disc CD Accessories z The type of accessories varies depending on product model User Manual Setup Guide Software Screws Design and specifications are subject to change without prior notice Connecting the Cables Using the Drive...

Страница 16: ...disc vertically in a well ventilated and stable location Do not write or attach a label on a disc Do not drop a disc or place heavy objects on it Do not touch the surface of a disc hold it by the edges To clean a disc polish lightly from the inside of the disc to the outside with a soft cotton cloth Do not leave the disc compartment open when you are not using it Connecting the Cables Using the Dr...

Страница 17: ...c would be broken if operating in the maximum speed Therefore it is recommended to operate in the low noise mode or to immediately make a copy and use it Ways to Use the MAGIC SPEED The first of all please install the Magic Speed program from Samsung s homepage Operate the program by clicking the right mouse button on the MAGIC SPEED Tray Icon Select a desired mode from a program window and click ...

Страница 18: ... product firmware can be upgraded by downloading the updated file from the following Web site Http samsung ODD com Http samsung com Upgrading the Firmware Flash Memory Connecting the Cables Using the Drive ...

Страница 19: ... below System Requirements Item Description Computer Intel Pentium II 400MHz or higher 64 MB of RAM or higher with an 40pin IDE interface for Ultra DMA Disk space At least twice as much free space as the amount of data to be writable Windows version Windows 98 2000 ME XP NT4 0 or higher Connecting the Cables Using the Drive ...

Страница 20: ...n the disc If you wish to record more than 1000 small files z First create an image file and copy the image file to the disc z Choose the low record speed z Compress small files and then record them Network Drive Copy the network drive contents to the hard disk and then from the hard disk to the CD RW Drive CD ROM Drive Clean the source CD if necessary Create an image file and then copy the image ...

Страница 21: ...ure maximum 700MB of available space in the hard disk for reliable recording process Use an E IDE cable which has the specified length 46cm Using E IDE cables longer than 46cm may cause errors during data transaction Use only one recording software program To install a software program for recording uninstall any other types or versions of recording software programs first and then reboot the comp...

Страница 22: ...tem Windows 98 ME Click on START Click on Settings Select Control Panel Select the System Icon Select the Device Manager panel in System Properties Expand the CD ROM icon Select your CD RW Drive Click on the Properties button Click on the Settings tab Check the DMA checkbox to enables DMA Click OK Restart your PC Windows 2000 XP Select the DMA mode by selecting Start Setting Control Panel System D...

Страница 23: ...hen the MPEG software plays a Video CD the pictures are not regular and the running speed is too slow Adjust the size of the replay screen After checking the display resolution adjust it if necessary The Disc is not in message is displayed even though a disc has been inserted The computer may not recognize the disc if you start playback too quickly after inserting the disc Open and close the disc ...

Страница 24: ...B sec 10X 600 KB sec 4X Reading CD ROM MAX CAV 52X CD R MAX CAV 40X CD RW MAX CAV 40X PIO Mode 4 16 6MB sec Multiword DMA mode 2 16 6MB sec UDMA mode 2 33 3MB sec Access time Random 100ms Typical Data Buffer 2MB Laser Semiconductor laser Slide mechanism Stepping motor Spindle motor Brushless DC motor Load mechanism Tray DC motor Soft Eject Horizontal Vertical ERROR RATE Mode 1 10 12 Mode 2 10 9 FR...

Отзывы: