background image

English - 4

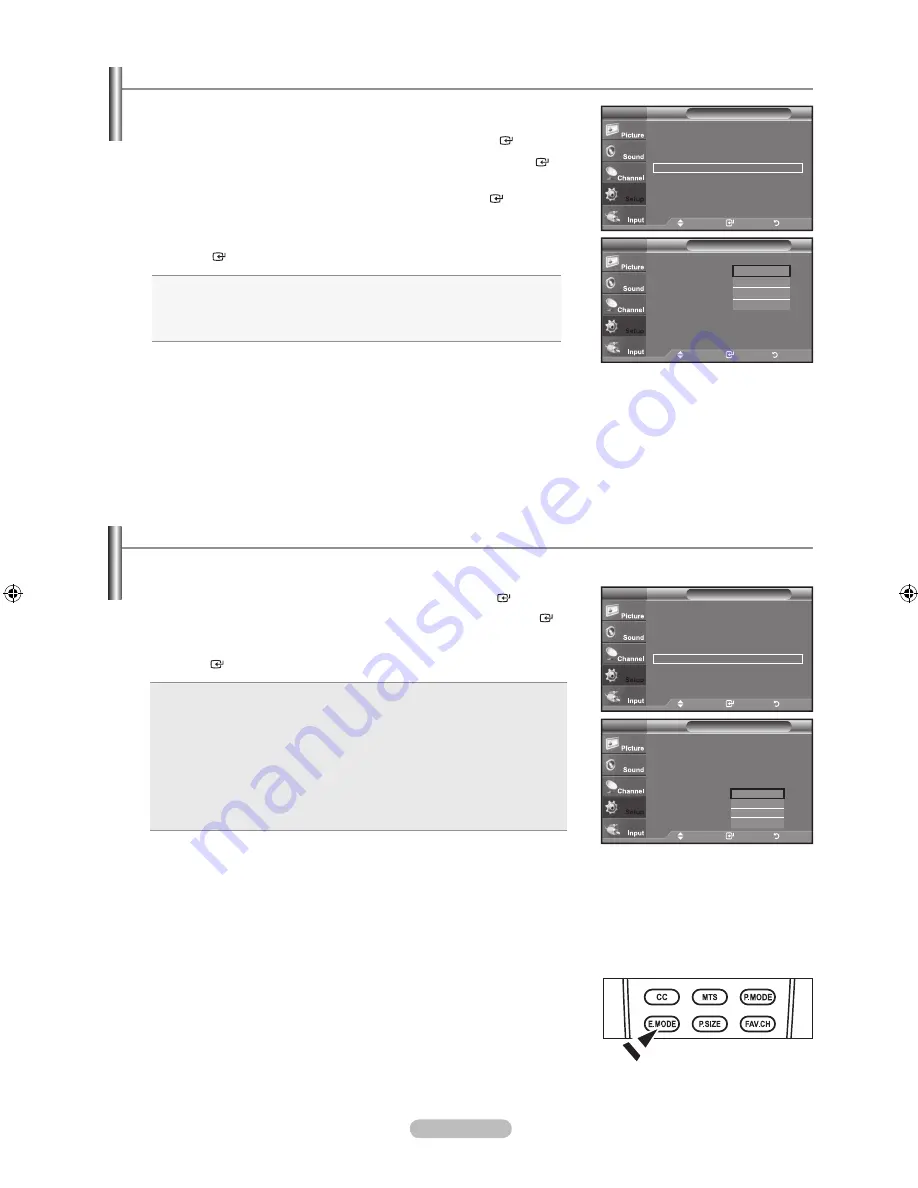
Setting the Entertainment mode

The “Entertainment” mode enables you to select the optimal display and sound for sports, cinema and games.

1.

   Press the 

mEnu

 button to display the menu. 

Press the ▲ or ▼ button to select “Setup”, then press the 

EntEr

 button.

2.

   Press the ▲ or ▼ button to select “Entertainment”, then press the 

EntEr


button.

3.

   Press the ▲ or ▼ button to select “Off”, “Sports”, “Cinema” or “Game”, then press 

the 

EntEr

 button.

off

: Switches the “Entertainment” function off.

Sports

:  Provides the optimal picture and sound quality for sports. 

You can enjoy more thrilling color and sound.

Cinema

:  Provides the optimal picture and sound quality for movie 

watching. You can experience a richer picture and enhanced 

sound.

Game

:  Provides the optimal picture and sound quality for games. This 

mode accelerates the playing speed when using an external game 

console connected to the TV.


Press the 

ExIt

 button to exit.

If you set any of the three “Entertainment” modes to “On”, the settings will be 

locked and can not be adjusted. If you want to make Picture and Sound mode 

adjustments, the “Entertainment” mode must be turned off.
If you set any of the three “Entertainment” modes to On, “SRS TS XT” and 

“Equalizer” funtions are not available.
The “Entertainment” settings are saved for each input source.

You can press the 

E.moDE

 button on the remote control repeatedly to change the 

“Entertainment” setting.

O

adjusting the tV on/off melody Sound

1. 

Press the 

mEnu 

button to display the menu. 

    Press the ▲ or ▼ button to select "Setup", then press the 

EntEr  

button.

2. 

Press the ▲ or ▼ button to select “External Settings”, then press the 

EntEr


    button.

3. 

Press the ▲ or ▼ button to select "Melody", then press the 

EntEr  

button.

4. 

Press the ▲ or ▼ button to select “Off”, “Low”, “Medium” or “High”, then press


    the 

EntEr

 button.

• 

off

 : Turns off the melody function. 

• 

low

 : Sets the melody volume to low. 

• 

medium

 : Sets the melody volume to medium. 

• 

high

 : Sets the melody volume to high.

    Press the 

ExIt

 button to exit.

the melody does not play


-  When no sound is output from the TV because the 

mutE

 button has been 

pressed.


-  When no sound is output from the TV because the 

Vol

-

 button has been 

pressed.


- When the TV is turned off by the Sleep Timer function. 

A melody sound can be set to come on when the TV is powered On or Off.

External Settings

auto Wall-mount

melody 

: medium 


tV


move  


Enter 

return

off

low

medium

high

Setup

Plug & Play 


Language 

: English 

Time  


Caption 


External Settings 


Entertainment 

: Off 

Energy Saving 

: Off 

AV Color System 

: Auto 

PIP 


tV


move  


Enter 

return

Setup

Plug & Play 


Language 

: English 

Time  


Caption 


External Settings 


Entertainment 

: Off 

Energy Saving 

: Off 

AV Color System 

: Auto 

PIP 


tV


move  


Enter 

return

Setup

Plug & Play 


language 

: English

time  


Caption 


External Settings 


Entertainment 

: off

Energy Saving 

: off

aV Color System 

: auto

PIP 


tV


move  


Enter 

return

off

Sports

Cinema

Game

BN68-01429F-00Eng-0416.indd   41

2008-04-16   ¿ÀÀü 10:17:21

Содержание SERIES 6 610

Страница 1: ...A 1 800 299 0013 www samsung com latin HONDURAS 800 7919267 JAMAICA 1 800 234 7267 www samsung com latin PANAMA 800 7267 www samsung com latin PUERTO RICO 1 800 682 3180 www samsung com latin REP DOMINICA 1 800 751 2676 www samsung com latin NICARAGUA 00 1800 5077267 MEXICO 01 800 SAMSUNG 726 7864 www samsung com TRINIDAD TOBAGO 1 800 SAMSUNG 726 7864 www samsung com latin VENEZUELA 0 800 100 5303...

Страница 2: ...he LCD TV in 4 3 format for a long period of time may leave traces of borders displayed on the left right and center of the screen caused by the difference of light emission on the screen Playing a DVD or a game console may cause a similar effect to the screen Damages caused by the above effect are not covered by the Warranty Displaying still images from Video games and PC for longer than a certai...

Страница 3: ...7 Customizing the Sound 27 Setting the TruSurround XT SRS TS XT 28 Choosing a Multi Channel Sound MTS track 28 Automatic Volume Control 29 Setting the TV Speaker On Off 29 Listening to the Sound of the Sub PIP Picture 30 Connecting Headphones Sold separately 30 Channel Control Adding Deleting Channels 31 Activating the Child Lock 32 Fine Tuning Analog Channels 33 Using the Color System Feature 33 ...

Страница 4: ...ons Cover Bottom Power Cord Cleaning Cloth Owner s Instructions The items color and shape may vary depending on the model General Information List of Features Adjustable picture settings that can be stored in the TV s memory Automatic timer to turn the TV on and off A special sleep timer HDMI DVI connection of your PC to this TV Excellent Picture Quality DNIe technology provides life like clear im...

Страница 5: ...ange channels In the on screen menu use the CH buttons as you would use the and buttons on the remote control 5 POWER INDICATOR Blinks and turns off when the power is on and lights up in stand by mode 6 Power Press to turn the TV on and off 7 REMOTE CONTROL SENSOR Aim the remote control towards this spot on the TV 8 SPEAKERS Buttons on the Lower Right Part of the Panel The buttons on the lower rig...

Страница 6: ...R AUDIO L jacks for audio When using an HDMI DVI cable connection you must use the HDMI IN 2 jack 4 ANT IN Connects to an antenna or cable TV system 5 SERVICE Connector for SERVICE only Connect this to the jack on the optional wall mount bracket This will allow you to adjust the TV viewing angle using your remote control 6 WISELINK Connect a USB mass storage device to view photo files JPEG play au...

Страница 7: ...or sports cinema and games Use these buttons in the WISELINK and Anynet modes This remote can be used to control recording on Samsung recorders with the Anynet feature SOURCE Press to display and select the available video sources PRE CH Tunes to the previous channel CH CH Press to change channels MENU Displays the main on screen menu W LINK WISELINK This function enables you to view and play phot...

Страница 8: ...ead that looks like the diagram to the right see Antennas with 75 Ω Round Leads If you have two antennas see Separate VHF and UHF Antennas 1 Place the wires from the twin leads under the screws on a 300 75 Ω adapter not supplied Use a screwdriver to tighten the screws 2 Plug the adaptor into the ANT IN terminal on the back of the TV ANT IN Antennas with 300 Ω Flat Twin Leads If you are using an of...

Страница 9: ... ANT OUT terminal on the cable box and the B IN terminal on the RF A B switch 5 Connect another cable between the other OUT terminal on the splitter and the A IN terminal on the RF A B switch 6 Connect the last RF cable between the OUT terminal on the RF A B switch and the ANT IN terminal on the rear of the TV Splitter Incoming cable Splitter Cable Box Incoming cable Splitter Cable Box RF A B Swit...

Страница 10: ...n the HDMI IN 2 jack on the TV and the DVI jack on the DVD Player or Cable Box Satellite receiver Set Top Box 2 Connect Audio Cables between the DVI IN HDMI2 R AUDIO L jack on the TV and the DVD Player or Cable Box Satellite receiver Set Top Box TV Side Panel What is HDMI HDMI High Definition Multimedia Interface is an interface that enables the transmission of digital audio and video signals usin...

Страница 11: ...NENT IN 1 also Each DVD Player or Cable Box Satellite receiver Set Top Box has a different back panel configuration When connecting a DVD Player or Cable Box Satellite receiver Set Top Box match the color of the connection terminal to the cable DVD Player or Cable Box Satellite receiver Set Top Box TV Rear Panel Component Cable Not supplied 1 Audio Cable Not supplied 2 Connecting a Camcorder The s...

Страница 12: ...r Camcorder Tape to view your VCR tape Each VCR has a different back panel configuration When connecting a VCR match the color of the connection terminal to the cable VCR Rear Panel Video Cable Not supplied 4 Audio Cable Not supplied 5 Your Samsung TV can be connected to an S Video jack on a VCR This connection delivers a better picture as compared to a standard VCR 1 To begin follow steps 1 3 in ...

Страница 13: ... 2 1 Connect a D Sub Cable between PC IN PC connector on the TV and the PC output connector on your computer 2 Connect a PC Audio Cable between the PC IN AUDIO jack on the TV and the Audio Out jack of the sound card on your computer Each PC has a different back panel configuration When connecting a PC match the color of the connection terminal to the cable When using an HDMI DVI cable connection y...

Страница 14: ...ssage Check antenna input is displayed with OK selected Press the ENTER button 5 Press the or button to select Air STD HRC or IRC then press the ENTER button 6 Press the ENTER button to select Start The TV will begin memorizing all of the available channels To stop the search before it has finished press the ENTER button with Stop selected 7 The Clock Set menu is displayed Press the or button to m...

Страница 15: ... are far apart tune to one channel then use the number button to select the second channel Then use the PRE CH button to quickly alternate between them If you want to reset this feature 1 Press the MENU button to display the menu Press the or button to select Setup then press the ENTER button 2 Press the ENTER button again to select Plug Play For further details on setting up options refer to the ...

Страница 16: ...ard Sound Custom MTS Stereo SRS TS XT Off 05 54 pm Using the TOOLS Button You can use the TOOLS button to select your frequently used functions quickly and easily The Tools menu changes depending on which external input mode you are viewing 1 Press the TOOLS button The Tools menu will appear 2 Press the or button to select a menu 3 Press the ENTER buttons to display change or use the selected item...

Страница 17: ...ocal cable company to identify the type of cable system that exists in your particular area At this point the signal source has been selected Storing Channels in Memory Automatic Method 1 First select the correct signal source Air STD HRC or IRC 2 Press the or button to select Auto Program then press the ENTER button 3 Press the ENTER button to select Start The TV will begin memorizing all of the ...

Страница 18: ...ton to select Input then press the ENTER button Press the or button to select Edit Name then press the ENTER button 2 Press the or button to select AV1 AV2 S Video Component1 Component2 PC HDMI1 HDMI2 HDMI3 HDMI4 input jack then press the ENTER button 3 Press the or button to select VCR DVD Cable STB Satellite STB PVR STB AV Receiver Game Camcorder PC TV IPTV Blu Ray HD DVD DMA input source then p...

Страница 19: ... a particular item Press the ENTER button Press the EXIT button to exit When you make changes to Backlight Contrast Brightness Sharpness Color or Tint the OSD will be adjusted accordingly In PC mode you can only make changes to Backlight Contrast and Brightness Settings can be adjusted and stored for each external device you have connected to an input of the TV The energy consumed during use can b...

Страница 20: ...trast You can adjust the screen contrast so that the optimal contrast is provided 6 Press the or button to select Dynamic Contrast then press the ENTER button 7 Press the or button to select Off Low Medium or High Press the ENTER button Off Turns off the dynamic contrast adjustment function Low Sets the dynamic contrast to low Medium Sets the dynamic contrast to medium High Sets the dynamic contra...

Страница 21: ...tton to select Red Green or Blue to change it Press the ENTER button 16 Press the or button to decrease or increase the value of a particular item Press the ENTER button In Color you can adjust the RGB values for the selected color To reset the adjusted RGB value select Reset Red Adjusts the red saturation level Green Adjusts the green saturation level Blue Adjusts the blue saturation level Reset ...

Страница 22: ...NTER button Changing the adjustment value will refresh the adjusted screen 0 Adjust Return Flesh Tone Move Enter Return Black Adjust Off Dynamic Contrast Medium Gamma 0 Color Space Native White Balance Flesh Tone 0 Edge Enhancement Off xvYCC Off Detailed Settings TV Move Enter Return Black Adjust Off Dynamic Contrast Medium Gamma 0 Color Space Native White Balance Flesh Tone 0 Edge Enhancement Off...

Страница 23: ...ox or satellite receiver may have its own set of screen sizes as well In general though you should view the TV in 16 9 mode as much as possible 1 Follow the Activating Picture Options instructions numbers 1 and 2 2 Press the or button to select Size then press the ENTER button 3 Press the or button to select the screen format you want Press the ENTER button Press the EXIT button to exit 16 9 Sets ...

Страница 24: ...ton You can initialize the setting HD High Definition 16 9 1080i 1080p 1920x1080 720p 1280x720 Settings can be adjusted and stored for each external device you have connected to an input of the TV Input Source Picture Size TV AV S Video Component 480i 480p 16 9 Wide Zoom Zoom 4 3 Component 1080i 1080p HDMI 1080i 1080p 16 9 Wide Zoom Zoom 4 3 Just Scan PC 16 9 4 3 Alternately you can press the P SI...

Страница 25: ...se at a low level Medium Reduces screen noise at a medium level High Reduces screen noise at a high level Auto Automatically recognizes and reduces screen noise Press the EXIT button to exit Setting the HDMI Black Level You can select the black level on the screen to adjust the screen depth 1 Follow the Activating Picture Options instructions numbers 1 and 2 Refer to page 21 2 Press the or button ...

Страница 26: ... Options instructions numbers 1 and 2 Refer to page 21 2 Press the or button to select Blue Only Mode then press the ENTER button 3 Press the or button to select Off or On then press the ENTER button Press the EXIT button to exit Blue Only Mode is available when the picture mode is set to Movie or Standard Resetting the Picture Settings to the Factory Defaults 1 Press the MENU button to display th...

Страница 27: ...a Signal Source External A V for PIP 3 Press the or button to select Source then press the ENTER button Select the source of the sub picture PIP by pressing the or button and press the ENTER button The sub picture can serve different source selections based on what the main picture is set to Changing the Size of the PIP Window 4 Press the or button to select Size then press the ENTER button Press ...

Страница 28: ...nnel can be active when the sub picture is set to TV Easy Setting 1 Press the TOOLS button on the remote control 2 Press the or button to select PIP then press the ENTER button 3 Press the or button to select a particular item 4 Press the or button to select the required option 5 Press the EXIT or TOOLS button to exit Move Enter Return PIP On Source TV Size Position Channel Air 4 PIP TV Move Enter...

Страница 29: ...e Press the or button to select Standard Music Movie Speech or Custom sound setting then press the ENTER button Press the EXIT button to exit Standard selects the normal sound mode Music emphasizes music over voices Movie provides the best sound for movies Speech emphasizes voice over other sounds Custom recalls your customized sound settings see Customizing the Sound Easy Setting 1 Press the TOOL...

Страница 30: ... to display the menu Press the or button to select Sound then press the ENTER button 2 Press the or button to select MTS then press the ENTER button 3 Press the or button to select a setting you want then press the ENTER button Press the EXIT button to exit Mono Choose for channels that are broadcasting in mono or if you are having difficulty receiving a stereo signal Stereo Choose for channels th...

Страница 31: ...n 2 Press the or button to select TV Speaker then press the ENTER button 3 Press the or button to select Off then press the ENTER button Press the EXIT button to exit When TV Speaker is set to Off Sound menus except MTS and Sound Select in PIP mode cannot be adjusted The VOL VOL and MUTE buttons do not operate when the TV Speaker is set to Off Sound output from the TV speakers is muted Move Enter ...

Страница 32: ...re You can connect a set of headphones to your set if you wish to watch a TV program without disturbing other people in the room Connecting Headphones Sold separately When you insert the headphone s plug into the headphone jack you can operate MTS in TV mode Auto Volume and Sound Select in PIP mode in Sound menu Prolonged use of headphones at a high volume may damage your hearing You will not hear...

Страница 33: ...n again the symbol next to the channel disappears and the channel is not added 6 Repeat steps 5 for each channel to be added or deleted Press the EXIT button to exit is active when Child Lock is selected to On You can add or delete a channel so only channels you want are displayed Move Enter Return Air Cable Air Auto Program Channel Manager Fine Tune Color System Auto Channel TV Move Enter Return ...

Страница 34: ...unlocked Press the EXIT button to exit Select On or Off in Child Lock to easily turn the channels which selected on to be active or inactive A blue screen is displayed when Child Lock is activated Child Lock is not available when PIP is set to on This feature allows you to prevent unauthorized users such as children from watching unsuitable programmes by muting out video and audio Child Lock canno...

Страница 35: ...m Auto Channel TV Move Enter Return Fine Tune Air 24 0 Reset Adjust Save Return Fine Tune Air 24 10 Reset Adjust Save Return Fine Tune Air 24 10 Reset Using the Color System Feature 1 Press the MENU button to display the menu Press the or button to select Channel then press the ENTER button 2 Press the or button to select Color System then press the ENTER button Select the required option Auto PAL...

Страница 36: ...al from the system doesn t equal the standard signal mode adjust the mode by referring to your videocard user guide otherwise there may be no video For the display modes listed below the screen image has been optimized during manufacturing D Sub Input Mode Resolution Horizontal Frequency kHz Vertical Frequency Hz Pixel Clock Frequency MHz Sync Polarity H V IBM 640 x 350 720 x 400 31 469 31 469 70 ...

Страница 37: ...ne tune again After the noise has been reduced re adjust the picture so that it is aligned on the center of the screen Preset Press the SOURCE button to select PC mode 1 Press the MENU button to display the menu Press the or button to select Picture then press the ENTER button Press the or button to select Screen then press the ENTER button 2 Press the or button to select Coarse or Fine then press...

Страница 38: ...ition Press the ENTER button Press the EXIT button to exit Initializing the Screen Position or Color Settings You can replace all image settings with the factory default values Preset Press the SOURCE button to select PC mode 1 Press the MENU button to display the menu Press the or button to select Picture then press the ENTER button Press the or button to select Screen then press the ENTER button...

Страница 39: ...nute or am pm Set the date and time you want by pressing the or button then press the ENTER button Press the EXIT button to exit The current time will appear every time you press the INFO button You can set the month day year hour and minute directly by pressing the number buttons on the remote control Time Setting Setup Plug Play Language English Time Caption External Settings Entertainment Off E...

Страница 40: ...tton to select Off then press the ENTER button 4 Press the EXIT button to exit Easy Setting 1 Press the TOOLS button on the remote control 2 Press the or button to select Sleep Timer 3 Press the or button to select the minute 4 Press the EXIT or TOOLS button to exit Setup Plug Play Language English Time Caption External Settings Entertainment Off Energy Saving Off AV Color System Auto PIP TV Move ...

Страница 41: ...ill eventually turn off if no controls are operated for 3 hours after the TV was turned on by the timer This function is only available in timer Activated mode and prevents overheating which may occur if a TV is on for too long time Setting the On Off Timer Selecting a Menu Language 1 Press the MENU button to display the menu Press the or button to select Setup then press the ENTER button Press th...

Страница 42: ...nnels and fields display different information Field 2 carries additional information that supplements the information in Field 1 For example Channel 1 may have subtitles in English while Channel 2 has subtitles in Spanish 4 Press the or button to select Channel or Field then press the ENTER button Press the or button to select 1 or 2 then press the ENTER button Press the EXIT button to exit Press...

Страница 43: ...button on the remote control repeatedly to change the Entertainment setting O Adjusting the TV On Off Melody Sound 1 Press the MENU button to display the menu Press the or button to select Setup then press the ENTER button 2 Press the or button to select External Settings then press the ENTER button 3 Press the or button to select Melody then press the ENTER button 4 Press the or button to select ...

Страница 44: ...ve Enter Return Off Low Medium High Auto Using the AV Color System Feature Normally the TV can receive image and sound with good quality when in the mode AUTO This mode detects the signal color system automatically In case of some signal reception with color unsatisfactory select the AV Color System Mode to PAL M PAL N or NTSC 1 Press the MENU button to display the menu Press the or button to sele...

Страница 45: ...es of MSC are Thumb drives and Flash Card Readers Both USB HDD and HUB are not supported Before connecting your device to the TV please back up your files to prevent them from damage or loss of data SAMSUNG is not responsible for any data file damage or data loss Please connect directly to the USB port of your TV If you are using a separate cable connection there may be a USB Compatibility problem...

Страница 46: ...Press the W LINK button on the remote control to display a WISELINK menu O Move Enter Exit SUM STORAGE DEVICE STORAGE DEVICE STORAGE DEVICE STORAGE DEVICE Move Enter Return Source List TV Edit Name Anynet HDMI CEC WISELINK Input TV Using the Remote Control Button in WISELINK Menu Button Operations Move the cursor and select an item ENTER Select the currently selected item Play a slide show movie o...

Страница 47: ...ng the Option Menu in the movie list Play Play the selected file Select to play Movie files If you have selected MP3 files with the Yellow button the Play the Selected File menu item will appear Only the selected files will be played This menu only shows files with the Movie file extension Files with other file extensions are not displayed even if they are saved on the same USB device Using the bu...

Страница 48: ...tton will let you see another photo image in the same folder Press the button when a Photo icon is selected to start a Slide Show Photos without EXIF information may not be displayed as thumbnail images in the PHOTO LIST depending on the picture quality and resolution Viewing a Slide Show 4 Press the INFO button to display the option Start Slide Show Select All 5 Press the or button to select Star...

Страница 49: ...le information is displayed on the left side of the TV screen such as the resolution the date modified and the order of the file in the current directory e g 10th out of 15 Folder icon Photo icon Move to the previous folder stage icon Upper Folder 01 001 02 002 03 003 04 004 05 005 Select Move Enter Return 1 1 Page Background Music Setting Choose a file for background music Upper Folder Forder1 Ph...

Страница 50: ...up down left right in the zoomed in photo press the INFO button to exit option menu then press the and buttons Start Slide Show or Rotate is disabled when the Zoom option is selected x1 Restore a photo to its original size x2 Zoom in to a photo x2 x4 Zoom in to a photo x4 Move the zoomed in photo up down right left Rotate Press the or button to select Rotate then press the ENTER button Select the ...

Страница 51: ...nu only shows files with the MP3 file extension Files with other file extensions are not displayed even if they are saved on the same USB device The selected file is displayed on the top with its playing time To adjust the music volume press the VOL VOL button on the remote control To mute the sound press the MUTE button on the remote control Repeat Music Select to repeatedly play MP3 files in the...

Страница 52: ...vie Select to determine whether to repeat playing the movie when all Movie files in the current folder have been played Screen Saver Select to set the waiting time before the screen saver appears The screensaver will appear when no button is pressed for 1 5 or 10 minutes Using the Setup Menu English 50 Slide Show Speed Normal Background Music On Background Music Setting Repeat Music Off Repeat Mov...

Страница 53: ...le To connect to Home Theater TV Anynet Device 1 Anynet Device 2 Anynet Device 3 Home Theater HDMI1 3 Cable HDMI1 3 Cable HDMI1 3 Cable HDMI1 3 Cable Anynet Device 4 HDMI1 3 Cable 1 Connect the HDMI1 HDMI2 HDMI3 or HDMI4 jack on the TV and the HDMI OUT jack of the corresponding Anynet device using an HDMI cable 2 Connect the HDMI IN jack of the home theater and the HDMI OUT jack of the correspondi...

Страница 54: ... Off 1 Press the or button to select Auto Turn Off then press the ENTER button 2 Press the or button to select Yes then press the ENTER button The Auto Turn Off function is enabled If you select No the Auto Turn Off function is canceled Press the EXIT button to exit The active source on the TV remote must be set to TV to use the Anynet function If you set Auto Turn Off to Yes connected external de...

Страница 55: ...iption View TV Switches from Anynet to TV broadcast mode Record Starts a recording This menu works only for a device supporting recording Device_Name Menu Shows the menu of the connected device Example When a DVD Recorder is connected the DVD Recorder s title menu appears Device_Name Operation Shows the play control menu of the connected device Example When a DVD Recorder is connected the play con...

Страница 56: ...re is a power interruption to the TV when the Receiver is set to On by disconnecting the power cord or a power failure the TV Speaker may be set to Off when you turn the TV on again refer to page 29 Recording You can make a recording of a TV program using a recorder Press the REC button Recording begins Only when the Anynet enabled recording device is connected You can record the source streams by...

Страница 57: ...nt to exit Anynet Select View TV in Anynet menu Press the SOURCE button on the TV remote control and select a device other than Anynet devices Press any of CH and PRE CH to change the TV mode Note that the channel button operates only when a tuner embedded Anynet device is not connected The message Connecting to Anynet device appears on the screen You cannot use the remote control when you are con...

Страница 58: ...e upper edge of the remote control transmission window Check the battery terminals Check signal cable message Ensure that the signal cable is firmly connected to the PC source Not Supported Mode message Check the maximum resolution and connected device s Video frequency Compare these values with the data in the Display Modes The image is too light or too dark Adjust the Brightness and Contrast Adj...

Страница 59: ...C Maximum refresh rate at 60 Hz 1920 X 1080 Image is not centered on the screen Adjust the horizontal and vertical position The screen position must be adjusted on the output source i e STB with a digital signal The picture appears distorted in the corner of the screen If Just Scan is selected with some external devices the picture may appear distorted in the corner of the screen This symptom is c...

Страница 60: ...tand at a proper level do not apply excess downward pressure to the upper left of right sides of the TV 2 Fasten two screws at position 1 and then fasten two screws at position 2 Stand the product up and fasten the screws If you fasten the screws with the LCD TV placed down it may lean to one side 1 Remove four screws from the back of the TV 2 Separate the stand from the TV Two or more people shou...

Страница 61: ...the Position 2 Adjust to the desired position using the or buttons If you press an arrow button when no OSD is displayed on the TV screen the Adjustment screen appears Press the INFO button to reset Press the or button to select Yes then press the ENTER button The position is initialized to the default setting 3 Press the blue button Press the and buttons to select a save mode from either Position...

Страница 62: ...ension as they may cause damage to the inside of the TV set For wall mounts that do not comply with the VESA standard screw specifications the length of the screws may differ depending on their specifications Do not use screws that do not comply with the VESA standard screw specifications Do not use fasten the screws too strongly this may damage the product or cause the product to fall leading to ...

Страница 63: ...nsington Lock depending on the model The Kensington Lock is a device used to physically fix the system when using it in a public place The appearance and locking method may differ from the illustration depending on the manufacturer Refer to the manual provided with the Kensington Lock for proper use The locking device has to be purchased separately Optional Figure 2 Figure 1 Cable The location of ...

Страница 64: ...Right 20 20 Model Name LN46A610A3R LN52A610A3R Screen Size Diagonal 46 inches 52 inches PC Resolution 1920 x 1080 60 Hz 1920 x 1080 60 Hz Sound Output 10W X 2 10W X 2 Dimensions WxDxH Body With stand 44 5 x 3 7 x 28 1 inches 1131 0 x 94 5 x 714 2 mm 44 5 x 11 0 x 30 5 inches 1131 0 x 279 9 x 774 5 mm 50 2 x 4 1 x 31 7 inches 1276 0 x 105 0 x 805 7 mm 50 2 x 12 8 x 34 1 inches 1276 0 x 326 0 x 866 ...

Страница 65: ...This page is intentionally left blank ...

Страница 66: ...El uso del televisor LCD en formato 4 3 durante un tiempo prolongado puede dejar rastros de bordes en las partes izquierda derecha y central de la pantalla debido a las diferencias en la emisión lumínica de la pantalla La reproducción de un DVD o el uso de una consola de videojuegos pueden provocar un efecto similar en la pantalla Reproducir un DVD o una videoconsola puede causar un efecto similar...

Страница 67: ...27 Configuración del TruSurround XT SRS TS XT 28 Selección de una pista de sonido multicanal MTS 28 Control automático de volumen 29 Encendido apagado del altavoz del televisor 29 Escuchar el sonido de la sub imagen del PIP 30 Conexión de los auriculares se vende por separado 30 Control de los Canales Adición y supresión de canales 31 Activación del bloqueo infantil 32 Sintonización fina de los ca...

Страница 68: ...mágenes completamente reales SRS TruSurround XT SRS TruSurround XT proporciona un sistema surround Dolby virtual Compruebe que las opciones siguientes se incluyen con su TV LCD Si falta alguna opción póngase en contacto con el proveedor Mando A Distancia y Pilas AAA x 2 No disponible en todos los lugares Tarjeta de garantía Tarjetas de registro Guía de seguridad no esta disponible en todas las loc...

Страница 69: ...l En el menú de la pantalla utilice estos botones CH del mismo modo que los botones y del mando a distancia 5 INDICADOR DE ALIMENTACIÓN Parpadea y se apaga cuando se enciende el aparato y se ilumina en el modo en espera 6 ENCENDIDO Pulse para encender o apagar el TV 7 SENSOR DEL MANDO A DISTANCIA Dirija el mando a distancia hacia este punto del TV 8 Altavoces Botones de la parte inferior derecha d...

Страница 70: ...O L de DVI IN HDMI2 para el audio Cuando se usa una conexión de cable HDMI DVI se debe conectar en el terminal HDMI IN 2 4 ANT IN Permite conectar a una antena o un sistema de TV por cable 5 SERVICE Conector solamente para servicio Toma de conexión para un soporte de montaje mural opcional Permite ajustar el ángulo de visualización del televisor mediante el mando a distancia 6 WISELINK Conecte un ...

Страница 71: ...dos de visualización y de sonido establecidos para deportes películas y juegos Use estos botones en los modos WISELINK y Anynet Este mando remoto se puede usar para controlar la grabación en las grabadoras de Samsung con la función Anynet feature SOURCE Pulse este botón para ver y seleccionar las fuentes de vídeo disponibles PRE CH Sintoniza el canal anterior CH CH Permiten cambiar de canal MENU M...

Страница 72: ... que se muestra en el diagrama de la derecha consulte Antenas de cable coaxial de 75 Ω Si tiene dos antenas consulte Antenas de VHF y UHF independientes 1 Coloque los conductores del par de cables bajo los tornillos del adaptador de 300 75 Ω no incluido Utilice un destornillador para apretar los tornillos 2 Conecte el adaptador en la terminal ANT IN en la parte posterior del televisor ANT IN Anten...

Страница 73: ...tar indicado como ANT IN VHF IN o IN 5 Conecte otro cable RF entre la otra terminal OUT del divisor y la terminal A IN del conmutador de RF A B 6 Conecte el último cable RF entre la terminal OUT del conmutador RF A B y el terminal ANT IN en la parte posterior del televisor Divisor Cable entrante Divisor Servicio de Cable Cable entrante Divisor Servicio de Cable RF A B Conmutador Cable entrante ANT...

Страница 74: ...elevisor y el conector HDMI del reproductor de DVD o receptor de televisión por cable satélite decodificador Qué es HDMI HDMI o interfaz multimedia de alta definición es una interfaz de la siguiente generación que permite la transmisión de señales digitales de audio y de vídeo mediante un cable simple sin compresión La diferencia entre los dispositivos HDMI y DVI es que el HDMI es más pequeño y ti...

Страница 75: ...D o receptor de televisión por cable satélite decodificador tiene una configuración diferente del panel posterior Cuando conecte un reproductor de DVD o receptor de televisión por cable satélite decodificador debe hacer coincidir los colores de la terminal de conexión y del cable Conexión de una videocámara Las tomas del panel lateral del televisor facilitan la conexión de la videocámara Permiten ...

Страница 76: ...panel posterior Cuando conecte un dispositivo externo debe hacer coincidir los colores de la terminal de conexión y del cable ANT IN Conexión de S Vídeo Este televisor Samsung se puede conectar a una señal S Vídeo procedente de un reproductor de vídeo S VHS Esta conexión ofrece mejor calidad de imagen con relación a un reproductor de vídeo VHS normal 1 Para empezar siga los pasos 1 a 3 del apartad...

Страница 77: ...a PC IN AUDIO del televisor y la toma de salida de audio de la tarjeta de sonido del ordenador Uso del cable HDMI DVI 1 Conecte un cable HDMI DVI entre la toma HDMI IN 2 del televisor y la toma de salida PC del ordenador 2 Conecte un cable estéreo miniclavija 2 RCA de 3 5 mm entre la toma DVI IN HDMI2 R AUDIO L del televisor y la toma de salida de audio de la tarjeta de sonido del ordenador Cada P...

Страница 78: ...nar Aire STD HRC o IRC después pulse el botón ENTER 6 Pulse el botón ENTER para seleccionar Iniciar El televisor empezará a memorizar todos los canales disponibles Para detener la búsqueda antes de que finalice pulse el botón ENTER con Detener seleccionado 7 Se muestra el menú de configuración del reloj Pulse los botones o para desplazarse a la Mes Dia Año Hora Minuto o am pm Defina el valor de Me...

Страница 79: ...pulse los botones CH o CH el TV cambiará los canales por orden Verá todos los canales que ha memorizado el TV El TV deberá haber memorizado como mínimo tres canales No verá los canales borrados o no memorizados Consulte la página 15 para la memorización de los canales Utilización de los botones numéricos 1 Utilice los botones numéricos para ir directamente a un canal Por ejemplo para seleccionar e...

Страница 80: ...r el botón TOOLS para seleccionar rápida y fácilmente las funciones que se usan con más frecuencia El menú Herramientas cambia según el modo de entrada externo que se está viendo 1 Pulse el botón TOOLS Aparece el menú Herramientas 2 Pulse los botones o para seleccionar un menú 3 Pulse los botones ENTER para ver cambiar o usar las opciones seleccionadas Para ver una descripción más detallada de cad...

Страница 81: ...ales La memorización de canales implica tres pasos seleccionar una emisora de origen memorizar los canales automático y añadir o borrar canales Gestor de canales Selección del origen de la señal de vídeo Antes de empezar a memorizar los canales disponibles debe indicar el tipo de origen de la señal conectada al TV es decir antena o sistema de cable 1 Pulse el botón MENU para visualizar el menú Pul...

Страница 82: ...s o para seleccionar Entrada y pulse el botón ENTER Pulse los botones o para seleccionar Editar Nombre y después pulse el botón ENTER 2 Pulse los botones o para seleccionar la toma de entrada AV1 AV2 S Vídeo Componente1 Componente2 PC HDMI1 HDMI2 HDMI3 o HDMI4 y a continuación pulse el botón ENTER 3 Pulse los botones o para seleccionar la fuente de entrada Vídeo DVD Cable STB Satélite STB PVR STB ...

Страница 83: ...alor de una opción concreta Pulse el botón ENTER Pulse el botón EXIT para salir Cuando haga cambios en Luz de fondo Contraste Brillo Definición Color y Tinte el color del OSD también se ajustará En el modo PC sólo se pueden realizar cambios en las opciones Luz de fondo Contraste y Brillo La configuración de cada dispositivo externo conectado a la entrada del televisor se puede ajustar y guardar La...

Страница 84: ...alto Activación de Contraste Dinám Se puede ajustar el contraste de la pantalla para conseguir un contraste óptimo 6 Pulse los botones o para seleccionar Contraste Dinám y a continuación pulse el botón ENTER 7 Pulse los botones o para seleccionar Apagado Bajo Medio o Alto Pulse el botón ENTER Apag Apaga la función de ajuste del contraste dinámico Bajo Establece el contraste dinámico en un nivel ba...

Страница 85: ...s o para seleccionar Rojo Verde o Azul a fin de cambiarlos Pulse el botón ENTER 16 Pulse los botones o para reducir o aumentar el valor de un elemento concreto Pulse el botón ENTER En Color se pueden ajustar los valores RGB del color seleccionado Para restablecer el valor RGB ajustado seleccione Reiniciar Rojo Ajusta el nivel de saturación del rojo Verde Ajusta el nivel de saturación del verde Azu...

Страница 86: ...ras se ven películas desde un dispositivo externo es decir un reproductor DVD conectado en las tomas HDMI o Component IN 24 Pulse los botones o para seleccionar xvYCC y a continuación pulse el botón ENTER 25 Pulse los botones o para seleccionar Apag o Enc Pulse el botón ENTER xvYCC está disponible cuando el modo de imagen está configurado en Cine y la entrada externa está establecida en los modos ...

Страница 87: ...os de entrada de vídeo Es posible que el receptor de cable o satélite tenga también su propia gama de tamaños de pantalla Sin embargo en general debe ver el televisor en el modo 16 9 tanto como sea posible 1 Siga las instrucciones 1 y 2 de Activación de las opciones de la imagen 2 Pulse los botones o para seleccionar Tamaño y después pulse el botón ENTER 3 Pulse los botones o para seleccionar el f...

Страница 88: ...n ENTER Puede inicializar la configuración HD alta definición 16 9 1080i 1080p 1920x1080 720p 1280x720 La configuración de cada dispositivo externo conectado a la entrada del televisor se puede ajustar y guardar Fuente entrada Tamaño imagen TV AV S Vídeo Componente 480i 480p 16 9 Zoom ancho Zoom 4 3 Componente 1080i 1080p HDMI 1080i 1080p 16 9 Zoom ancho Zoom 4 3 Sólo buscar PC 16 9 4 3 Alternativ...

Страница 89: ...de la pantalla a un nivel bajo Medio Reduce el ruido de la pantalla a un nivel medio Alto Reduce el ruido de la pantalla a un nivel alto Auto Reconoce y reduce el ruido de la pantalla automáticamente Pulse el botón EXIT para salir Configuración del nivel de negro HDMI Se puede seleccionar el nivel de negro en la pantalla para ajustar la profundidad de ésta 1 Siga las instrucciones 1 y 2 de Activac...

Страница 90: ...es 1 y 2 de Activación de las opciones de la imagen Consulte la página 21 2 Pulse los botones o para seleccionar Sólo modo azul y a continuación pulse el botón ENTER 3 Pulse los botones o para seleccionar Apag o Enc y a continuación pulse el botón ENTER Pulse el botón EXIT para salir Sólo modo azul está disponible cuando el modo de imagen está configurado como Cine o Normal Reajuste de valores de ...

Страница 91: ...DMI4 PC TV AV1 AV2 Selección de una fuente de señal A V externo para el modo PIP 3 Pulse los botones o para seleccionar Origen y después pulse el botón ENTER Seleccione la fuente de la imagen secundaria PIP pulsando los botones o y ENTER La imagen secundaria puede servir a diferentes selecciones de fuente basadas en cómo esté configurada la imagen principal Cambio del tamaño de la ventana PIP 4 Pu...

Страница 92: ...o la imagen secundaria esté configurada como TV Configuración sencilla 1 Pulse el botón TOOLS del mando a distancia 2 Pulse los botones o para seleccionar PIP y a continuación pulse el botón ENTER 3 Pulse los botones o para seleccionar una opción concreta 4 Pulse los botones o para seleccionar la opción deseada 5 Pulse los botones EXIT o TOOLS para salir Mover Ingresar Regresar PIP Enc Origen TV T...

Страница 93: ...s botones o para seleccionar el ajuste de sonido Normal Música Cine Diálogo o Favorito y pulse el botón ENTER Pulse el botón EXIT para salir Normal Selecciona el modo de sonido normal Música Realza la música respecto de las voces Cine Proporciona el mejor sonido para ver películas Diálogo Realza las voces respecto de los sonidos Favorito Recupera la configuración de sonido personalizada vea Person...

Страница 94: ...a de audio independiente que normalmente es la versión en otro idioma MTS está disponible sólo en el modo de televisión Según el programa concreto emitido puede escuchar en Mono Estéreo o SAP Pulse varias veces el boton MTS del mando a distancia para seleccionar Mono Estéreo o SAP Selección de una pista de sonido multicanal MTS Configuración sencilla 1 Pulse el botón TOOLS del mando a distancia 2 ...

Страница 95: ... funcionan si Altavoz TV está establecido en Apag Se silencia la salida de sonido desde los altavoces del televisor Altavoces internos del televisor Audio Out R L Out para el sistema de sonido RF AV S Vídeo Componente PC y HDMI RF AV S Vídeo Componente PC y HDMI Altavoz TV Encendido Salida de altavoces Salida de altavoces Salida de altavoces Salida de altavoces Salida de altavoces Salida de altavo...

Страница 96: ... ver el menú en pantalla Pulse los botones o para seleccionar Sonido y después pulse el botón ENTER 2 Pulse los botones o para seleccionar Sel Sonido y después pulse el botón ENTER 3 Pulse los botones o para seleccionar Principal o Sub y después pulse el botón ENTER Pulse el botón EXIT para salir Principal Se usa para escuchar el sonido de la imagen principal Sub Se usa para escuchar el sonido de ...

Страница 97: ...l canal desaparece y el bloqueo del canal se cancela 6 Repita el paso 5 con cada canal que desee seleccionar o cancelar Pulse el botón EXIT para salir está activo cuando Bloqueo está seleccionado en Enc Pulse el botón CH LIST del mando a distancia para mostrar las listas de canales Puede agregar o suprimir un canal de manera que sólo se visualicen los canales que desee Control de los Canales Mover...

Страница 98: ...se el botón EXIT para salir Seleccione Enc o Apag en Bloqueo para activar o desactivar fácilmente los canales que estén marcados con Aparece una pantalla azul cuando se activa la función Seguridad para niños La función Bloqueo no está disponible cuando PIP está activado Pulse el botón CH LIST del mando a distancia para mostrar las listas de canales Esta función permite bloquear el vídeo y el audio...

Страница 99: ... continuación pulse el botón ENTER 2 Pulse los botones o para seleccionar Sistema Color y a continuación pulse el botón ENTER Seleccione la opción deseada Auto PAL M PAL N NTSC pulsando los botones o Pulse el botón ENTER Pulse el botón EXIT para salir Uso de la función Sistema Color Normalmente el televisor puede recibir imagen y sonido de buena calidad en el modo AUTO Este modo detecta automática...

Страница 100: ...l del sistema es igual al modo de señal estándar la pantalla se ajusta automáticamente Si la señal del sistema no es igual al modo de señal estándar ajuste el modo consultando la guía del usuario de la tarjeta de vídeo de lo contrario puede no haber señal de vídeo La imagen de pantalla se ha optimizado durante la fabricación para los modos de visualización enumerados a continuación D Sub Entrada M...

Страница 101: ... y después pulse el botón ENTER Pulse los botones o para ajustar la calidad de la pantalla Es posible que aparezcan rayas verticales en la imagen o que ésta aparezca borrosa Pulse el botón ENTER Pulse el botón EXIT para salir Ajuste de la calidad de la pantalla El objetivo del ajuste de la calidad de imagen es eliminar o reducir las interferencias Si el ruido no desaparece sólo con la sintonizació...

Страница 102: ...ENTER Pulse el botón EXIT para salir Inicio de la configuración de Posición de la pantalla o del Color Puede recuperar todos los ajustes de imagen predeterminados de fábrica Preselección Pulse el botón SOURCE para seleccionar el modo PC 1 Pulse el botón MENU para ver el menú en pantalla Pulse los botones o para seleccionar Imagen y después pulse el botón ENTER Pulse los botones o para seleccionar ...

Страница 103: ...l botón INFO Puede ajustar el mes el día el año la hora y el minuto directamente pulsando los botones numéricos del mando a distancia Ajuste de la Hora Establecer el reloj es necesario para usar las distintas características de temporizador del TV Además puede comprobar la hora mientras está viendo el TV Simplemente pulse INFO Tiempo Config Reloj am Temporizador Apag Temporizador 1 Desactivado Tem...

Страница 104: ...ara seleccionar Apag y a continuación pulse el botón ENTER Pulse el botón EXIT para salir Configuración sencilla 1 Pulse el botón TOOLS del mando a distancia 2 Pulse los botones o para seleccionar Temporizador 3 Pulse los botones o para seleccionar los minutos 4 Pulse los botones EXIT o TOOLS para salir Configuración Plug Play Idioma Español Tiempo Subtítulo Configuración externa Entretenimiento A...

Страница 105: ... ningún botón durante 3 horas después que el temporizador lo haya puesto en marcha Esta función sólo está disponible en el modo Activar del temporizador y evita el recalentamiento que se puede producir si el televisor está encendido durante demasiado tiempo Activación y desactivación del temporizador Selección del idioma de menú 1 Pulse el botón MENU para ver el menú en pantalla Pulse los botones ...

Страница 106: ...necesario realizar cambios en Canal y Campo Los distintos canales y campos muestran información diferente El campo 2 lleva información adicional que complementa la información del campo 1 por ejemplo el canal 1 puede tener subtítulos en inglés y el canal 2 en español 4 Pulse los botones o para seleccionar Canal o Campo y a continuación pulse el botón ENTER Pulse los botones o para seleccionar 1 o ...

Страница 107: ...e el botón MENU para ver el menú en pantalla Pulse los botones o para seleccionar Configuración y después pulse el botón ENTER 2 Pulse los botones o para seleccionar Entretenimiento y después pulse el botón ENTER 3 Pulse los botones o para seleccionar Apag Deportes Cine Juego y después pulse el botón ENTER Apag Desactiva la función Entretenimiento Deportes Proporciona una calidad óptima de imagen ...

Страница 108: ...g Apaga la función de ahorro de energía Bajo Configura el televisor en el modo de ahorro de energía bajo Medio Configura el televisor en el modo de ahorro de energía medio Alto Configura el televisor en el modo de ahorro de energía alto Auto Ajusta automáticamente el brillo de la pantalla del televisor según las escenas Pulse el botón EXIT para salir Configuración sencilla 1 Pulse el botón TOOLS d...

Страница 109: ...s de almacenamiento en miniatura y los lectores de tarjetas Flash No se admite ni el HUB ni el disco duro USB Antes de conectar el dispositivo al televisor haga una copia de seguridad de sus archivos para evitar daños o pérdidas de datos SAMSUNG no se hace responsable del daño o pérdida de datos que pueda sufrir archivo alguno Conecte directamente al puerto USB del aparato Si utiliza una conexión ...

Страница 110: ...zar un menú WISELINK Uso de los botones del mando a distancia con el menú WISELINK Botón Función Mover el cursor y seleccionar una opción ENTER Seleccionar la opción marcada Reproducir una presentación una película o un archivo de música Hacer una pausa en una presentación una película o un archivo de música RETURN Volver al menú anterior INFO Ejecutar varias funciones de los menús de películas fo...

Страница 111: ...ducir el archivo seleccionado Seleccione para reproducir los archivos de películas Si ha seleccionado archivos MP3 con el botón amarillo aparece la opción de menú Reproducir el archivo seleccionado Sólo se reproducirán los archivos seleccionados Este menú sólo muestra archivos con la extensión de archivo de película Los archivos con otras extensiones no se muestran aunque se hayan guardado en el m...

Страница 112: ...tra foto de la misma carpeta Pulse el botón cuando esté seleccionado un icono de foto para iniciar un visionado automático Según la calidad y la resolución de la imagen es posible que las fotos sin información EXIF no se muestren como imágenes en miniatura en la Lista de fotos Visualización de una presentación 4 Pulse el botón INFO para ver la opción Iniciar visionado automático Selecc todos 5 Pul...

Страница 113: ... o un archivo JPEG Para salir del modo WISELINK pulse el botón W LINK del mando a distancia Cuando se selecciona un archivo de fotos la información de éste aparece en la parte izquierda de la pantalla del televisor así como la resolución la fecha de modificación y el orden del archivo en este directorio por ejemplo 10 de 15 Icono de carpeta Icono de foto Icono de desplazarse a carpeta de nivel ant...

Страница 114: ...plazarse por una foto ampliada arriba abajo izquierda y derecha pulse el botón INFO para salir del menú y a continuación pulse los botones y Cuando está seleccionada la opción Zoom se desactivan las opciones Iniciar visionado automático o Girar x1 Restablece la foto a su tamaño original x2 Aumenta dos veces la foto x4 Aumenta cuatro veces la foto Mueva la foto ampliada hacia arriba abajo derecha i...

Страница 115: ...y Este menú sólo muestra archivos con la extensión mp3 Los archivos con otras extensiones no se muestran aunque se hayan guardado en el mismo dispositivo USB El archivo seleccionado se visualiza en la parte superior con su tiempo de reproducción Para ajustar el volumen de la música pulse los botones VOL VOL del mando a distancia Para silenciar el sonido pulse el botón MUTE del mando a distancia Re...

Страница 116: ...os MP3 de esta carpeta Repetir película Se selecciona para determinar si se desea repetir la reproducción de la Cine cuando se han reproducido todos los archivos Cine de esta carpeta Salvapantallas Seleccione para configurar el tiempo de espera necesario para que se ejecute el salvapantallas El salvapantallas aparecerá si no se pulsa ningún botón durante 1 5 o 10 minutos Uso del menú de configurac...

Страница 117: ...ar al sistema de cine en casa Panel lateral del televisor Dispositivo Anynet 1 Dispositivo Anynet 1 Dispositivo Anynet 1 Cine en casa Cable HDMI 1 3 Cable HDMI 1 3 Cable HDMI 1 3 Cable HDMI 1 3 Dispositivo Anynet 1 Cable HDMI 1 3 1 Conecte las tomas HDMI 1 HDMI 2 HDMI 3 o HDMI 4 del televisor y la toma HDMI OUT del dispositivo Anynet correspondiente mediante el cable HDMI 2 Conecte la toma HDMI IN...

Страница 118: ...ra seleccionar Apagado automático y a continuación pulse el botón ENTER 2 Pulse los botones o para seleccionar Sí y a continuación pulse el botón ENTER La función Apagado automático se activa Si selecciona No se cancela la función de Apagado automático Pulse el botón EXIT para salir La fuente activa del televisor remoto se debe configurar como TV para usar la función Anynet Si establece Apagado au...

Страница 119: ...spositivo Muestra el menú de control de reproducción del dispositivo conectado Ejemplo Cuando hay una grabadora de DVD conectada aparece el menú de control de reproducción de la grabadora de DVD Conexión Nombre_dispositivo El televisor está conectado al dispositivo correspondiente Receptor La salida de sonido se efectúa a través del receptor sistema de cine en casa Configuración Se puede configura...

Страница 120: ...del televisor con la opción Receptor configurada en Enc por desconectar el cable de alimentación o por un fallo de corriente puede que Altavoz TV esté establecido como Apag al volver a encender el televisor Consulte la página 29 Grabación El grabador permite efectuar una grabación de un programa de televisión 1 Pulse el botón REC 2 Comienza la grabación Sólo cuando está conectado el dispositivo de...

Страница 121: ...TV en el menú Anynet Pulse el botón SOURCE del mando a distancia del televisor y seleccione un dispositivo que no sea Anynet Pulse CH PRE CH para cambiar al modo TV Tenga en cuenta que el botón de canal sólo funciona cuando no hay ningún dispositivo Anynet con sintonizador incorporado conectado En la pantalla aparece el mensaje Conectando a un dispositivo Anynet El mando a distancia no se puede ut...

Страница 122: ... mando a distancia ventana de transmisión Compruebe los terminales de la pila Mensaje Verificar cable señal Compruebe que el cable de señal esté conectado firmemente con las fuentes del PC Mensaje Modo no compatible Compruebe la resolución máxima y la frecuencia del adaptador de vídeo Compare estos valores con los datos de los modos de Pantalla La imagen es demasiado clara o demasiado oscura Ajust...

Страница 123: ...a en la pantalla Ajuste la posición horizontal y vertical La posición de la pantalla se debe ajustar respecto a la fuente de salida por ejemplo STB con una señal digital La imagen aparece distorsionada en la esquina de la pantalla Si Sólo buscar está seleccionado en algún dispositivo externo la imagen puede aparecer distorsionada en la esquina de la pantalla Este síntoma se origina en los disposit...

Страница 124: ... nivel adecuado no aplique una presión excesiva en la parte superior izquierda y derecha del televisor 2 Apriete dos tornillos en la posición 1 y a continuación apriete dos en la posición 2 Levante el producto y apriete los tornillos Si aprieta los tornillos con el TV LCD tumbado éste se puede inclinar hacia un lado 1 Desmonte los 4 tornillos de la parte posterior del TV 2 Separe el soporte del TV...

Страница 125: ...mente WMN5090A Memorización de la posición 2 Ajuste la posición deseada con los botones o Si pulsa un botón de flecha sin que haya aparecido un OSD en la pantalla del televisor aparece la pantalla de ajuste Pulse el botón INFO para restaurar Pulse los botones o para seleccionar Sí y a continuación pulse el botón ENTER La posición se inicializa con la configuración predeterminada 3 Pulse el botón a...

Страница 126: ...ipo de montaje en la pared también se distribuye un manual de instalación detallado y todas las piezas necesarias para el montaje No use tornillos con un tamaño superior al estándar ya que pueden causar daños en el interior del televisor Para montajes murales que no cumplen las especificaciones de tornillos estándar VESA la longitud de éstos puede variar dependiendo de las especificaciones No use ...

Страница 127: ...kensington dependiendo del modelo El bloqueo Kensington es un dispositivo que se usa para fijar físicamente el sistema cuando se usa en un lugar público La apariencia y el método de bloqueo pueden diferir de la ilustración según los fabricantes Consulte el manual que acompaña al bloqueo Kensington para utilizarlo correctamente El dispositivo de bloqueo debe adquirirse por separado Opcional Figura ...

Страница 128: ...re del Modelo LN46A610A3R LN52A610A3R Tamaño de pantalla Diagonal 46 pulg 52 pulg PC Resolution 1920 x 1080 60 Hz 1920 x 1080 60 Hz Sonido Salida 10W X 2 10W X 2 Dimensiones An x Pr x Al Cuerpo principal Con soporte 1131 0 x 94 5 x 714 2 mm 44 5 x 3 7 x 28 1 pulgadas 1131 0 x 279 9 x 774 5 mm 44 5 x 11 0 x 30 5 pulgadas 1276 0 x 105 0 x 805 7 mm 50 2 x 4 1 x 31 7 pulgadas 1276 0 x 326 0 x 866 1 mm...

Страница 129: ...Esta página se ha dejado intencionadamente en blanco ...

Отзывы: