background image

Great user manuals database on 

UserManuals.info

English-5

4.  REC & pLAY

Press the [

MENU

] button on the remote control. 

Select <

Record

>.

11

To change the record quality & resolution, select  

<

REC Quality & Resolution

>.

If you change the setting of the resolution and the remaining 

rate, the remaining count shows each available resolution.

13

Press the [

SEARCH

] button on the remote control.

14

Set each of the Record Schedule options. 

To change the setting, set the channel then select the 

time and date you when want to record. 
Press the [

ENTER

] button while the cells are selected. 

The record type will cycle through <

No Recording

>-

<

Continuous

>-<

Event

>-<

Both(Cont&Evnt)

>. 

The default is as shown below.

12

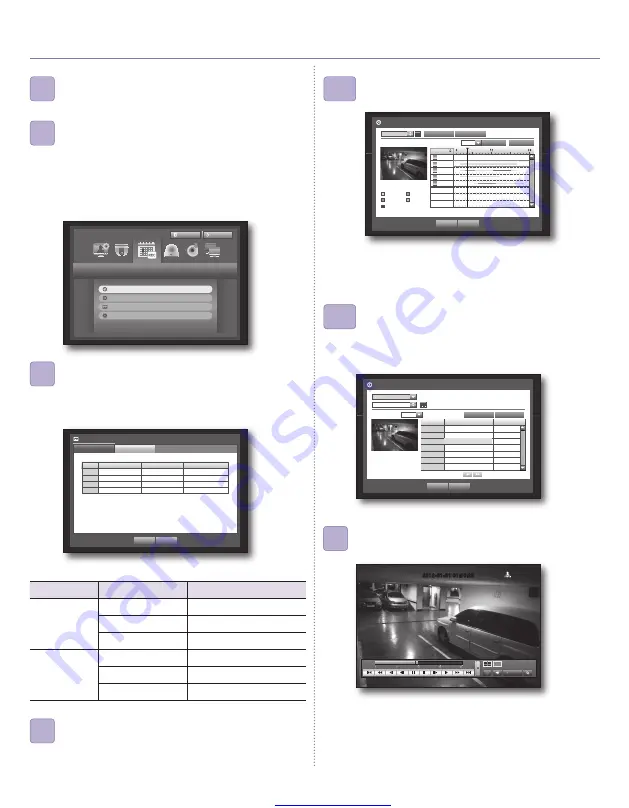
Select a desired date in the calendar, and a desired 

timeline in the Time bar, and press the <

Play

> button.

15-1

If you have set the event recording, you can play a 

desired scene using the <

Event Search

> function. Set 

a desired date in the calendar and the result will be 

listed on the table. 

Select one you desired and press the <

Play

> button.

15-2

The colored line indicates types of the recording data. 

If you want to play a time specific data, enter an exact 

time.

SYSTEM

RECORD SIZE

POSSIBLE FPS

NTSC

CIF 352 × 240

OFF, 1~30

2CIF 704 × 240

OFF, 1~30

4CIF 704 × 480

OFF, 1~30

PAL

CIF 352 x 288

OFF, 1~25

2CIF 704 x 288

OFF, 1~25

4CIF 704 x 576

OFF, 1~25

You can change the play speed or channel, or stop the 

playback using the onscreen button bar.

16

Record

Logout

Return

Recording Schedule
Event Record Duration
REC Quality & Resolution
Record Option

 CH 

Resolution 


Record Rate 


Record Quality 

 1 

CIF(S) 


7fps 


Level4 

 2 

CIF(S) 


7fps 


Level4 

 3 

CIF(S) 


7fps 


Level4 

 4 

CIF(S) 


7fps 


Level4 

REC Quality & Resolution

Standard

Event


OK 

Cancel

Remaining count : 4CIF(L) : 2 

2CIF(M) : 4 

CIF(S) : 8

Event Search

CAM 01
2012-01-01


Play 

Return

Previous/Next Page

2012/01/01  00:01:22


No. 

Date/Time Preview 

Event


02:47:54 ~ 02:48:59 

Motion


00:39:06 ~ 00:40:30 

Motion


00:01:22 ~ 00:02:28 

Motion

Go to First

Go to Last

Overlapped Data  List1

2012-01-01 01:10:25

REC

Time Search

2012-01-01


Play 

Return

2012/01/01  00:01:17

Standard Schedule
Motion Etc
V.Loss 

Go to First

Go to Last

Zoom In

Zoom Out

 All 

Data

CAM 01
CAM 02
CAM 03
CAM 04

00:01

Overlapped Data  List1

Содержание SDE-3004

Страница 1: ...er manuals database on UserManuals info EZ View Kit Quick Start Guide SDE 3004 1 Connecting with Other Devices 2 Installation 3 Starting Up 4 REC Play 5 Router Port Forwarding Set Up 6 Web Browsing 7 Monitoring ...

Страница 2: ...exposure to excessive rain or moisture The camera satisfies the IP65 standard and direct exposure to water or moisture may cause problem such as condensation Ú Ú If you do not use the Internet just follow the steps below 1 2 4 5 6 11 12 13 14 15 16 24 Broadband Router or HUB Local PC Broadband Modem 1 2 3 4 G 1 COM G ALARM IN ALARM OUT NETWORK USB CONSOLE VGA AUDIO IN AUDIO OUT VIDEO OUT DC 12V 1 ...

Страница 3: ... VGA OUT Connection LAN Mouse Local PC Broadband Modem Connect the modem to the WAN port of the router and connect each of the PC and the set to the LAN port Broadband Router or HUB 1 2 3 4 G 1 COM G ALARM IN ALARM OUT NETWORK USB CONSOLE VGA AUDIO IN AUDIO OUT VIDEO OUT DC 12V 1 2 3 4 G 1 COM G ALARM IN ALARM OUT NETW ORK USB CON SOLE VGA AUD IO IN AUD IO OUT VIDE O OUT DC 12V TOCAMERASIDEONLY TO...

Страница 4: ...appears when you change the auto logout time Ú Ú All operations can be controlled with the mouse 1 Use the direction buttons _ to move to a desired character and press the ENTER button 2 Use the button to erase the previous character 3 Use the button to toggle the letter case 4 Complete your input and when done click OK to close the virtual keyboard OK Cancel 1 2 3 4 5 6 7 8 9 0 q w e r t y u i o ...

Страница 5: ...press the Play button 15 2 The colored line indicates types of the recording data If you want to play a time specific data enter an exact time SYSTEM RECORD SIZE POSSIBLE FPS NTSC CIF 352 240 OFF 1 30 2CIF 704 240 OFF 1 30 4CIF 704 480 OFF 1 30 PAL CIF 352 x 288 OFF 1 25 2CIF 704 x 288 OFF 1 25 4CIF 704 x 576 OFF 1 25 You can change the play speed or channel or stop the playback using the onscreen...

Страница 6: ...ed tab where you can configure the Port Forwarding settings Click Apply to apply your settings For more information refer to the router guide of the manual CD Model D LINK DI 624 21 1 Running the Quick Connect program For more information refer to the quick connect guide of the provided manual CD 21 2 It is easy for you to use DHCP setting for Quick Connection Program Path Network Connection Mode ...

Страница 7: ...mmended to change the password after installing the product Note that the security and other related issues caused by the unchanged password shall be responsible for the user If the popup window is not activated unblock the popup If you first connect to the PC you will see a message as shown Install the suggested ActiveX control If you first connect to the PC you will see a message as shown above ...

Страница 8: ... more information refer to the user manual http www samsungcctv com 25 26 Right click the screen or press the MODE on the remote control 24 1 When the launcher menu appears press the button Ú Ú You can add or modify the screen transition interval in System Device Monitor menu 24 2 2012 01 01 01 10 25 2012 01 01 01 10 25 Date Time Language Date Time Language Holiday Date 2012 01 01 YYYY MM DD Time ...

Отзывы: