background image

Service Manual

Disassembly and Reassembly

5-4

Samsung Electronics

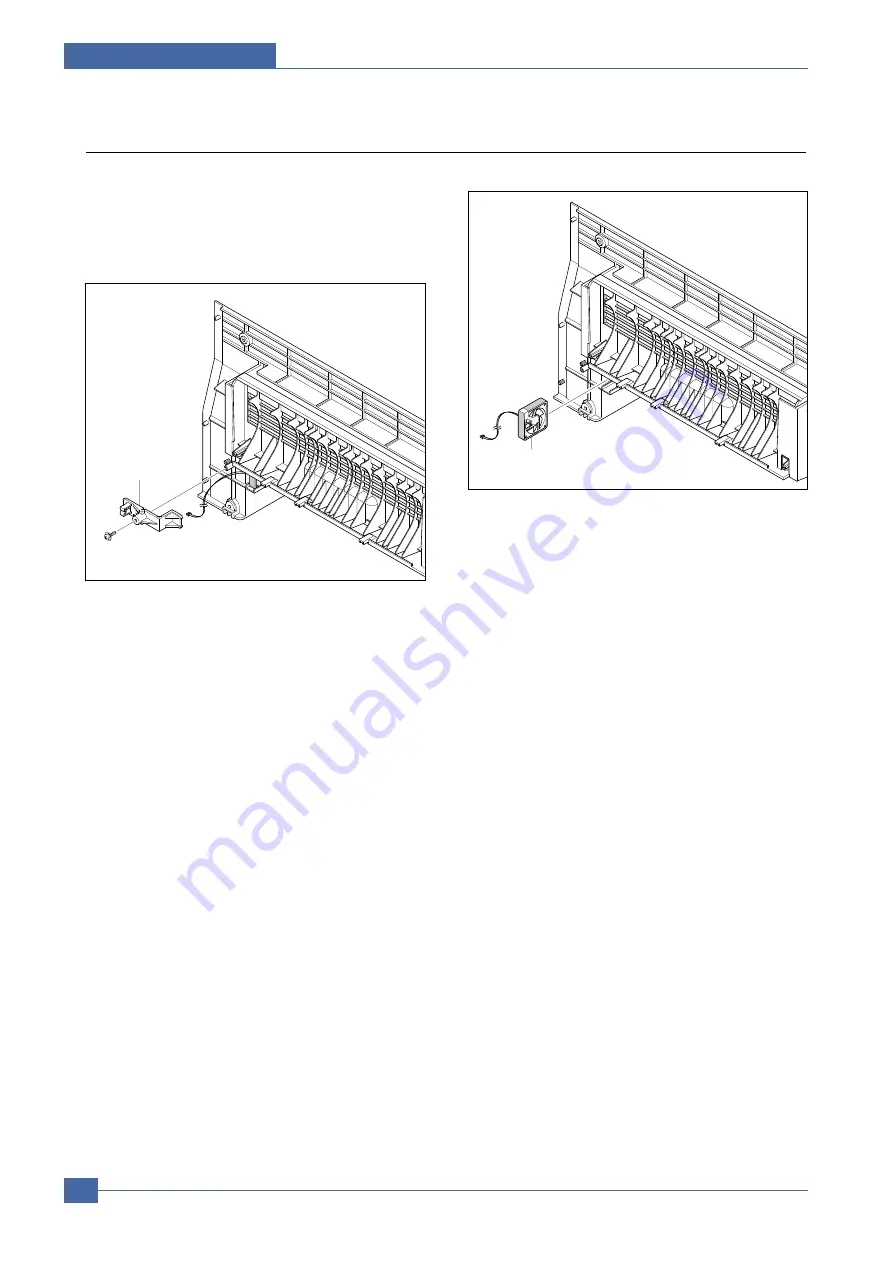
5.4 DC Fan

1. Before you remove the DC Fan, you should remove:

- Rear Cover (Refer to 5.3) 

2. First release the harness from the Harness Holder

and then remove the one screw securing the Harness
Holder and remove it, as shown below.

3. Pull the DC Fan out of the Rear Cover.

Harness Holder

DC Fan
(24V, 80mA)

Содержание SCX-4200 Series

Страница 1: ...Key Features 18ppm Print Copy Speed 600dpi Print Copy Resolution 600 x 2400dpi Scan Resolution Samsung Print Language 8MB System Momory 250sh Paper Input 50sh Paper Output Under 42sec Warm up Time 16 x 2 Line LCD Display USB 2 0 3K Toner Yield initial 1K sales 3K Special Copy ID Copy Clone 2 up Poster Autofit SCX 4200 Series ...

Страница 2: ...iew 3 1 System Outline 3 1 3 2 H W Structure abd Descriptions 3 9 3 3 S W Structure and Descriptions 3 19 4 Alignment and Adjustments 4 1 Engine Test Mode 4 1 4 2 Paper Path 4 2 4 3 Clearing Paper Jams 4 3 4 4 Printing the System Data List 4 6 4 5 Clearing the Memory 4 6 4 6 Clearing the Drum 4 6 4 7 Consumables and Replacement Parts 4 7 4 8 The LCD Status Display by Each Error 4 7 4 9 Periodic De...

Страница 3: ...1 Exit Roller 5 14 5 12 LSU 5 15 5 13 Fan 5 16 5 14 Drive Ass y 5 16 5 15 Engine Shield Ass y 5 17 5 16 Main PBA 5 17 5 17 SMPS 5 18 5 18 CRUM PCB 5 19 5 19 Transfer Roller 5 20 5 20 Feed Roller 5 21 5 21 Pick Up Roller Solenoid 5 23 6 Troubleshooting 6 1 Procedure of Checking the Symptoms 6 1 6 2 Solution of Image Problem 6 5 6 3 Paper Feeding Problems and Troubleshooting 6 10 6 4 Symptoms of Bad...

Страница 4: ...iagram 9 1 SCX 4200 Connection Diagram 9 1 10 Schematic Diagram 10 1 Main Board 10 1 10 2 OPE Circuit Diagram 10 8 10 3 SMPS 110V 10 9 10 3 SMPS 220V 10 13 11 Reference Information 11 1 Tools for Troubleshooting 12 1 11 2 Acronyms and Abbreviations 11 2 11 3 Select a location for the printer 11 4 11 4 A4 ISO 19752 Standard Pattern 11 5 ...

Страница 5: ...ny human access to laser radiation above a Class I level during normal operation user maintenance or prescribed service condition Warning Never operate or service the printer with the protective cover removed from Laser Scanner assembly The reflected beam although invisible can damage your eyes When using this product these basic safety pre cautions should always be followed to reduce risk of fire...

Страница 6: ...g or removing the power connector The power connector must be inserted com pletely otherwise a poor contact could cause overheating possibly leading to a fire When removing the power connector grip it firmly and pull 7 Take care of the power cable Do not allow it to become twisted bent sharply round corners or otherwise damaged Do not place objects on top of the power cable If the power cable is d...

Страница 7: ...lease carry out the following procedures before dismantling the printer or replacing any parts 1 Check the contents of the machine memory and make a note of any user settings These will be erased if the mainboard is replaced 2 Ensure that power is disconnected before servicing or replacing any electrical parts 3 Disconnect printer interface cables and power cables 4 Only use approved spare parts E...

Страница 8: ...e motor fan etc If do you can get harm 3 When you move the printer This printer weighs 12 1kg Gross Weight With Package Use safe lifting and handling techniques Back injury could be caused if you do not lift carefully 4 Ensure the printer is installed safely The printer weighs 9 5Kg Net Weight inc Toner Cartridge ensure the printer is installed on a level surface capable of supporting its weight F...

Страница 9: ...ctrical charges sufficient to damage ESDs 5 Do not use Freon propelled chemicals When sprayed these can generate electrical charges sufficient to dam age ESDs 6 Do not remove a replacement ESD from its protective packaging until immediately before installing it Most replacement ESDs are packaged with all leads shorted together by conductive foam aluminum foil or a compa rable conductive material 7...

Страница 10: ...Basic Model SCX 4200 SEE Series Model SCX 4200 Market of Sailes Persnal user MFP Low Price for small work Group Specification 18ppm Ltr 19ppm Chorus2 CPU Use 16 32 Bit RISC Processor 1K initial 3K sailes USB 2 0 250pages feeding 50pages Face Down 2 Product Specification 2 1 Product Overview ...

Страница 11: ...ht with package 12 1 Kg LCD 16 2 Char No BackLight I O Interface USB 2 0 Power Printing Operation 350 Wh Consumption Sleep Mode Energy Star Compliant Power Switch Yes Noise Operating 53 dBA Standby 38 dBA Warm Up Time from Cold Status Less than 30 seconds Machine Life Max Monthly Volume Print 4K pages Duty Cycle Scan 800 pages Average Monthly Print Volume 500 Pages Machine Life 5 years 50 000 Page...

Страница 12: ... 11 seconds From Cold Status Less than 41 seconds Duplex Print N A Printable Area 208 x 273 mm Letter Halftone Gray Scale 256 levels Items SCX 4200 Remarks SCAN Scan Method Color CIS Scan Speed through Lineart Halftone 15 sec Platen Gray 30 sec Color 75 sec 75dpi 300dpi Resolution Optical 600 2400dpi Enhanced 4800dpi 4800dpi USB Halftone 256level Scan Size Max Document Max 216mm 8 5 Width Effiecti...

Страница 13: ... Multiple Copy Resolution Scan 600 600dpi Print 600 600dpi Zoom Range 50 to 200 Multi Copy 1 99 Preset Yes Darkness Control 3 level Light Normal Dark Copy Mode Original Type Text Text Photo Photo Collation Copy N A Auto return to default mode Yes after 1 minute Timecanbe changeable 15 30 60 180sec Off ChangeableDefaultmode Darkness OriginalType Reduce Enlarge No ofCopies SpecialCopy 2 upcopy Yes P...

Страница 14: ...ut Capacity Face Down 50Sheets 20lb Face Up 1Sheet Output Control Face down Face up Paper Size Main Tray Legal A4 Letter Folio Executive B5 A5 A6 Bypass Bypass Envelope6 3 4 7 Withmaintraypaper 3 4 9 10 DL C5 B5 Paper Weight Main Tray 16 24 lb Bypass 16 43 lb Paper Path Standard output Bottom to Top Front FIFO Straight Through Face up Single Sheet Paper Size Max 216 x 356mm 8 5 x14 Min 76 x 127mm ...

Страница 15: ...pgrade FW PC FAX No Only available through PC Package and POP POP Yes Quick Reference guide Yes include Setup Guide and Function Guide Accessory Owner s manual Yes Electronic S W CD ROM 1 CD for User Manual Smar Thru 4 Print Driver Scan Driver RCP Toner Cartridge 1 EA Power Cable 1 EA L shapepowercable Telephone Jack No Printer Cable No China Korea USB Type One Piece Consumables How to install Fro...

Страница 16: ...System Overview Samsung Electronics Service Manual 3 1 3 3 3 System Overview This chapter describes the functions and operating principles of the main components 3 1 System Outline 3 1 1 Front View ...

Страница 17: ...Samsung Electronics Service Manual System Overview 3 2 3 1 2 Sensor ...

Страница 18: ...System Overview Samsung Electronics Service Manual 3 3 3 1 3 Control Panel ...

Страница 19: ...nual System Overview 3 4 3 1 4 System Layout SCAN PART Paper Input Cassette Paper Input Manual Feeder Paper Out Face Down Paper Empty Sensor Manual Paper Empty Sensor Cassette Paper Feeding Sensor Paper Exit Sensor Paper Out Face Up ...

Страница 20: ...1 4 3 Drive Ass y A gear driven power unit The motor supplies power to the paper feed unit the fuser unit and the toner cartridge 3 1 4 4 Fixing Part Fuser Heat Lamp type used on 220V Export models and all 110V models The Heat Lamp type fuser consists of the Heat Lamp Heat Roller Pressure Roller Thermistor and Thermostat It fixes toner to the paper using pressure and heat to complete the printing ...

Страница 21: ...ion device Thermostat cuts off mains power to the lamp Safety device Fuser power is cut off when the front cover is opened LSU power is cut off when the front cover is opened The temperature of the fuser cover s surface is maintained at less than 80ºC to protect the user and a caution label is attached where the customer can see it easily when the rear cover is opened 3 1 4 5 Scanner Unit Scan Ima...

Страница 22: ...laser light A rotating polygon mirror reflects the laser light onto the OPC and each side of the mirror is one scan line The OPC drum turns as the paper feeds to scan the image down the page The HSYNC signal is created when the laser beam from LSU reaches the end of the polygon mirror and this signal is sent to the controller The controller detects the HSYNC signal to adjust the vertical line of t...

Страница 23: ...veloping roller and blade Doctor blade Developing Method Non magnetic 1 element contacting method Toner Non magnetic 1 element shatter type toner The life span of toner 3 000 sheets ISO standard Toner remaining amount detecting sensor No OPC Cleaning Electrostatic process Management of waste toner Electro static process Cleanerless Type OPC Drum protecting Shutter No Classifying device for toner c...

Страница 24: ...Cantroller by Harness 3 2 1 CPU Part 1 CPU Use 16 32Bit RISC Processor Chorus 2 which is exclusive controller to execute Printer and to execute operation block by flash memory within system program and to control whole system Main function block Completely Integrated System for Embedded Applications 16 32 Bit Risc Architecture Efficient and Powerful ARM7 Core LSU Interface Module for Interfacing P...

Страница 25: ...ng Memory Area Size 8Mbyte 3 5 MB System Working Memory Area and Scan Buffer 4 5 MB Printing System Working Memory Area Max Frequency 133MHz CPU ARM7TDMI DMA Controller IP_DMAC DATA BUS Scanner Analog Signal Sensor Control Signal MEMORY CONTROLLER IP_TOP DATA BUS ADDR BUS ADDR BUS IP_TOP interface IP_MAIN IP_SFR Motor Motro Control Signal ...

Страница 26: ...ecuted ahead then processing is executed later Scan Image Control Specification Minimum Scan Line Time 1 23ms Scan Resolution Max 600 x 2400 DPI optical Scan Width 216mm main function Internal 10bit ADC White Shading Correction Gamma Correction CIS Interface 256 Gray Scale 3 CIS Operating Part CIS use 3 3V CIS Maximum Operating Frequency 5MHz CIS Line time 1 63ms White Data output Voltage 1 7V Mon...

Страница 27: ... data to the LSU and manages the conduct of Electrophotography for printing It is consisted of the circuits of the motor paper feed pass driving clutch driving pre transfer lamp driving current driving and fan driving The signals from the paper feed jam sensor and paper empty sensor are directly inputted to the main board 3 2 4 1 ASIC Chorus 2 16 32 bit RISC embedded processor core 4KB instruction...

Страница 28: ...er 4 ch GPIO Controller Watchdog Timer 10bit ADC Rotator RTC Real Time Clock JTAG AIN 3 0 General DMA 2 CH Interrupt Controller Memory I F ROM SRAM DRAM SDRAM IP_TOP SSB USB v1 1 UART 2 ch HP SIO Tone Generator CRCON LFCON CRFIRE LSU I F Parallel Port P1284 System Bus Bridge Arbitration BDMA 2 Ch Clock Generator MPLL Clock Generator UPLL PRT_TOP Clock Generator PPLL Chorus 2 Block Diagram ...

Страница 29: ...ments 9 Non printable Area 4 mm Top Bottom and each Side 10 Copy Count 1 to 99 Page count displayed on LCD during copy operation 11 Copy Modes Text Text Photo Photo 12 Fixed R E Setting 100 Auto fit 13 Darkness Control 3 levels 14 First Copy Output Time FCOT Platen 11 sec 600 x 300 dpi 15 Duplex Copy Manual 3 2 6 SMPS HVPS The SMPS supplies DC Power to the System It takes 110V 220V and outputs the...

Страница 30: ...oltage 24 V DC 15 Output Voltage 1 3KV 1 8KV DC 3 Output Voltage Rising Time 50 ms Max Output Voltage Falling Time 50 ms Max Output Loading range 30 M 1000 M Output Control Signal MHV PWM CPU is HV output when PWM is Low Cleaning Voltage THV The Transfer Voltage is not outputted because the THV PWM is controlled with high The Transfer Voltage is outputted because the THV Enable Signal is controlle...

Страница 31: ... when lamp is off or rated voltage is inputted outputted Rated Output Power NO ITEM CH1 CH2 CH3 Remark 1 CHANNEL NAME 5V 24V 24 0VS 2 CONNECTOR PIN CON2 CON 2 CON 2 5V PIN 3 4 24 24V PIN 13 24VS PIN 11 12 GND PIN 5 6 GND PIN 7 9 10 GND PIN 7 9 10 3 Rated Output 5V 5 24V 10 15 24VS 10 15 4 75 5 25V 21 6 27 6V 21 6 27 46V 4 Max Output current 1 0A 0 5 A 1 0 A 5 Peak Loading voltage 1 5A 1 0 A 1 5 A ...

Страница 32: ...EAK In other conditions Rising Time within 2Sec Falling Time over 20ms Surge Bi Wave 3kV 2 Normal 6KV 12 Common Environment Condition Operating Temperature Range 0 40 Maintaining Temperature Range 25 85 Preserving Humidity Condition 30 90 RH Operating Atmospheric Pressure Range 1atm EMI Requirement CISPR FCC CE MIC Safety Requirement IEC950 UL1950 CSA950 C UL Semko CB CCC CCIB GOST EPA Power Save ...

Страница 33: ...he HEATER ON signal is turned on at Engine The LED of PC102 Photo Triac takes the voltage and flash es From the flashing light the Triac part light receiving part takes the voltage and the voltage is supplied to the gate of Triac and flows into the Triac As a result the AC current flows in the heat lamp and heat is occurred On the other hand when the signal is off the PC102 is off the voltage is c...

Страница 34: ...gine Control System Fig 1 The architecture of the engine firmware Main F W of the printer controller Print Interface Control Module Engine Print Processing Control Module Engine Unit Control Module Hardware Devices Mechanical Device Power On Initial Engine Firmware Device Units Sensors signals Fuser Unit LSU HVPS Fan Unit Motors Solenoid Clutch ...

Страница 35: ...ird function is that is doing jam processing and final function is that doing state processing for the each engine state Virtual timer function This is about the virtual timer used to control time process in the engine part This consists of three parts One is the action part to declare ID and Function another is the execution part to run the timer and the function and the other is the stop part to...

Страница 36: ...paper size sensor So the information of the paper size is basically received from the main system But the engine measures the paper size with the counter value based on the time of the feed sensor on off when the paper is fed We obtain the interval distance between paper and paper in the information from the main system and the measured interval distance Comparing two interval distances we choose ...

Страница 37: ...the paper type the temperature is different Generally a thick paper has higher temperature and OHP has lower temperature than a plain paper does The fixing unit has a different temperature according to the paper type mentioned in 3 1 2 2 Paper Type 3 3 3 3 Paper Size If the paper width is narrow the temperature of fuser roller does not uniformly at overall surface of the roller So in this case the...

Страница 38: ... place 3 3 3 7Temperature in the Warm Up mode When the engine operates the warm up processing it controls the temperature of the fixing unit for raising the temperature to the stand by temperature 3 3 3 8Environmental Index The engine checks the present environment when it performs the printing job or the warm up process and then with the checked result the temperature of fixing unit is assigned w...

Страница 39: ...will check whether the LSU is ready or not and the Hsync is detected or not for appointed time 3 3 4 2 Sequence of LSU module The laser scanning unit control is executed when engine control module receives print command Setting up the initial value With above results it controls the polygon motor and laser diode when receives print command With above results it monitors register value related to L...

Страница 40: ...s operated when OPC is revolved without the paper Recognizing Environment with paper It is operated when the front edge of the paper is between the transfer roller and OPC 3 3 5 2 Air Temperature Sensor N A 3 3 5 3 Environment Recognition There are several reference voltages to supply to the transfer roller in order to recognize the environment At first it supplies the lowest voltage to the transf...

Страница 41: ...ller for cleaning polluted transfer roller by moving the toner remained a transfer roller to the OPC drum The value is fixed to about 1000V 3 3 6 3 DEV This high voltage is supplied to the developer roller to move the toner to the skin of the OPC drum scanned by laser beam while printing the image The engine controls if a high voltage is supplied or not and its quantity The developer team presents...

Страница 42: ...s the plus clean mode Minus clean mode Supplying minus voltage to transfer roller for removing toner with negative pole Plus clean mode Supplying plus voltage to transfer roller for removing toner with plus pole The developer team presents the cleaning process 3 3 10 Functional Requirements of Fan Operation The fan is always driven except a sleep mode and a special condition to cool the inner temp...

Страница 43: ...he feed sensor and the exit sensor If the feed sensor is active or the exit sensor is not active after the specified time from activating the feed sensor the engine decides the paper is jammed Also if the status the exit sensor and the feed sensor are active is maintained the engine decides the paper is jammed by the structure of the mechanism after the specified time So the engine informs the err...

Страница 44: ...ser 3 3 15 3 Over Heat Error For overall engine state if the temperature of the fixing unit is higher than the specified temperature and the temper ature state is kept during the specified time the engine defines Over Heat Error When this error is broken out the engine stops all functions and keeps it at the error state Also the engine informs the error status of the main sys tem And then the erro...

Страница 45: ...or state Also the engine informs the error status of the main system and the error message is displayed at LCD window to inform the error status of the user By Hsync When the polygon motor is ready the LSU sends out the signal called Hsync and used to synchronize with each image line So if the engine does not detect consecutively the signal for a fixed time it defines the Hsync Error If this error...

Страница 46: ...an upper menu Press the Menu Exit key To return to the user menu Press the Menu Exit key 4 1 2 Diagnostic Main Menu Engine test Remark ENGINE TEST Motor Test 1 On 2 Off MTR FAN SOL ETC PickUp Test 1 On 2 Off Fan Test 1 On 2 Off Manual Clt Test 1 On 2 Off PTL Test 1 On 2 Off ENGINE TEST LSU Motor Test 1 On 2 Off LSU TEST LSU Hsync Test 1 On 2 Off LD Test 1 On 2 Off ENGINE TEST Feed Sen Test Check C...

Страница 47: ... main cassette or manual feeder as required 2 The paper being fed passes the paper feed sensor Jam 0 occurs if the sensor is not operated within a certain time 3 Having passed the paper feed sensor the paper moves to the paper exit sensor via printing process Jam 1 occurs if the sensor is not operated within a certain time 4 The paper then passes through the paper exit sensor and out of the set Ja...

Страница 48: ...PAPER JAM 2 CHECK INSIDE In the fuser area or around the toner cartridge BYPASS JAM In the manual feeder 1 Open and close the front cover The jammed paper is automatically ejected from the machine If the paper is not ejected continue to step 2 2 Pull the paper tray open 3 Remove the jammed paper by gently pulling it straight out If there is any resistance and the paper does not move when you pull ...

Страница 49: ...nt edge of the scanner unit The support lever will automatically pop up 4 Pull the paper out gently 5 Close the jam cover by pushing the support tab to the left and hold it down whilst lowering the cover carefully until the cover fully down this will hold down the tab If there is any resistance and the paper does not move when you pull or if you cannot see the paper in the jam cover continue to st...

Страница 50: ... 3 Replace the toner cartridge and close the front cover Printing automatically resumes 4 3 3 In the Fuser Area or Around the Toner Cartridge Bypass Jam appears on the display when you try to print using the manual feeder and the machine does not detect paper due to no paper or improper paper loading The error message may also occur when the paper is not properly fed into the machine through the m...

Страница 51: ...ystem data report which shows the status of the user selectable options You may print this list to confirm your changes after changing any settings To print the system data list 1 Press Menu until Report appears on the top line of the display System Data appears on the bottom line 2 Press Start The system data list prints out ...

Страница 52: ...d save modes to the factory default 4 Press Start Enter The selected memory is cleared and the display asks you to continue clearing the next item 5 To clear another item press Start Enter and repeat steps 3 and 4 Or to return to Standby mode press Stop Clear 4 6 Clearing the Drum If there are streaks or spots on your print the OPC drum of the cartridge may require cleaning 1 Before carrying out t...

Страница 53: ...aper Jam 1 Open Close Door Paper Jam 2 Check Inside The front or rear cover is not securely latched The toner cartrige is not installed There is a problem in the fuser unit A problem has occurred in the LSU Laser Scanning Unit The paper tray has run out of paper Paper has jammed in the feeding area of the paper tray Paper has jammed in the fuser area A paper jam has occurred in the manual feeder o...

Страница 54: ...black image or black spot 2 Charge Roller 37 8mm black spot 3 Supply Roller 44 9mm light or dark horizontal image band 4 Developing Roller 35 2mm horizontal image band 5 Transfer Roller 45 3mm image ghost 6 Heat Roller 64 0mm Black spot and image ghost 7 Pressure Roller 75 3mm black spot on the backside SCAN PART PTL 1 3 7 5 MP Sensor 1 2 3 4 OPC Drum Charge Roller Supply Roller Developing Roller ...

Страница 55: ...he paper input tray Open Heat Error There is a problem in the fuser unit Unplug the power cord and plug it back in If the problem persists please call for service Over Heat There is a problem in the fuser unit Unplug the power cord and plug it back in If the problem persists please call for service Paper Jam 0 Open Close Door Paper has jammed in the feeding area of the paper input tray Clear the j...

Страница 56: ...guage English French Spanish Po rtuguese German Italian D utch Russian Swedish 9 countries English Portuguese European On 5 10 15 30 45 5 min Off 3 USB Mode Fast Slow Fast 1 Clean Drum Paper Setting Copy Setup All Settings Machine Setup Clear All Mem Total Page CNT FLT Scan CNT Remote Switch Test Dram Test Rom Test Pattern Test Shading Test 3 Report System Data DIRECT KEY Copies Menu Start Stop ڦڪ...

Страница 57: ...ΧΒΝΦΖ ΠΗ ΒΝΝ ΔΠΡΪ ΜΖΪΤ notice Menu Start Stop ڦڪ ඔ ඖ ڟڠڧٻێېۏڼۏڮډڎ LED Color LED Status ΗΗ ΗΗ Ο Ο ͳΝΚΟΜ This is to be used to enter the Menu This key is used to activate the job This key is used to stop the job being done or to exit from the Menu And clear value of 5 copy keys Green This key is used to select the right item what customer wants from several items Left Right Arrow Key ͳΝΚΟΜ ΝΠΨΝΪ ΣΚΟ...

Страница 58: ...machine note the cable routing that will be affected Whenever servicing the machine you must perform as follows 1 Check to verify that documents are not stored in memory 2 Be sure to remove the print cartridge before you disassemble parts 3 Unplug the power cord 4 Use a flat and clean surface 5 Replace only with authorized components 6 Do not force plastic material components 7 Make sure all compo...

Страница 59: ... Cover 1 Take the Cassette out of the printer 2 Open the Front Cover 3 To remove the Front Cover first pull the part below the right side of the Front Cover with a light pressure to the direction of arrow and then remove the Front Cover as shown below Front Cover 1 2 Cassette ...

Страница 60: ...rews securing the Rear Cover as shown below 2 To remove the Rear Cover make sure the Power Switch doesn t get jammed to Rear Cover and then Unplug the one connector DC Fan from the Main PBA as shown below 3 If necessary remove the Rear Door in the direction of arrow as shown below Rear Door Rear Cover ...

Страница 61: ...Before you remove the DC Fan you should remove Rear Cover Refer to 5 3 2 First release the harness from the Harness Holder and then remove the one screw securing the Harness Holder and remove it as shown below 3 Pull the DC Fan out of the Rear Cover Harness Holder DC Fan 24V 80mA ...

Страница 62: ... Refer to 5 3 2 Remove the one screw at the front of the unit 3 Apply light pressure to the back of the Right Side Cover and pull it to the right side in the direction of arrow as shown below 4 Unplug the connector Micro Switch from the SMPS as shown below 5 If necessary remove the one screw securing the Micro Switch and remove it Micro Switch Right Side Cover Right Side Cover 1 2 ...

Страница 63: ...e you remove the Left Side Cover you should remove Front Cover Refer to 5 2 Rear Cover Refer to 5 3 2 Remove the one screw at the front of the unit 3 Apply light pressure to the back of the Left Side Cover and pull it to the left side in the direction of arrow as shown below Left Side Cover 1 2 ...

Страница 64: ...Unplug the two connectors Scan Motor OPE Unit and CIS FFC from the Main PBA as shown below 3 Carefully lift the Scanner Unit from the base taking care to thread the cables through the frame 4 Lift the Platen Cover upward and remove it 5 To remove OPE Unit first pull the part below the front of the OPE Unit with a light pressure to the direction of arrow CIS FFC Scan Motor OPE Scanner Unit Platen C...

Страница 65: ...he left hand to lift and remove the Belt 9 When removing CIS FFC note that the cable is taped to the Scan Lower Unit Then take the CIS with Carriage Belt CIS FFC out of OPE Lower Unit 10 To remove the CIS from the Carriage first unplug the CIS FFC from the CIS and remove two CIS Slider from each end of the CIS Then Release the CIS in the direction of arrow as shown below Belt 2 1 CIS FFC CIS Carri...

Страница 66: ...nter of the Carriage and remove the Belt as shown below 12 Take the CIS Shaft out of OPE Lower Unit and then remove the three screws securing the Scan Motor Ass y and remove it 13 Remove the Idle Pulley in the direction of arrow as shown below Carriage Belt Clip Belt Pulley Idle Pulley Bracket Spring ETC Belt CIS Shaft Scan Motor Ass y ...

Страница 67: ...the Platen Cover upward and remove it 2 To remove OPE Unit first pull the part below the front of the OPE Unit with a light pressure to the direction of arrow 3 Remove the three scrrews securing the OPE PBA and remove it 4 Release the Keys Platen Cover LCD Cap OPE PBA LED Cap Key OPE Unit ...

Страница 68: ...ual 5 11 Samsung Electronics 5 9 Middle Cover Unit 1 Before you remove the Middle Cover Unit you should remove Scanner Unit Refer to 5 7 2 Remove the four screws securing the Middle Cover Unit and remove it as shown below Middle Cover Unit ...

Страница 69: ...e not to damage the Exit Sensor 4 Remove the two screws securing the Thermostat and then release the Fuser Harness and Fuser Joint Harness from both side of the Thermostat as shown below Then take the Thermostat out of the Fuser 5 Remove the two screws securing the Halogen Lamp and then release the Fuser Harness and Fuser Joint Harness from both side of the Halogen Lamp as shown below Then take th...

Страница 70: ...s 6 Remove the one screw securing the Gear RDCN 25 15 and remove it 7 Remove the four screws and divide the Fuser into two parts 8 Unwrap the Thermistor Harness as shown below 9 Remove the Thermistor from the Fuser Cover Gear RDCN 25 15 Thermister Harness Thermister ...

Страница 71: ... remove the Exit Roller you should remove Scanner Unit Refer to 5 7 Middle Cover Unit Refer to 5 9 2 Remove the Exit Gear and Bearing using a screw dri ver at one end then remove the shaft and rollers as shown below 1 2 1 Exit Gear Bearing Roller Exit F Down Holder Roller Exit Main Roller Exit FR ...

Страница 72: ...5 12 LSU 1 Before you remove the LSU you should remove Scanner Unit Refer to 5 7 Middle Cover Unit Refer to 5 9 2 Remove the one screw securing the CAP LSU and remove it 3 Unplug the two connectors from the LSU 4 Unplug the four screws and take the LSU out CAP LSU LSU ...

Страница 73: ...en the screws in the order that they are numbered on the Drive Ass y base plate 3 Unplug the connector from the Drive Motor as shown below Service Manual Disassembly and Reassembly 5 16 Samsung Electronics 5 13 Fan 1 Before you remove the Fan you should remove Front Cover Refer to 5 2 Rear Cover Refer to 5 3 Right Side Cover Refer to 5 5 2 Unplug the connector from the SMPS and remove the one scre...

Страница 74: ...tors Refer to 5 10 2 2 Remove the eleven screws securing the Engine Shield Ass y and unplug the all connectors Then remove the Engine Shield Ass y hield Ass y 5 16 Main PBA 1 Before you remove the Main PBA you should remove Engine Shield Ass y Refer to 5 15 2 Unplug the Engine Harness and remove the two screws from the Main PBA Then lift the Main PBA out as shown below Main PBA Engin Harness ...

Страница 75: ...hould remove Engine Shield Ass y Refer to 5 15 2 Remove the two screws then take the Inlet Bracket out as shown below 3 Unplug the Engine Harness from the SMPS and then remove the one screw securing the ground cable as shown below 4 Remove the three screws and take the SMPS out Inlet Bracket SMPS Engine Harness ...

Страница 76: ...e Manual 5 19 Samsung Electronics 5 18 CRUM PCB 1 Before you remove the CRUM PCB you should remove LSU Refer to 5 12 Engine Shield Ass y Refer to 5 15 2 Remove the four screws securing the CRUM PCB and remove it as shown below CRUM PCB ...

Страница 77: ... 9 LSU Refer to 5 12 2 Remove the three screws and take the Transfer Earth out 3 Unplug the PTL PBA Harness then remove the PTL Holder and PTL Lens as shown below Take care to note the orientation of the PTL Lens and ensure it is refitted correctly 4 Unlatch the Bush and remove it Then lift the Transfer Roller out as shown below Transfer Earth Bush Transfer Roller PTL Holder PTL Lens PTL PBA Harne...

Страница 78: ...Refer to 5 9 LSU Refer to 5 12 Drive Ass y Refer to 5 14 2 Remove the two screws from the Guide Paper and take it out 3 Pull up the Feed Idle Bush and Feed Idle Shaft as shown below 4 Remove the three screws from the Feed Bracket and take it out 5 Remove the Idle Gear and Feed Gear2 Guide Paper Feed Bracket Feed Gear2 Idle Gear Bush Feed Idle Shaft Spring ...

Страница 79: ...vice Manual Disassembly and Reassembly 5 22 Samsung Electronics 6 Remove the Feed Gear1 Ass y as shown below 7 Pull the Feed Roller and Feed Roller1 as shown below Feed Gear1 Ass y Feed Roller1 Feed Roller ...

Страница 80: ...acket and Gear Refer to 5 19 steps 4 6 2 Remove the Pick Up Gear Ass y as shown below 3 To remove the Pick Up Ass y first lift the notch attached to the Bush so that it s released from the shaft then slide the Pick Up Ass y from right to left and it will be released completely as shown below 4 Remove the two screws and then remove the Regi Solenoid and Pick Up Solenoid Pick Up Gear Ass y Pick Up A...

Страница 81: ...Service Manual Disassembly and Reassembly 5 24 Samsung Electronics ...

Страница 82: ...ting to repair the printer first obtain a detailed description of the problem from the customer Power On No Power Power Module error Main PBA error LCD Panel error Refer to Solution of Image Problem OP Panel ON Ready or Power save Indicate Error Massage Refer to Error Massage Chapter 4 10 Test Print END printing Quality is Nomal ...

Страница 83: ...printing Digital Printer Digital Printer Digital Printer Digital Printer Digital Printer Check and Cause Solution 1 Damaged developer roller deformed Doctor blade in the Toner cartridge 2 Scratched surface of the charge roller in the toner cartridge 1 Replace the toner cartridge and test again 2 Replace the toner cartridge and test again Samsung Electronics Service Manual Troubleshooting 6 2 ...

Страница 84: ...ner 3 Foreign object contamination or burr on the edge of the toner cartridge window 4 If the fuser is defective voids occur periodically at the top of a black image 5 Contamination of the OPC drum 1 Clean the LSU window with recommended cleaner IPA Clean the window with a clean cotton swab If dirt is inside the LSU replace LSU 2 Replace the toner cartridge 3 Clean the exposure window 4 Open the f...

Страница 85: ...ts occur periodically in the printing Digital Printer Digital Printer Digital Printer Digital Printer Digital Printer Check and Cause Solution 1 If dark or blurry black spots occur periodi cally the rollers in the Developer may be contaminated with foreign matte or paper particles Charge roller 37 8 mm interval OPC drum 75 5 mm interval 2 If faded areas or voids occur in a black image at intervals...

Страница 86: ...print out again 3 Wait 30 minutes after printer is powered on before you start printing 4 Clean the cartridge and set contacts Generally clean dirt from inside the set 5 Replace the HVPS if the problems are not solved by the above four instructions 6 2 6 Dark Image or a Black Description The printed image is dark Digital Printer Digital Printer Digital Printer Digital Printer Digital Printer Check...

Страница 87: ...ption Light dark background appears in whole area of the printing Digital Printer Digital Printer Digital Printer Digital Printer Digital Printer Check and Cause Solution 1 Printing large quantities of low coverage 2 pages or the printer has not been used for a long time 2 Is a recycled toner cartridge be used 3 Has the life span of the toner cartridge ended 4 Is the movement Up and Down of the tr...

Страница 88: ...ow ambient temperature below 10 C 1 and 2 Clean all HV contacts If problem persists replace the HVPS If problem still persists replace the Main PBA 3 Replace the toner cartridge and try to print out 4 Check the transfer roller lifetime and replace it 5 Wait about 30 minutes after power on before using printer 6 2 10 Ghost 2 Description Ghost occurs at 75 5mm intervals of the OPC drum in the whole ...

Страница 89: ...Digital Printer Check and Cause Solution 1 Toner leakage due to improperly sealed toner cartridge 1 Replace the toner cartridge 2 If the transfer roller is contaminated run PC Cleaning Mode Print 2 or 3 times and then perform Self Test 2 or 3 times to remove contamination 6 2 12 Ghost 4 Description A White ghost occurs in a black image printing at 35 2mm intervals DigitalPrinter DigitalPrinter Dig...

Страница 90: ...ressure roller Check and clean the area between the H R and the Thermistor Caution Take care not to deform the rollers 6 2 15 Blank Page Print out 1 Description Blank page is printed Check and Cause Solution Bad ground contacts in OPC and or toner cartridge 1 Check if the Ground OPC or the OPC Ground Zener diode are defective or open circuit set inside left side 2 Remove contamination of the termi...

Страница 91: ... the Main PBA 2 Check shading profile 1 Check the CIS harness is properly connected 2 Redo shading profile in the tech mode Check and Cause Solution 1 Check the Scanner Cover is properly closed 2 Check shading profile 3 Check white black reference voltage on Main PBA e q CIS_SI CIS_CLK at CN8 Or Check the FFC 1 Room light can pass through a thin original 2 Redo shading profile in the tech mode 3 R...

Страница 92: ...ely light or dark Check and Cause Solution 1 Check shading profile 2 Check the gap between original and scanner glass 3 Check printing quality 1 Redo shading profile in the tech mode 2 A gap of more than 0 5 mm can cause a blurred image Ensure cover close correctly Replace as necessary 3 See Print troubleshooting 1 Check for correct assembly of gear and motor Ensure no parts are fouling and there ...

Страница 93: ...e Solution 1 Check the Solenoid by using Tech Mode 2 Check cassette MP knock up plate and springs 3 Check paper separator pad 4 Check the pick up roller for contamination and correct assembly 5 If continuous clusters occur check all rollers between pickup and registration sensor 6 If the paper feeds into the printer and Jam 0 occurs perform Tech Mode to check feed sensor 1 Replace the solenoid 2 R...

Страница 94: ...ith toner 1 Check if the exit sensor actuator is defective Check if the actuator exit is deformed Check if the lever part is deformed Check whether burrs occur in the assembly part of the exit actuator and if the actuator operates smoothly Check if foreign objects or paper debris are preventing the correct operation of the actuator 2 If the paper is stuck in the fuser disassemble the fuser and rem...

Страница 95: ...ubber with a soft cloth dampened with IPA Isopropyl Alcohol or water 4 Use paper with a smother surface finish 6 4 6 Paper rolled in the fuser Description Paper rolled around fuser rollers or Concertina jam Check and Cause Solution 1 Contamination of the pressure roller or heat roller 2 Damaged or deformed ribs claws or springs 1 After disassembling the fuser clean contamination from between the h...

Страница 96: ...1 Use paper that conforms to the printer specification 2 Ensure paper is stored properly to prevent curl Note To remove paper rolled in the OPC Remove the toner cartridge from the set taking care not to touch the green surface Use the gearwheel at the side to rotate the OPC drum and pull the paper from the cassette Clean fingerprints on the OPC gently with soft tissue taking care not to scratch th...

Страница 97: ...n circuit 3 Heat lamp ON OFF test 4 Drive gear melted 1 Replace the whole fuser assembly if the thermostat is open circuit 2 Replace the whole fuser assembly if the ther mistor sensor is faulty 3 Replace the fuser 6 5 2 LSU Error Description A message LSU Error is displayed in the LCD panel Check and Cause Solution 1 LSU cable or connector faulty 2 LSU motor is faulty 3 Check the HSYNC signal Use ...

Страница 98: ...tat and thermistor 1 Use EDC Mode to test the fuser Replace Fuser unit Replace SMPS or Main PBA as appropriate 6 5 4 Paper Empty Description Paper Empty is displayed in the LCD panel even when paper is loaded in the cassette Check and Cause Solution 1 Deformed paper sensor actuator or faulty sensor 2 SMPS PBA or Main PBA is defective 3 Faulty cables or connectors 1 Replace the defective actuator o...

Страница 99: ...place the SMPS PBA or MAIN PBA as appropriate 6 5 6 Cover Open Description The Cover Open message appears on the LCD even when the print cover is closed Check and Cause Solution 1 The Open Cover microswitch may be stuck or faulty 2 The tab on the front cover may be damaged or broken 3 Check the connector and cables between Switch and main PBA 1 Use TECH mode cover sensor test to check cover switch...

Страница 100: ...rs on the LCD even when the print cover is open Check and Cause Solution 1 The Open Cover microswitch may be stuck or faulty 2 Check the connector and cables between Switch and main PBA 1 Use TECH mode cover sensor test to check cover switch operation Check and replace switch if necessary 2 Replace the Main Control board or Cover Open S W as necessary ...

Страница 101: ...lem persists replace the main PBA Note Check motor operation using EDC Mode 6 5 9 No Power Description When system power is turned on the LCD panel does not come on Check and Cause Solution 1 Check if the power input and SMPS output are normal 2 LCD panel does not come on but normal start up sounds are heard 3 After replacing SMPS display does not come on and no start up sounds are heard 1 Replace...

Страница 102: ...5 10 Printed Vertical Lines become curved Description When printing vertical lines are not straight Check and Cause Solution 1 Check stability of 24V supply to LSU 1 24V stable Replace LSU 24V unstable replace SMPS if the problem persists replace the main PBA ...

Страница 103: ...near the end of its life white streaks or light print occurs You can temporarily reestablish the print quality by redistributing the remaining toner in the cartridge 1 Open the Front Cover 2 Lightly pushing the used cartridge down pull it out Note Help the environment by recycling your used toner car tridge Refer to the recycling brochure packed with the toner cartridge for details 3 Unpack the ne...

Страница 104: ... intervals a Check the distance between contamination marks b Check the appearance of both ends of the toner cartridge OPC drum 2 Random page contamination a Check that the terminals contact points of the toner cartridge and the set are clean b Check that the terminals contact points of the toner cartridge and the set are not damaged 1 All of 1 2 3 If image quality improves by shaking replace with...

Страница 105: ...e toner cartridge and the set are clean b Check that the terminals contact point of the toner cartridge and the set are not damaged 1 For item 1 Run OPC Cleaning Mode Print 4 5 times repeatedly to remove excess toner Especially check for foreign substances on the OPC surface Clean with a clean gauze moistened with IPA Isopropyl Alcohol take care not to damage the OPC surface Never use other forms ...

Страница 106: ...ct of the toner cartridge or set b Check if the terminal assembly is normal Especially check the charge roller terminal 3 The printed image is dark and ghost occurs a Check if foreign substances are stuck to the terminal point of contact of the toner cartridge or set b Check if the terminal assembly is normal Especially check the developer roller terminal 1 All of Items 1 2 3 a Clean the contacts ...

Страница 107: ...rvice Manual Troubleshooting 6 26 6 7 Software Problems Causes and Solutions 6 7 1 The printer is not working 1 Description While Power turned on the printer is not working in the printing mode Check and Cause Solution 1 Run Self Test Mode using the menu buttons print the test page Menu Enter Enter 2 Check that the PC and the printer are properly connected and that the toner cartridge installed co...

Страница 108: ... previous failed print jobs on the hard disk with the name in the form jnl Delete these files and Reboot Windows to restart the printer 3 Shut down all other programs except the current one if possible 4 Delete the printer driver completely and reinstall it 5 After rebooting the computer check for viruses restore the damaged files and reinstall the application program which is not working properly...

Страница 109: ...977 Motor Drv A3977 Main Motor Scan Motor LSU CIS RESET IC C R SMPS HVPS D R S R T R REG REG Exit Sensor Feed Sensor Cover Open S W 24V 5V TRIAC Thermistor Fuser Thermostat LSU OPE HC 48C50 LCD KEY PC Pickup Solenoid FAN 2 Scanner A 1 20 D 0 15 5V 3 3V 1 8V Main Board P Empty Sensor Engine Frame Developer Unit CY25814 Video CLK 16 59MHz 3 3V MP Sensor FAN 1 CDRH S W MP Solenoid LED ...

Страница 110: ...mpany standard The information below will help you to understand the part number format and assist when ordering spare parts This format is used throughout Samsung on all product ranges Typically it is used for small components and electronic parts This format is controlled by individual Samsung Divisions and is used on specific products typically for mechanical parts Type 2 format part numbers fa...

Страница 111: ...Service Manual Exploded Views Parts List 8 2 8 1 Main Exploded View 0 4 6 7 8 9 10 B 11 1 11 2 11 3 17 20 A 12 13 14 15 16 19 19 1 2 23 3 18 22 21 ...

Страница 112: ...Exploded Views Parts List Service Manual 8 3 8 2 Housing Base Exploded View 0 1 1 1 1 2 1 3 1 4 1 4 1 6 1 7 2 3 5 4 5 1 5 2 3 1 3 2 2 1 2 2 2 3 2 4 2 4 2 5 ...

Страница 113: ...41 5 41 6 41 7 41 4 46 1 46 2 46 3 46 4 45 1 45 2 45 3 46 5 Transfer Roller 0 4 5 6 7 6 5 8 9 10 11 12 12 13 13 14 15 16 17 18 19 20 21 22 23 24 25 26 28 29 30 30 22 31 32 33 34 27 35 36 37 38 38 39 40 C 42 43 44 A B 47 48 49 50 51 52 71 53 54 55 56 57 58 56 57 59 60 61 62 64 63 65 66 67 68 69 3 70 2 ...

Страница 114: ...Exploded Views Parts List Service Manual 8 5 8 4 Fuser Unit Exploded View 0 1 2 3 4 5 6 7 8 9 10 11 12 13 14 15 16 17 18 19 20 21 22 23 24 25 26 27 28 29 30 31 ...

Страница 115: ...Service Manual Exploded Views Parts List 8 6 8 5 Drive Assembly Exploded View 0 8 12 11 5 6 9 10 4 3 2 1 7 13 13 13 5 5 7 ...

Страница 116: ...Exploded Views Parts List Service Manual 8 7 8 6 Scan Assembly Exploded View 0 1 2 3 3 4 5 6 7 8 9 10 11 12 13 14 15 16 26 A 17 18 18 20 21 22 23 24 25 ...

Страница 117: ...Service Manual Exploded Views Parts List 8 8 8 7 OPE Assembly Exploded View 0 1 2 3 4 5 6 7 8 10 9 10 10 ...

Страница 118: ...Exploded Views Parts List Service Manual 8 9 8 8 Cassette Assembly Exploded View 0 1 3 2 20 19 4 5 6 7 8 10 10 9 11 12 13 18 15 14 16 17 17 ...

Страница 119: ...S 1 5T SA 8 2 1 JC97 02433A MEA UNIT COVER MIDDLE SCX 4200 SEC SA 8 2 1 1 JC63 01008A COVER M MIDDLE SCX 4200 HIPS T2 2 393 6 SA 8 2 1 2 JC61 00026A SPRING ETC TS CHARGE APOLLO SF 5100 SUS3 SNA 8 2 1 3 JC61 00949A STOPPER M LEVER SCX 4100 PC T2 5 19 5 31 Z4138 SA 8 2 1 4 JC72 01343A PMO SUB_M_STACKER ML 1520 PC BLACK 39 25 Z4139 SA 8 2 1 5 JC61 01644A STACKER M LARGE SCX 4200 HIPS 1 8 100 55 SA 8 ...

Страница 120: ...1710 SUS304 CSP SNA 8 3 34 JC72 00975A PMO ACTUATOR EMPTY ML 1710 PC NH 1023P K3816 SA 8 3 35 JC72 00977A PMO ACTUATOR MANUAL ML 1710 PC NH 1023P K3817 SA 8 3 37 6107 001162 SPRING ETC SUS304 WPB PI0 45 D4 45 L12 Z4160 SA 8 3 38 JC72 00382B PMO BUSHING FEED ML 1710 POM DERLIN 8903 O1102 SA 8 3 39 JC66 00526A ROLLER FEED ROLLER 1 ML 1510 SUM24L NI E F6201 SA 8 3 40 JC66 00598A ROLLER FEED ML 1710 S...

Страница 121: ...1 SA 8 4 12 JC39 00558A HARNESS FUSER SCX 4200 UL3122 18 UL 312 SA 8 4 13 1404 001298 THERMISTOR NTC 7KOHM 3370K 0 3MW C W3071 SA 8 4 14 4713 001203 LAMP HALOGEN 115V 600W 6X284MM SA 8 4 15 JC66 00601A ROLLER HEAT ML 1710 AL 5052 PFA 20 3 247 H2010 SA 8 4 16 JC66 00564A GEAR FUSER Z37 ML 1710 PPS OFL4036 0 8 F4094 SA 8 4 17 JC61 00589A BUSH M HR L ML 1710 PPS RBA313N K2879 SA 8 4 18 JC61 00590A BU...

Страница 122: ...MM 5136DOT 1 5MS SA 8 6 23 JC66 00904A SLIDER M_CIS R SCX 4521F POM 3 13 5 37 4 SNA 8 6 24 JC66 00840A SLIDER M_CIS L SCX 4521F POM 3 13 5 37 4 SNA 8 6 25 JC96 03809A ELA UNIT OPE SCX 4200 SEC SA 8 6 26 JB61 00232A CLIP P BELT SF 457 SUS 0 2 NTR HALF HARD Z4185 SA 8 6 27 0203 001267 TAPE DOUBLE FACE 3M9448HK T0 16 W8 L280 SNA 8 6 28 0203 001266 TAPE DOUBLE FACE 3M9448HK T0 16 W4 L280 SNA 8 6 C JC9...

Страница 123: ...3x11 5 SA N A 2801 001375 CRYSTAL UNIT 10MHz 20ppm 28 AAA 16pF 45o SNA N A 2801 003267 CRYSTAL UNIT 16 5912MHz 50ppm 28 AAA 20p SNA N A 2801 003886 CRYSTAL UNIT 12MHz 50ppm 28 AAA 16pF 50o SNA N A 3301 001742 CORE FERRITE AD 32X35X7 75MM SNA N A 3708 001408 CONNECTOR FPC FFC PIC 12P 1MM STRAIGHT S SA N A 3711 002003 HEADER BOARD TO CABLE BOX 26P 2R 2mm STR SNA N A 3711 002812 HEADER BOARD TO CABLE...

Страница 124: ...T INVERTER T SNA N A 0904 001989 IC USC ISP1582BS HVQFN56 56P 8X8X0 85M SA N A 1003 001535 IC MOTOR DRIVER A3977SLP TSSOP 28P 9 6X4 SA N A 1105 001390 IC DRAM K4S641632 64Mbit 4x1Mx16 TSOP SA N A 1107 001302 IC FLASH MEMORY 29LV800 1Mx8 512Kx16 TSO SA N A 1202 000164 IC VOLTAGE COMP 393 SOP 8P 150MIL DUAL SA N A 1203 001455 IC POSI FIXED REG 1117 DPAK 3P 265MIL P SA N A 1203 002233 IC RESET XC61F ...

Страница 125: ...ML 1710 SUS304 CSP 0 1 H4032 SNA N A JC61 00610B PLATE M_DEV_SD ML 1710D3 PC 2 BLACK SNA N A JC61 01648A FRAME M DEVE LOWER SCX 4200 ABS HB BLK SNA N A JC61 01650A PLATE M_DEVE R SCX 4200 ABS 2 96 7 41 8 SNA N A JC62 00083A SEAL SUPPLY L ML 1510 PORON T5 0 47 2 SNA N A JC62 00084A SEAL SUPPLY R ML 1510 PORON T5 0 47 2 SNA N A JC62 00085A SEAL SIDE ML 1510 URETHAN FORM T2 8 1 SNA N A JC62 00086A SE...

Страница 126: ...PDT SNA N A 3711 003411 HEADER BOARD TO CABLE BOX 5P 1R 2mm STRA SNA N A JC07 00003A LCD DISPLAY XEV VHX1620BHRC9 SCX 5312F D2159 SA N A JC39 00306A CBF HARNESS LCD CLP 500 WIRE UL2877 14 1 SA N A JC39 00560A HARNESS SWITCH SCX 4200 CBF UL 1061 4P 2 SA N A JC39 40511A CBF HARNESS ML 80 JUMPER AWG22 52mm SILV D2176 SA N A JC41 00324A PCB SWITCH SCX 4200 FR 1 1 1 6T 33X25M SNA N A JC61 00597A BRACKE...

Страница 127: ... N A 2203 000626 C CER CHIP 0 022nF 5 50V C0G 1608 SA N A 2203 000998 C CER CHIP 0 047nF 5 50V C0G 1608 SA N A 2203 005819 C CER CHIP 1000nF 80 20 16V Y5V 1608 SNA N A 2404 001102 C TA CHIP 33uF 20 16V GP TP 6032 SNA N A 2802 001069 RESONATOR CERAMIC 7 37MHz 0 5 TP 4 7x4 SNA N A JB13 00004A IC ASIC OPE SF 3100 HT48C5 SSOP 48P 16 1 SA N A JC41 00325A PCB PANEL SCX 4200 FR 1 1LAYER 1 6T 30 SNA 9 ...

Страница 128: ...D_B 10 LED_G 11 LED_R 12 GND ENGINE MOT CIS_UNIT SCAN_MOT 1 A 2 B 3 A 4 B 1 nP_EMPT Y 2 nP_FEED 3 5V 4 5V 5 GND 6 GND 7 3 3V 8 GND 9 GND 10 GND 11 24VS 12 24VS 13 MANUAL 14 24V 15 LSU_5V 16 T HV_READ 17 LSU_5V 18 nT HV_PWM 19 T HV_EN 20 nBIAS_PWM 21 MHV_PWM 22 LSU_5V 23 5V 24 FAN 25 FUSER_ON 26 P_EXIT 1 NC 2 LSU_5V 3 LSU_5V 4 LSU_5V 5 5V 1 M_CLUT CH 2 N C 3 24VS 1 24VS 2 MP_CLUT CH MAIN_CLUTCH MP_...

Страница 129: ...g s authorization Samsung Electronics 10 Schematic Diagrams 10 1 Main Board 1 7 PTL FAN2 Main controller REV 0 3 5 12 LSU SMPS PANEL COVER OPEN 2 1 3 7 10 Description 9 11 INDEX 6 MEMO USB2 0 CRUM Eiger ASIC CHORUS 2 Sheet SDRAM FLASH ROM FUSER MAIN MOTOR CLUTCHES CIS SCAN MOTOR 4 8 ...

Страница 130: ...Schematic Diagram Service Manual 10 2 This Document can not be used without Samsung s authorization Samsung Electronics INSTPAR L4 L5 INSTPAR Main Board 2 7 ...

Страница 131: ...Q3 46 52 VSSQ4 1 14 VDD2 VDD3 27 3 VDDQ1 VDDQ2 9 43 VDDQ3 VDDQ4 49 VSS1 28 VSS2 DQ4 DQ5 10 11 DQ6 DQ7 13 42 DQ8 DQ9 44 36 NC1 NC2 40 VDD1 DQ10 DQ11 47 48 DQ12 DQ13 50 51 DQ14 DQ15 53 5 DQ2 DQ3 7 8 33 34 A9 20 BA0 BA1 21 CLK 38 CLKE 37 2 DQ0 DQ1 4 45 22 35 A11 A2 25 26 A3 A4 29 30 A5 A6 31 32 A7 A8 17 19 CS HDQM 39 15 LDQM 18 RAS WE 16 A0 23 24 A1 A10 U2 K4S641632H TC75 CAS ...

Страница 132: ...Schematic Diagram Service Manual 10 4 This Document can not be used without Samsung s authorization Samsung Electronics Main Board 4 7 Not used ...

Страница 133: ...Schematic Diagram Service Manual 10 5 This Document can not be used without Samsung s authorization Samsung Electronics Main Board 5 7 Not Used Not Used Not Used L6 INSTPAR ...

Страница 134: ...Schematic Diagram Service Manual 10 6 This Document can not be used without Samsung s authorization Samsung Electronics Main Board 6 7 ...

Страница 135: ...Schematic Diagram Service Manual 10 7 This Document can not be used without Samsung s authorization Samsung Electronics Main Board 7 7 ...

Страница 136: ... used without Samsung s authorization Samsung Electronics MI MICO CO M M U1 U1 LCD LCD BASIC LCD1 BASIC LCD1 CHIN CHINA KOREA LCD2 A KOREA LCD2 JB13 00004A JB13 00004A JB13 00035A JB13 00035A JB07 00004A JB07 00004A JC07 00008A JC07 00008A 10 2 OPE Circuit Diagram ...

Страница 137: ...Schematic Diagram Service Manual 10 9 This Document can not be used without Samsung s authorization Samsung Electronics 10 3 SMPS 110V 1 4 ...

Страница 138: ...Schematic Diagram Service Manual 10 10 This Document can not be used without Samsung s authorization Samsung Electronics SMPS 110V 2 4 ...

Страница 139: ...Schematic Diagram Service Manual 10 11 This Document can not be used without Samsung s authorization Samsung Electronics SMPS 110V 3 4 ...

Страница 140: ...Schematic Diagram Service Manual 10 12 This Document can not be used without Samsung s authorization Samsung Electronics SMPS 110V 4 4 ...

Страница 141: ...Schematic Diagram Service Manual 10 13 This Document can not be used without Samsung s authorization Samsung Electronics 10 3 SMPS 220V 1 4 ...

Страница 142: ...Schematic Diagram Service Manual 10 14 This Document can not be used without Samsung s authorization Samsung Electronics SMPS 220V 2 4 ...

Страница 143: ...Schematic Diagram Service Manual 10 15 This Document can not be used without Samsung s authorization Samsung Electronics SMPS 220V 3 4 ...

Страница 144: ...Schematic Diagram Service Manual 10 16 This Document can not be used without Samsung s authorization Samsung Electronics SMPS 220V 4 4 ...

Страница 145: ...are recommended for safe and smooth troubleshooting described in this service manual DVM Digital Volt Meter Standard Indicates more than 3 digits 1 Cleaning Equipments Standard An IPA Isopropyl Alcohol dry wipe tissue or a gentle neutral detergent and lint free cloth 5 Software Driver installation CD ROM 8 Vacuum Cleaner 6 Spring Hook Standard For general use 7 Driver Standard type type M3 long M3...

Страница 146: ...cess Memory DVM Digital Voltmeter ECP Enhanced Capability Port ECU Engine Control Unit EEPROM Electronically Erasable Programmable Read Only Memory EMI Electro Magnetic Interference EP Electro photographic EPP Enhanced Parallel Port FCOT First Copy Out Time FFC FLexiable FLat Cable LAN local area network LBP Laser Beam Printer EPP Enhanced Parallel Port F W Firmware FCF FCT First Cassette Feeder F...

Страница 147: ...age Description Language Ping Packet internet or Inter Network Groper PPD Postscript Printer Discription PPM Page Per Minute PS Post Script PTL Pre Transfer Lamp PWM Pulse Width Moduration Q ty Quantity QCD Quality Cost and Delivery RAM Random Access Memory ROM Read Only Memory SCF SCT Second Cassette Feeder Second Cassette Tray SMPS Switching Mode Power Supply SPGP Samsung Printer Graphic Process...

Страница 148: ...nough room to open the printer trays covers and allow for proper ventilation see diagram below Provide the proper environment A firm level surface Away from the direct airflow of air conditioners heaters or ventilators Free of extreme fluctuations of temperature sunlight or humidity Clean dry and free of dust ...

Страница 149: ...Reference Information Samsung Electronics Service Manual 11 5 11 4 A4 ISO 19752 Standard Pattern This test page is reproduced at 70 of the normal A4 size ...

Страница 150: ...JC 0155G This service manual is a property of Samsung Electronics Co Ltd Any unauthorized use of Manual can be punished under applicable international and or domestic law This service manual is also provided on the web the ITSELF system Samsung Electronics Co Ltd http itself sec samsung co kr ...

Отзывы: