background image

COLOR DOME CAMERA

User Guide

24

COLOR DOME CAMERA

User Guide

25

Operating Your Camera

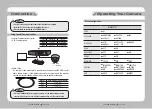
You can display pictures in color or in black and white.
1.  When the SETUP menu screen is displayed, select ‘DAY/NIGHT’ by using the Function 

Setup switch so that the arrow indicates ‘DAY/NIGHT’.

DAY/NIGHT

MAIN SETUP

  1.LENS 


DC  

  2.EXPOSURE   


  3.WHITE BAL 


ATW

  4.SSDR  


OFF 

  5.BACKLIGHT 


OFF

  6.SSNR3 


ON  

  7.DAY/NIGHT 

  AUTO   

  8.SPECIAL      

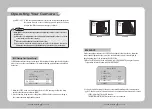
2.  Select a desired mode using the Function Setup switch according to the picture display 

you want.


 COLOR  : The picture is always displayed in color.  


  B/W 

:  The picture is always displayed in black and white. 

You can turn on or off the burst signal on B/W mode. 


 AUTO  :  The mode is switched to ’Color‘ in a normal environment, but switches to  

’B/W‘ mode when ambient illumination is 
low. To set up the switching time for AUTO 
mode, press the Function Setup switch. 
You can turn on or off the burst signal on  
B/W mode.

    - DURATION :  You can select the day/night switching 

point.

•  When AGC in the EXPOSURE menu is 'OFF', '---' mode operates as selecting 'COLOR' 

mode and 'AUTO' mode cannot be selected.

Notes

*  The day/night switching point of the 

camera can be adjusted.

Color 

 B/W

B/W 

 Color

Early

2.5 lux

5 lux

Late

1 lux

10 lux

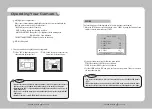
1.  When the SETUP menu screen is displayed, select ‘SPECIAL’ by using the Function Setup 

switch so that the arrow indicates ‘SPECIAL’.

SPECIAL

MAIN SETUP

  1.LENS 


DC  

  2.EXPOSURE   


  3.WHITE BAL 


ATW

  4.SSDR  


OFF 

  5.BACKLIGHT 


OFF

  6.SSNR3 


ON  

  7.DAY/NIGHT 

  AUTO   

  8.SPECIAL   


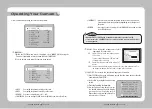
    - DWELL TIME :  You can select the duration time about changing the day/night mode.  

3s, 5s, 7s, 10s, 15s, 20s, 30s, 40, 60s

Содержание scd-2080p

Страница 1: ...High Resolution Varifocal Dome Camera SCD 2080 UserGuide Before installing and operating this product please read this manual thoroughly ENGLISH ...

Страница 2: ...cing instructions in the literature accompanying the appliance This equipment has been tested and found to comply with limits for a Class A digital device pursuant to part 15 of the FCC Rules These limits are designed to provide reasonable protection against harmful interference when the equipment is operated in a commercial environment This equipment generates uses and can radiate radio frequency...

Страница 3: ...oduce more stable pictures Communication Coaxial communication methods are supported Protocol Pelco Coaxitron Miscellaneous Functions HLC High Light Compensation SENS UP FLIP H V REV D ZOOM SHARPNESS and PRIVACY functions are provided OSD The camera s OSD is complimented by 18 languages NTSC Korean English French Spanish Japanese Portuguese Taiwanese PAL English Chinese German Italian French Spani...

Страница 4: ... t compensate for material loss and or personalinjuriesbyrobbery fire naturaldisasterorothersuchevents Ignoring this information may result in material loss and or serious personal injuries including death Indicates Never Allowed Ignoring this information may result in material loss and or a slight injuries Indicates No Disassembling Warnings Cautions Warning Attention Special Mark Messages Do not...

Страница 5: ...ry any liquids Liquids may contain minerals that are corrosive to electronic components Components and Accessories Pan Base Control panning angle of camera 2 Rotate Base Control rotating angle of camera 3 x3 6 Vari focal Lens Module 2 8 10 0mm F1 2 4 Video Output Terminal to Monitor 5 Function Setup switch Display the menu on the screen and move the cursor to four directions to confirm status or a...

Страница 6: ...otes Original position of the cable Hole Cover Figure 2 M4 tapping screw Pan Base fixation screw Unlocking direction M4 tapping screw provided Dome cover CAMERA Locking direction Ceiling bracket 1 Hold the ceiling bracket located where the arrow points to and separate it from the main body of the camera by rotating it anti clockwise refer to the picture in Notes on page 10 2 Place the separated ce...

Страница 7: ...ting rotating while watching the monitor Installation Connect theVideo Output jack to theVIDEO IN jack of monitor CCTV Camera Monitor As the connecting method varies with the instruments refer to the manual supplied with the instrument If necessary you can connect the monitor to the REMOTE jack on the back of your camera Only connect the cable when the power is turned off Connect the adaptor to th...

Страница 8: ...EXIT SAVE NOT SAVE RESET Coaxial Communications System OSD Control method Using Coaxial Communications Distance Recommended Cable Specification 300m 3C2V RG 59 U 450m 5C2V RG 6 U 600m 7C2V RG 11 U Video Cable The camera s video output port is connected to the monitor with a BNC coaxial cable shown below If the distance between the camera and the monitor exceeds the recommended maximum please use a...

Страница 9: ...itch Change the status using the Function Setup switch 1 Press the Function Setup switch Main setup menu is displayed on the monitor screen Using this function you can control the screen brightness 1 When the SETUP menu screen is displayed select LENS by using the Function Setup switch so that the arrow indicates LENS LENS MAIN SETUP 1 LENS DC 2 EXPOSURE 2 The Lens mode has sub menu site as listed...

Страница 10: ...ight fluorescent light Therefore take care when choosing the installation position When the SHUTTER is set to MANUAL or A FLK mode SENS UP will be disabled Notes If you set the Function Setup switch to AUTO mode You can adjust the brightness by increasing or decreasing the shutter speed x2 x512 Note that the higher the zoom level the brighter the screen but the more likely it is that an after imag...

Страница 11: ... light level for brighter areas to even out the overall brightness of images with high contrast between bright and dark areas SSDR OFF 1 When the SETUP menu screen is displayed select SSDR by using the Function Setup switch so that the arrow indicates SSDR 2 Use the Function Setup switch to change the SSDR level in the sub menu according to the contrast between bright and dark areas SSDR ON BACKLI...

Страница 12: ...is only activated when a bright light exceeding a specific size In NIGHT ONLY mode The HLC is not activated in day light or when bright light is not present at night In NIGHT ONLY mode When HLC function is used D ZOOM and DIS functions are not activated Notes This function reduces the background noise in a low luminance environment 1 When the SETUP menu screen is displayed select SSNR3 by using th...

Страница 13: ...witched to Color in a normal environment but switches to B W mode when ambient illumination is low To set up the switching time forAUTO mode press the Function Setup switch You can turn on or off the burst signal on B W mode DURATION You can select the day night switching point When AGC in the EXPOSURE menu is OFF mode operates as selecting COLOR mode and AUTO mode cannot be selected Notes The day...

Страница 14: ...em when using a CRT monitor USER Please use this menu item when using a monitor other than standard ones You can change the gamma PED level and color gain in the sub menus CAMTITLE If you enter a title the title will appear on the monitor 1 If the SPECIAL menu screen is displayed use the Function Setup switch so that the arrow indicates CAMTITLE SPECIAL 1 IMAGE ADJ 2 MONITOR LCD 3 CAM TITLE OFF 4 ...

Страница 15: ...ED appear on the screen when movement is detected You can monitor activity more efficient 1 When the SPECIAL menu screen is displayed press the Function Setup switch so that the arrow indicates MOTION DET 2 Set up the mode using the Function Setup switch SENSITIVITY You can select up to 8 MD areas When SENSITIVITY number is high motion detection sensitivity is increased to recognize even small mov...

Страница 16: ...screen is dim Is the lens stained with dirt Clean your lens with soft clean cloth Set the monitor to the proper condition If the camera is exposed to very strong light change the camera position The image on the screen is dark Adjust the contrast feature of the monitor If you have an intermediate device set the 75Ω Hi z properly The camera is not working properly and the surface of the camera is h...

Страница 17: ...TATE Pan Tilt Rotate Range 0 352 0 73 0 348 OPERATIONAL Electronic Shutter Speed 1 60 1 120k sec 1 50 1 120k sec ON Screen Display NTSC Korean English Japanese Spanish French Portuguese Taiwanese PAL English Chinese German Italian French Spanish Russian Czech Polish Romanian Serbian Swedish Danish Turkish Portuguese SSDR On Off Level adjustable Backlight Compensation BLC HLC OFF Day Night COLOR BW...

Страница 18: ...opean Representative Address Equipment Type Environment CCTV Camera Model Name SCD 2080P Beginning Serial NO C5CZ6V3Z200001X Year of Manufacture 2010 02 01 Conformance to EN 55022 2006 EN 50130 4 2003 We the undersigned hereby declare that the equipment specified above conforms to the above Directive s Manufacturer SAMSUNGTECHWIN CO LTD LegalRepresentativeinEurope Signature Signature Full Name BON...

Страница 19: ...703 TEL 82 31 740 8151 8 FAX 82 31 740 8145 SAMSUNG TECHWIN EUROPE LTD Samsung House 1000 Hillswood Drive Hillswood Business Park Chertsey Surrey UNITED KINGDOM KT16 OPS TEL 44 1932 45 5300 FAX 44 1932 45 5325 SAMSUNG TECHWIN AMERICA Inc 1480 Charles Willard St Carson CA 90746 UNITED STATES Tol Free 1 877 213 1222 FAX 1 310 632 2195 www samsungcctvusa com SALES NETWORK ...

Отзывы: