


Setup
22_ Setup
6615
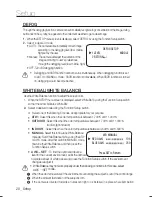
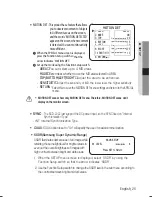
This function reduces the background noise in a low luminance environment.
1.
When the SETUP menu screen is displayed, select 'SSNR3' by using the Function
Setup switch so that the arrow indicates 'SSNR3'.
2.
Off
: Deactivates SSNR3. Noise is not reduced.
ON
: Activates SSNR3 so that noise is reduced.
3. Set the SSNR3 mode to 'ON' and press the Function Setup switch.
4. Then you can adjust the noise reduction level.
You cannot set the SSNR3 to 'ON' or 'OFF' when the AGC mode of the EXPOSURE
menu is 'OFF'.
When adjusting the noise reduction level of the SSNR3 mode, remember that the higher
the level set, the
more the noise level will be reduced but that after image may also occur.
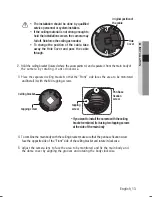
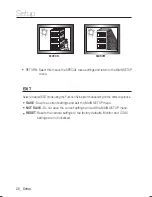
Select a desired mode using the Function Setup
switch.
DAY/ NIGHT
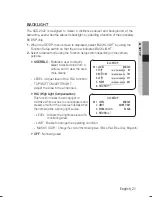
You can display pictures in color or black and white.
1.
When the SETUP menu screen is displayed, select ‘DAY/NIGHT’ by using the Up
and Down
buttons so that the arrow indicates ‘DAY/NIGHT’.
2. Select a desired mode using the Left and Right buttons according to the picture display
you want.
AUTO SETUP
▶
DWELL TIME
5 SEC
BURST MODE
ON
Press SET to Return
AUTO
-
BURST MODE : You can turn on or off the burst mode on B/W mode.
COlOR
: The picture is always displayed in color.
: The mode is switched to ’Color‘ in a
normal
environment,but switches to ’B/W‘
mode when ambient
illumination is low. To set
up the switching time for AUTO mode,
press
the Function Setup switch. You can turn on or
off the burst
signal on B/W mode.
b/W
: The picture is always displayed in black and white.
You can turn on or off the
burst mode on B/W mode.
-
DWELL TIME : Y
↑
3s, 5s, 7s, 10s, 15s, 20s, 30s, 40s, 60s
ou can select the duration time about changing the day/night mode.
SSNR3
IIIIIIIIIII
12
IIIIIIII IIIIII
▶
LEVEL
RETURN
1.
2.
Содержание SCD-2022
Страница 1: ...High Resolution Dome Camera User Manual SCD 2022 ...
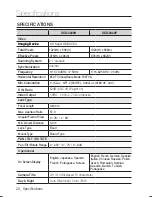
Страница 30: ...Specifications DIMENSION Unit mm Ø107 6 R45 83 7 81 6 30_ Specifications ...
Страница 31: ...MEMO ...


