ENGLISH
ESPAÑOL
ENGLISH
116
116
Setting the Sports Camcorder
: Using USB Mode
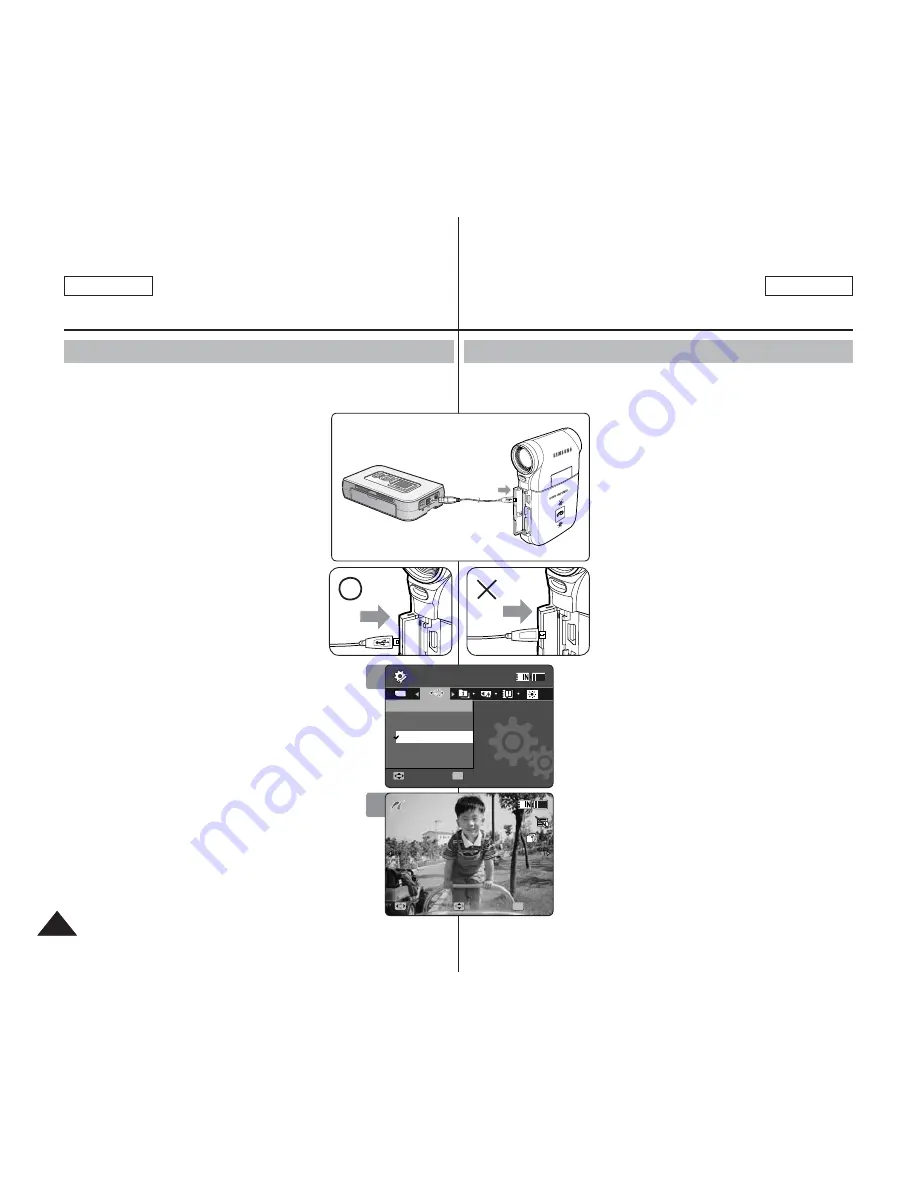
With the provided USB cable and a PictBridge-supporting printer, you
can print your photo images directly without connecting to a PC.
1. Press the [POWER] button to turn on the
Sports Camcorder.
◆
The Movie Record screen appears.
2. Set the
System Settings
mode by
pressing the [MODE] button.
◆
The System Settings screen appears.
3. Move the [Joystick] left / right to select
<USB Mode>.
4. Move the [Joystick] up / down to
select <PictBridge> and then press the
[Joystick(OK)].
5. Connect the Sports Camcorder and the
PictBridge supporting printer with a USB
cable.
6. Move the [Joystick] left/right to select
the file you want to print.
7. Move the [Joystick] up/down to set the number
of copies.
◆
Range of possibilities: 01 ~ 30
8. Press the [Joystick(OK)] to begin printing.
9. When finished, disconnect the USB cable.
[ Warning ]
✤
This function works only with printers that support
PictBridge.
[ Notes ]
✤
For printing information, refer to the user's manual
of the printer.
✤
Depending on the printer, printing failure may
occur. In this case, download JPEG files directly to
the PC and print them.
✤
Depending on the printer, date and time option
may not be supported. In this case, date and time
menu will not be displayed.
Printing with PictBridge
Ajuste de la Videocámara
Deportiva: Utilización del modo USB
Con el cable USB y una impresora que admita PictBridge, puede imprimir
los archivos de fotos directamente sin conectar al PC.
1. Presione el botón [POWER] para encender
la Videocámara Deportiva.
◆
Aparece la pantalla de grabación de video.
2. Ajuste el modo
System Settings
presionando el botón [MODE].
◆
Aparece la pantalla System Settings.
3. Mueva el [Joystick] a la izquierda / derecha
para seleccionar <USB Mode>.
4. Mueva el [Joystick] arriba / abajo para
seleccionar <PictBridge> y presione el
[Joystick(OK)].
5. Conecte la Videocámara Deportiva y la
impresora compatible con PictBridge con
un cable USB.
6. Mueva el [Joystick] a la izquierda / a la
derecha para seleccionar el archivo que
desea imprimir.
7. Mueva el [Joystick] arriba / abajo para
establecer el número de copias.
◆
Posibilidades: 01 ~ 30
8. Presione el [Joystick(OK)] para iniciar la
impresión.
9. Al finalizar, desconecte el cable USB.
[Atención]
✤
Esta función sólo está operativa con impresoras
compatibles con PictBridge.
[Notas]
✤
Para obtener información de impresión, consulte el
manual del usuario de la impresora.
✤
Dependiendo de la impresora, es posible que se
produzca un fallo en la impresión. En este caso,
descargue los archivos JPEG directamente en el PC
e imprímalos.
✤
Dependiendo de la impresora, es posible que no se
admita la opción de fecha y hora. En este caso, no
aparecerá el menú de fecha y hora.
Impresión con PictBridge
4
System Settings
Move
Select
OK
USB Mode
Mass Storage
PictBridge
PC-Cam
100-0001
Search
Copies
01
TYPE
7
System Settings
Move
Select
USB Mode
Mass Storage
PictBridge
PC-Cam
100-0001
Search
Copies
OK
01
USB
MMC/SD
PictBridge Supporting Printer
(sold separately)
USB
USB


