background image

29

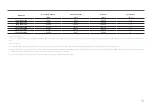
2nd

3rd

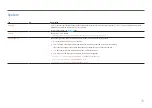
Description

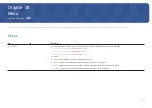
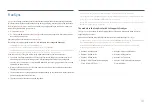
Off Timer Plus

Off Timer

• 

Off Timer

: Turn on 

Off Timer

 mode.

• 

Turn Off After

: The off timer can be set within a range of 1 to 23 hours. The product will automatically power off after the specified number of 

hours.


This option is only available when 

Off Timer

 is set to 

On

.


֜

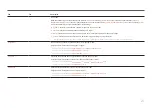
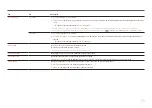
For products for the market in some regions, the 

Off Timer

 is set to automatically activate 4 hours after the product powers on. This is done in 

accordance with power supply regulations. If you do not want the timer to activate, go to 

 → 

System

 → 

Off Timer Plus 

and set 

Off Timer 

to 

Off

.

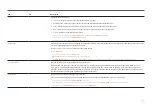
Eco Timer

• 

Eco Timer

: Turn on 

Eco Timer

 mode.

• 

Eco Off After

: The 

Eco Timer

 can be set between 10 and 180 minutes. The product will automatically power off after the specified time has 

elapsed.


This option is only available when 

Eco Timer

 is set to 

On

.

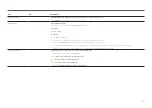
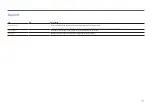
PC/AV Mode

Set 

PC/AV Mode

 to 

AV

. The picture size will be enlarged. 

This option is useful when you view a movie.


֜

Products with a display area of 16:9 or 16:10 are only supported.

Source Detection

Select either 

Auto

 or 

Manual

 as the method to recognise input source.

Key Repeat Time

Control the response rate of a button when the button is pressed.

Acceleration

1 sec

 or 

2 sec

 can be selected. If 

No Repeat

 is selected, a command responds only once when a button is pressed.

Power LED On

Configure the settings to enable or disable the power LED located at the lower part of the product.

• 

Working

: The power LED is on when the product is turned on.

• 

Stand-by

: The power LED is on when the product is turned off.

Содержание S24C36 Series

Страница 1: ...of this manual in parts or entirety without the authorization of Samsung is prohibited Trademarks otherthan that of Samsung are owned by their respective owners An administration fee may be charged i...

Страница 2: ...ing the product 13 Checking the space around the product 14 Adjusting the Product Tilt 15 Anti theft Lock 15 Installing the Wall Mount 16 Wall Mount Kit Specifications VESA 16 Control Panel 17 Direct...

Страница 3: ...n issue 32 Checking the Resolution and Frequency 32 Check the following 32 Q A 35 Specifications General 36 Standard Signal Mode Table 37 Appendix Responsibility forthe Pay Service Cost to Customers 3...

Страница 4: ...onnection to protective earth ground Caution Consult instructions for use This symbol instructs the user to consult the user manual for further safety related information Electricity and Safety Warnin...

Страница 5: ...oil can damage or deform the product Do not install the product in a kitchen or near a kitchen counter Caution Do not drop the product while moving Do not set down the product on its front When insta...

Страница 6: ...hunderstorm power off the product and remove the power cable Do not drop objects on the product or apply impact Do not move the product by pulling the power cord or any cable If a gas leakage is found...

Страница 7: ...DC adapter in a well ventilated area If you place the AC DC power adapter hanging with the cord input facing upwards water or other foreign substances could enter the Adapter and cause the Adapter to...

Страница 8: ...e the cloth to wipe the exterior of the product clean Do not apply a cleaning agent that contains alcohol solvent or surfactant to the product Do not spray water or detergent directly on the product 4...

Страница 9: ...in the package on the floor and place the product facing down on the Styrofoam as shown in the image If Styrofoam is unavailable use a thick sitting mat Hold the back of the monitor as shown in the fi...

Страница 10: ...ushion included in the package on the floor and place the product facing down on the Styrofoam as shown in the image If Styrofoam is unavailable use a thick sitting mat Hold the back of the monitor as...

Страница 11: ...on it The exterior may differ depending on the product 1 2 3 Place the protective Styrofoam cushion included in the package on the floor and place the product facing down on the Styrofoam as shown in...

Страница 12: ...t pressure on it The exterior may differ depending on the product 1 2 3 Place the protective Styrofoam cushion included in the package on the floor and place the product facing down on the Styrofoam a...

Страница 13: ...oduct upside down only by the stand Do not press down on the product There is a risk of damaging the product S24C366EA S24C368EA S24C369EA S24C36DEA S27C366EA S27C368EA S27C369EA S27C36DEA Hold the lo...

Страница 14: ...as shown in the diagram when installing the product The exterior may differ depending on the product S24C360EA S24C362EA S24C364EA S27C360EA S27C362EA S27C364EA S24C366EA S24C368EA S24C369EA S24C36DEA...

Страница 15: ...ing method depend on the manufacturer Refer to the manuals provided with your anti theft locking device for details To lock an anti theft locking device S24C360EA S24C362EA S24C364EA S27C360EA S27C362...

Страница 16: ...all parts necessary for assembly are provided Do not use screws that are longer than the standard length or do not comply with the VESA standard screw specifications Screws that are too long may caus...

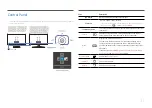
Страница 17: ...ss the JOG button when the screen is turned on Source Changes the input source A message will appear on the top left corner of the screen if the input source has been changed Menu Displays the main on...

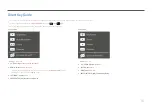
Страница 18: ...he JOG Button could be used as below Analog mode Analog mode option UP Adjust Brightness Contrast Sharpness DOWN Adjust Auto Adjustment Changing the resolution in Display Properties will activate the...

Страница 19: ...oth the product and the external device to prevent damage to the product due to a short circuit or over current 3 After all signal cables have been properly connected connect the power cables back to...

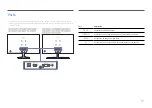
Страница 20: ...is shown Specifications are subject to change without notice to improve quality Refer to the actual product Port Description Connects to the AC DC adapter Connects to a source device using an HDMI cab...

Страница 21: ...is connected using the HDMI DVI cable Connecting to headphones or earphones Use headphones or earphones when activating sound with an HDMI HDMI cable The headphones or earphones jack supports only th...

Страница 22: ...Select a language on the product and change the resolution on your PC to the optimum setting If the optimum resolution is not selected the message will appear up to three times for a specified time e...

Страница 23: ...ironment where the product will be used This menu is not available when Eco Saving Plus is enabled This menu is not available when Game Mode is enabled This menu is not available when Eye SaverMode is...

Страница 24: ...display normally Not every model can support all of these signals Brightness You can adjust the general brightness of the picture Range 0 100 A highervalue will make the picture appear brighter This m...

Страница 25: ...DMI mode Black Level may not be compatible with some source devices The Black Level feature is only activated at a certain AV resolution such as 480p 60 Hz 576p 50 Hz 720p 60 Hz and 1080p 60 Hz Eye Sa...

Страница 26: ...ng the Screen Ratio is available when the following conditions are satisfied The input source is 480p 576p 720p or1080p and product can display normally Not every model can support all of these signal...

Страница 27: ...H Position Move the menu position to the left or right V Position Move the menu position up or down Language Set the menu language A change to the language setting will only be applied to the onscree...

Страница 28: ...energy consumption compared to consumption at the maximum brightness level Off Deactivate the Eco Saving Plus function Auto The power consumption will automatically be reduced by about 10 over the cu...

Страница 29: ...en 10 and 180 minutes The product will automatically power off after the specified time has elapsed This option is only available when Eco Timer is set to On PC AV Mode Set PC AV Mode to AV The pictur...

Страница 30: ...r monitor s picture Never turn off the power nor change the input source during self diagnosis If possible try not to interrupt testing Information View the current software information Refer to the a...

Страница 31: ...pear press the F5 key Restrictions and Problems with the Installation The Easy Setting Box installation may be affected by the Graphics Card Motherboard and the Networking Environment System Requireme...

Страница 32: ...ound may be caused by contraction or expansion from temperature change of external components or internal circuit of the product This is NOT a product failure and does not affect the life of the produ...

Страница 33: ...en Check that the resolution and frequency forthe PC are within the range of resolution and frequency compatible with the product Next if required change the settings referring to Standard Signal Mode...

Страница 34: ...is used to connect the input device Connect the device using an HDMI cable Source device issue A beeping sound is heard when my PC is booting If a beeping sound is heard when your PC is booting have...

Страница 35: ...es Monitor and adjust Screen refresh rate under Monitorsettings How can I change the resolution Windows 7 Go to Control Panel Appearance and Personalization Display Screen Resolution Adjust Resolution...

Страница 36: ...3 F Humidity 5 95 non condensing Plug and Play This product can be installed and used with any Plug and Play compatible systems Two way data exchange between the product and PC system optimises the pr...

Страница 37: ...ing table by referring to the graphics card user manual Resolution Horizontal Frequency kHz Vertical Frequency Hz Pixel Clock MHz Sync Polarity H V IBM 720 x 400 31 469 70 087 28 322 VESA 640 x 480 31...

Страница 38: ...is called horizontal frequency Horizontal frequency is measured in kHz Vertical Frequency Repeating the same picture dozens of times per second allows you to view natural pictures The repeat frequenc...

Страница 39: ...tomer requests software installation and setup for the product If a service technician removes cleans dusts or foreign materials inside of the product If customer requests an installation additionally...

Страница 40: ...g the FreeSync function the screen may flicker due to variation of the output frequency from the graphics card The response rate during the game may fluctuate depending on the resolution A higher reso...

Отзывы: