


TROUBLE SHOOTING
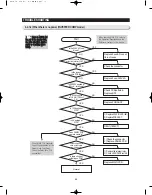
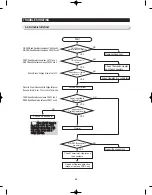
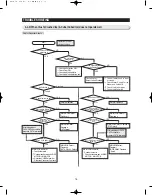
4-2-8) Freezer / Fridge Lamp does not light up
Start
Check F/R-DOOR S/W
contacts & Lamp Socket
Replace Lamp
YES
Replace Door S/W
NO
Replace PCB or Relay
NO
NO
YES
YES
The lamp is blown.
F/R-H/B Door S/W is
good.
Lamp Control Relay
on PCB is good.
1. When replacing the Freezer Lamp, be sure to turn off the power to prevent electric shock.
2. Take care when replacing the incandescent lamp to prevent skin burn.
Caution
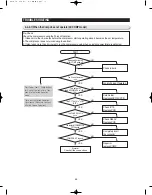
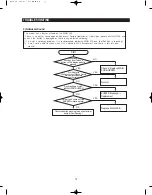
When the F-Door is open, its Door S/W will be open. And then 5V is to be applied to MICOM, signalling the Door Open.
After that, when 5V is input for more than 2 minutes, it will send out Door Open alarm for 10 seconds at an interval of 1
minute. (it's the same for the R-Door and the R/F-H/B Door.) So, when the Door S/W is defective, it will send "Ding
Dong" sound at an interval of 1 minute with the doors closed. In this case it needs repairing.
Note
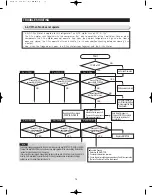
The Room Lamp Relay
switches on & off when the
door gets opened and closed.
When the lamp does not light
up, check the relay operation
with its switching sounds by
opening & closing the door.
Note
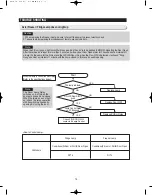
When the lamp is controlled with Relay
(Refer to the specifications below).
<How to Control Lamp>
Fridge Lamp
Conditions)R-Door or R-H/B Door Open
RY75
All Models
Freezer Lamp
Conditions)F-Door or F-H/B Door Open
RY74
75
Содержание RSJ1K Series
Страница 2: ......
Страница 18: ...18 511 9 385 9 30 35 83 55 6 1663 5 1779 1702 908 D E F PRODUCT SPECIFICATIONS 2 4 Dimensions mm PRODUCT SIZE...
Страница 19: ...PRODUCT SPECIFICATIONS 2 5 Optional Material Specification 19 Photograph Part Name Part Code Quantity Remark...
Страница 68: ...TROUBLE SHOOTING SPM FREEWHEELING DIODE Voltage 68...
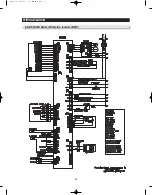
Страница 82: ...82 6 WIRING DIAGRAM 6 1 RS21 23H Series CHINA Z Option Inverter COMP...
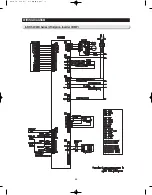
Страница 83: ...83 WIRING DIAGRAM 6 2 RS21 23H Series CHINA V S Option Inverter COMP...
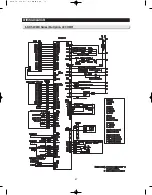
Страница 84: ...84 WIRING DIAGRAM 6 3 RS21 23H Series Z Y Option Inverter COMP...
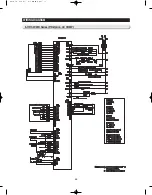
Страница 85: ...85 WIRING DIAGRAM 6 4 RS21 23H Series P U Option Inverter COMP...
Страница 86: ...86 WIRING DIAGRAM 6 5 RS21 23H Series V S Option Inverter COMP...
Страница 87: ...87 WIRING DIAGRAM 6 6 RS21 23H Series K J Option AC COMP...
Страница 88: ...88 WIRING DIAGRAM 6 7 RS21 23H Series F D Option AC COMP...
Страница 89: ...89 WIRING DIAGRAM 6 8 RS21 23H Series B N Option AC COMP...
Страница 90: ...90 WIRING DIAGRAM 6 9 RSJ1 Series Z Option Inverter COMP...
Страница 91: ...91 WIRING DIAGRAM 6 10 RSJ1 Series P Option Inverter COMP...
Страница 92: ...92 WIRING DIAGRAM 6 11 RSJ1 Series K J Option AC COMP...
Страница 93: ...93 WIRING DIAGRAM 6 12 RSJ1 Series F D Option AC COMP...
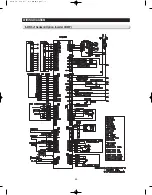
Страница 94: ...94 94 7 SCHEMATIC DIAGRAM 7 1 Main PCB Schematic Diagram RSJ1 Series...
Страница 95: ...95 95 SCHEMATIC DIAGRAM 7 2 Main PCB Schematic Diagram RS21 23H Series...
Страница 96: ...96 SCHEMATIC DIAGRAM 7 3 Inverter PCB Schematic Diagram RSJ1 RS21 23H Series...
Страница 97: ...97 SCHEMATIC DIAGRAM 7 3 1 BLOCK DIAGRAM RS21 23H Series All...
Страница 98: ...98 SCHEMATIC DIAGRAM 7 3 2 BLOCK DIAGRAM RS21 23H Series Inverter COMP...
Страница 99: ...99 SCHEMATIC DIAGRAM 7 3 3 BLOCK DIAGRAM RS21 23H Series AC COMP...
Страница 100: ...8 REFERENCE INFORMATION Label Location 8 1 RSJ1 Series Nomenclature 100...
Страница 101: ...101 REFERENCE INFORMATION Label Location 8 2 RS21 23H Series Nomenclature...
Страница 106: ...106 REFERENCE INFORMATION 8 6 Air Circulation...


