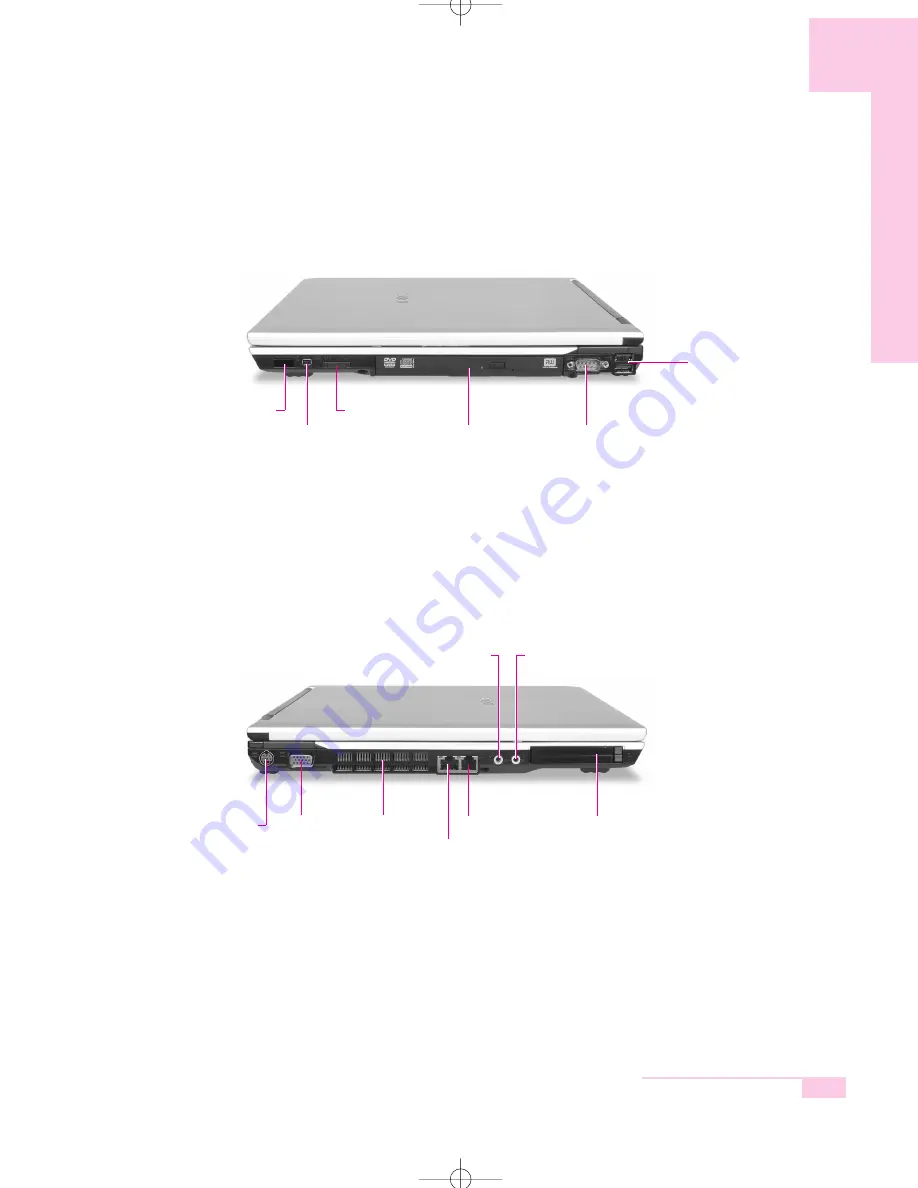
background image

Right View

Left View

1-3

Chapter 1. Getting Started

CD Drive 

(Optional, P. 3-2) 

IEEE 1394 Port (4Pin)

Serial Port

(Optional)

Network(LAN) Port 

(P. 4-4) 

Monitor

Port

Fan Vents

Modem Port (P. 4-3)

PC Card Slot (P. 3-11) 

Infrared Port

TV Output Port 

(S-Video, P. 6-8)  

Wireless LAN Latch

USB 2.0 Port

Headphone Jack /

S/PDIF Jack (Optical, P. 3-7)

Microphone Jack


r65-hk_ch1  2006.1.2 2:49 PM  페이지3   1000 Dolev-2540-Color-S  T

Содержание R65

Страница 1: ...Manual This manual describes how to use computer as well as information on Windows Internet Upgrade and Troubleshooting R65 P50 The product images may differ from actual product appearance...

Страница 2: ...Computer Use 1 14 2 Introducing Windows Windows XP Basics 2 2 Document Operations 2 7 3 Using The Computer Using the CD Rom Drive 3 2 Enjoying Home Theater 3 7 Using the Multi Card Slot 3 9 Using the...

Страница 3: ...for Wireless LAN Network WLAN 4 7 Using Samsung Network Manager 4 14 Using Network Service 4 21 Using Bluetooth Devices 4 27 Infrared Communication 4 35 5 System Management Managing Power 5 2 Using th...

Страница 4: ...toring the System 7 2 Reinstalling Software 7 4 Re Installing Windows 7 6 Q A 7 9 Appendix System Specifications A 2 Wireless LAN Specifications A 3 Copyright A 4 Safety Instructions A 5 Samsung Noteb...

Страница 5: ...Getting Started This chapter provides basic information for using this computer System overview and methods for general use are provided Chapter 1 Chapter 1...

Страница 6: ...Windows For more information refer to the additionally supplied manual Only for models with the fingerprint identification system 1 2 Manual Introducing The Computer Front View N N N No o o ot t t te...

Страница 7: ...nal P 3 2 IEEE 1394 Port 4Pin Serial Port Optional Network LAN Port P 4 4 Monitor Port Fan Vents Modem Port P 4 3 PC Card Slot P 3 11 Infrared Port TV Output Port S Video P 6 8 Wireless LAN Latch USB...

Страница 8: ...k drive will void your warranty To replace the hard disk drive please contact your nearest Samsung Service Centre 1 4 Manual Rear View Bottom View Battery P 5 4 USB 2 0 Port Battery Latches Memory Com...

Страница 9: ...g Off 1 Click the Start button on the Taskbar 2 Select Turn Off Computer 3 Click Turn Off from the Turn Off Computer window 1 5 Chapter 1 Getting Started C C C Ca a a au u u ut t t tii iio o o on n n...

Страница 10: ...Create a new account 3 Type a name for the new account and click Next 4 Select the account type and click Create Account The new user account has been created Changing users 1 Click Start Log Off 2 Cl...

Страница 11: ...operations Double click Run Function Place a finger on the touchpad move the pointer on the screen to the item to run and quickly tap your finger on the touchpad twice Or double click the left touchpa...

Страница 12: ...Manual Drag Move Select Drag and drop a part to the required place C C C Ca a a au u u ut t t tii iio o o on n n n Please use the touchpad only with your finger Using sharp devices may damage the touc...

Страница 13: ...experience more stereophonic sound You can select one of the following modes by pressing the button Turns the touchpad function on and off You can select Etiquette Mode when you require a quiet operat...

Страница 14: ...r end of the sentence Key Function Makes the keypad in the middle of keyboard available Scrolls the screen up and down while the cursor position does not change in some applications Increases the audi...

Страница 15: ...N function is enabled This light does not operate for the models without wireless LAN Green When the computer is operating on AC power and the battery is fully charged Amber When the computer is opera...

Страница 16: ...the F2 key to enter Setup 2 In the Boot menu change the Bright Mode Control option to User Control 3 Save the settings and exit Setup When using the Battery Manager only the screen brightness set in C...

Страница 17: ...ing the Volume Control Program On the taskbar click the Volume icon and adjust the slide bars For advanced volume control options double click the Volume icon and adjust the settings in the Master Vol...

Страница 18: ...the legs naturally If necessary use a cushion to provide extra back support Avoid working postures that require twisting the body or neck Lighting Soft indirect lighting is recommended Position the d...

Страница 19: ...Introducing Windows This chapter provides basic information on using the computer s main operating system Windows Chapter 2 Chapter 2...

Страница 20: ...for efficiently computer use Windows XP Tour A tour of the elementary functions provided by Windows XP Click Start Tour Windows XP Or click Start All Programs Accessories Tour Windows XP Click on the...

Страница 21: ...art Button Opens the Start Menu Taskbar Displays programs that are currently running Frequently used icons can be placed here Recycle Bin Deleted files or folders end up here Language Bar Enables swit...

Страница 22: ...and floppy disks It can also be used to search and open files and folders Enables users to configure settings on the computer Provides on line help information on Windows and troubleshooting Enables u...

Страница 23: ...on Maximize Button Minimize Button Double click a shared document or a local disk to view the folders and files in it Folders Files What is a Drive A storage device in which files and folders are save...

Страница 24: ...and support centre before calling the Samsung helpline Click Start Help and Support Related help information appears when a search keyword is entered Displays Help Index Help Topics Troubleshooting I...

Страница 25: ...documents using WordPad is provided here Creating a New Document 1 Click Start All Programs Accessories WordPad 2 Create and edit your document For more information about WordPad refer to on line Help...

Страница 26: ...Printing a Document To print a document connect a printer to the computer For more information about connecting and configuring a printer please refer to the printer manual To print a WordPad documen...

Страница 27: ...Using The Computer This chapter investigates various different functions of the computer and provides information on using the related application programs for them Chapter 3 Chapter 3...

Страница 28: ...in gently The CD will run automatically 3 2 Manual To eject a CD when the CD drive is out of order or the system is turned off unfold a paper clip and insert the unfolded end of the clip into the hol...

Страница 29: ...Running the program the first time displays the set up screen Define the settings according to the instructions displayed on the screen When you complete the settings the following screen appears Fea...

Страница 30: ...k OK to play the audio CD To Play a Video CD 1 Insert a video CD into the CD drive 2 When a video window appears double click the MPEGAV folder 3 Double click the DAT file 4 When a warning window appe...

Страница 31: ...If your computer has CD RW functionality you can copy data to a blank CD or create an audio CD 1 Insert a blank CD into the CD RW drive 2 Click Open Writable CD Folder and click OK The CD ROM drive wi...

Страница 32: ...l CD ROM drive window 2 Click Write Files to CD 1 Drag and drop folders or files to copy My Computer window For more information on copying CDs Click Start Help and Support Enter CD copy in the search...

Страница 33: ...computer 1 Connect the S PDIF jack of the system and a 5 1 channel amplifier 2 Connect speakers to the amplifier See the User Manual for the Speakers 3 To view through a TV connect the TV and change...

Страница 34: ...ut in digital format Step 3 Enable S PDIF on the DVD program To use 5 1 channel speakers you need to install the CyberLink Power DVD program from the CyberLink DVD Solution Installation CD or System s...

Страница 35: ...C C C Ca a a au u u ut t t tii iio o o on n n n Restrictions on Using Memory Cards You can use memory cards for storing data only Copyright protection function is not supported Memory Stick Memory St...

Страница 36: ...when moving your computer keep the memory card separately C C C Ca a a au u u ut t t tii iio o o on n n n Since format operation deletes all data in the memory card please make sure that there is no...

Страница 37: ...PC card slot remove the slot protector Push the eject button of the PC card slot once to pop it out Push the button again to eject the slot protector To remove PC card a Double click Safely Remove Har...

Страница 38: ...ults and change the boot sequence Desktop Desktop management features include changing the font size execut ing a magnifier function the start menu settings and managing the quick launch icons on the...

Страница 39: ...l prevents unauthorized users from gaining access to your system via the network or the Internet 1 Click Start All Programs Samsung EasyBox EasyBox 2 Click Security from the top menu bar 3 Select Wind...

Страница 40: ...ograms Samsung Samsung Update Plus Samsung Update Plus 2 Click Search for and Install Updates and click the Search for Updates button 3 If there are available software or driver updates for your compu...

Страница 41: ...atic update items display By default your computer is configured to automatically search for updates If there is a new update available this is notified in the notification area Click the balloon help...

Страница 42: ...ion TV Station is only available for systems supporting the TV function For detailed usage refer to the program help Start and Screen Layout To launch the program select Start All Programs Samsung AVS...

Страница 43: ...DS Enhanced Digital Sound is a sound quality enhancement technology devel oped by Samsung Electronics You can listen to clearer sound if you enable the EDS function when playing music or video on AVSt...

Страница 44: ...ct Play Audio CD using Samsung AVStation and click the OK button 3 The tracks on the audio CD are displayed in the Playlist and the first track is automatically played N N N No o o ot t t te e e e If...

Страница 45: ...click a music file The file is added to the playlist and played N N N No o o ot t t te e e e Play a Track not registered to the Library Click File Open select a music file to be played and click Open...

Страница 46: ...add files folders or search and add files As an example the proce dures to add a folder are described below 1 Click on the Register a File button below the Library and click on Add by Folders 2 Selec...

Страница 47: ...re described below For the procedures to register image files to the Library refer to P 3 24 1 Move to PHOTO Station and double click on All Images 2 Click on a folder which includes images and the im...

Страница 48: ...n Full Screen or through a SlideShow Click the Full Screen button or SlideShow button below the Image Viewer window To return to the Image Viewer window press the Esc key or double click on the screen...

Страница 49: ...itor screen appears The Image Editor screen consists of an Image Workspace window and 3 Tool tabs 2 Edit the image using the Shape Edit and Effect tools Shape tool Change the shape of an image through...

Страница 50: ...add files add folders or search and add files As an example the pro cedures to add folders are described below 1 Click the Register a File button below the Library and click on Add by Folders 2 Selec...

Страница 51: ...d by Samsung Electronics You can view a clearer and sharper picture by enabling the EDI function when watching TV or playing a video on AVStation pre mium However some TV tuners and graphics cards are...

Страница 52: ...he DVD playing software first 1 Launch AVStation premium and insert a DVD title into the DVD drive 2 In the What do you want Windows to do window select Play DVD Video using Samsung AVStation and clic...

Страница 53: ...o the Library and played Playing a Video File in Full Screen 1 Double click on the current playback screen 2 The video is played in full screen In full screen move the mouse pointer to the bottom of t...

Страница 54: ...n add files add folders or search and add files As an example the pro cedures to add folders are described below 1 Click the Register a File button below the Library and click Add by Folders 2 Select...

Страница 55: ...to My Computer and saved on the multi card slot optional For the procedures to register files to the Library refer to P 3 20 P 3 24 and P 3 28 If you define a login password for a Windows user account...

Страница 56: ...g Move the mouse pointer to the top screen and click the Exit button Alternatively press the Power button of the computer Start Exit AVStation premium Viewer Starting Select Start All Programs Samsung...

Страница 57: ...p of the screen and click the Exit button Screen Layout MUSIC You can play a music file or audio CD PHOTO You can view a photograph or image file one by one or in a SlideShow MOVIE You can play a vide...

Страница 58: ...ile or an audio CD are described below Playing a Music File The procedures to play a music file registered to the MUSIC Library are described below For the procedures to register files refer to P 3 20...

Страница 59: ...1 Launch AVStation now and insert an audio CD into the CD drive 2 In the AVStation now start screen click on Music 3 Double click the Audio CD in the left pane and double click on an album or music fi...

Страница 60: ...right pane 3 The selected image is zoomed in on N N N No o o ot t t te e e e To view an image in Full Sreen or through a SlideShow Click on the SlideShow or Full Screen button below the zoomed in ima...

Страница 61: ...o P 3 28 1 Launch AVStation now and click the Movie 2 Click on All Movies and double click a movie file in the right pane The movie file is played N N N No o o ot t t te e e e Showing the Play Control...

Страница 62: ...al Playing a DVD 1 Launch AVStation now and insert a DVD title into the DVD drive 2 In the AVStation now start screen click on Movie 3 Click on DVD VCD and double click on the DVD title The DVD title...

Страница 63: ...Connecting to the Internet This chapter provides instructions on connecting to the Internet Chapter 4 Chapter 4...

Страница 64: ...ion network service such as ADSL and VDSL Service has to be applied for and received from a High speed communication network service provider Receiving Internet service may require support from specif...

Страница 65: ...connect the modem to the Internet and use e mail you have to apply to an Internet Service Provider ISP for an Internet service For more account information please contact your ISP Ask your ISP about...

Страница 66: ...el 3 Select Network and Internet Connections in the Control Panel window 4 Click Network Connections in the Network and Internet Connections window 5 In the Network Connections window point the mouse...

Страница 67: ...s automatically on the General tab 9 Once all of the information is entered in the Internet Protocol TCP IP Properties window click OK to finish 4 5 Chapter 4 Connecting to the Internet Check the driv...

Страница 68: ...tion press the right button of the touchpad and then select Properties 2 Select the Internet Protocol TCP IP item and then click Properties 3 In the Alternate Configuration tab click User configured a...

Страница 69: ...rks peer to peer or ad hoc The description in this section refers to the Intel R PRO Wireless 3945ABG Network Connection hereafter referred to as an 802 11ABG card device A wireless LAN card is option...

Страница 70: ...Enter the Network Key in the window and then click the Connect button Now when Connected in AP is displayed and you can access the network For more detailed information such as the network key encryp...

Страница 71: ...can share the Internet by accessing another computer connected to the Internet See P 4 17 Sharing Internet Access You can connect by completing the following steps Step 1 Set up a computer to computer...

Страница 72: ...etwork name e g samsung and unselect The key is provided for me automatically Enter the encryption key in the Network key field and click OK To prevent a network connection from an unauthorized user i...

Страница 73: ...4 11 Chapter 4 Connecting to the Internet 7 Check that the configured network name e g samsung is in the Preferred networks item and click OK Now your wireless network setup has been completed...

Страница 74: ...key in the network key box and click Connect When connected to the wireless network the system displays Connected in the selected network of the Network Connection window If the network key is not co...

Страница 75: ...ireless connection to an access point is established the connection icon appears in front of the name of the connected profile The Wireless Security Settings window may differ depending on the securit...

Страница 76: ...n diagnose the network status You can diagnose the network status when the network is not properly connected Using the Network This section describes the procedures to connect to the Internet by setti...

Страница 77: ...ernet Select either Wired LAN or Wireless LAN Setting up the IP Address To allocate an IP address automatically DHCP select Get IP Automatically To use a static IP address unselect Get IP Automaticall...

Страница 78: ...bar and click View Available Wireless Networks 2 Select an available wireless network e g SAMSUNG and click the Connect button For information on available wireless LAN APs ask your network administra...

Страница 79: ...which connect the sharing server and the Internet through a wired LAN and connect the sharing server and the sharing client through a wireless LAN are described below Sharing Server A computer with 2...

Страница 80: ...button 8 When the Printer Setting window appears click Finish For the printer setup procedures refer to Setting Up a Network on page 4 15 When the Shared Server setting is completed set up the shared...

Страница 81: ...completed you can use the Internet on the shared client To connect through a wireless LAN select Internet Sharing Wireless To connect through a wired LAN select Internet Sharing Wired N N N No o o ot...

Страница 82: ...ork Manager 2 Select Diagnose Status from the Manage menu 3 The Network Connections figure window appears Click the Start button to start the network diagnosis 4 When the diagnosis is complete out of...

Страница 83: ...ring of files and folders on a computer Step 2 Accessing shared files and folders from another computer Network services are provided for the computers that are connected to the network through wired...

Страница 84: ...re this folder on the network enter the share name and click OK The file and folder sharing configuration has been completed It has the same security effect as that of the Network Setup Wizard This sc...

Страница 85: ...ick Start My Computer Under Other Places click My Network Places in your computer 2 Click View workgroup computers and click the desired computer to access the shared file If your computer is a member...

Страница 86: ...printer sharing in the computer connected to the printer Step 2 Add and use the shared printer in other computers on the network Step 1 Configuring Printer Sharing 1 From the computer connected to th...

Страница 87: ...t computer that wants to use the shared printer click Start Printers and Faxes 2 Click Add a printer 3 In the Add Printer Wizard click Next 4 Select A network printer or a printer attached to another...

Страница 88: ...or Do you want to use this printer as a default printer and click Next 9 Click Finish 10 When the printer sharing configuration has been completed the shared printer appears in the Printers and Faxes...

Страница 89: ...nsmission You can exchange files between 2 Bluetooth devices You can exchange files with other computers mobile phones PDAs etc Network Access You can connect to another computer with the Bluetooth fu...

Страница 90: ...tart Using Bluetooth from the pop up menu 2 Click the Next button to start setting up N N N No o o ot t t te e e e In the setting up steps enter a device name to be displayed in the Bluetooth Manager...

Страница 91: ...the operation continue the installation 3 If the driver installation is complete the next step proceeds which searches for nearby Bluetooth devices Since you do not have to search while setting up cli...

Страница 92: ...devices Bluetooth Help Bluetooth Help provides detailed procedures on using Bluetooth functions Click on My Bluetooth Settings on the Desktop and press the F1 key Help N N N No o o ot t t te e e e Se...

Страница 93: ...folders between Bluetooth computers are described below 1 On the computer that is sending a file hereafter Computer A right click the Bluetooth icon in the notification area and select Quick Connectio...

Страница 94: ...Code E g same numbers on both Bluetooth devices to make a connection 4 After a short while the Bluetooth PIN Code required dialog box appears on Computer B enter the code that you have entered in Ste...

Страница 95: ...on the device to connect to mouse keyboard joystick or headset Some devices have a button to turn on the Bluetooth function so refer to the corresponding device manual 2 Double click on the My Bluetoo...

Страница 96: ...eception sound related functions and serial port function you can connect with only one Bluetooth device Using the network connection or file transmission function multiple Bluetooth devices can be co...

Страница 97: ...n an infrared connection is established a sound occurs and the Transmit file to another computer icon appears on the desktop Now you can transmit data through the infrared connection Transmitting data...

Страница 98: ...press the Enter key 3 Select IRDA Device and press the F5 or F6 key to set it to Enabled 4 Save the settings and exit Setup 2 Check the Windows settings 1 Click Start Control Panel Performance and Ma...

Страница 99: ...System Management This chapter provides information on efficient computer management Chapter 5 Chapter 5...

Страница 100: ...hard disk and turns the computer off Pressing the Power button restores the computer to the previous working status Press Power button to use computer again in Standby Mode or Hibernation Mode You ca...

Страница 101: ...ower Options and select the Advanced tab Configure the Power button function Configuring the function of the fn key combination C C C Ca a a au u u ut t t tii iio o o on n n n When the Power button is...

Страница 102: ...es the battery automatically C C C Ca a a au u u ut t t tii iio o o on n n n Precautions Use only chargers specified in the User Manual Never heat the battery pack put it near or in a fire or use at a...

Страница 103: ...battery charge 5 5 Chapter 5 System Management Remaining Battery Charge Power supply status C C C Ca a a au u u ut t t tii iio o o on n n n Using the battery Battery is an expendable supply so when y...

Страница 104: ...are optimized Maximum Performance Mode This mode is appropriate for conditions that require maximum system performance Therefore the battery usage time may be reduced in this mode Custom Mode In this...

Страница 105: ...tem Setup 3 Select Smart Battery Calibration in the Boot Menu and press Enter to start The Battery Calibration function is activated and the battery is discharged forcibly This operation requires 3 5...

Страница 106: ...om of the system 2 Push the memory module tabs outward to pop the memory module outward Pull the module out at an angle of about 30 5 8 Manual Before replacing the memory module turn the system off co...

Страница 107: ...and slide it into the slot at a 30 angle 4 Push the memory module in until the module clicks into place If the memory module is not fixed completely push the module while pressing the memory module t...

Страница 108: ...ic place The locking device needs to be purchased separately The shape and methods of use may differ depending on the manufacturer Please refer to the manual provided with the security lock for proper...

Страница 109: ...a bag designed for notebook PCs and hand carry the computer Allow the computer and disks to pass through security X rays but do not pass the computer and disks through metal detectors Do not use the c...

Страница 110: ...5 12 Manual...

Страница 111: ...Customizing your computer This chapter provides information how to use the system setup customizinig screen settings Chapter 6 Chapter 6...

Страница 112: ...the booting screen appears press F2 3 The initial System Setup screen will appear in a moment Setup Menu Help Displays help information on the current selected item Tab Shift Tab or Enter selects fiel...

Страница 113: ...s Displays the Help window Exits the current sub menu or opens the Exit menu Moves between menus Selects a field or opens a sub menu Saves changes and exits System Setup Moves up and down between fiel...

Страница 114: ...can restrict system access to autho rized users only 1 Select the Security menu in the System Setup To enter into System Setup see Page 6 2 2 On the Set Supervisor Password item press Enter 3 Enter a...

Страница 115: ...password to delete press Enter e g supervisor password 2 Enter the current configured password and press Enter 3 Leave the New Password and Confirm New Password field empty and press Enter to deactiva...

Страница 116: ...ice Priority item 3 Use the key to move to the Hard Drive item and press F6 key until it is at the very top 4 Press F10 to save the changed configuration and exit System Setup Now you can boot the sys...

Страница 117: ...dialog 3 When you have completed configuration click Apply To change the number of colors displayed on a monitor select an appropriate color quality To change your screen resolution move the slider t...

Страница 118: ...the system To connect a TV connect the TV to the TV output port of the system 2 If you press the Fn key combination once the Samsung Display Manager screen appears where you can select a screen Whene...

Страница 119: ...he TV output port of the system See P 6 8 Connecting to a TV 2 Press touchpad right button on the desktop click Properties and then click the Settings tab 3 Click the monitor 2 icon select the Extend...

Страница 120: ...ce 2 The window moves to the secondary display device N N N No o o ot t t te e e e When you use Dual View configuring the LCD as the Primary monitor is recommended N N N No o o ot t t te e e e When Du...

Страница 121: ...e When you first run Norton AntiVirus the Norton AntiVirus Configuration window pops up If you complete the configuration and your computer connect to network you can download and install the latest u...

Страница 122: ...6 12 Manual...

Страница 123: ...Recovering the Computer This chapter provides recovery procedures using the System Recovery CD when the computer is not operating properly Chapter 7 Chapter 7...

Страница 124: ...em events such as when a program or a driver is installed You can also decide when to create your own restore points The procedures to create your own restore point are described below 1 Click Start A...

Страница 125: ...ick OK Your computer has been restored to the selected restore point Undoing the last restoration The procedures to undo a restoration are described below 1 Click Start All Programs Accessories System...

Страница 126: ...rams that are not currently installed on your computer from the system software media provided All necessary components are installed using the factory defaults Minimum Installation This displays the...

Страница 127: ...lation in the main window of the System Software Media Standard Installation is recommended 2 The system is scanned to display the drivers and programs that need to be installed 3 Click OK The drivers...

Страница 128: ...ter a while the Samsung Recovery Solution Start screen appears 3 Read the instructions on the Start screen and click the Start button to install Windows C C C Ca a a au u u ut t t tii iio o o on n n n...

Страница 129: ...have used and click the Start button 4 2 The Confirmation window appears Confirm the selected Windows version and click the Yes button If the Select Windows version language screen appears instead of...

Страница 130: ...ystem Software Media need to be installed Windows cannot be used without them N N N No o o ot t t te e e e For more information about the procedures to use the System Software Media refer to the descr...

Страница 131: ...he Power Saving Mode is configured into the Power button press and hold for more than 4 seconds to shut the system off When the system is turned on after such manual shutdown Scandisk will run to chec...

Страница 132: ...Vidia graphics card Click the Graphics Related tab Change Resolution Change Display Device Remove the AC Adapter Restart the System Change PowerMizer level A This may happen while the video driver is...

Страница 133: ...DOS window Q9 The Taskbar on the bottom of the screen does not appear when a projector is used as the display device A A This may happen even though SXGA LCD supports the 1400 1050 mode the projector...

Страница 134: ...omputer For Intel Graphics press the Ctrl Alt Direction Key rotate 0 degrees rotate 270 degrees rotate 180 degrees rotate 90 degrees to return to the original orientation For other graphics cards use...

Страница 135: ...Select the Sound Driver on either Standard Installation or Custom Installation then the 3 components of the sound driver are automatically installed Installing the Sound Driver after a Windows XP Rein...

Страница 136: ...ng the system or reinstalling the driver You have to exit all programs using modem in the advance of diagnostics of the modem Q2 I cannot make a call using an extension line A In general the dial tone...

Страница 137: ...phone plug may differ according to the country you have to purchase and use the appropriate telephone plug for that particular country Q4 How do I receive a fax while the system is in power saving mod...

Страница 138: ...st mode is activated when there is no received signal use the system after disabling Wake On LAN function If you turn the power off when Wake On LAN is disabled the LAN LED con tinues to be lit up Con...

Страница 139: ...r Network adapters Wireless LAN adapter If there is a yellow exclamation mark If a warning message apears install the driver again using the System Software Media A4 Referring to A2 of Q3 check that t...

Страница 140: ...rk Connections Check if the wireless LAN is turned on A2 Verify whether the same network key encryption key has been entered in both the AP and the computer The network key is an encryption key for en...

Страница 141: ...ted by some types of APs but may cause compatibility problems It is recommended using a static IP Since static channel selection is more reliable than auto channel selection it is recommended setting...

Страница 142: ...CP IP properties of the computers to be connected through the com puter to computer Ad Hoc network All of the computers to be connected through a computer to computer Ad Hoc network should be configur...

Страница 143: ...ct A2 This may be caused by selecting the Use IEEE 802 1x network authentication option when IEEE 802 1x authentication is not available Check the properties of the AP in the wireless network settings...

Страница 144: ...less LAN off using the Off Button on the PROSet the wireless LAN operating light is still on A This is normal The Off Button for the Wireless LAN on the PROSet only turns off the S W and not the H W f...

Страница 145: ...program disables the function of Fn Q4 While playing a game pressing the Fn keys does not work or the screen is not properly displayed A Some games and 3D application programs may change the display d...

Страница 146: ...Display and set the Current Display to Notebook 4 Click the Display Settings menu select Full Screen for the Display Extension and then click the Apply button Q8 The game play screen frequently stops...

Страница 147: ...es set the screen resolution to 1024x768 and the color quality to 16 bit Q10 Game play is not displayed smoothly on the screen A For 3D games the texture data for the 3D screen display is saved to the...

Страница 148: ...ity settings for 2 In the Privacy tab of Internet Properties click on Settings from Block pop ups 3 Enter a URL to want to allow pop ups into Address of Web site to allow and click on Add 4 You will f...

Страница 149: ...b of the Windows Firewall If you want to add a program to Programs and Services click on Add Program and select it A2 Set up Windows Automatic Updates This automatically downloads and installs critica...

Страница 150: ...your computer is able to identify Check the following programs which Windows can detect and select one from the list A list of anti virus programs that Windows can detect Symantec Norton Anti Virus Ne...

Страница 151: ...ognized by Windows A Windows XP SP2 and Windows Sever 2003 SP1 Standard Server cannot display memory exceeding 4GB due to license and driver compatibility problem Even if the memory capacity is displa...

Страница 152: ...7 30 Manual...

Страница 153: ...Appendix System specifications software types and safety instructions are provided here Appendix Appendix...

Страница 154: ...EE 1394 4 Pin USB 2 0 x 4 Microphone Headphone S PDIF Support Modem RJ 11 LAN RJ 45 Monitor TV Out S Video Serial Port DC Jack Security Lock Port 120 Pin Dock Port IrDA Dimensions mm 329 8 x 272 x 30...

Страница 155: ...ode OFDM 11b mode DSSS 11g mode OFDM Data Rate Mbps 11a mode 11b mode 11 5 5 2 and 1 11g mode 54 48 36 24 18 12 9 and 6 Antenna Type Internal Antenna 2 EA main aux The data rate may differ from the ac...

Страница 156: ...Celeron are registered trademarks of Intel Corporation Microsoft MS DOS and Windows are registered trademarks of Microsoft Corporation Memory Stick and are trademarks of Sony Corporation All other pr...

Страница 157: ...in product damage or cause fires Use grounded power outlets designed for computers A grounded power outlet prevents electric shock from electricity leakage Set up the system away from magnetic objects...

Страница 158: ...ng in resetting the computer may cause disk or data damage Execution of delete DEL or format FORMAT commands by mistake may cause loss of data Virus infection may cause unrecoverable loss of data An a...

Страница 159: ...ers as the system may be damaged Do not touch the power strip with wet hands There is a danger of electric shock Place the computer away from heat devices such as heaters It may damage the system or c...

Страница 160: ...6 Maetan 3Dong Yeongtong Gu Suwon City Gyeonggi Do Korea Tel 82 1588 3366 E mail Computervoc sec samsung com U S A InteliSol 1001 NE Loop 820 Dock 5 Forth Worth TX 76131 U S A Tel 1 817 230 5293 FAX 1...

Страница 161: ...ter General Enquiry Hotline 2862 6001 Technical Support Hotline 2862 6406 E mail service sehk samsung com Web Site http www samsung com hk SAMSUNG R65 P50 Manual r65 hk_cover 2006 1 2 1 47 PM 1 1000 D...

Отзывы: